In this tutorial, you will learn how to install and publish an application on the Jotelulu Remote Desktop so you have all the applications that your business needs.
There are many reasons why you might need to provide access to a program through your remote desktop server. Perhaps you only have a limited number of licenses; maybe you need to provide remote access to multiple users; or maybe it just makes installation and maintenance tasks much easier.
Today, we will explain, step by step, how to install and publish an application on your remote desktop service.
By way of an illustration, we are going to install GVim, a text editor widely used by IT technicians, programmers and sysadmins who use Vi, one of the classic UNIX and GNU/Linux systems.
How to install and publish an application on Remote Desktop
Before you get started
To successfully complete this tutorial and install and publish an application on Remote Desktop, you will need:
- To be registered on the Jotelulu platform and have logged in.
- To have registered for a Remote Desktop subscription.
Installing and publishing a remote desktop application
Once you have logged in to the Joteluu platform, open the Remote Desktop section and click on “Applications” in the left-hand menu (1).
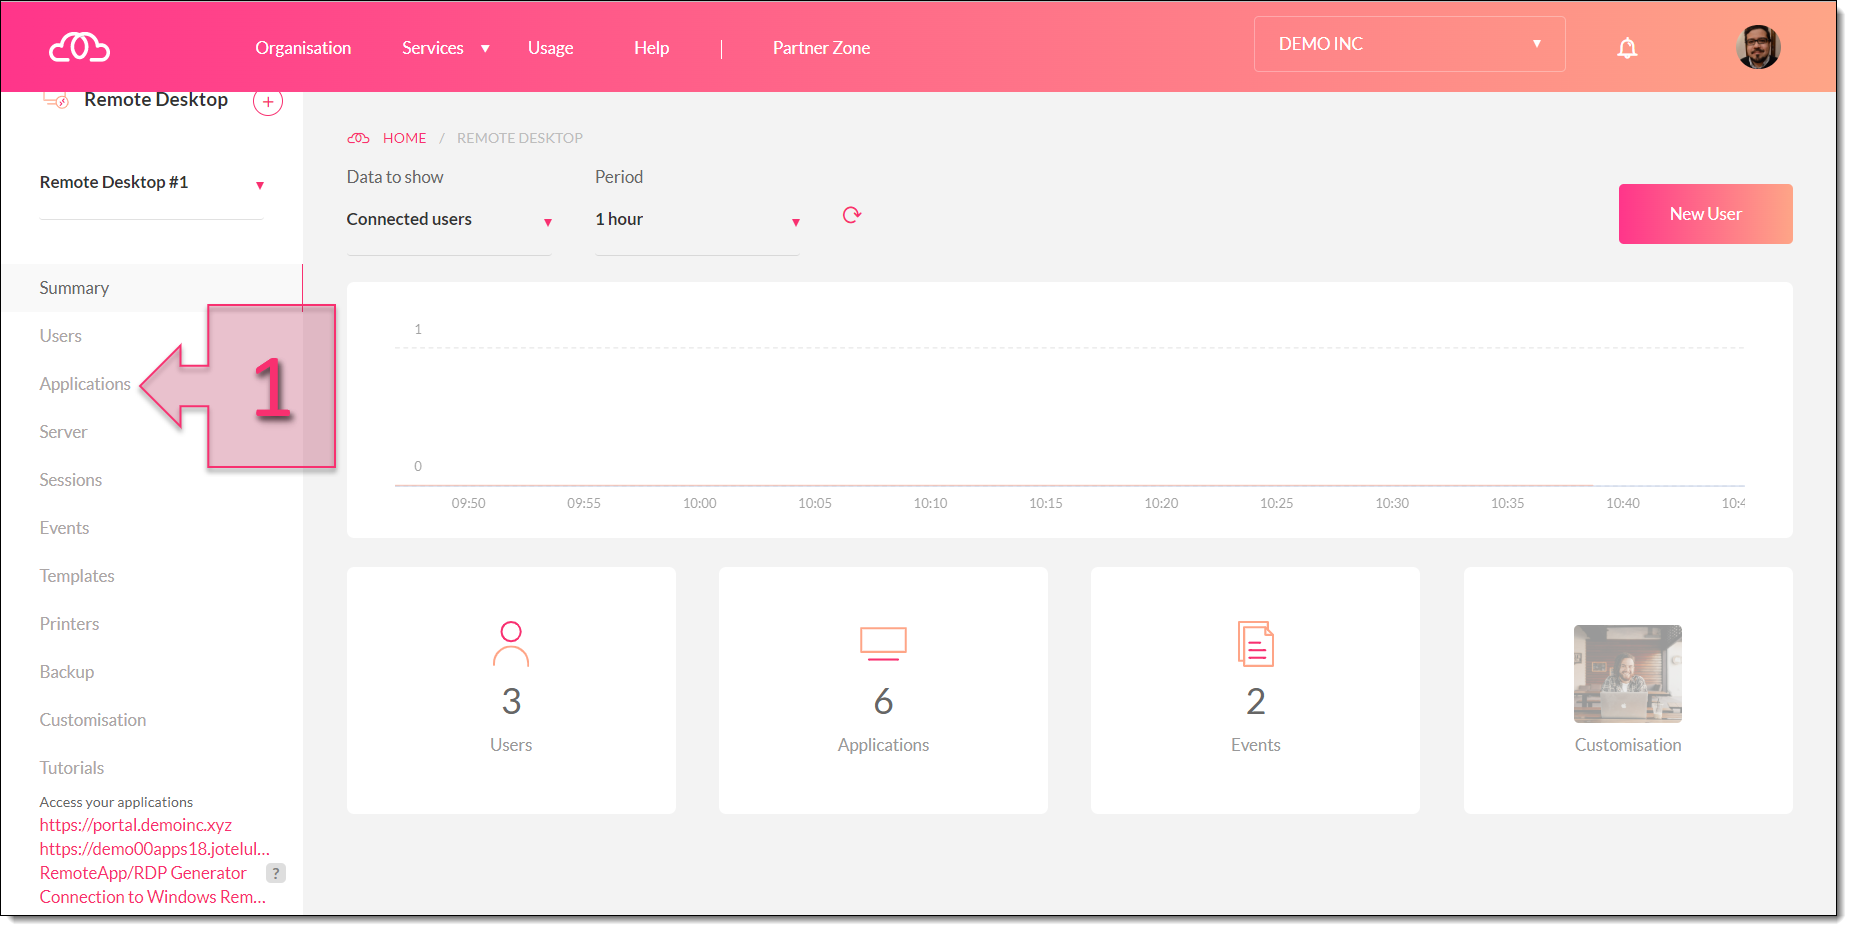
Open the Applications section from the Remote Desktop page
In the Applications section, you will see a table with 5 columns. This table lists all the applications that have been deployed on your Remote Desktop service so far. On the far right-hand side, you will see three dots (…) next to each application. Clicking on these dots will reveal further options such as access settings, deletion, edit features, etc.
The remaining four columns are:
- NAME: The name of the application, which is how it will be displayed on Remote Desktop.
- CATEGORY: Application types, such as database, utility, etc.
- INSTALLATION: Denotes whether the application has come from the Jotelulu marketplace or was installed manually.
- USERS: Users that have access to the application.
We will return to this table later, once we have installed our new application.
For the time being, we are interested in installing a new application. Click on “New Application” in the top-right of the page (2).
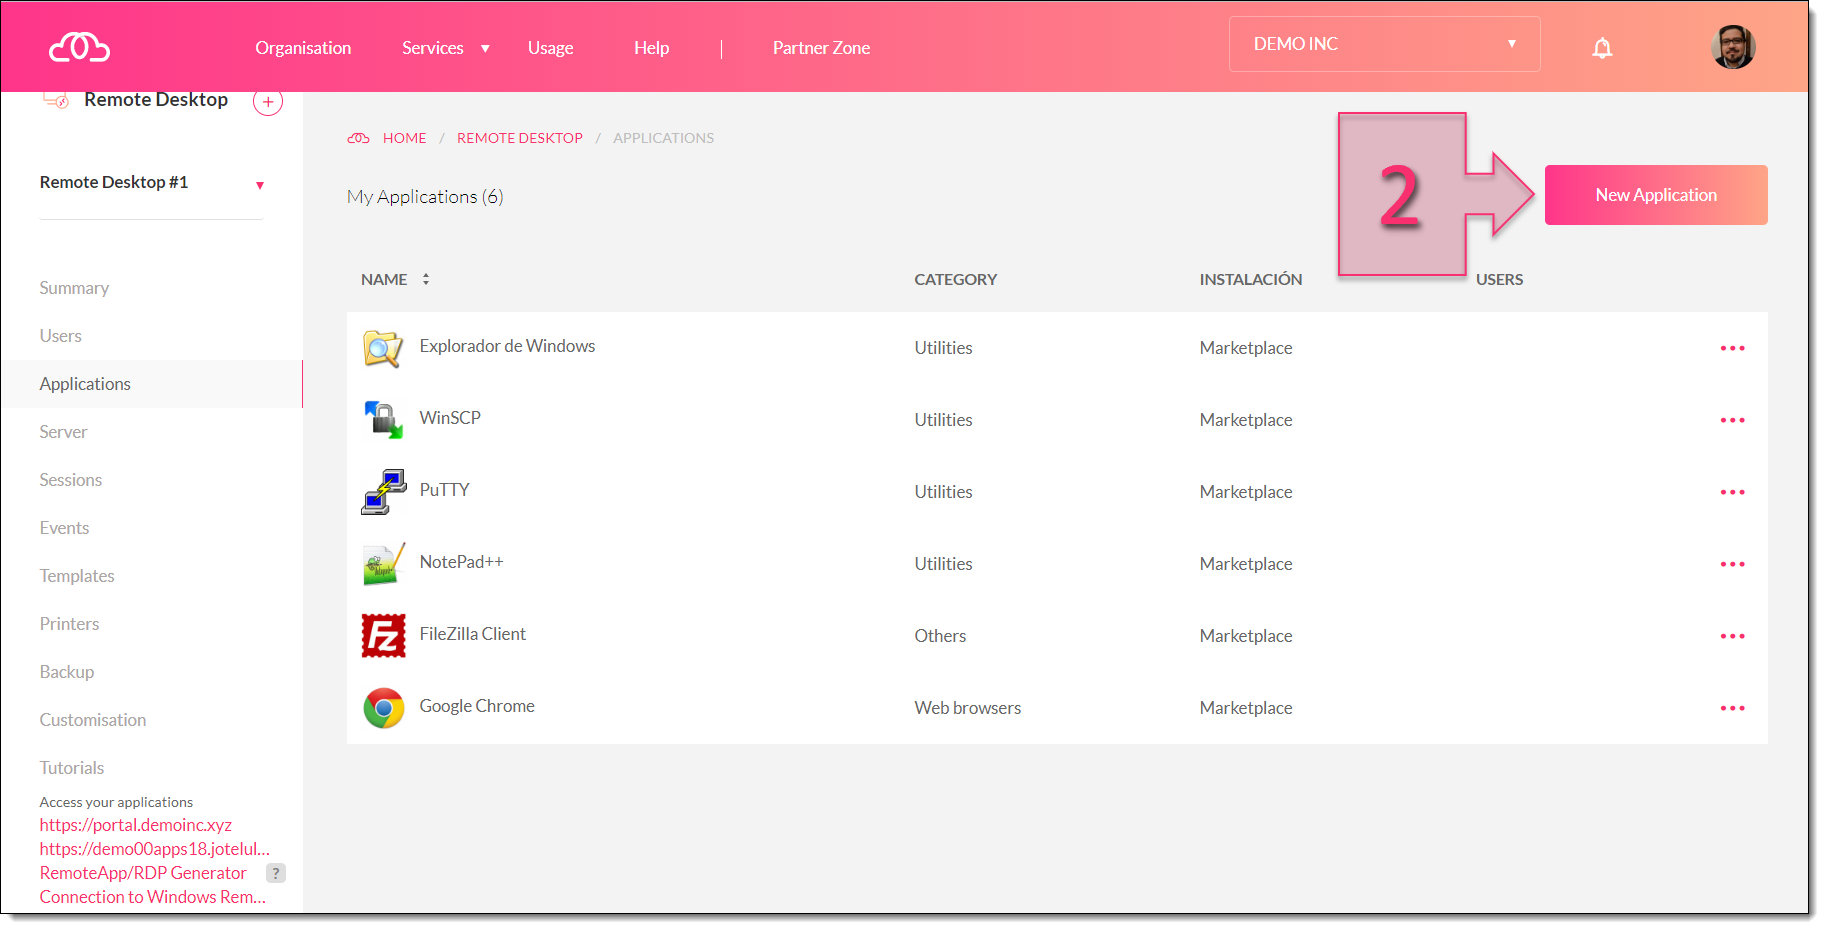
Click on “New Application”
On the “New application” page, click on “Install new application” (3).
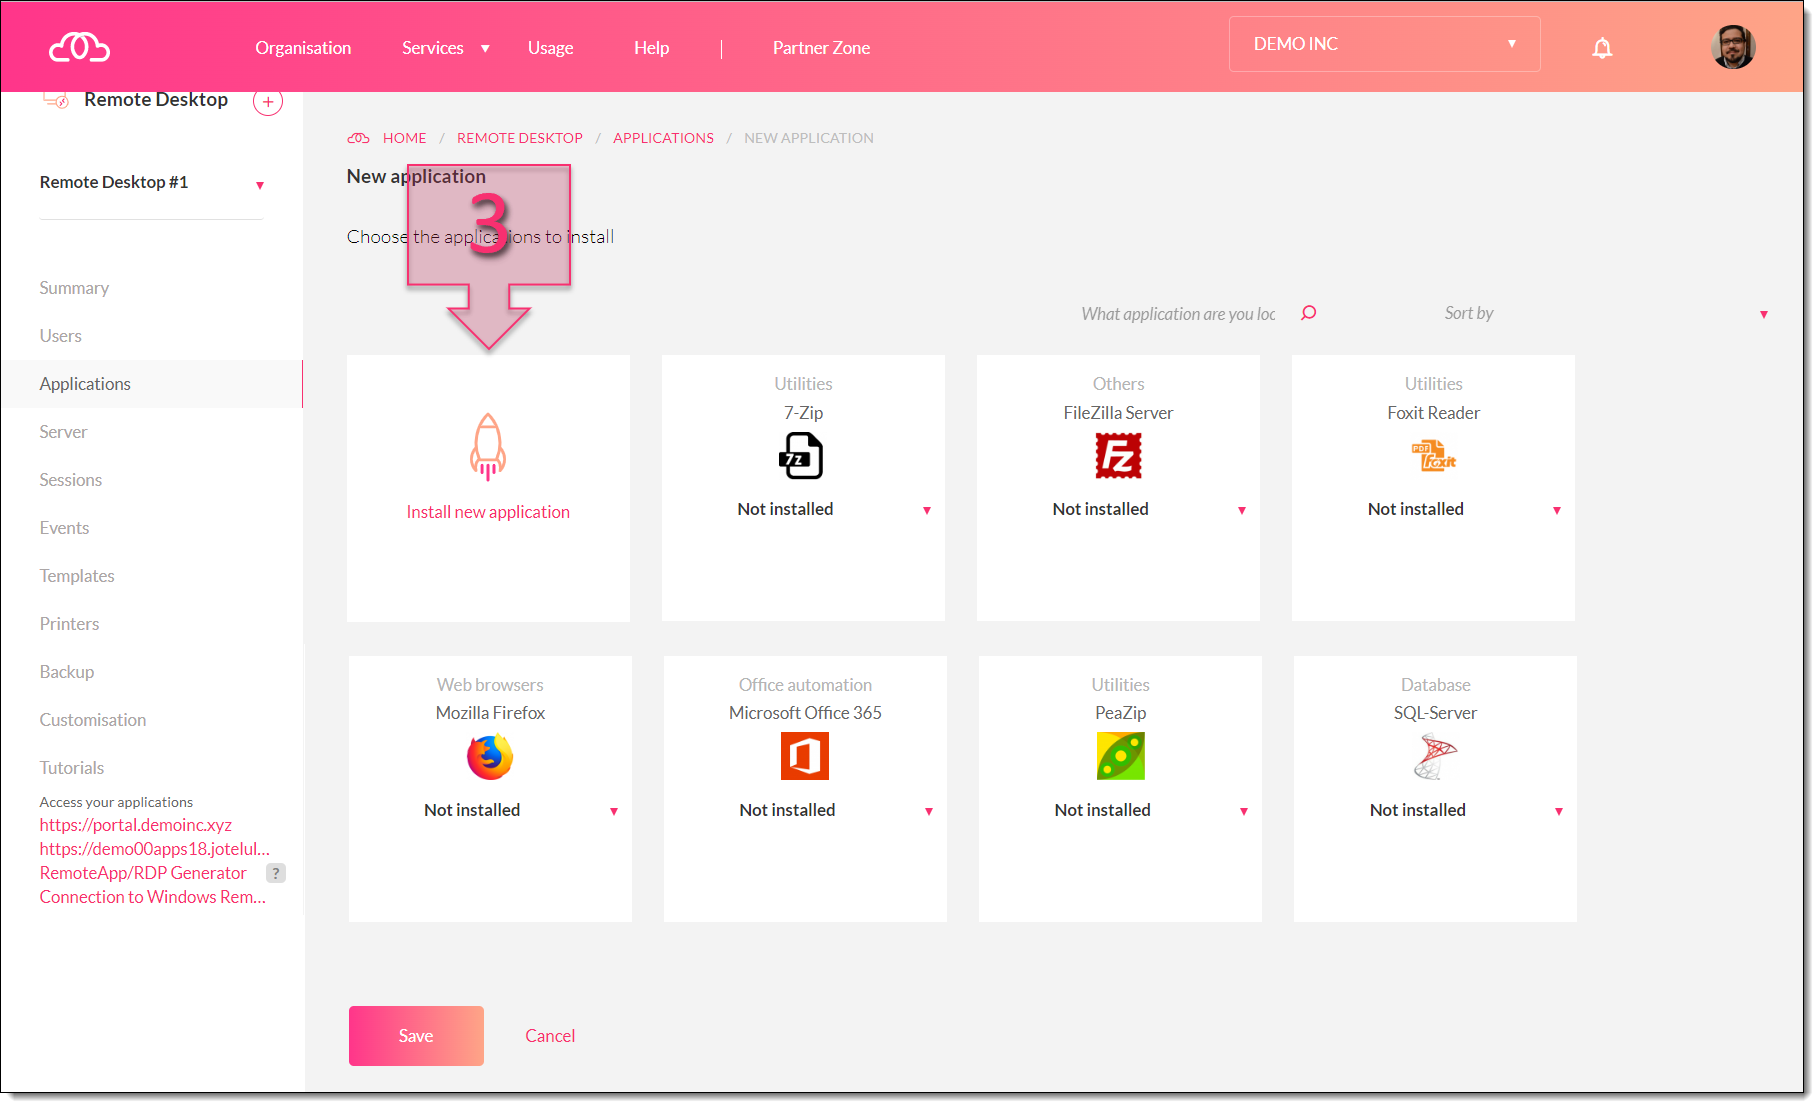
Click on “Install new application”
Next, you will see a window asking for details to register your new application. These details include the name, application type, location directory, etc.
This page is only relevant if you already have the application installed on your server. Therefore, for the purposes of this tutorial, we can ignore these fields.
Instead, we have two options to install our new application. You can either use the classic RDP connection through Windows, or you can use the “RDP connection” button at the top of the page (4). This second option will open a web portal through which to establish the connection.
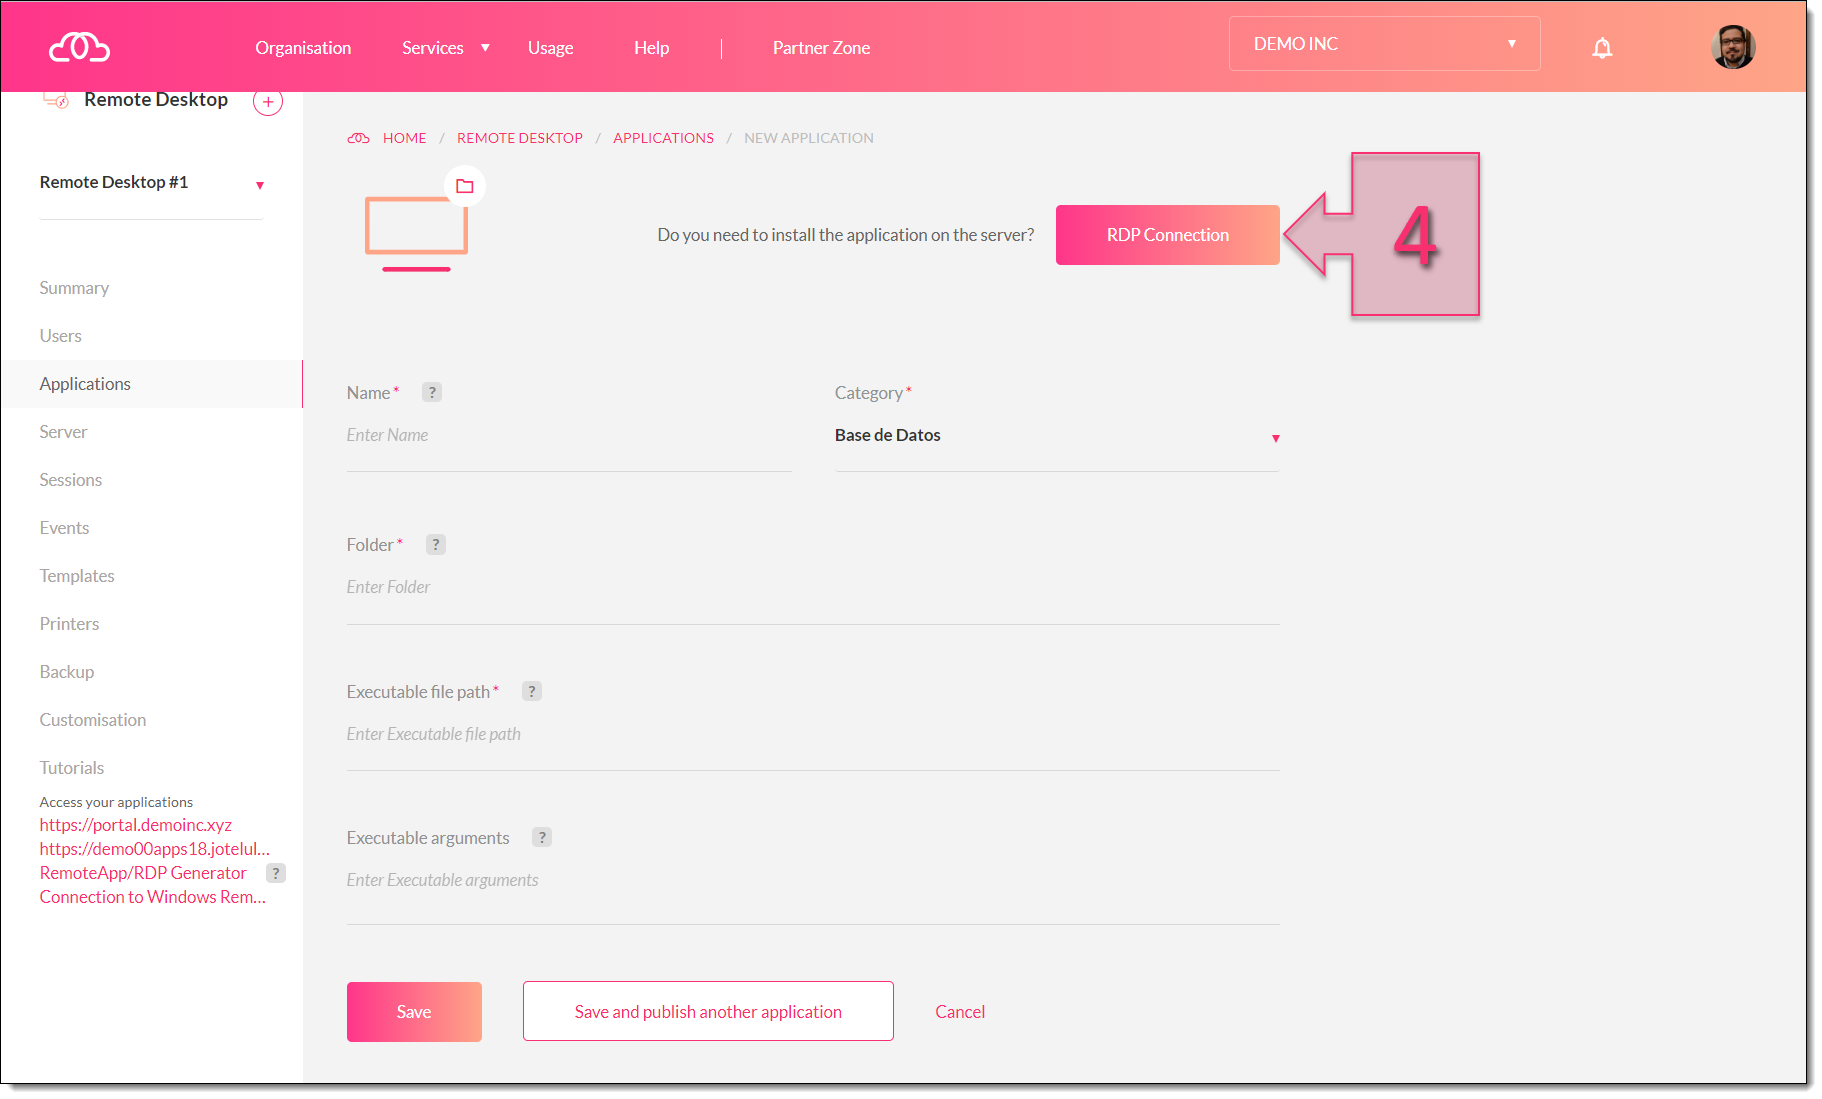
Click on “RDP connection” to begin installing your new application
The web portal will ask for your login details. This will need to be an administrator account in order to install a new application.

Enter your login details to begin installing your application
This is the point where you will install your new application. We are not going to go into further detail about this particular part of the process since every application is unique and will follow a slightly different procedure.
What you do need to remember is to note down the file locations of both the application and the executable file. To do this, on the desktop, right-click on the shortcut to the application (5) and select Properties. Next, click on the “Shortcut” tab and note down the contents of the “Target” field (6).
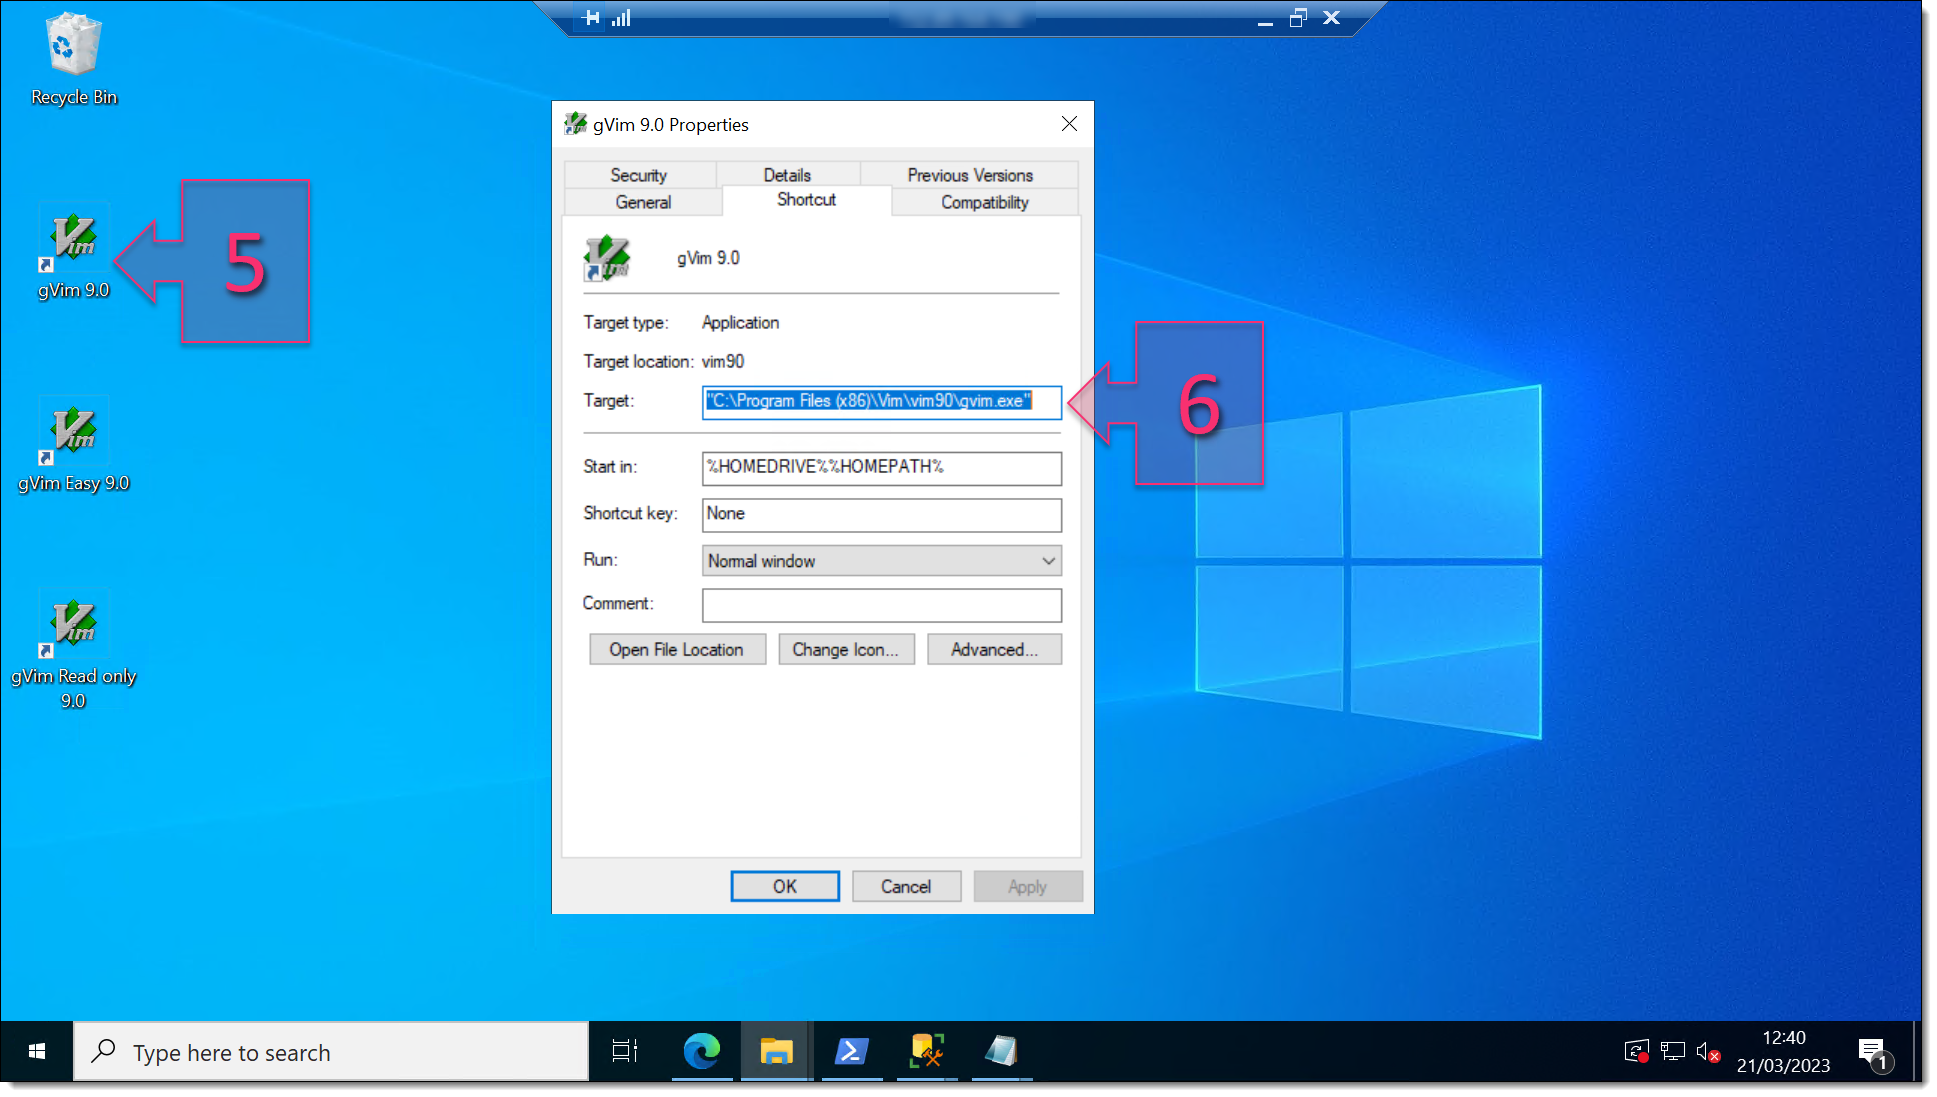
Locate the folder containing the executable file
Once you have the correct folder location, browse to the folder and check that you can run the executable file (7). Bear in mind that the executable file will not always be in the application folder (8), and this will be important when configuring the application later.
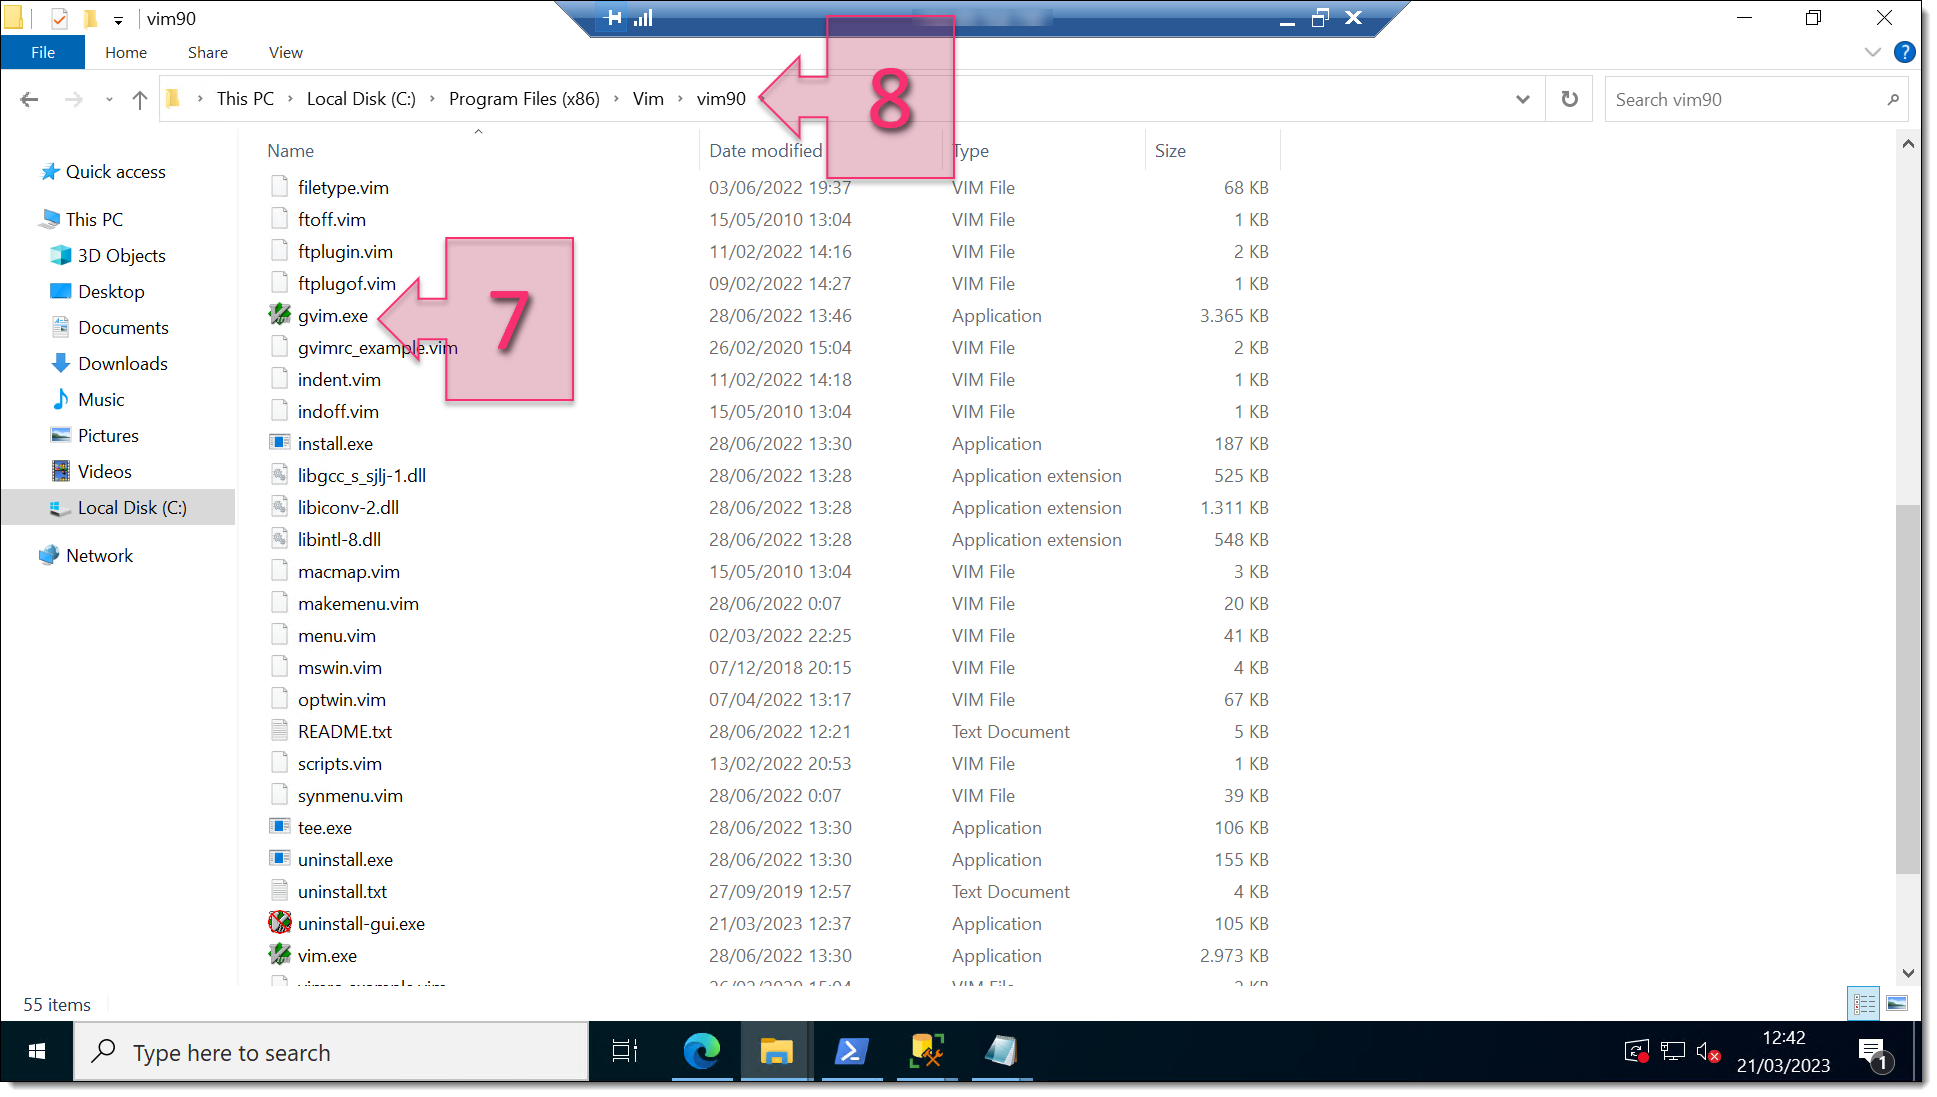
Check the location of the application and the executable file
Once you have made a note of these details, return to the “New application” window to register your new application.
Here, you will need to enter the following information:
- Name: (9) The display name for your new application.
- Category: (10) Type of application, such as database, utility, etc.
- Directory: (11) Folder containing the application. NOTE: This is the application root folder, not the location of the executable file.
- Executable location: (12) Folder containing the executable file. NOTE: This is not necessarily the application root folder.
- Executable parameters: (13) For some applications, you will need to enter some additional parameters in order for the application to function correctly.
Once you have entered these details, click on “Save” (14) to apply your changes. If you want to add another application, click on “Save and publish another application” (15).
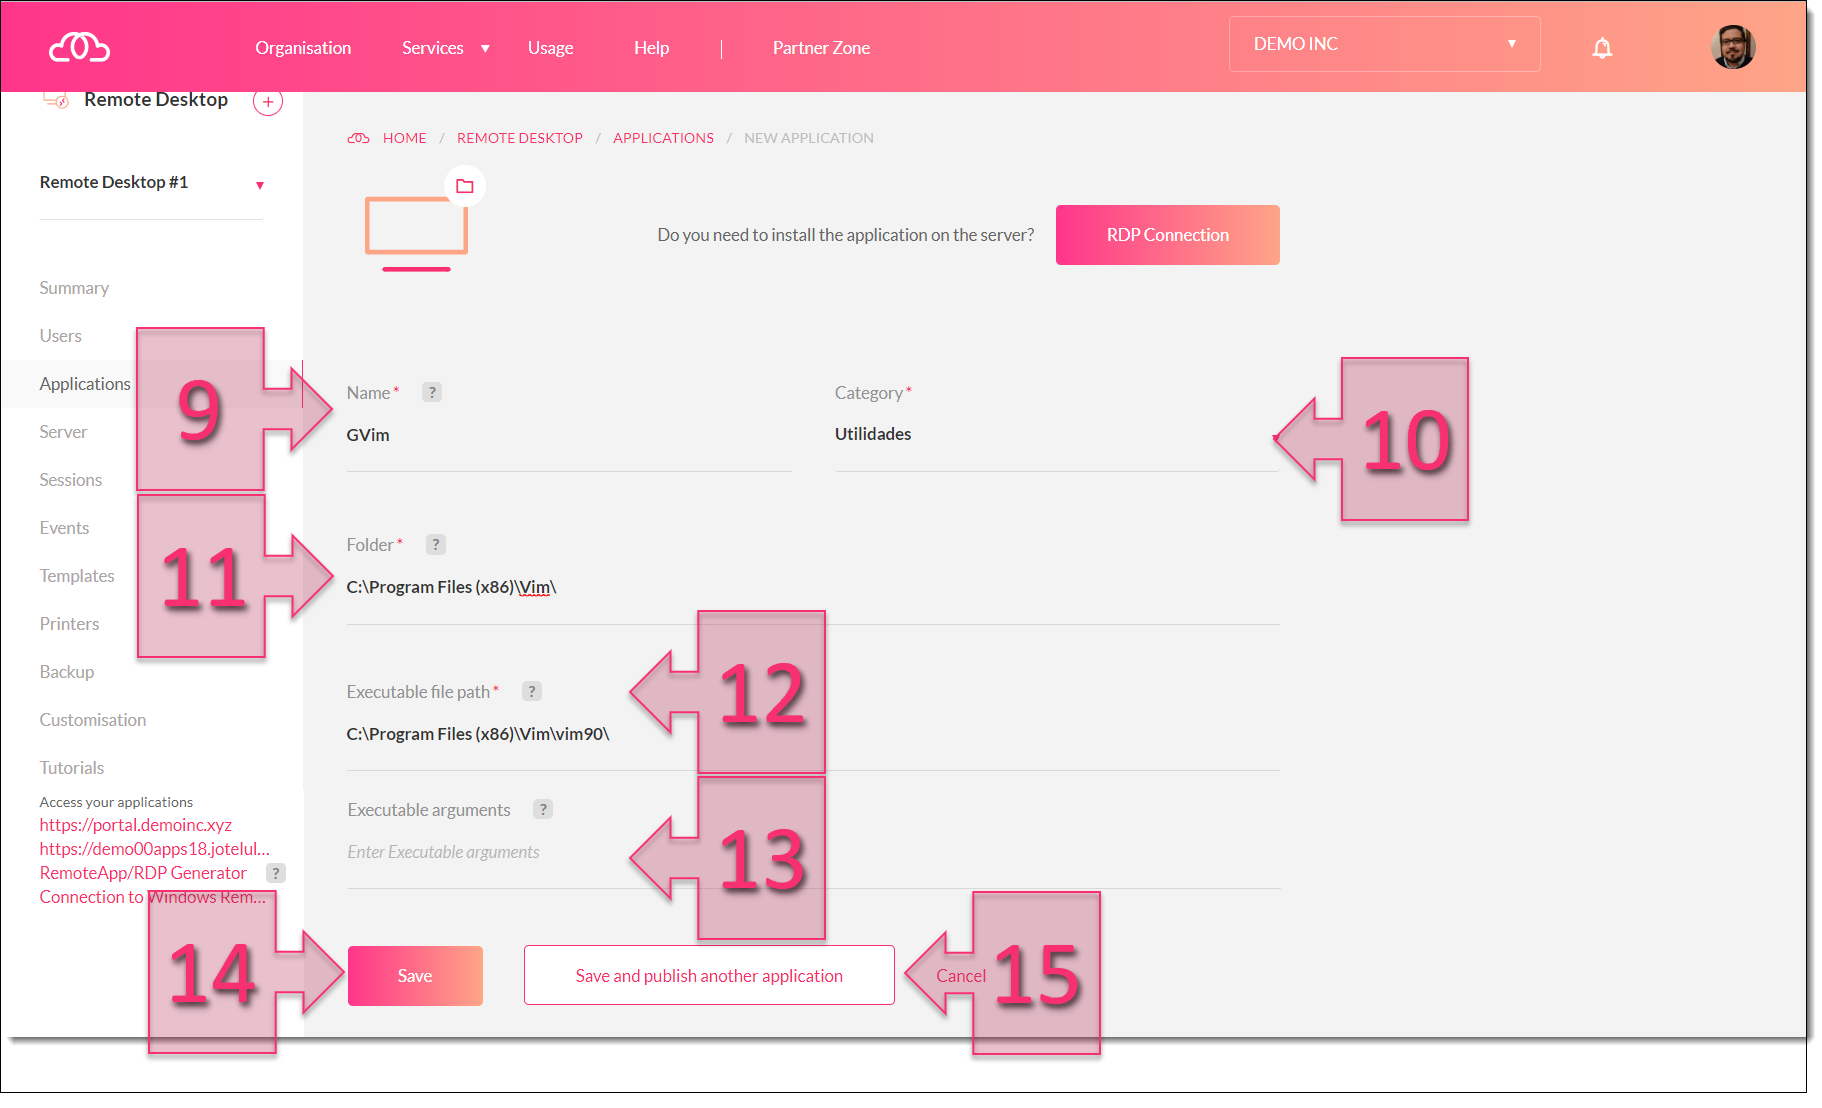
Enter the details of your new application
At this point, you will need to white while your new application is added to the server. If you click on the alerts icon in the top-right of the screen (16) you will be able to check its progress. Once this is complete, you will see the new application in your list of applications (17).
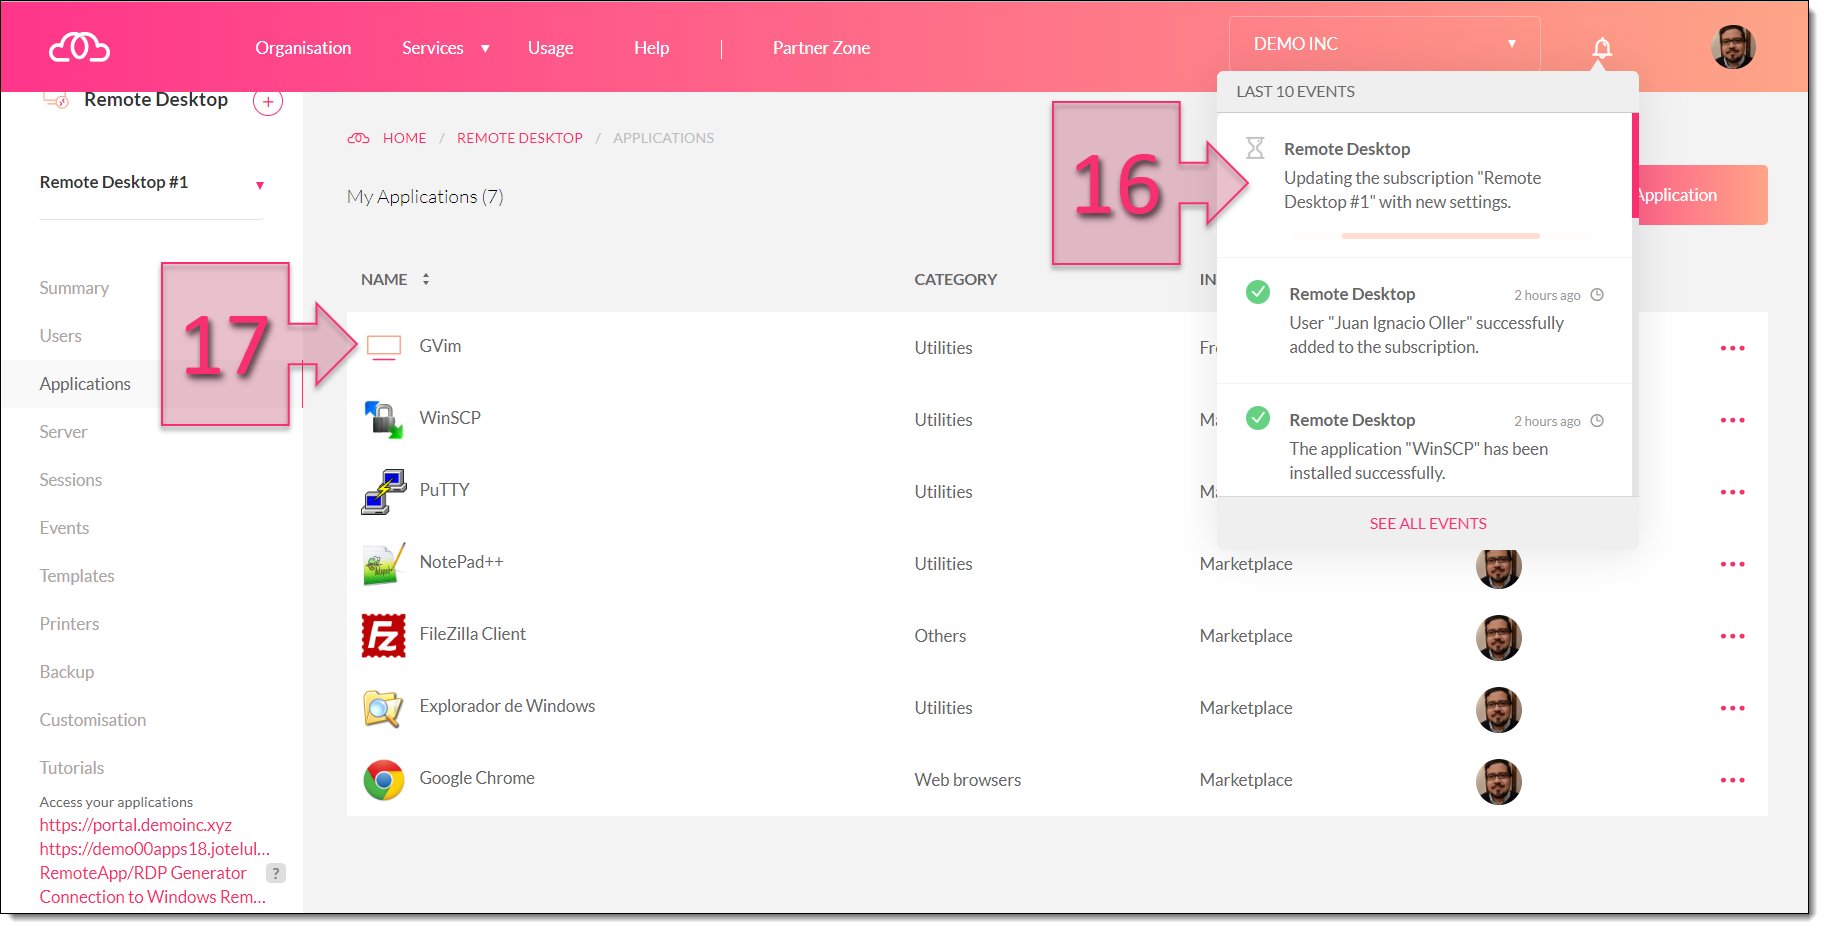
Check that the application now appears on the platform
We now need to provide users access to the new application. To do this, click on the three dots next to the application (18) and click on “Users” (19).
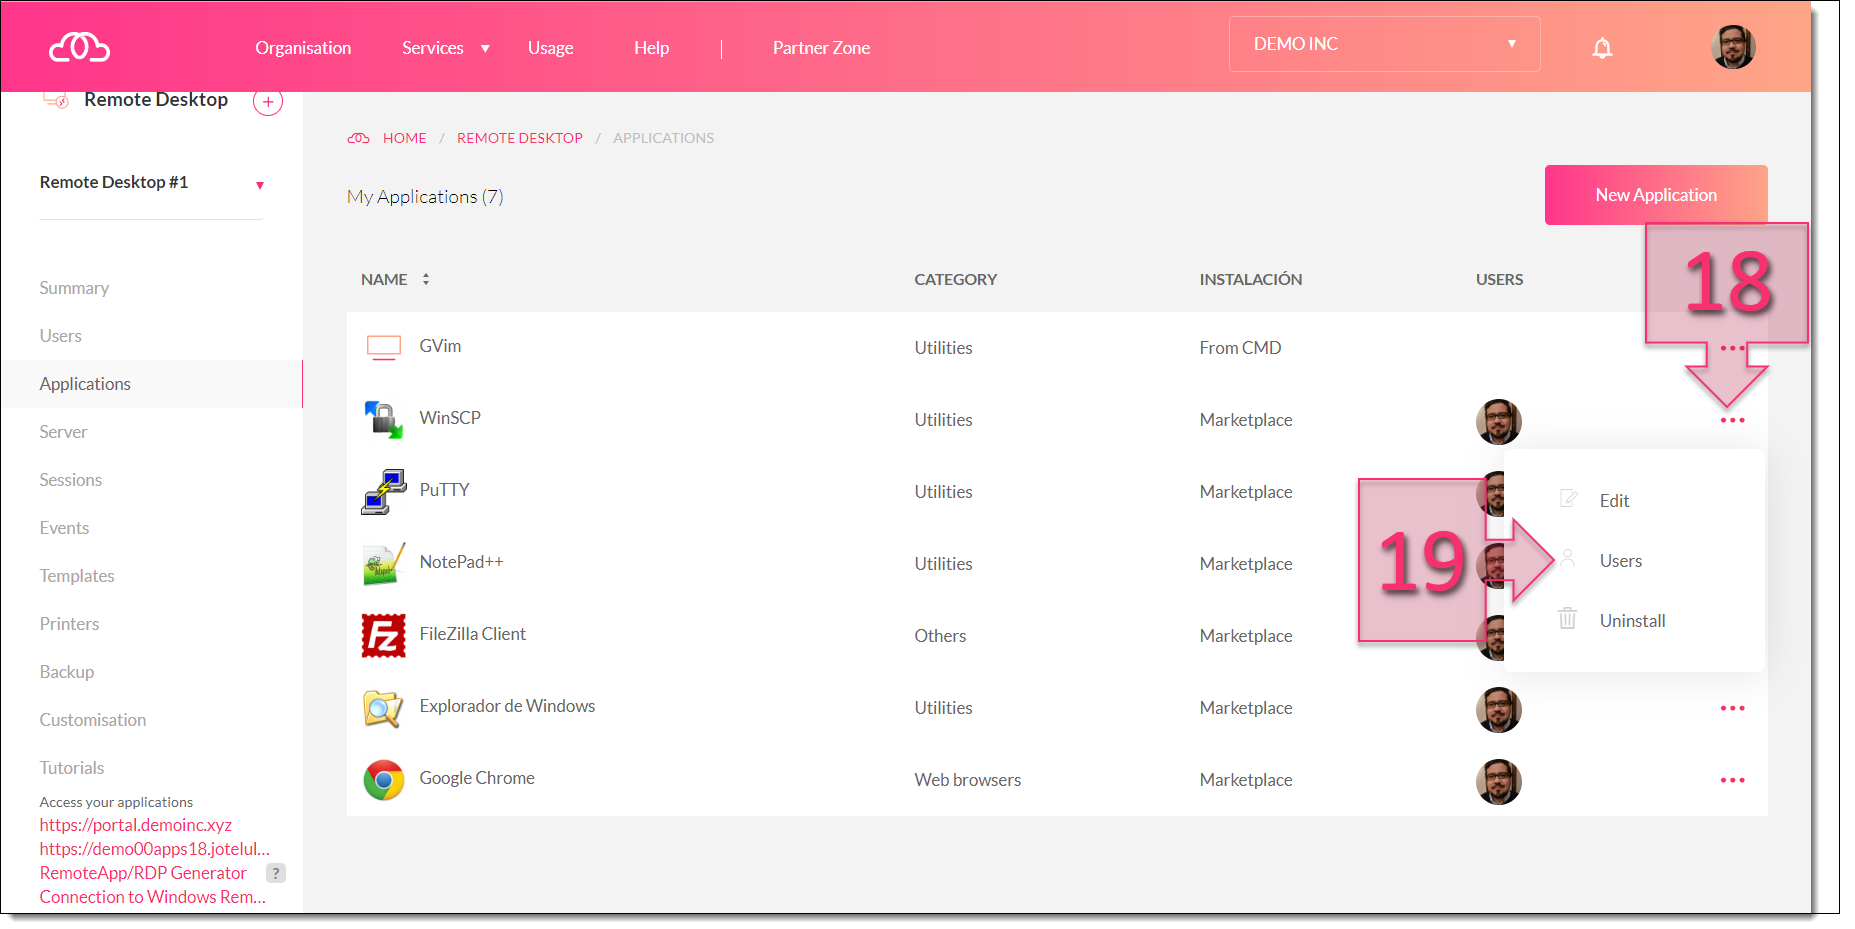
Edit the application to share it with users
On the Users screen, click on “Add user” (20).
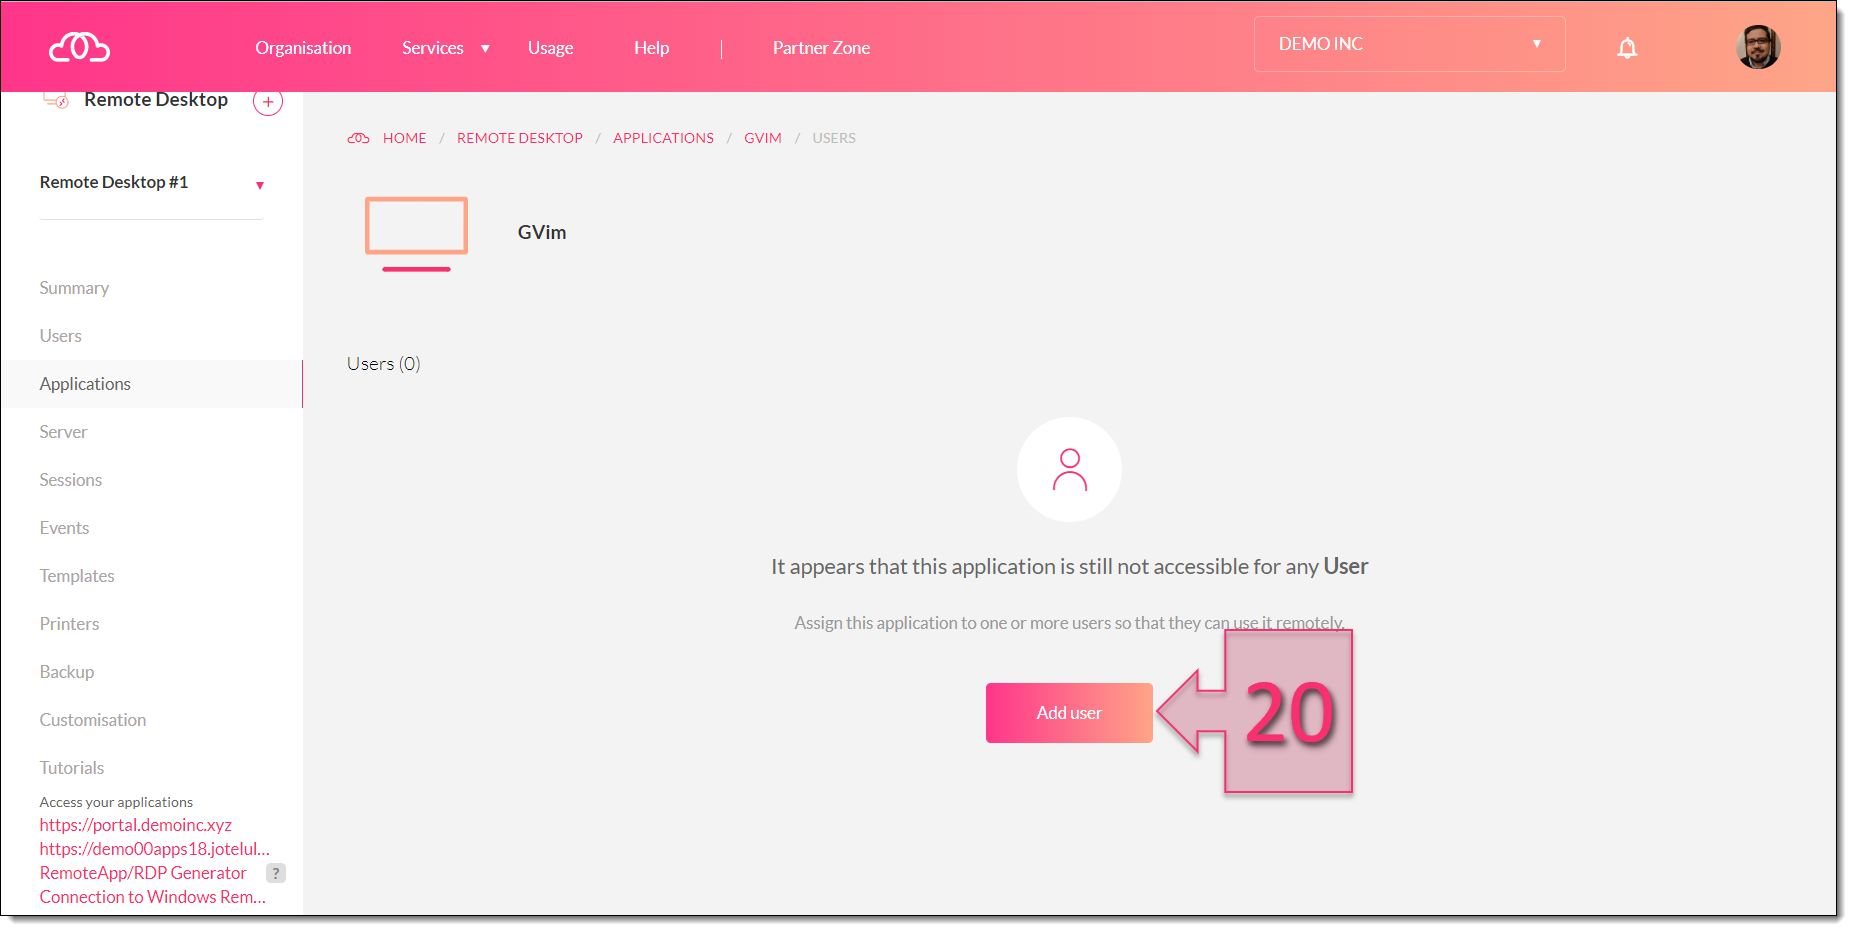
Click on Add User
On the next screen, click on the users to whom you wish to provide access to your new application (21), then, click on “Save” (22).
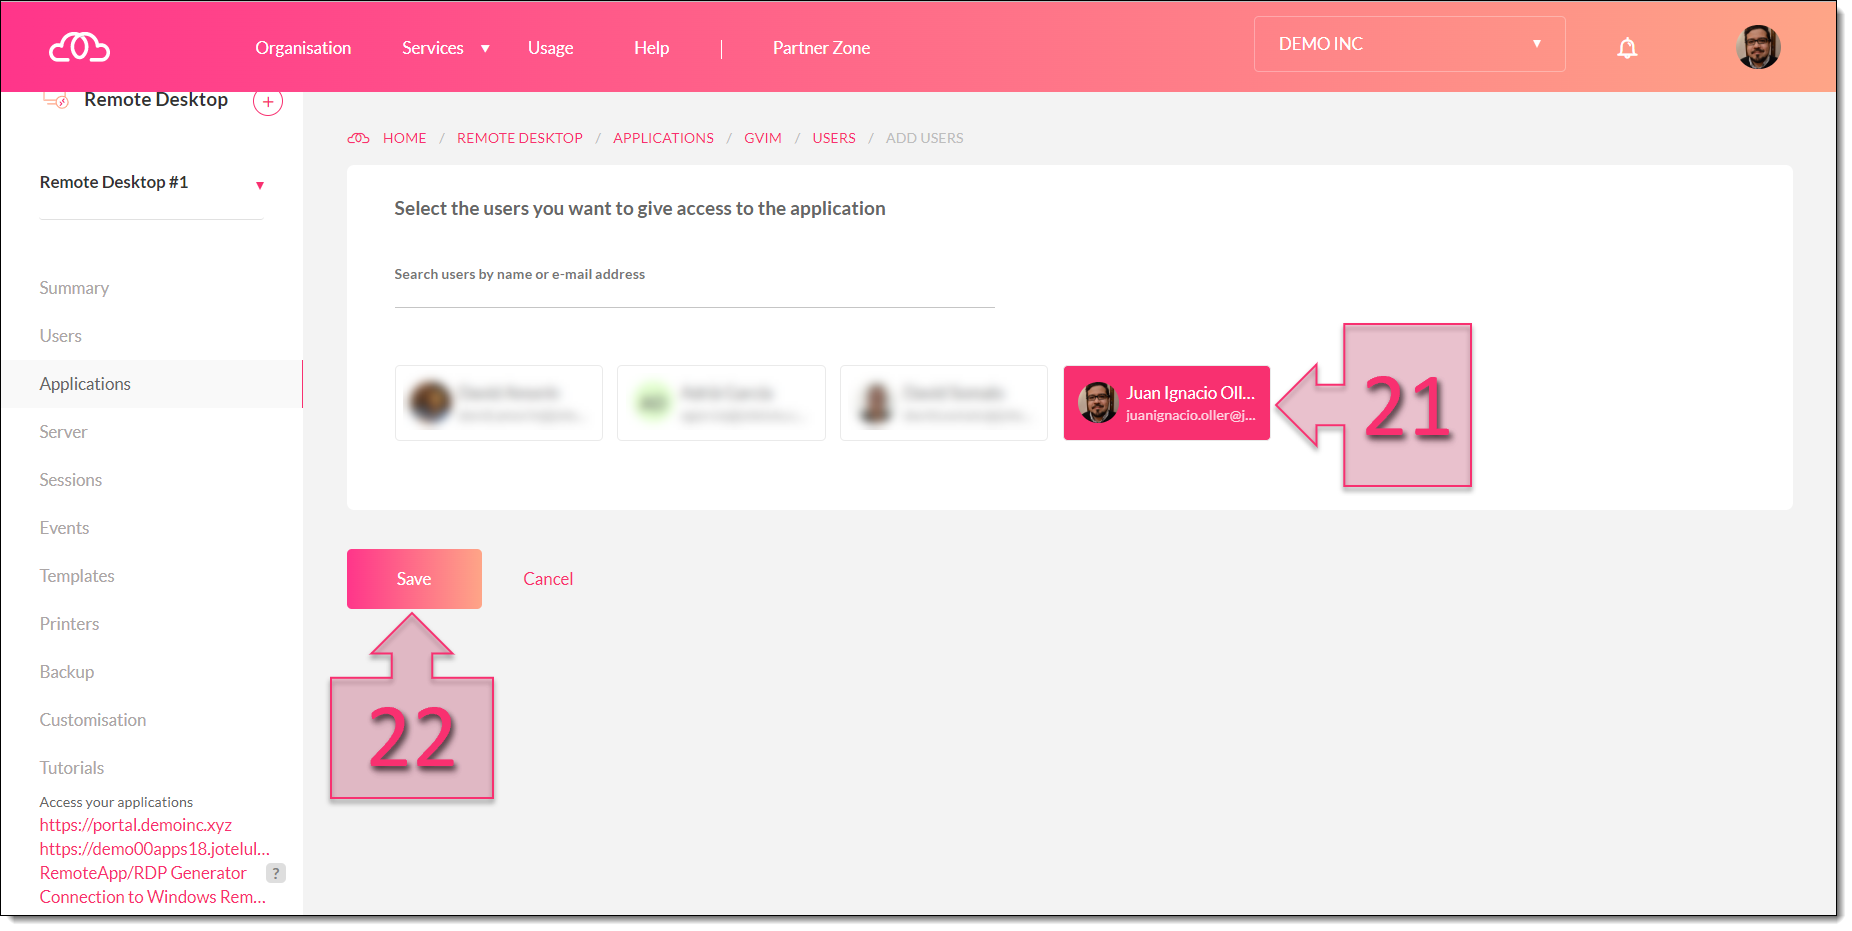
Select the users who will have access to the new application
Next, check that these users appear on the list on the Users screen (23).
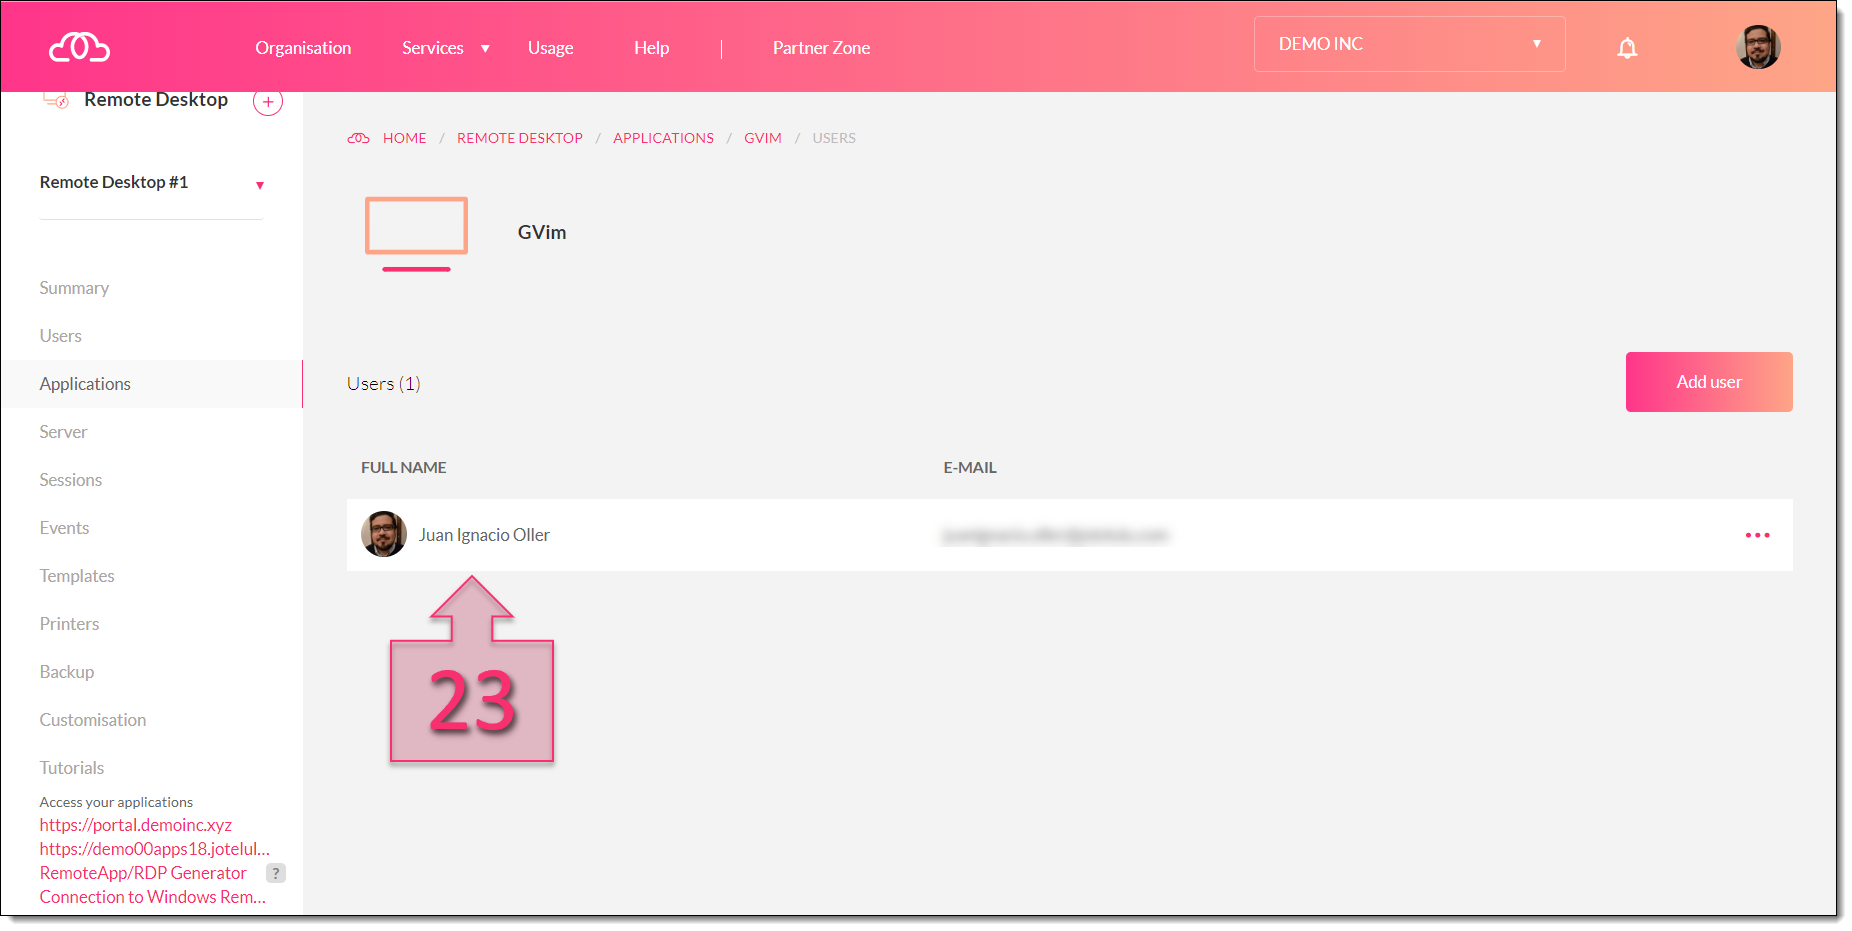
Check that the users have been added successfully
Having completed all these steps, return to the Applications section (24) and check that the new application is now available (25) and that the users (26) are displayed correctly.
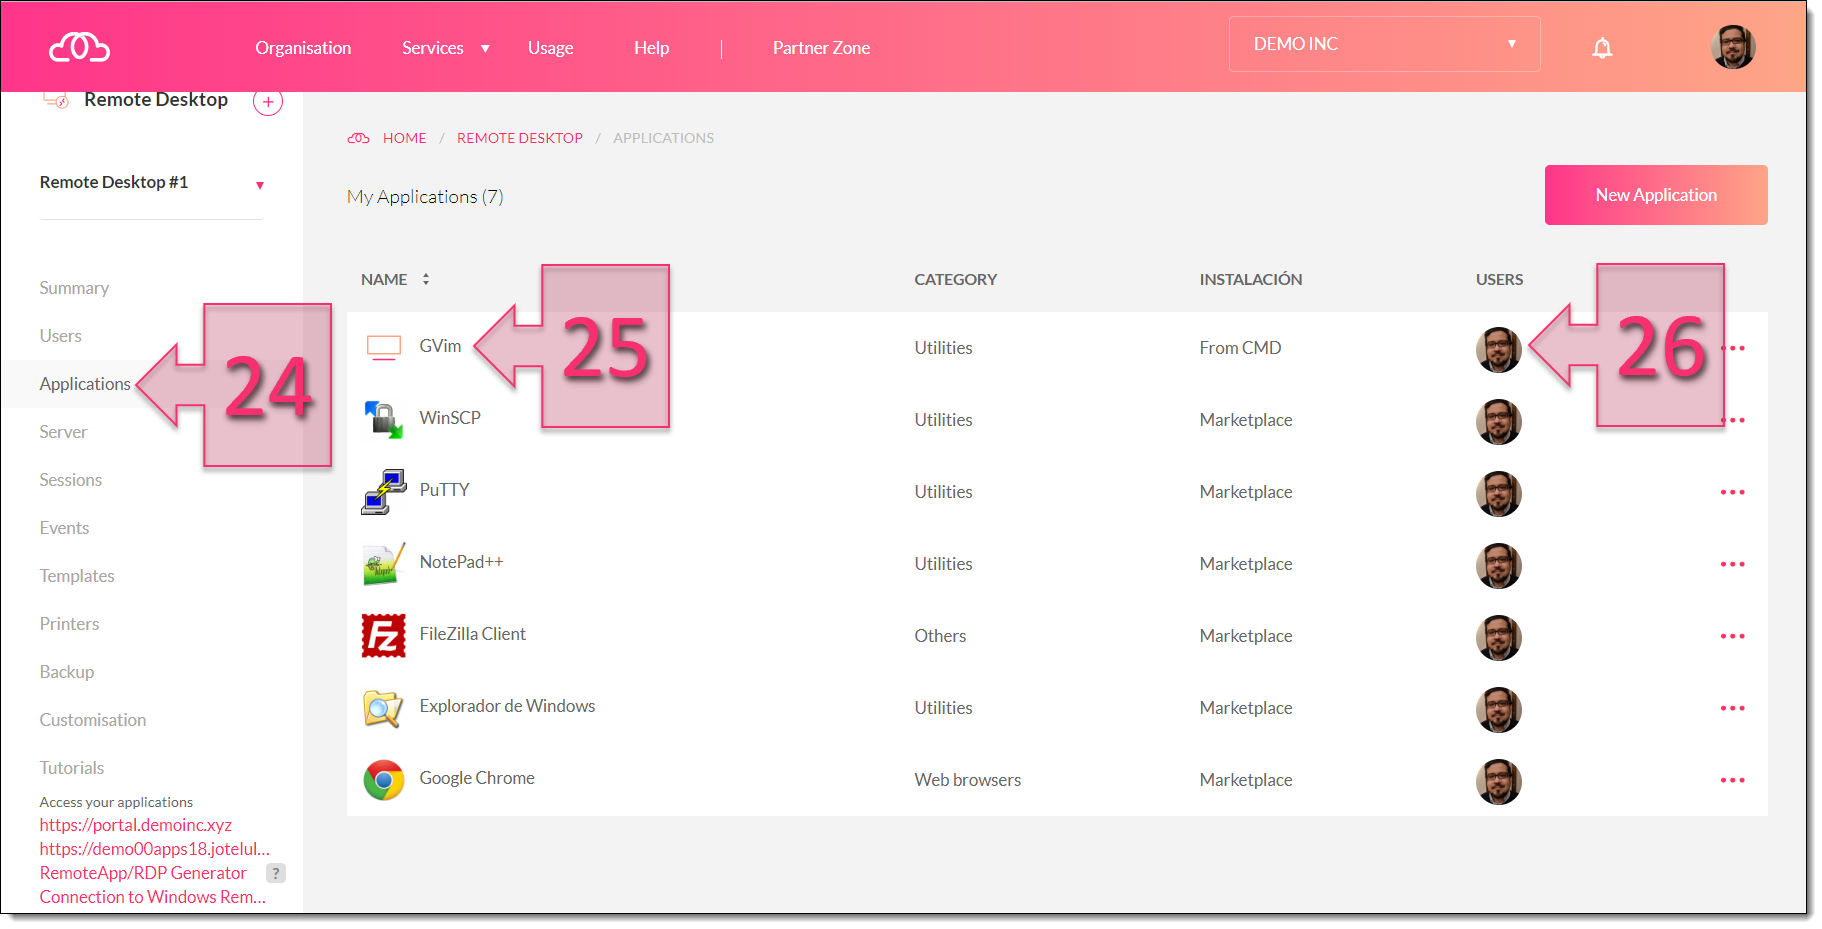
Check that the new application appears in the Applications section
You have now successfully installed and published your new application on your remote desktop server.
Conclusions
In this tutorial, you have learnt how to install and publish a new application to your remote desktop service and configure user access to the new program.
We hope that you have found this tutorial useful. However, if you still have any problems or questions, please don’t hesitate to contact us by writing to platform@jotelulu.com or calling +34 911 333 710.
If you found this tutorial interesting and would like to find out more about the Remote Desktop service, you might like to read the following tutorials:
- How to Register a Remote Desktop on Jotelulu.
- How to Manually Install an Application on Your Remote Desktop
Thank you for choosing Jotelulu!


