In this tutorial, we’re going to show you how to configure DHCP failover on Windows Server 2022 using PowerShell.
In a recent article, What is DHCP and Why Is It Important?, we tried to concisely explain why the Dynamic Host Configuration Protocol (DHCP) is so important. Essentially, this is a critical service for almost any business network because it provides a centralised way of distributing network configurations to connected devices. Some of these are really important settings, such as:
- IP addresses for individual machines.
- The subnet mask, which identifies the network that the machine is connected to.
- The Gateway, which is the address that machines use to communicate with devices outside the network.
- DNS servers, which translate names into IP addresses and vice versa.
- Domain names, which are used instead of IP addresses.
- The WINS address, which is the address of the WINS server that machines use to resolve NetBIOS names.
And there are many, many more parameters besides.
The problem with the DHCP service is that the entire network depends on it. If the DHCP server goes down, pretty much any business will grind to a complete halt.
This is why it’s important to have redundancy. This is achieved by deploying an additional server that can take over if the main one fails.
Two forms of redundancy are commonly used:
- Load balance: This is where requests are shared between the two servers, normally evenly, but this can be changed.
- Hot standby: This is where the second server is kept running but doesn’t respond to requests unless the main server fails.
In this tutorial, we’re going to look at how to configure “Hot standby” and we’ll assume that you already have your main DHCP server configured and operational.
NOTE: This tutorial is valid for Windows Server 2016, 2019 and 2022.
If you don’t already have your main DHCP server deployed, read these articles to find out how to do it:
And having covered all those important details, it’s time to get to work!
How to Configure DHCP Failover on Windows Server 2022
Before you get started…
To successfully complete this tutorial, you will need the following:
- To be registered with an organisation on the Jotelulu platform and to have logged in.
- A Servers subscription on the platform.
NOTE: Be careful when copying and pasting commands from this tutorial. Make sure that everything is exactly as it appears here.
Part 1 – Deploying a Second Server
As we said in the introduction, we’re going to assume that you’ve already deployed your main server. If you haven’t, you should do that before proceeding with this tutorial.
The second thing to do is to check that the two servers can see each other, which you can do using a simple ping.
NOTE: For security reasons, we recommend that you only open the ports required for DHCP communications and leave all the others closed. Unfortunately, many people just open all ports to save time.
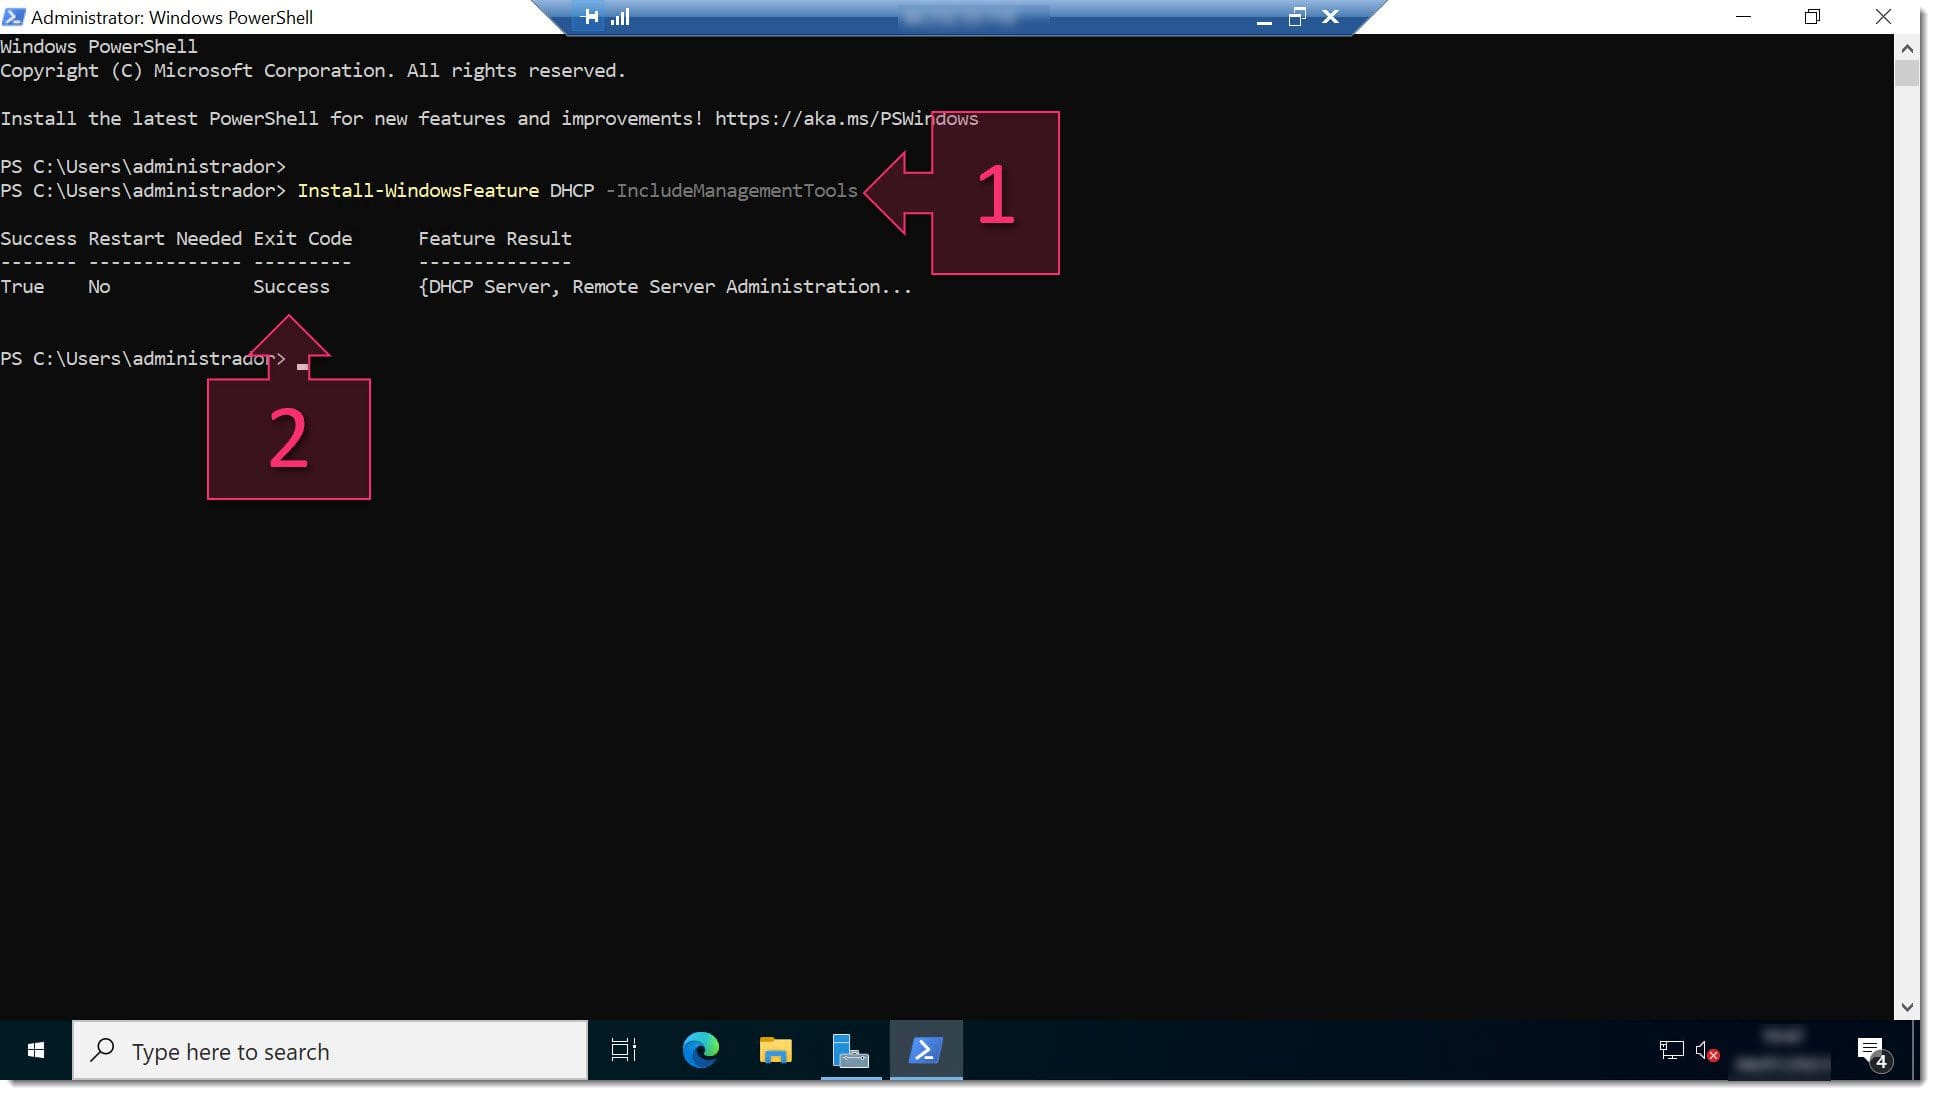
Next, in PowerShell, we’re going to add the DHCP Server role using the “Install-WindowsFeature” command (1) as follows:
# Install-WindowsFeature DHCP -IncludeManagementTools
Where…
- Install-WindowsFeature is the command to install a Windows feature.
- DHCP is the feature to be installed.
- IncludeManagementTools installs the associated management tools for the feature.
Once the command has been run, check that the word “Success” appears in the “Exit Code” column (2).
You have now successfully installed the DHCP Server role on your server.
Part 2 – Adding the Second Server to the DHCP Failover Cluster
Next, we need to configure the DHCP failover using a series of PowerShell commands, which when compared to the graphic interface, is a much faster process.
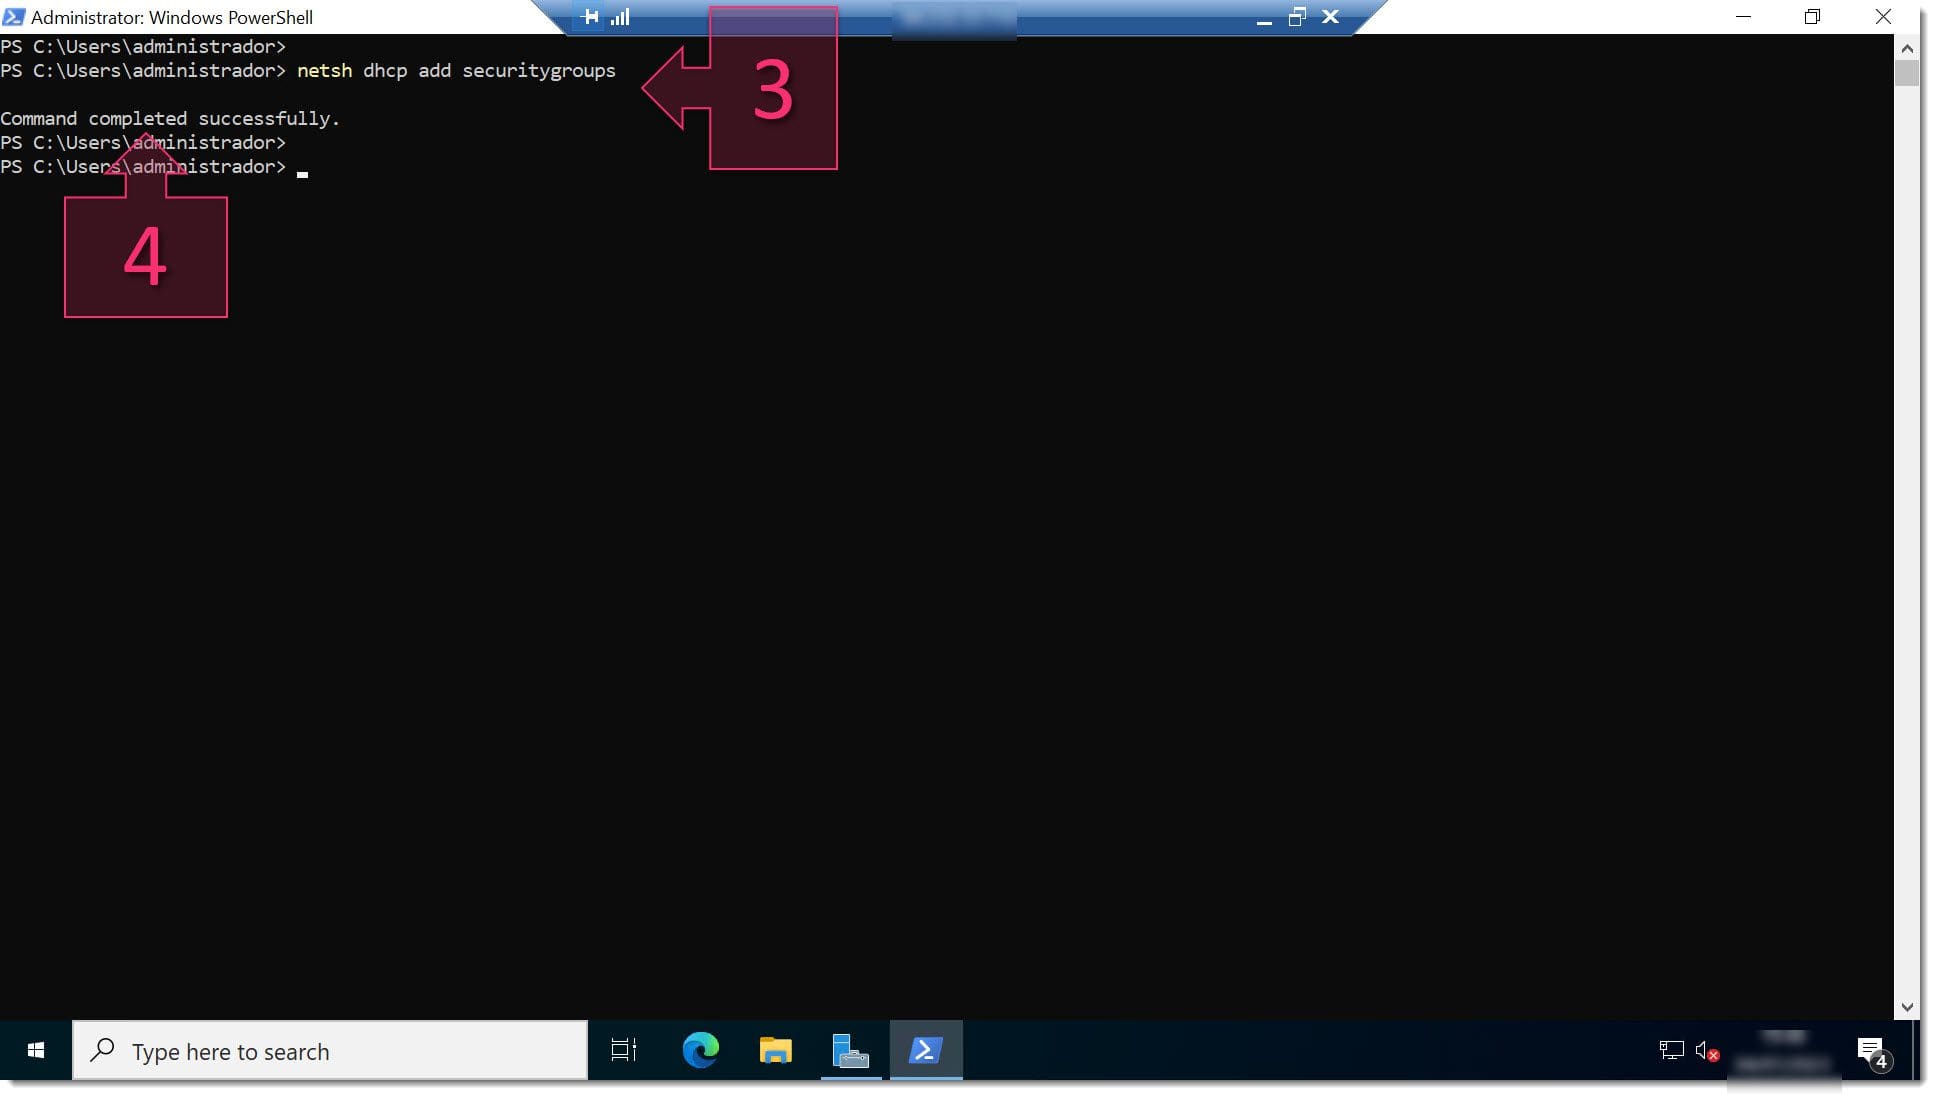
First, run the following command to add security groups to the server (3).
# netsh dhcp add securitygroups
Check that the line “Command completed successfully” appears below (4).
Alternatively, you could run the following command:
# Add-DhcpServerSecurityGroup -ComputerName “<FQDN_DHCP_Server>”
Where:
- <FQDN_DHCP_Server> is the fully qualified domain name of the new DHCP server.
Here’s an example:
# Add-DhcpServerSecurityGroup -ComputerName “SW22DHCPSERVER2.nachotest.int”
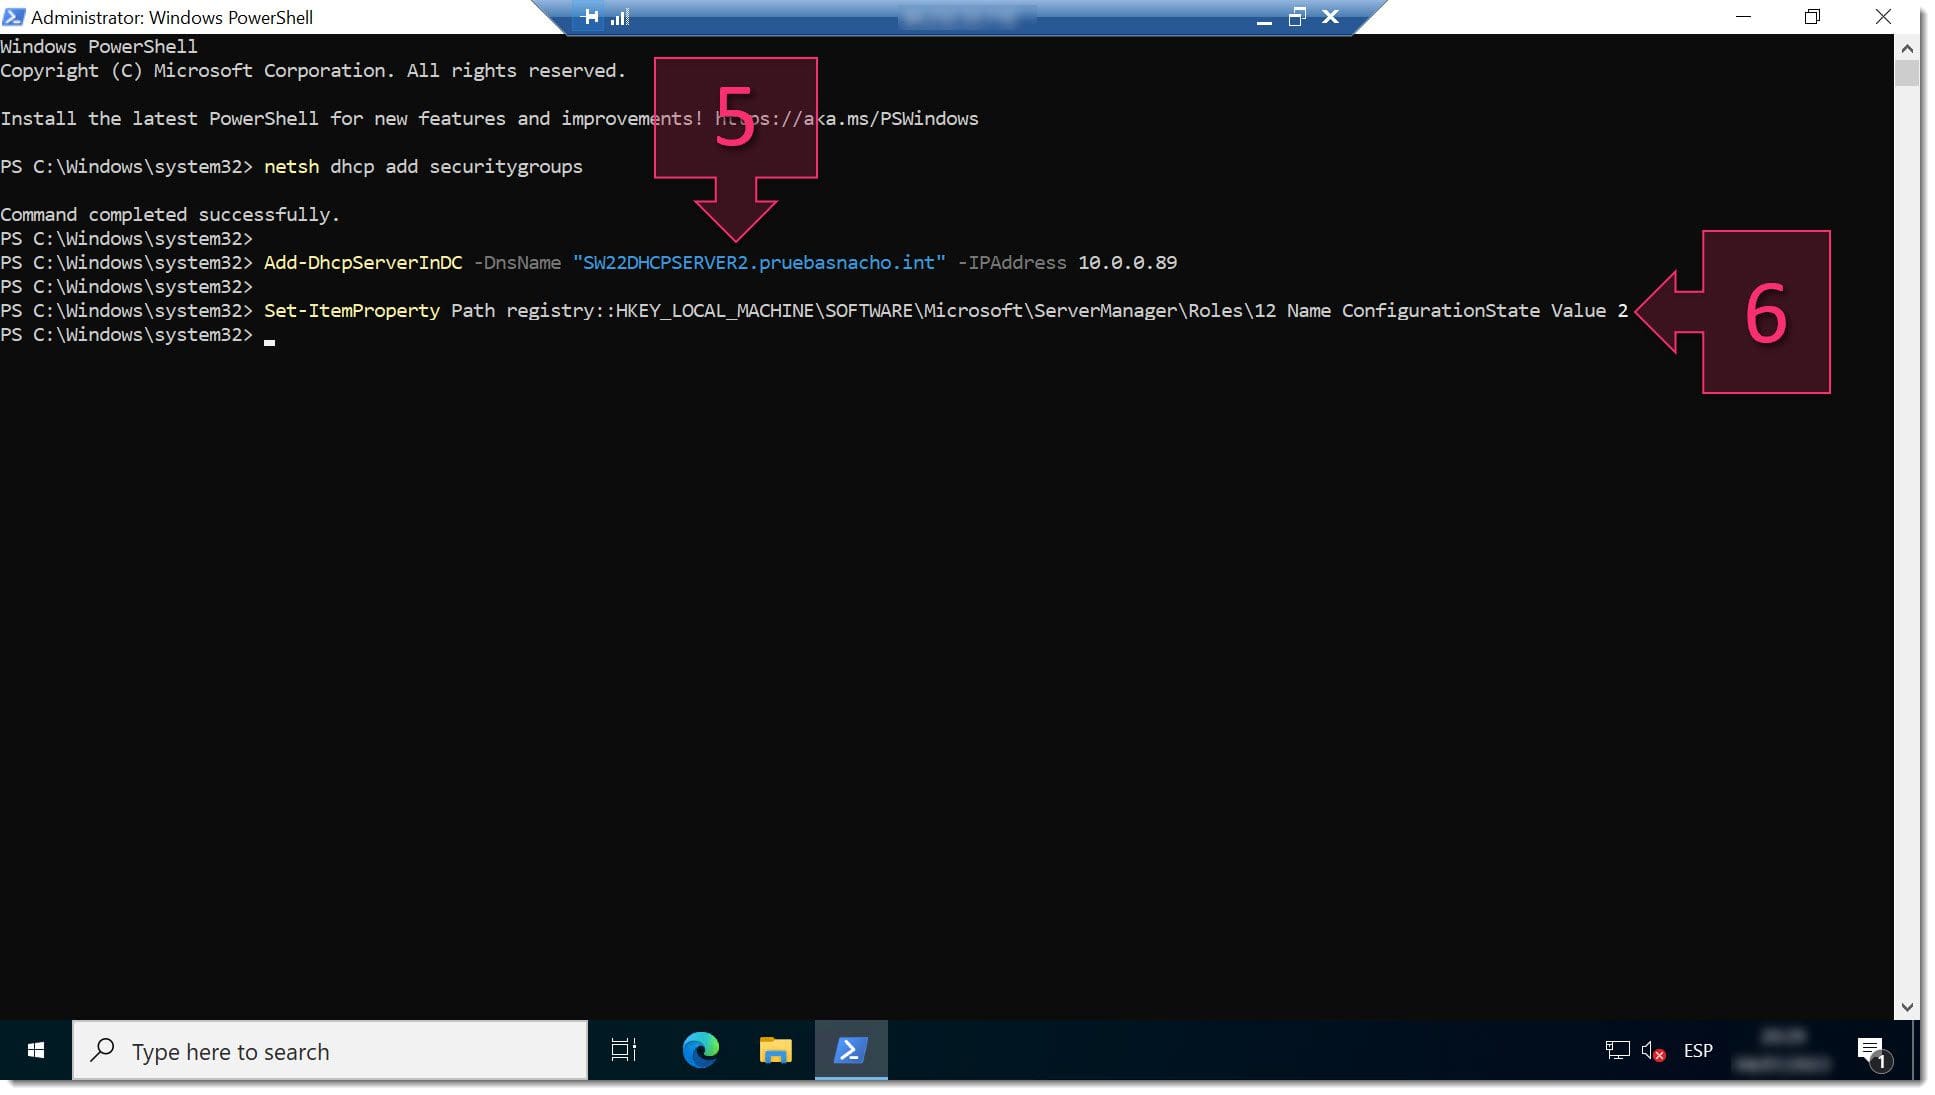
The next step is to add the server to the list of authorised DHCP services in the Active Directory. To do this, run the cmdlet “Add-DhcpServerInDC” (5):
# Add-DhcpServerInDC -DnsName “<FQDN_DHCP_Server>” -IPAddress <IP_Address>
Where…
- <FQDN_DHCP_Server> is the fully qualified domain name of the server.
- <IP_Address> is the server’s IP address.
Here’s an example:
# Add-DhcpServerInDC -DnsName “SW22DHCPSERVER2.nachotest.int” -IPAddress 10.0.0.89
Then, you’ll need to change the registry key to notify the server manager that the DHCP post-installation configuration is complete (6).
# Set-ItemProperty –Path registry::HKEY_LOCAL_MACHINE\SOFTWARE\Microsoft\ServerManager\Roles\12 –Name ConfigurationState –Value 2
NOTE: It’s possible that you might receive an error message when you run this command, such as “Add-DhcpServerInDC : Failed to initialize directory service resources for domain xxxxxxxx.xxx.” If this happens, you’ll need to uninstall the DHCP server and re-install it. This normally gets rid of the problem.

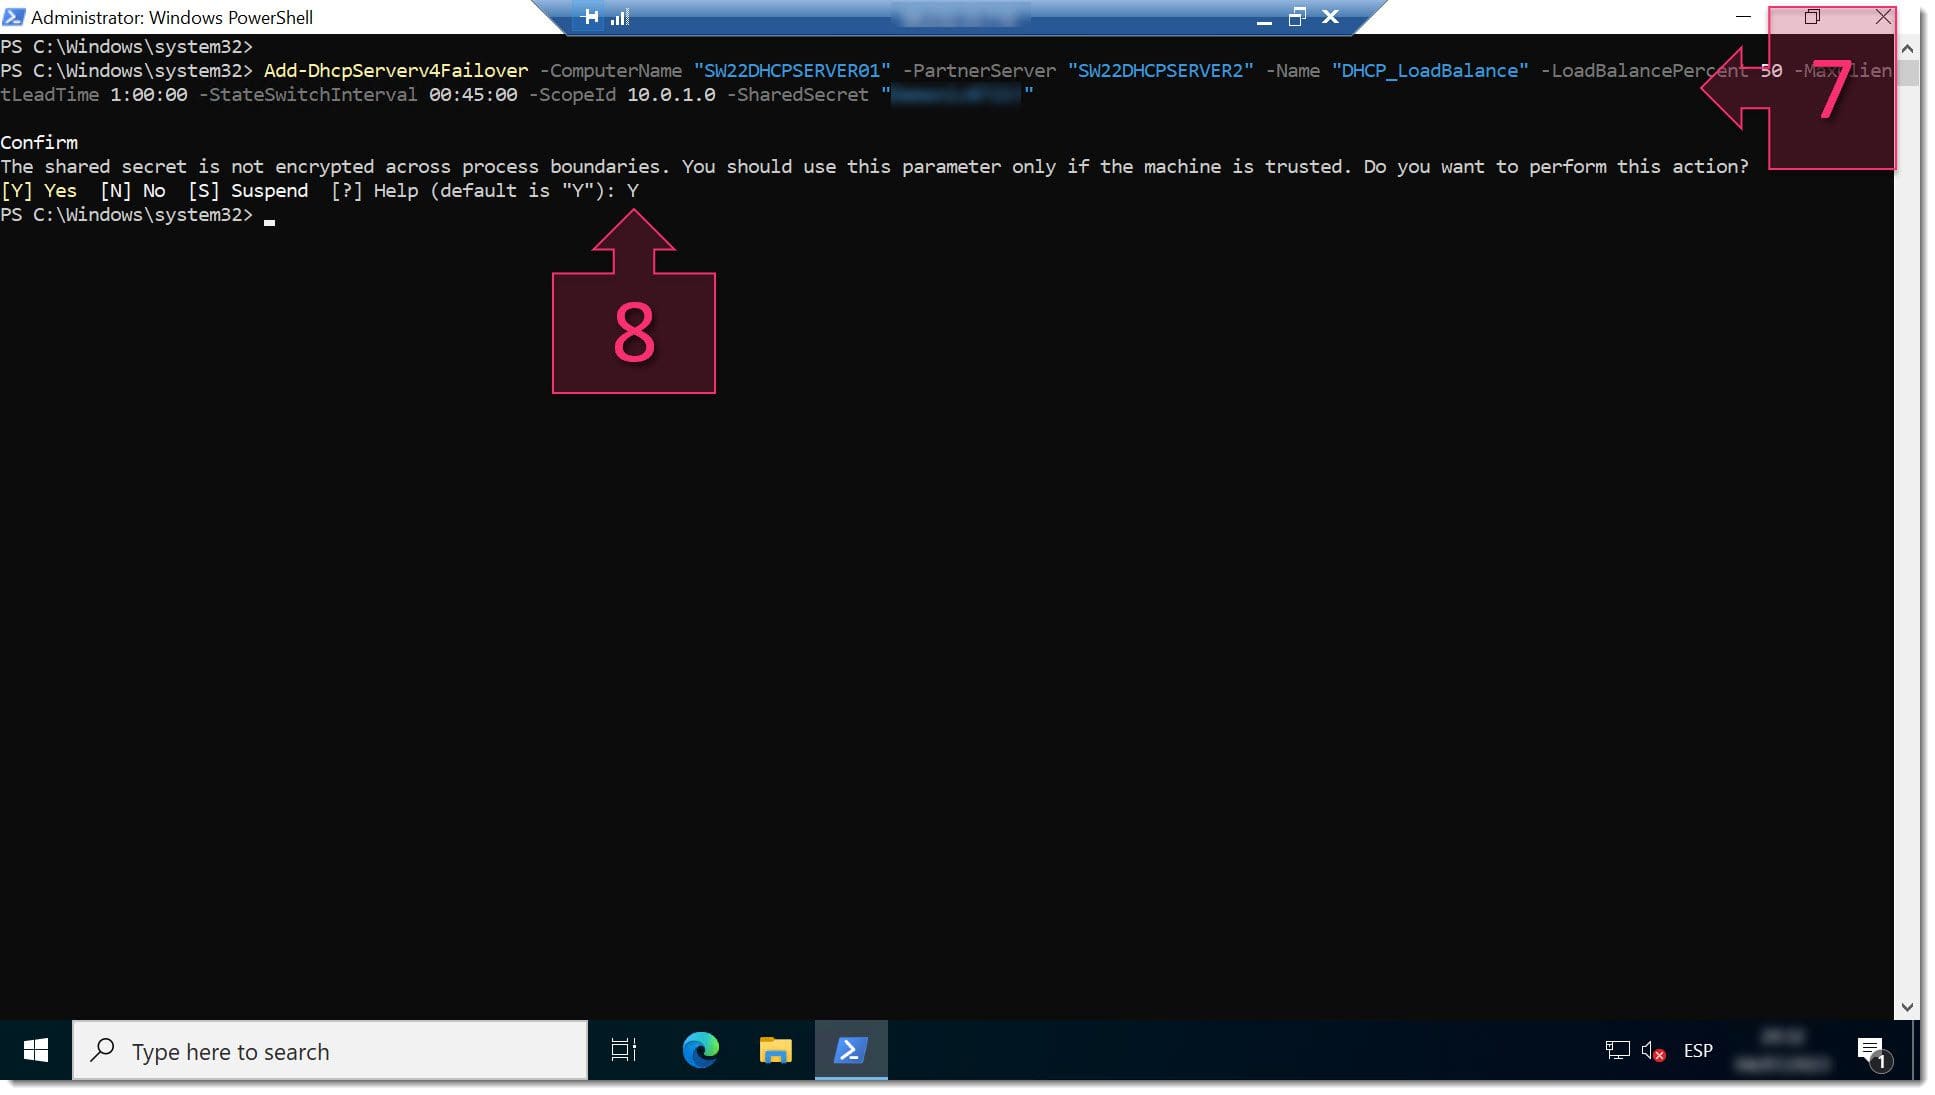
We’ve now reached the stage where we need to configure quite a lot of settings. Using the graphic interface, this can seem a little daunting, whilst with PowerShell, you can do it all with just a single command (7) as follows:
# Add-DhcpServerv4Failover –ComputerName “<Computer_Name>” –PartnerServer “<Server>” –Name “<Relationship_Name>” –LoadBalancePercent <Percentage> -MaxClientLeadTime 1:00:00 -StateSwitchInterval 00:45:00 -ScopeId <Scope_ID> -SharedSecret “<Password>“
Where each of the variables refers to a specific setting:
- <Computer_Name>: the name of the main server.
- <Server>: the name of the failover server.
- <Relationship_Name>: the name of the relationship to create.
- <Percentage>: the load percentage to be taken on by the main server.
- Maximum Client Lead Time: Leave the default settings.
- Shared Secret: Password used for communications.
Here’s an example:
# Add-DhcpServerv4Failover –ComputerName “SW22DHCPSERVER01” –PartnerServer “SW22DHCPSERVER2” –Name “DHCP_LoadBalance” –LoadBalancePercent 50 -MaxClientLeadTime 1:00:00 -StateSwitchInterval 00:45:00 -ScopeId 10.0.1.0 -SharedSecret “<Password>“
When you run this command, you will be asked for a confirmation. Press either the “Y” or Enter key to continue (8).
At this point, if you open the DHCP console, you should see that your changes have been applied.
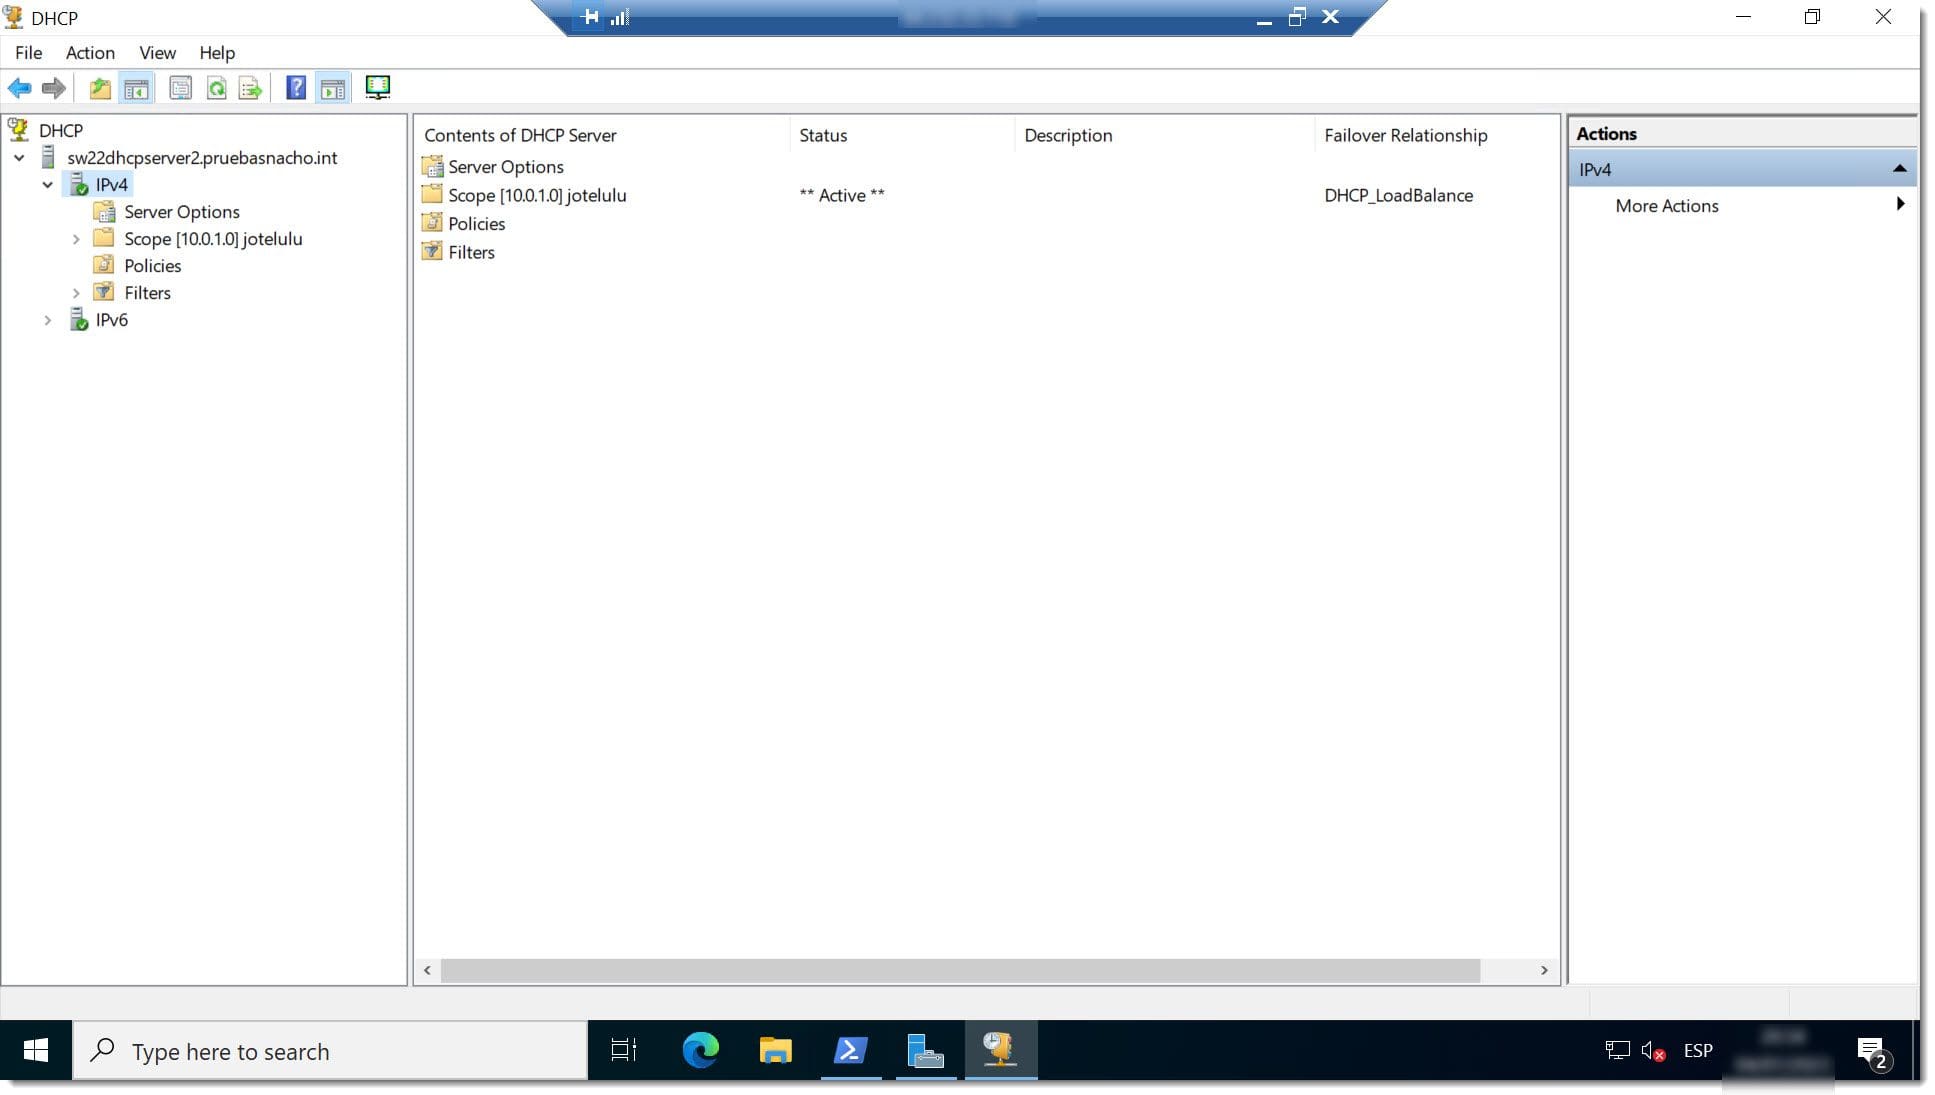
NOTE: If you finish the configuration process and don’t see any changes in the DHCP console on the second server, it’s possible that it just needs to be refreshed. All you need to do is close the console and re-open it.
Summary and Further Reading
In this tutorial, you’ve learnt how to configure DHCP failover on Windows 2022 using PowerShell, which allows you to deploy the DHCP server role on two servers and maintain high availability. It’s a standard way of making sure that your network is always operational even in the event of a server failure. This tutorial has been written for Windows Server 2022, but it’s also valid for versions 2019 and 2016.
If you’ve already configured your DHCP service, you might be interested in the following articles as well:
We hope that you’ve found this tutorial useful, but if you have any problems, please don’t hesitate to contact us so we can help you.
Thanks for choosing Jotelulu!


