In this quick tutorial, we’ll show you how to activate Disaster Recovery on the Jotelulu platform, step by step.
At Jotelulu, we make a special effort to keep up with the latest market trends and demands. That’s why we listen attentively to our customers to give them exactly what they need and value most.
Over the past year, one thing that has come up repeatedly is the need for Disaster Recovery as a Service (DRaaS) so that our customers can recover their services immediately if something goes catastrophically wrong.
NOTE: The IT security standard that covers Disaster Recovery in detail is ISO/UNE/22.301 “Business Continuity Management Systems”.
This quick guide is the first of many tutorials looking at Disaster Recovery. As with all Jotelulu services, it is very user-friendly. But it is also very powerful and has many features that we will explore and explain over the next few tutorials.
But before we dive in, you might be wondering what this service actually does. Essentially, Disaster Recovery allows you to copy all the resources used by your ‘Remote Desktop’ or ‘Servers’ subscriptions, such as servers, disks and IP addresses. This way, they will all be available on a different availability zone if something goes horribly wrong.
How to Activate Disaster Recovery
Before you get started
To successfully complete this tutorial, you will need:
- To be registered on the Jotelulu platform and have logged in.
- A ‘Remote Desktop’ or ‘Servers’ subscription. If you haven’t subscribed yet, check out our tutorial titled How to Register a Remote Desktop on Jotelulu.
There are essentially three steps to activate Disaster Recovery (DR):
- Select the subscription on which you want to activate DR and give the DR plan a name.
- Choose where the copy will be made.
- Configure your replication policy.
Step 1 – Choose a Subscription
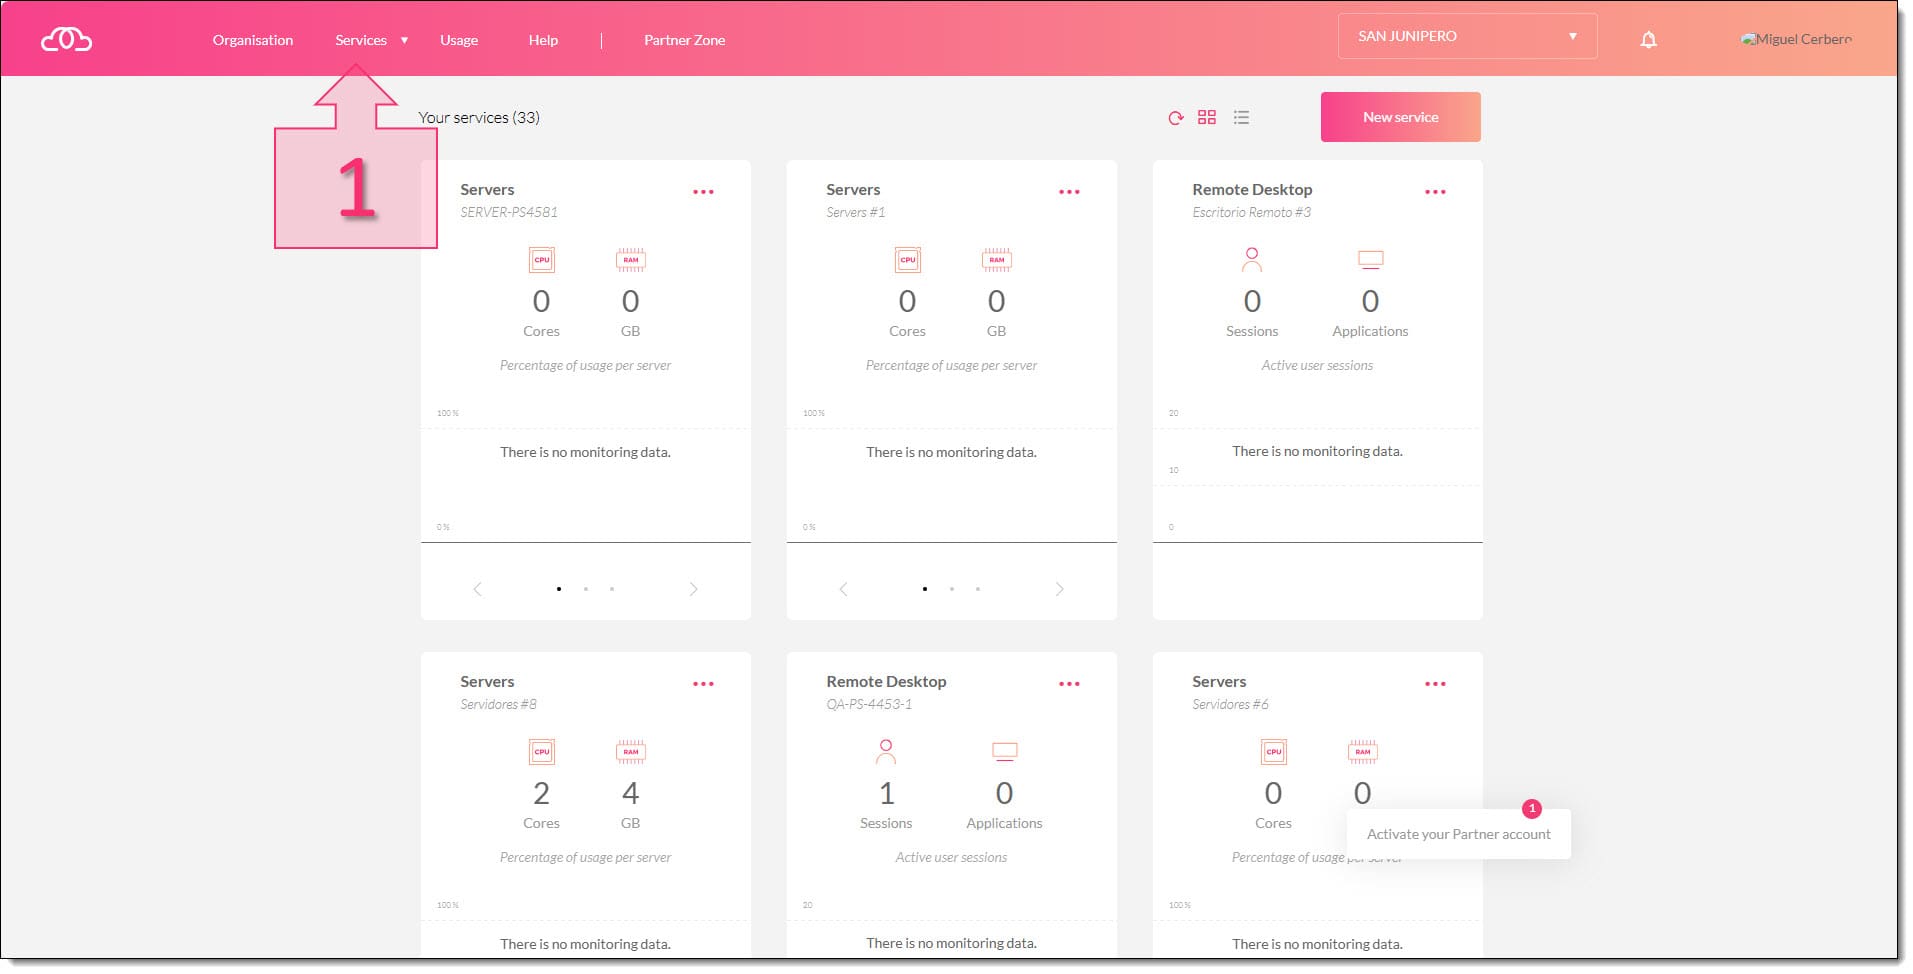
First of all, on the Jotelulu platform, click on “Services” (1).
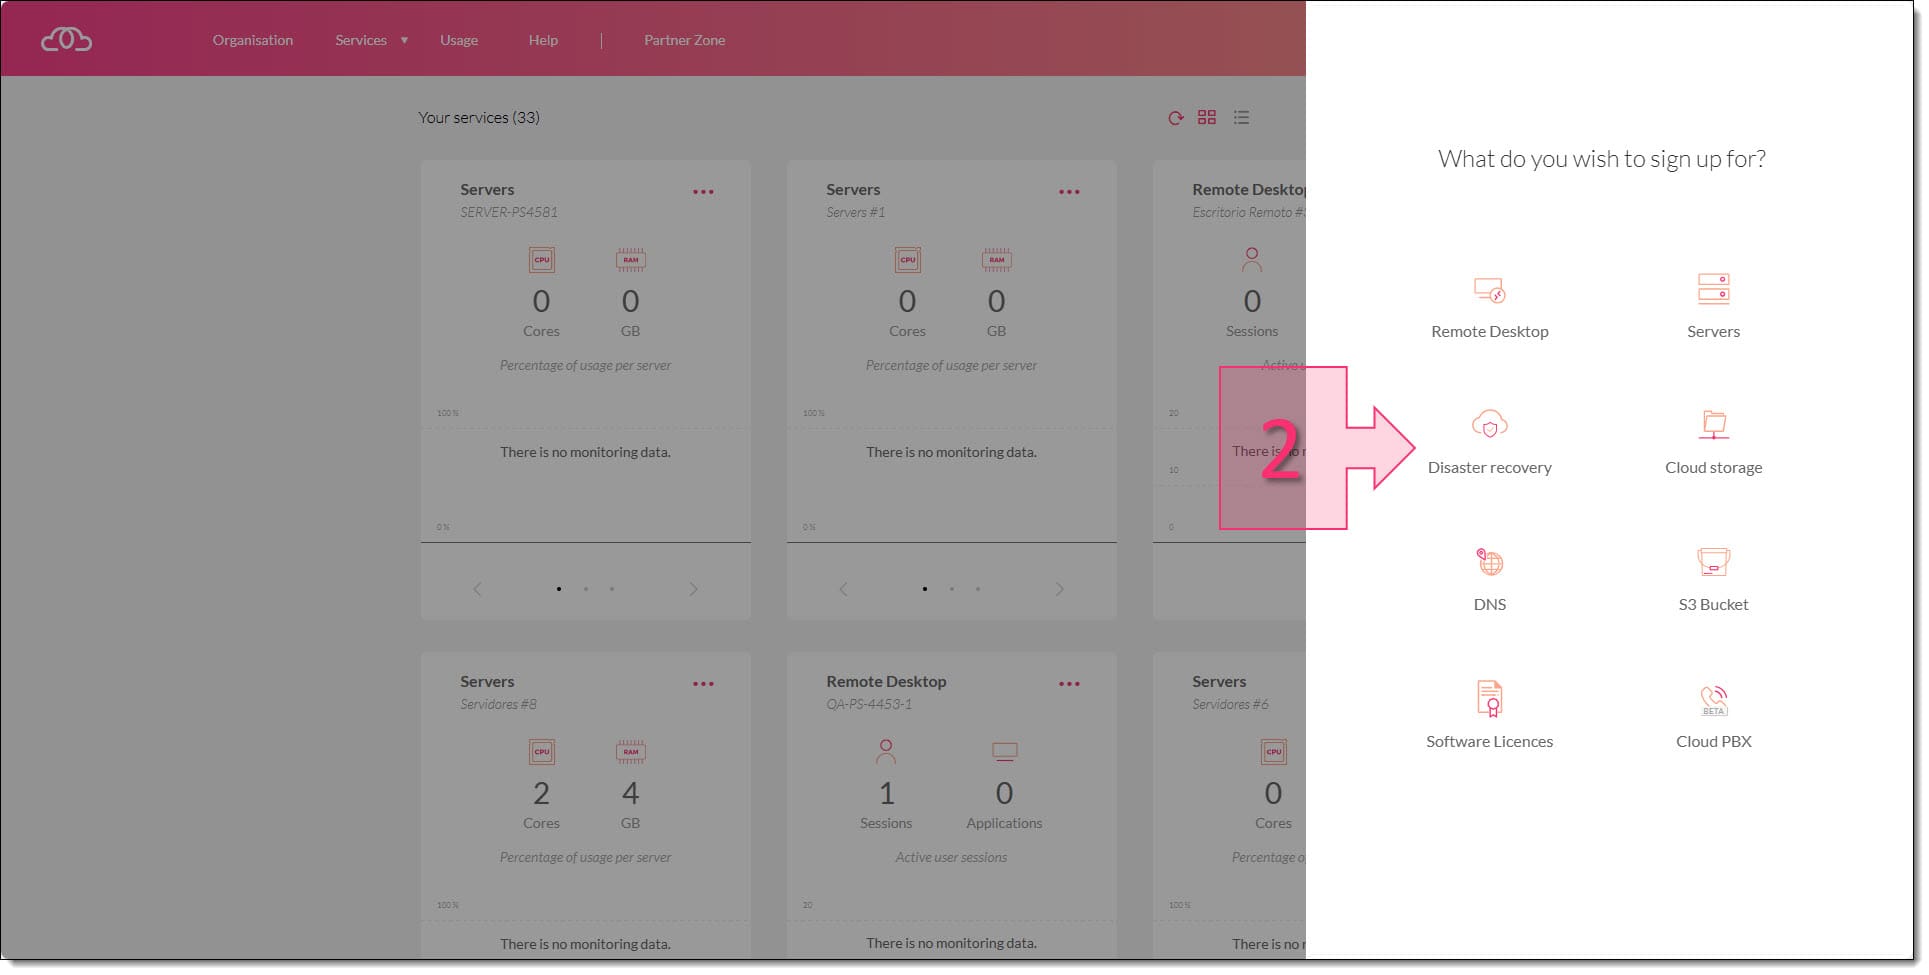
From the menu that appears on the right, click on “Disaster Recovery” (2).
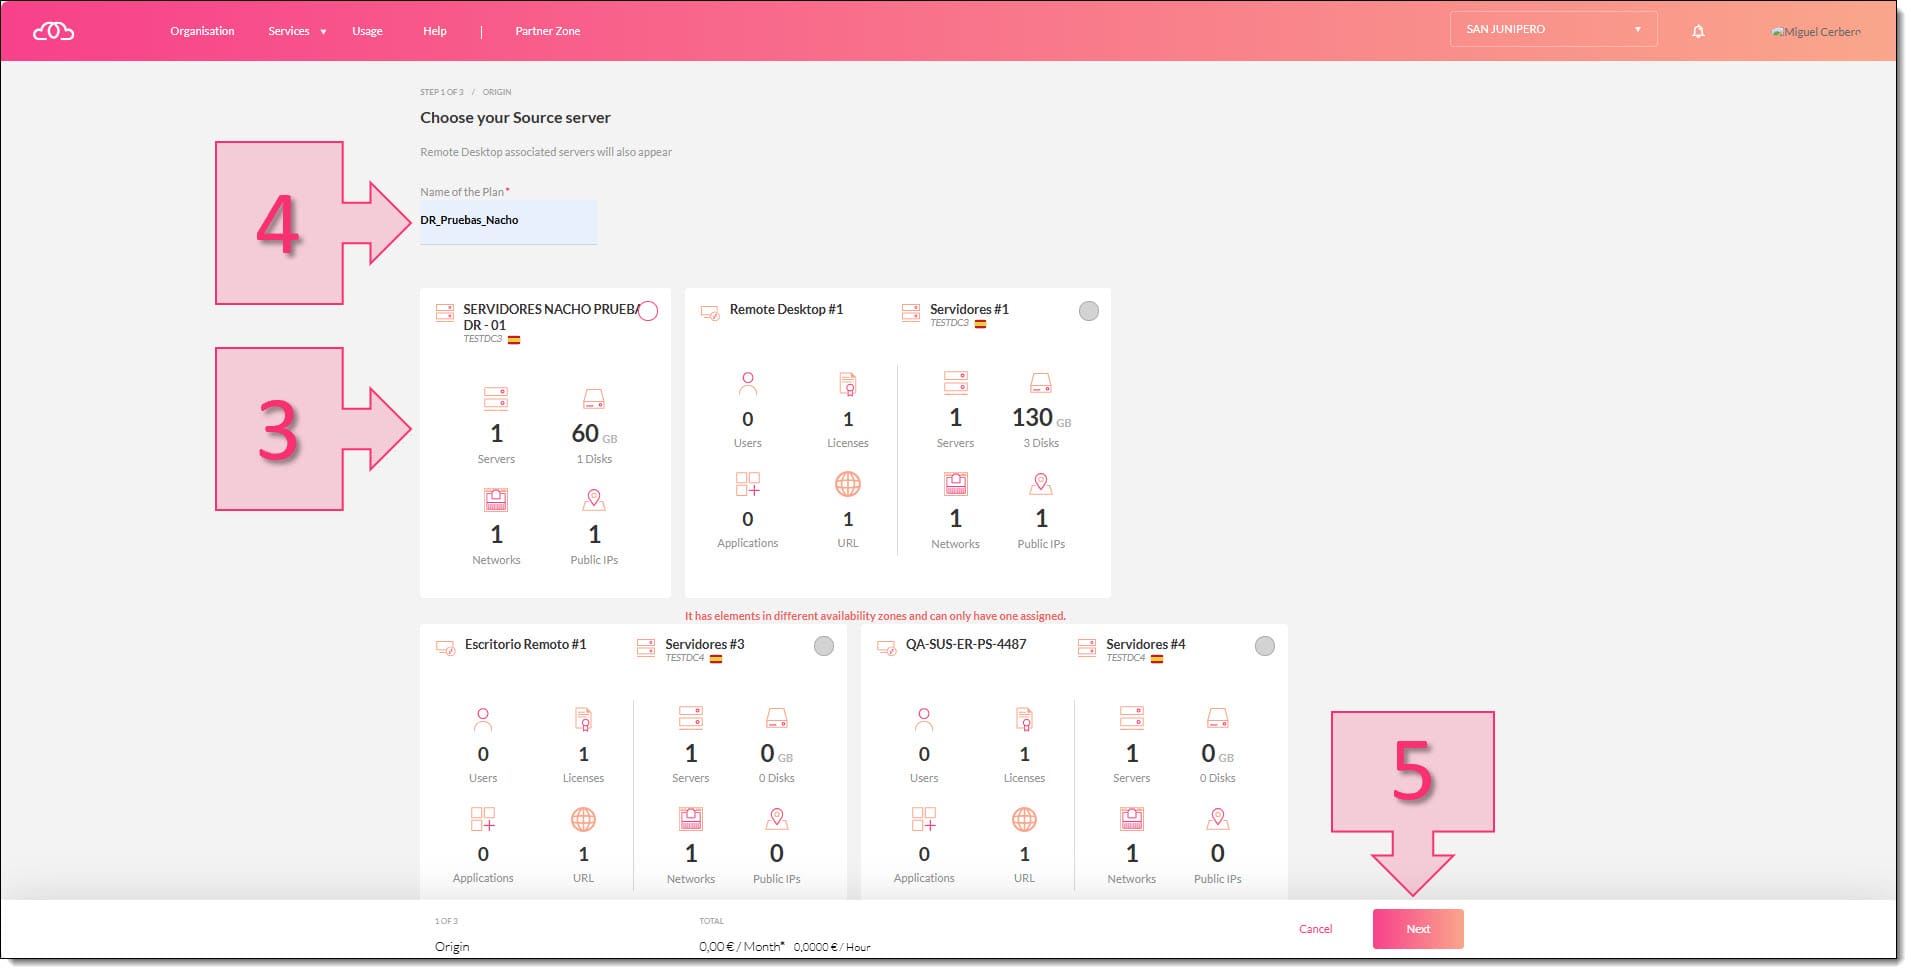
Next, choose the subscription (3) for which you want to set up a DR plan. This could be a ‘Remote Desktop’ subscription or a ‘Servers’ subscription. Then, give the DR plan a name (4). This will be especially important if you have multiple plans for multiple services or environments. Once you have done this, click on “Next” (5).
NOTE: If you don’t select a subscription and try to continue, you will receive an error message.
Step 2 – Choose a Target Zone
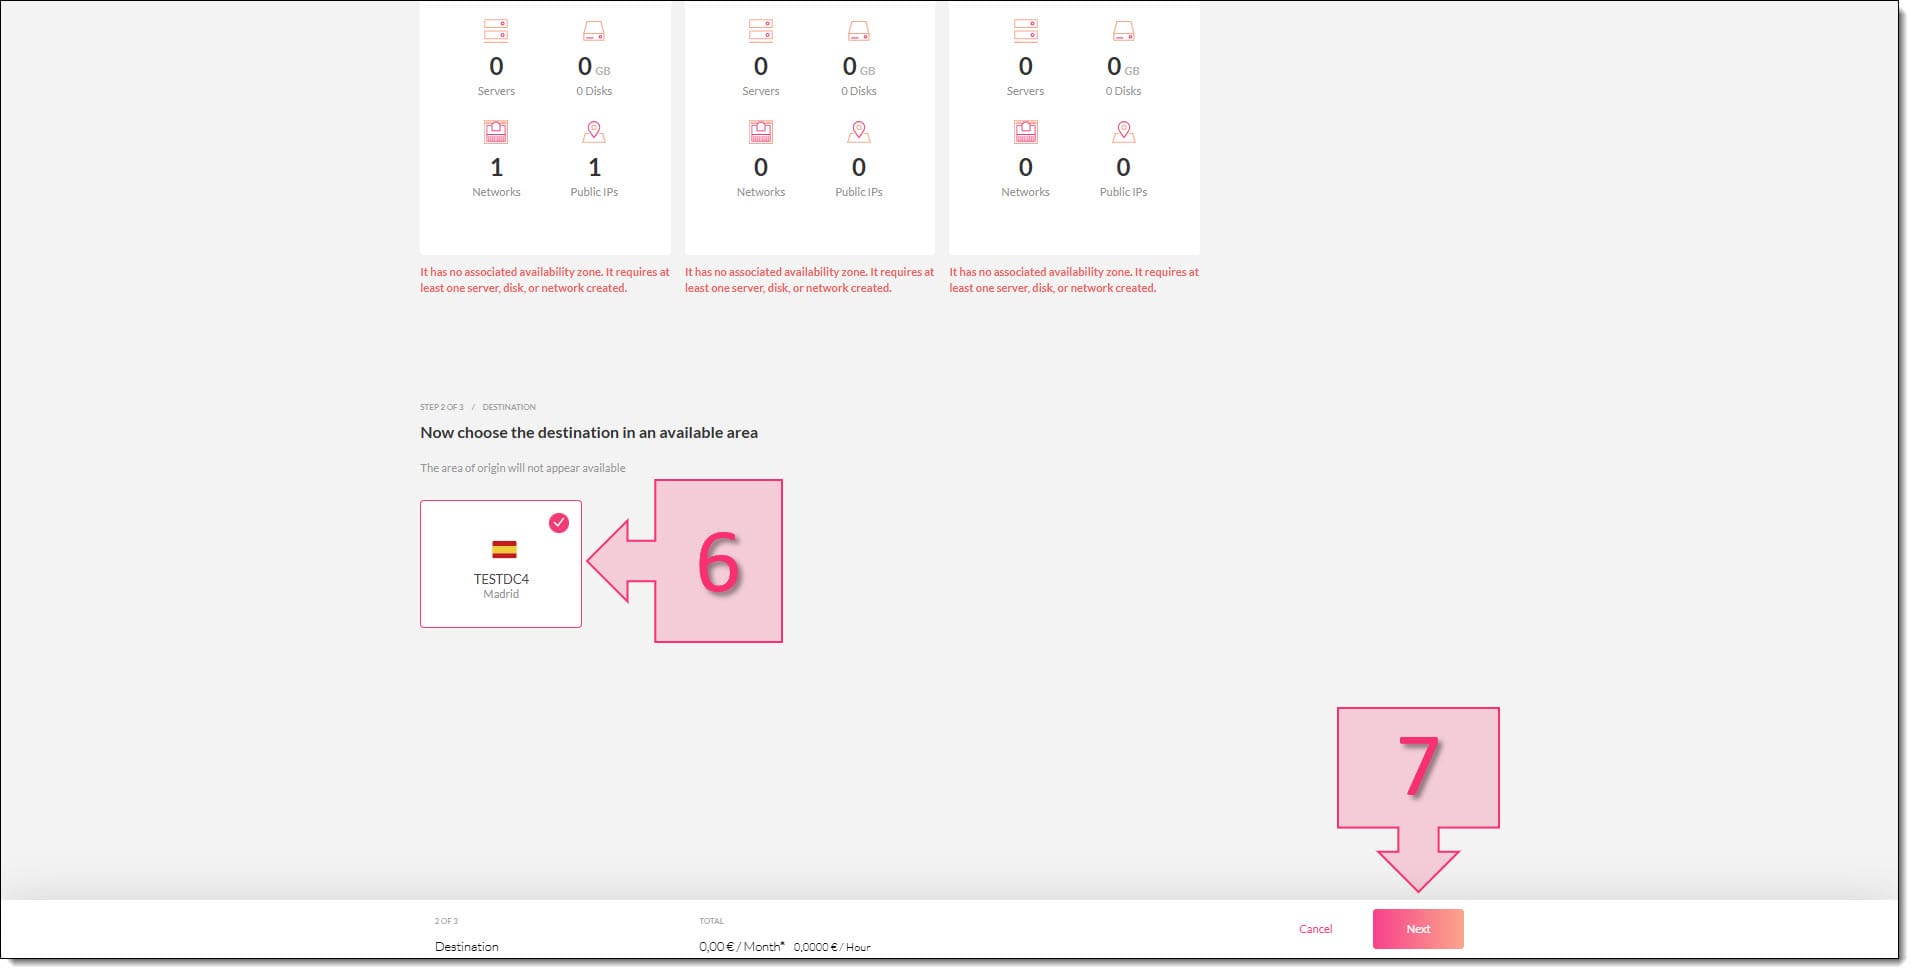
At this point, you need to choose the availability zone where your subscription will be replicated (6). Choose from one of the available zones shown on the screen and click on “Next” (7).
Step 3 – Configure your replication policy
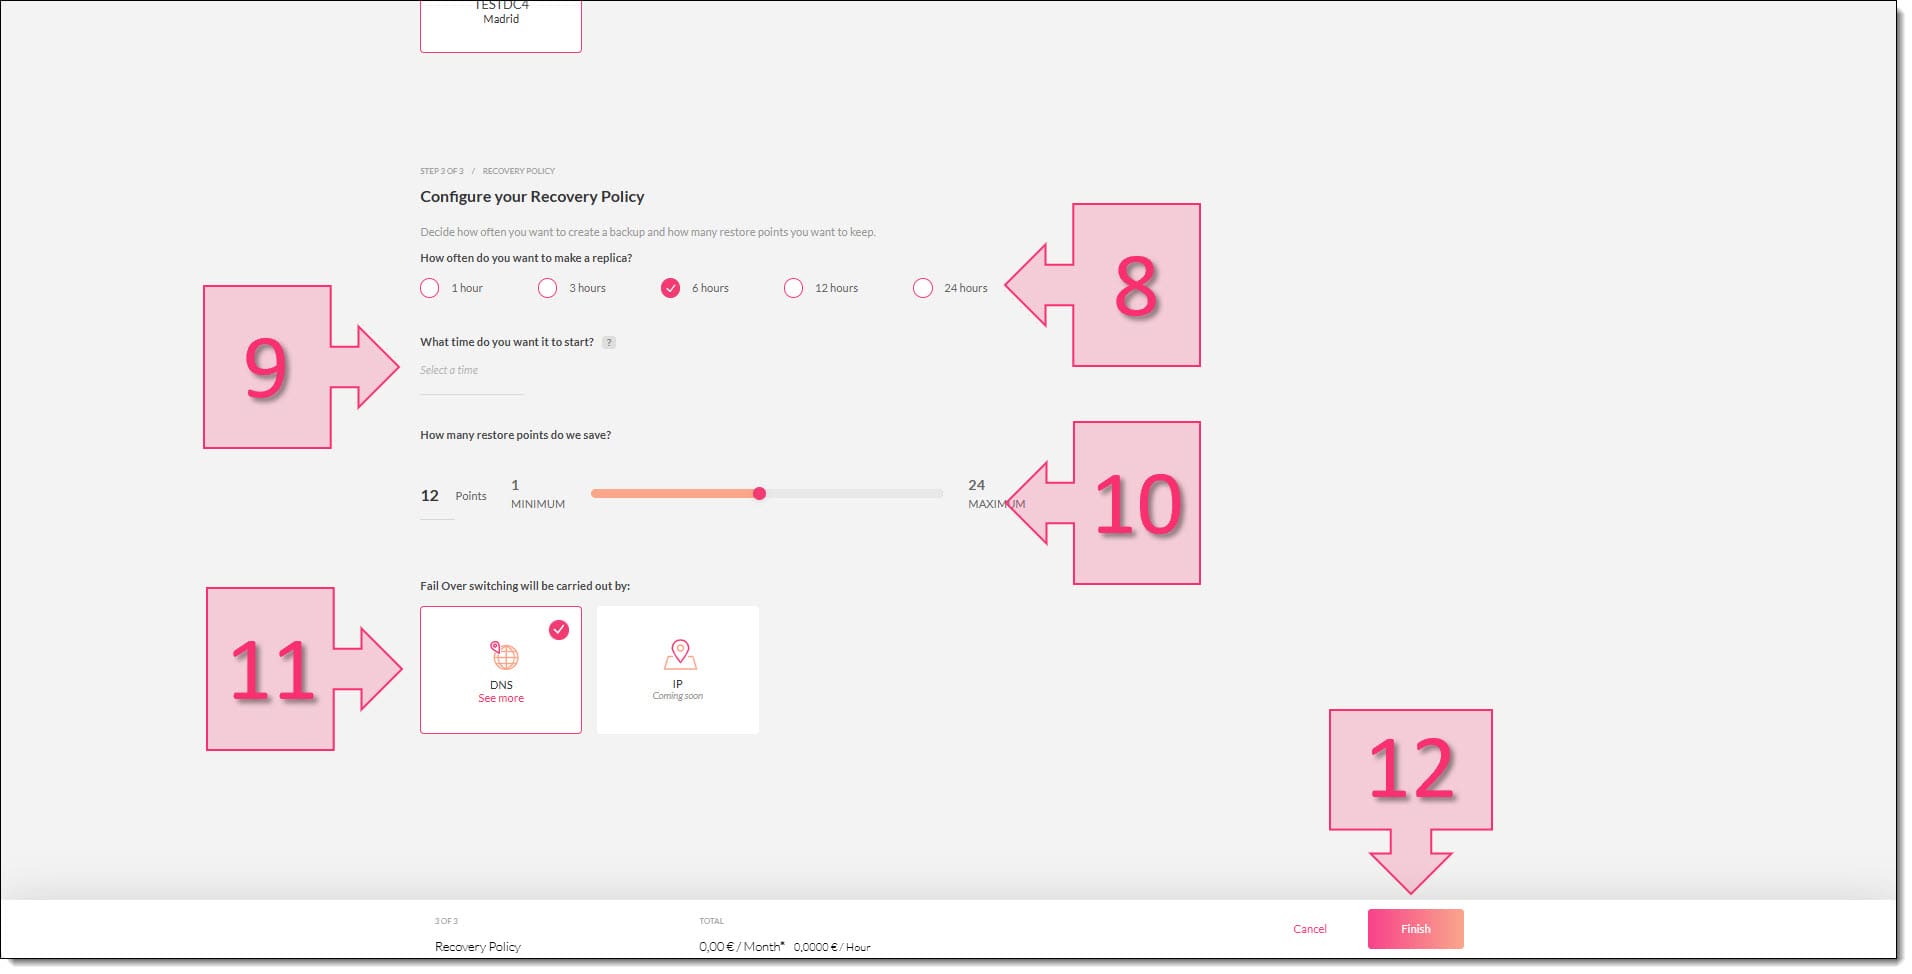
The final step is to configure your replication policy. To do this, you will need to set some parameters, one of which will be how often to create a new copy (8). The available options are:
- 1 hour
- 3 hours
- 6 hours
- 12 hours
- 24 hours
You will also be asked to set a time for replication to start (9) and the number of recovery points you wish to retain at any one time (10). For the latter, you can choose anything between 1 and 24, but 12 is the default setting. Lastly, you will need to choose whether to use IP or DNS failover switching (11). Once you have made your choices, click on “Finish” (12).
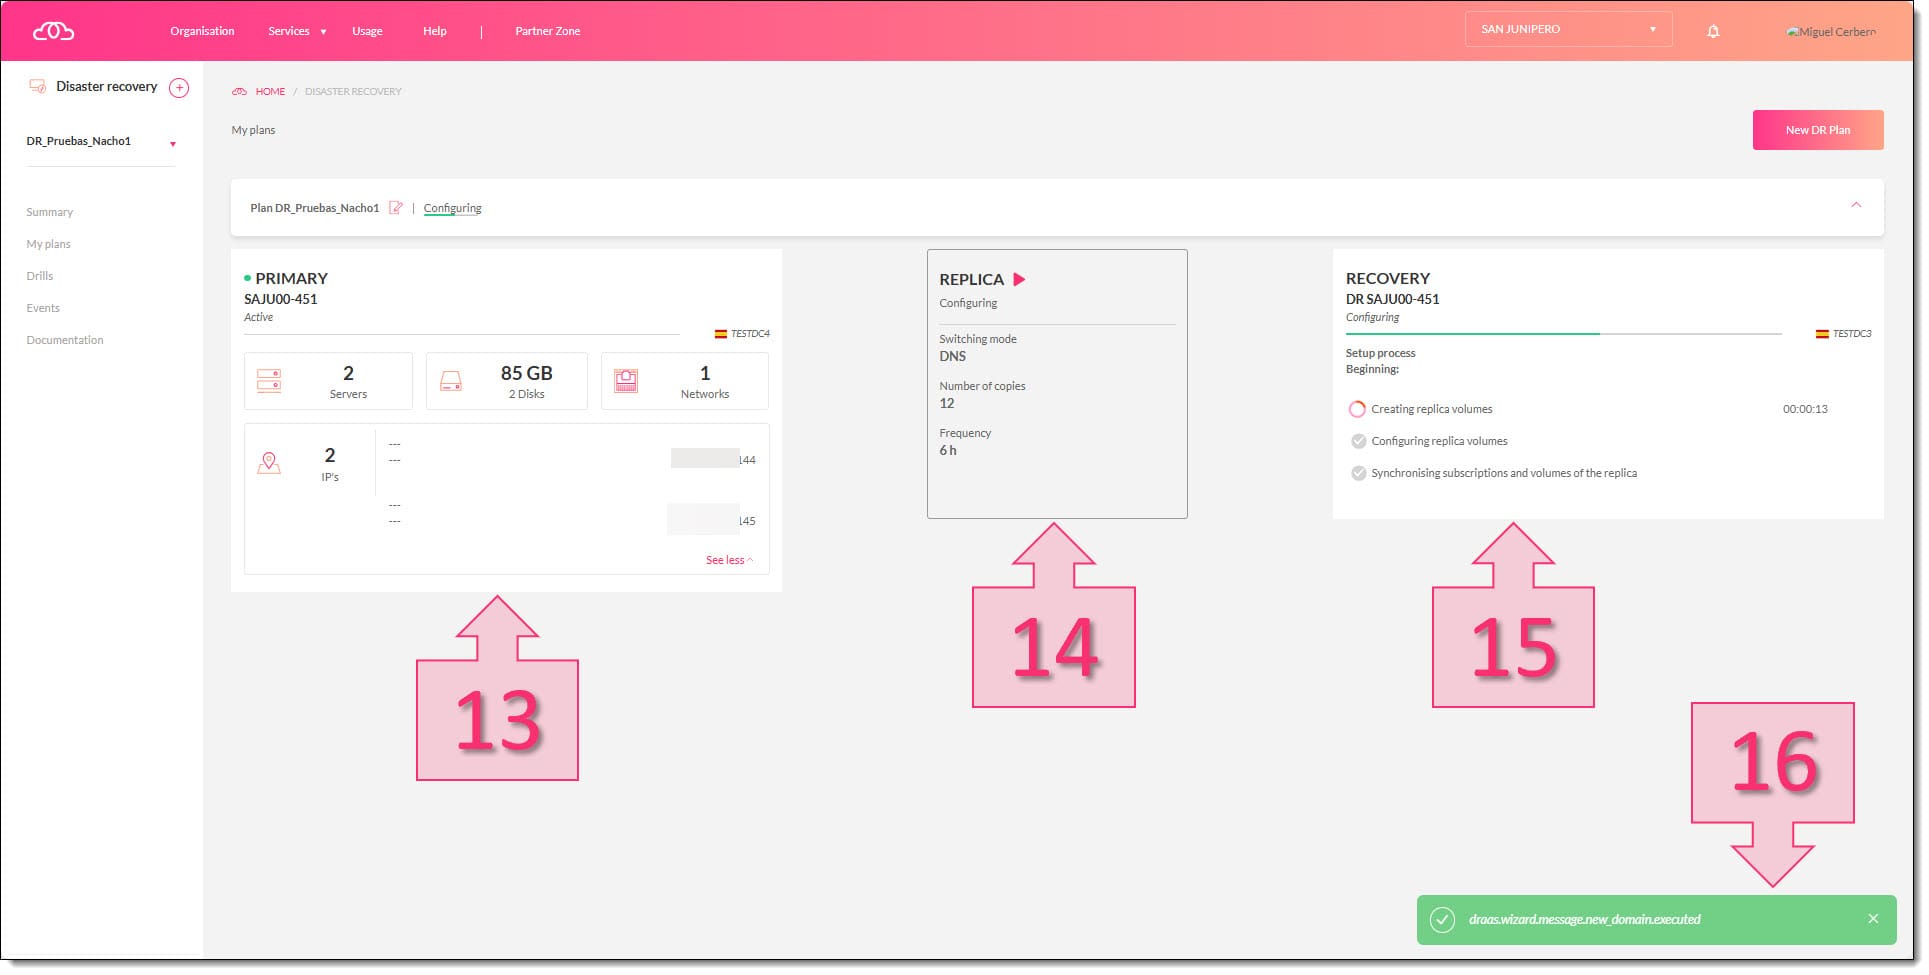
At this point, the platform will begin replicating the selected resources. On the screen, you will see the subscription and resources being replicated (13), the chosen recovery point settings (14) and a progress indicator (15).
As you can see in the screenshot below, the replication process consists of three steps:
- Creating replica volumes
- Configuring replica volumes
- Synchronising replica volumes and subscriptions
Once the task begins, you will also see a notification message in the bottom left-hand corner (16).
NOTE: If you leave this screen, you can still check on the progress by returning to the “My Plans” section on the platform.
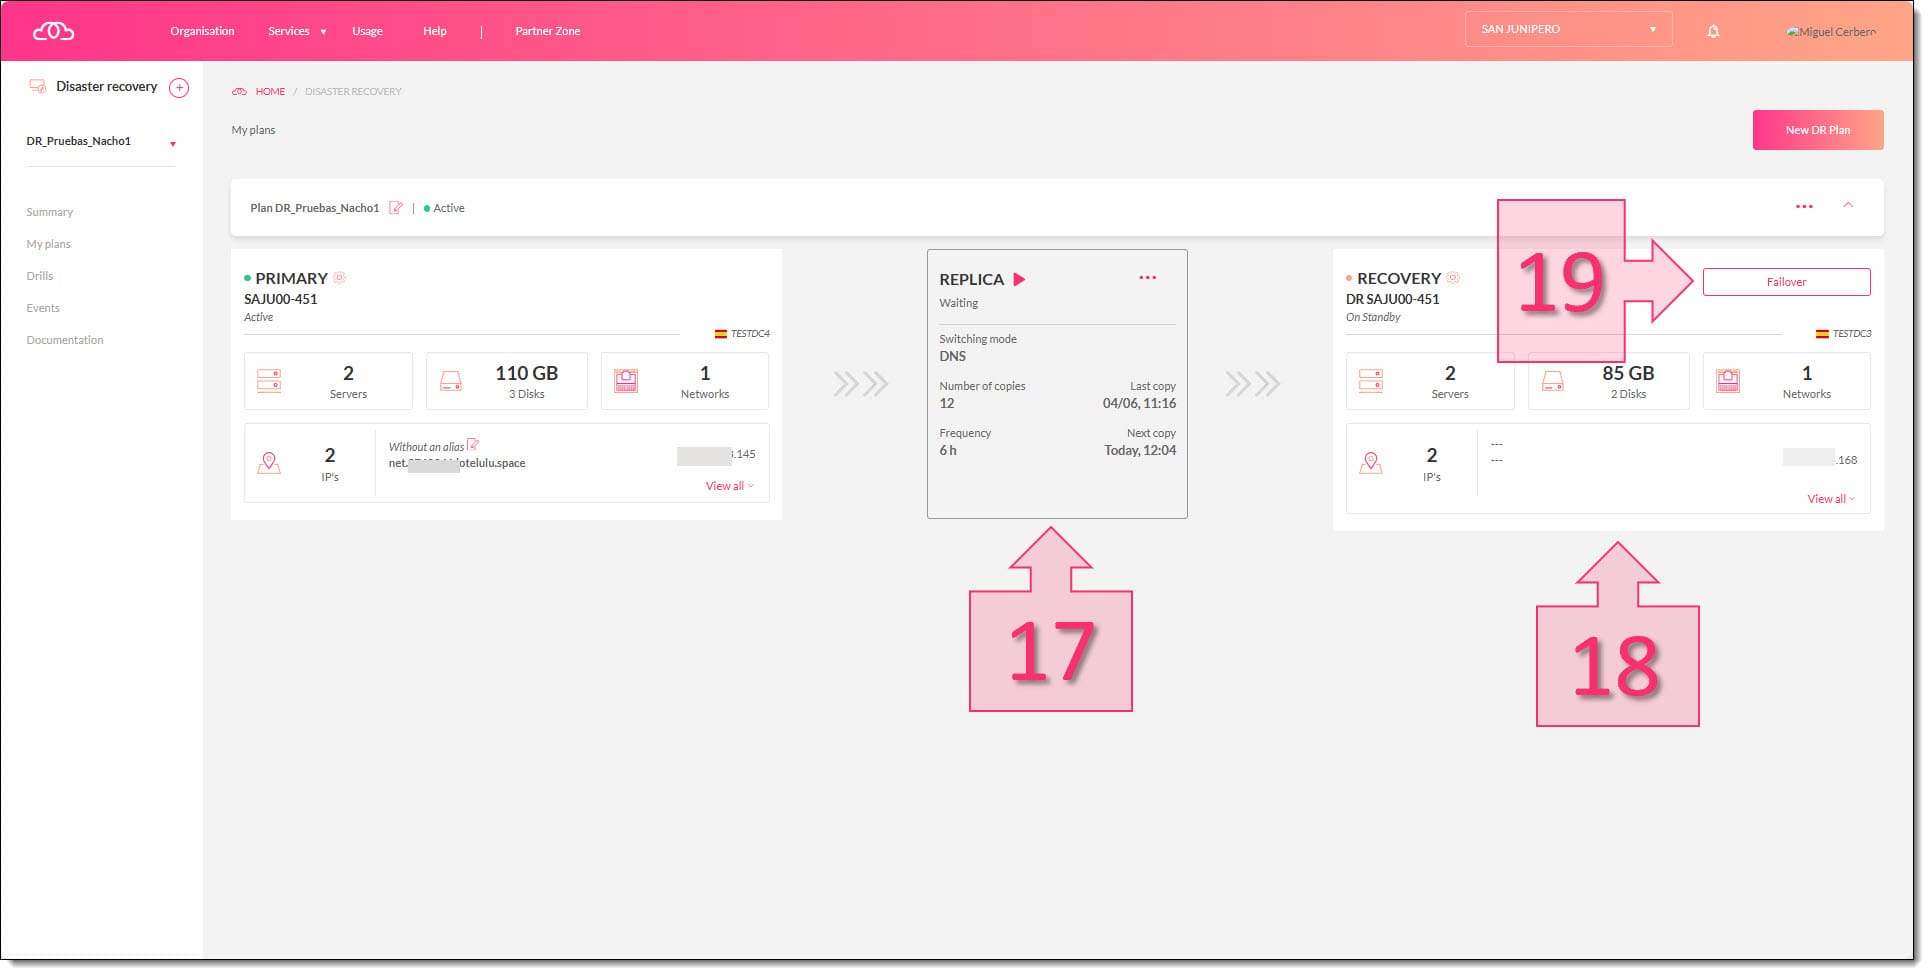
Now that you have successfully set up Disaster Recovery, it’s a good idea to check that everything has gone smoothly. To do this, you can check when the last copy was made (17) and the resources that have been replicated (18) and, if you need to, you can execute a failover (19).
There you have it! You have now successfully activated Disaster Recovery on your Jotelulu subscription.
Conclusion
In this short tutorial, you have learnt how to activate Disaster Recovery on the Jotelulu platform. We have shown you how to create a Disaster Recovery plan, select a target location and configure your replication policy, all in just a few simple steps.
If you have any problems, please, don’t hesitate to get in touch. We’ll be happy to help you out!
If you would like to learn more about DR, check out the following articles on our blog:
- Disaster Recovery: What Is It and Why Do We Need It?
- Top 10 Key Factors When Creating a Disaster Recovery Strategy
- Why is Disaster Recovery Planning Such a Headache?
Thanks for choosing Jotelulu!


