In this tutorial, we’ll take a look at how to manage your DHCP scopes, including how to create, configure and modify them.
As you probably already know, DHCP (Dynamic Host Configuration Protocol) is one of the most widely used protocols for configuring networks, whether using Windows, Linux or any other OS. This protocol makes it possible to automatically configure IP addresses and other network parameters to allow client computers to communicate with the rest of the network and the wider internet.
In particular, the DHCP service provides the following network parameters:
- The host IP address
- The subnet mask
- The default gateway
- The DNS servers
But it can also provide other parameters, such as WINS servers, NTP servers, etc.
In this tutorial, you will learn how to configure your first DHCP scope, configure it and perform some other administrative tasks.
Before we begin, it’s a good idea to just explain what a scope actually is. A scope is a group of IP addresses, whether IPv4 or IPv6, which have been made available for assignment to computers on a subnet that uses the DHCP service.
Usually, to use a DHCP server, the systems administrator needs to create a scope for each physical subnet and define the parameters to be used by the client computers.
How to Manage Your DHCP Scopes
Before you begin
To complete this tutorial successfully, you will need:
- To be registered with an organisation on the Jotelulu platform and have logged in.
Part 1 – Creating Your First DHCP Scope
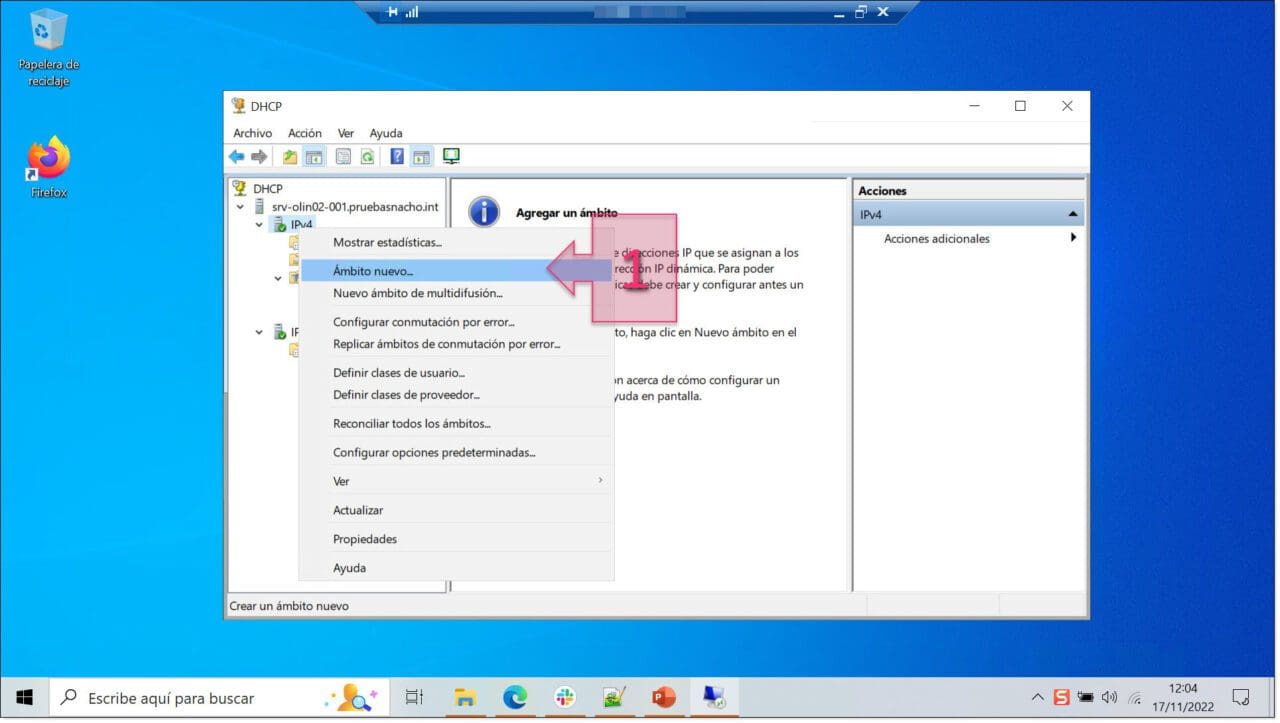
First, we need to create a scope. To do this, open the DHCP management tool, and expand the tree on the left-hand side until you find IPv4. Right-click on IPv4 (or IPv6 if this is what you’re using) and click on “New scope…” (1).
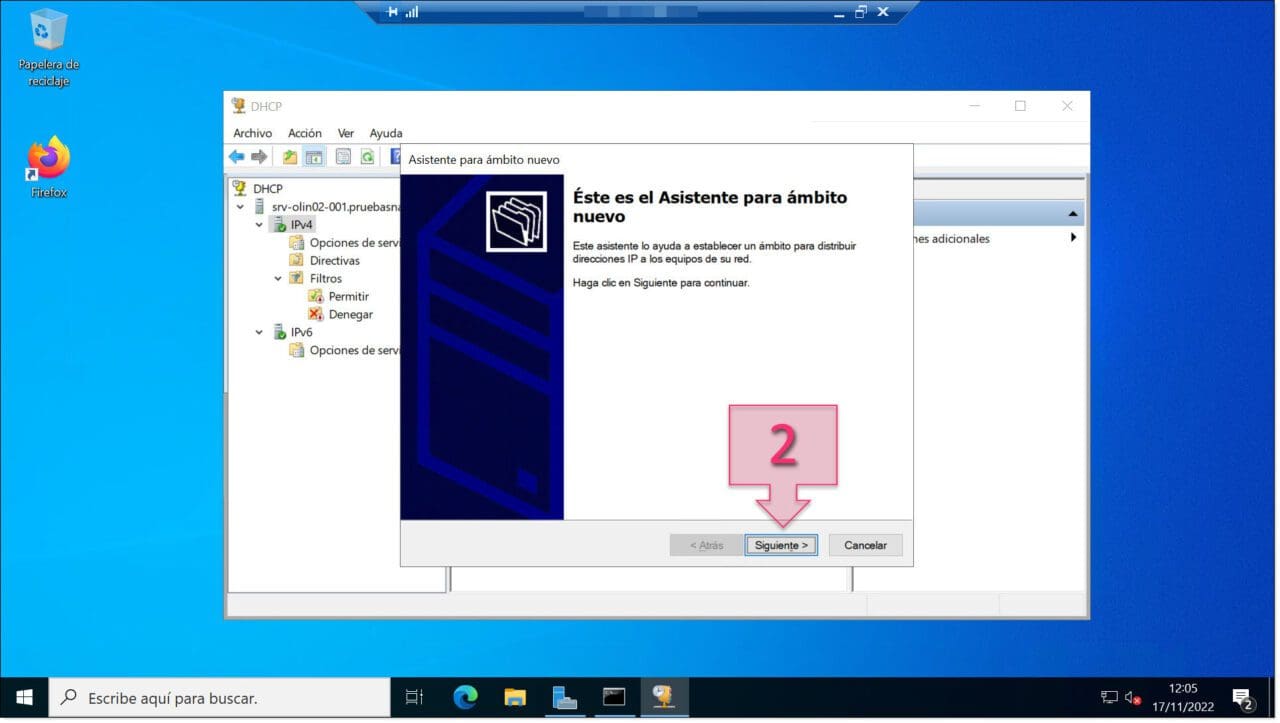
This will open the New Scope Wizard. Click on “Next” to continue (2).
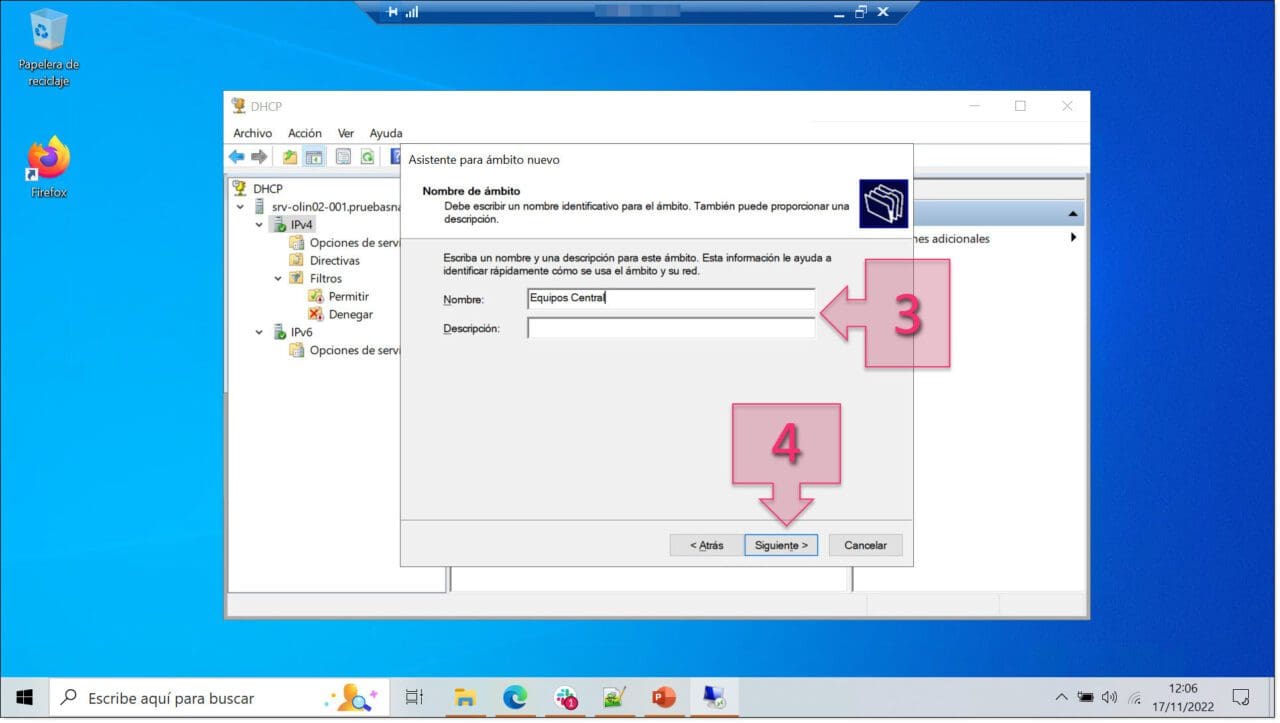
On the next screen, you will be asked to give a name and description for your new scope (3). This will serve to identify it from all the other available scopes. Once you have filled in these details, click on “Next” (4).
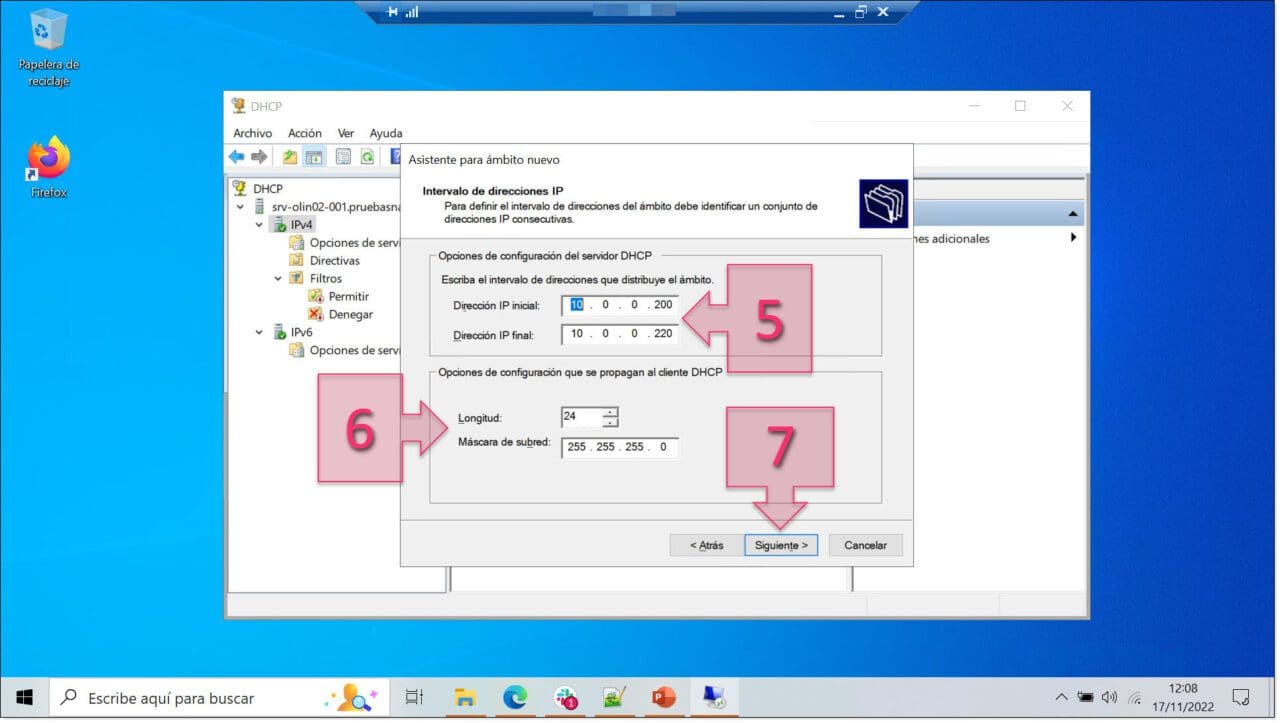
On the next screen, you will be asked to enter a range of IP addresses. These are the IP addresses that will be available for DHCP clients connected to this scope. All you need to do is enter a start and an end IP address (5).
Then, you need to define the subnet mask (6). To do this, you can either enter a length (for example, 24) or write the subnet mask in the format “x.x.x.x” (for example, 255.255.255.0).
Once you have done this, click on “Next” (7).
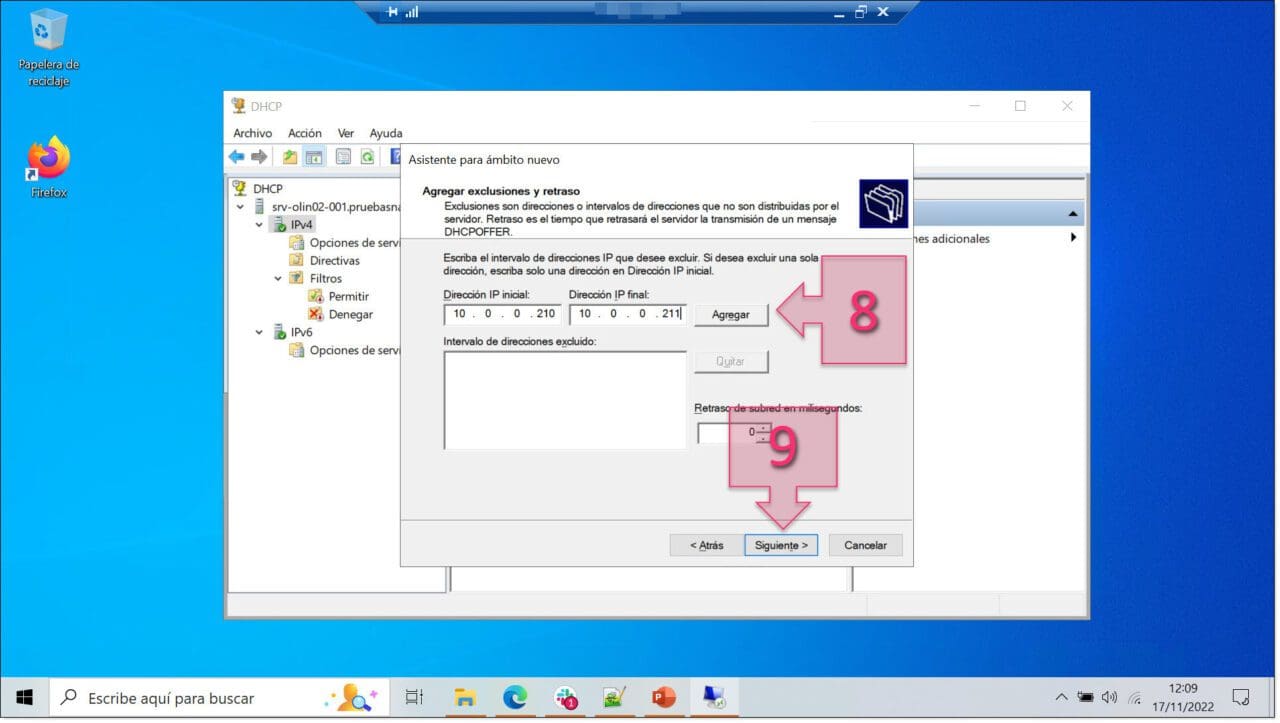
The next screen will give you the option to create exclusions. These are IP addresses within the range that cannot be assigned to DHCP clients. These tend to be network devices or servers that are located within your specified IP range. To add an exclusion, you will need to specify a start and an end IP address (8) and click on “Add”. Once you have added any necessary exclusions, click on “Next” (9).
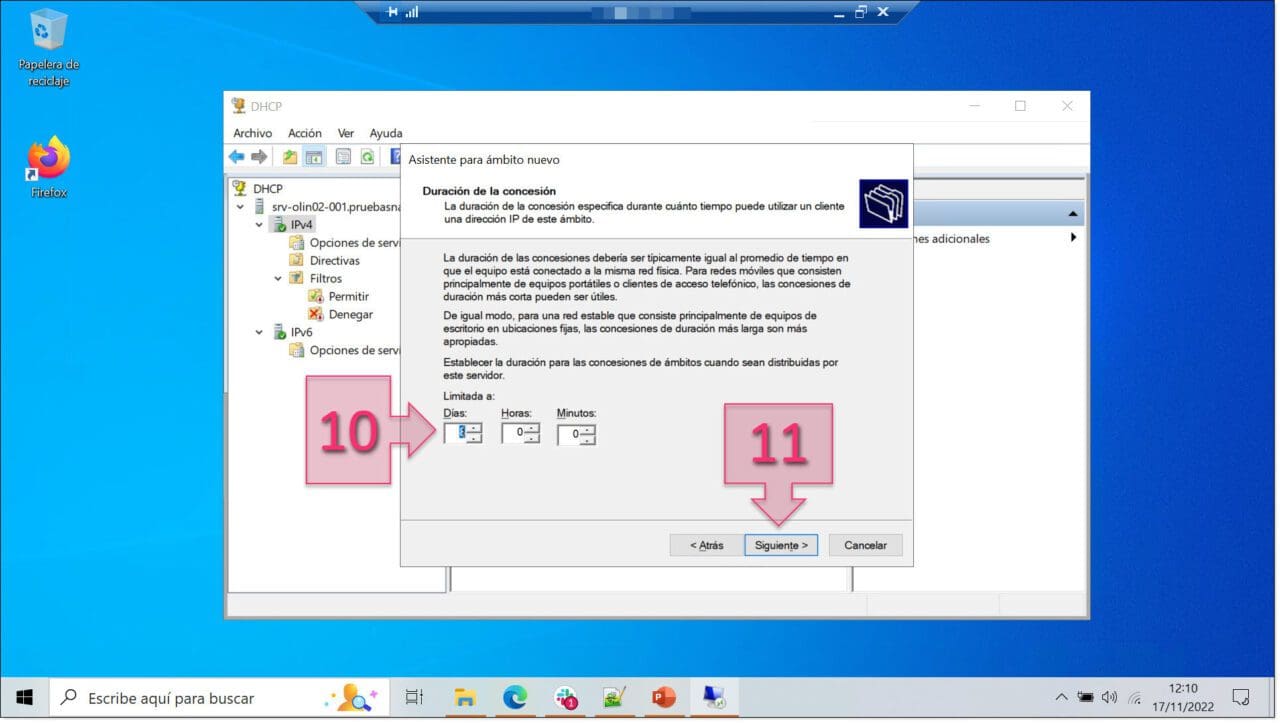
On the next screen, you need to set the lease duration (10) for the IP address assigned to a DHCP client. This can be in days, hours or minutes. The default setting for Windows servers is 8 days, but you should choose whichever duration is most appropriate for your business. Once you have done this, click on “Next” (11).
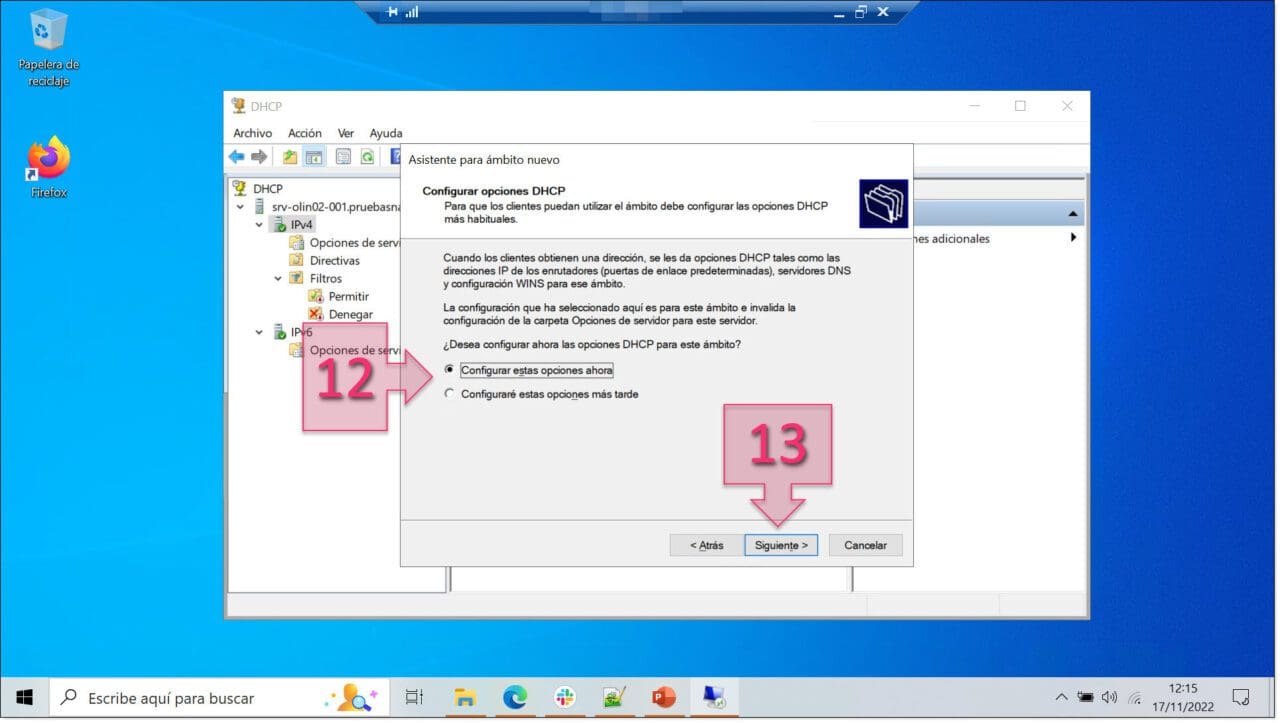
The next screen gives you the opportunity to configure your DHCP options now or save them for later. If you already know what your DHCP settings will be, now is a good time to do it. Click on “Yes, I want to configure these options now” (12) and click on “Next” (13).
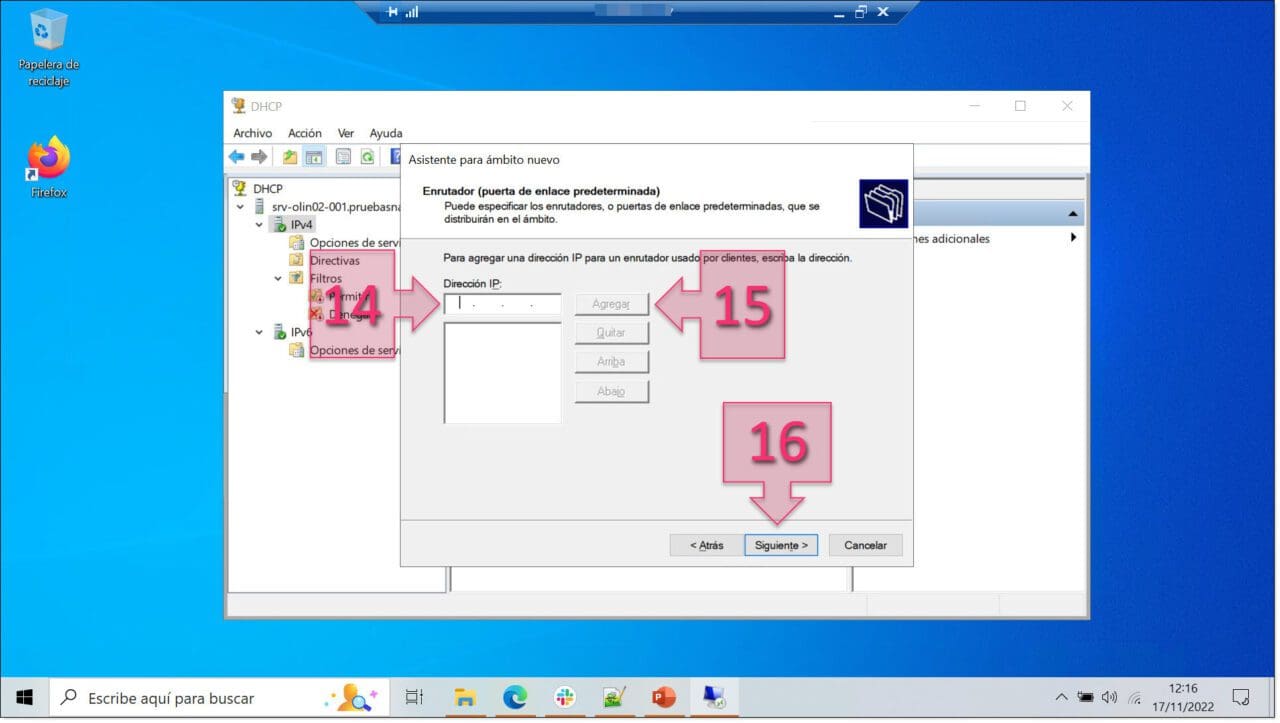
The next detail you will be asked for is the IP address for a router used by clients (14) or a default gateway. Once you have entered this address, click on “Add” (15) and then “Next” (16).
On the next screen, you need to specify your Domain Name and DNS Servers. Here, you need to enter the “Parent domain (17), add your DNS servers by either using the Server name or the IP address (18) and clicking on “Add” (19). Once you have done this, click on “Next” (20).
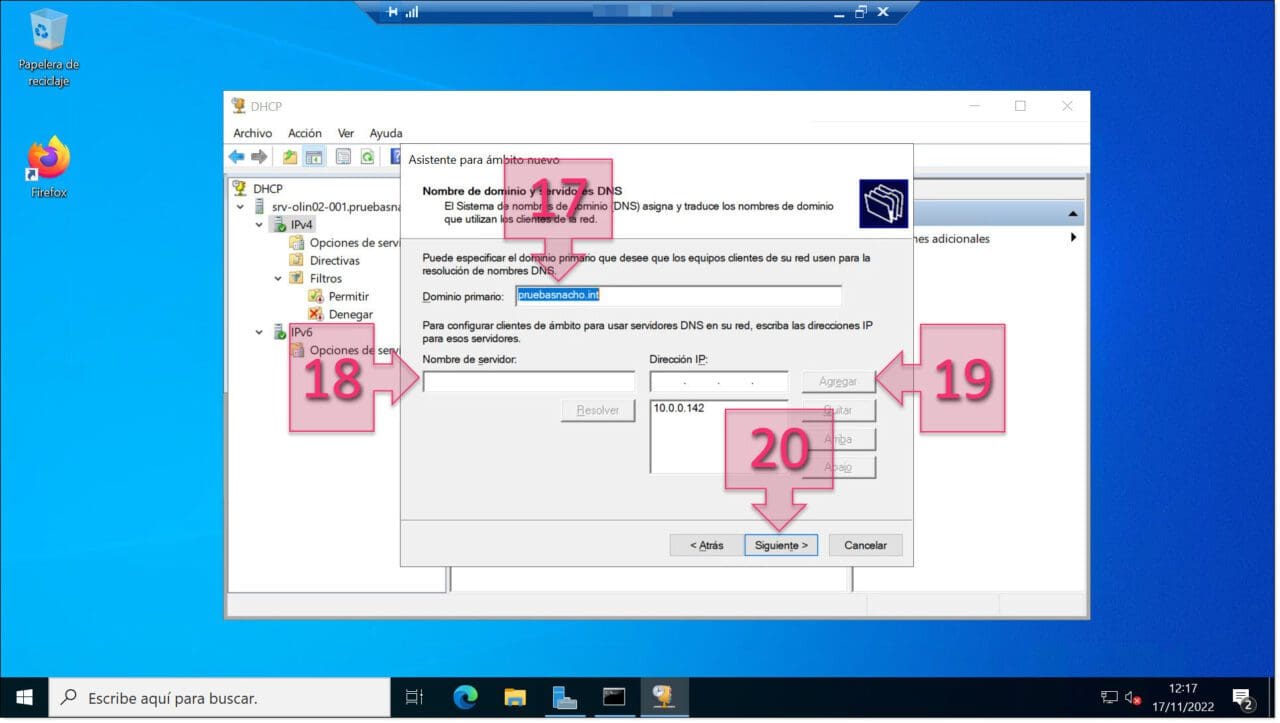
Similarly, on the next screen, you will be asked to add your WINS Servers. Once again, you can do this either by entering a Server Name or IP Address (21) and clicking on “Add” (22). Once you have done this, click on “Next” (23).
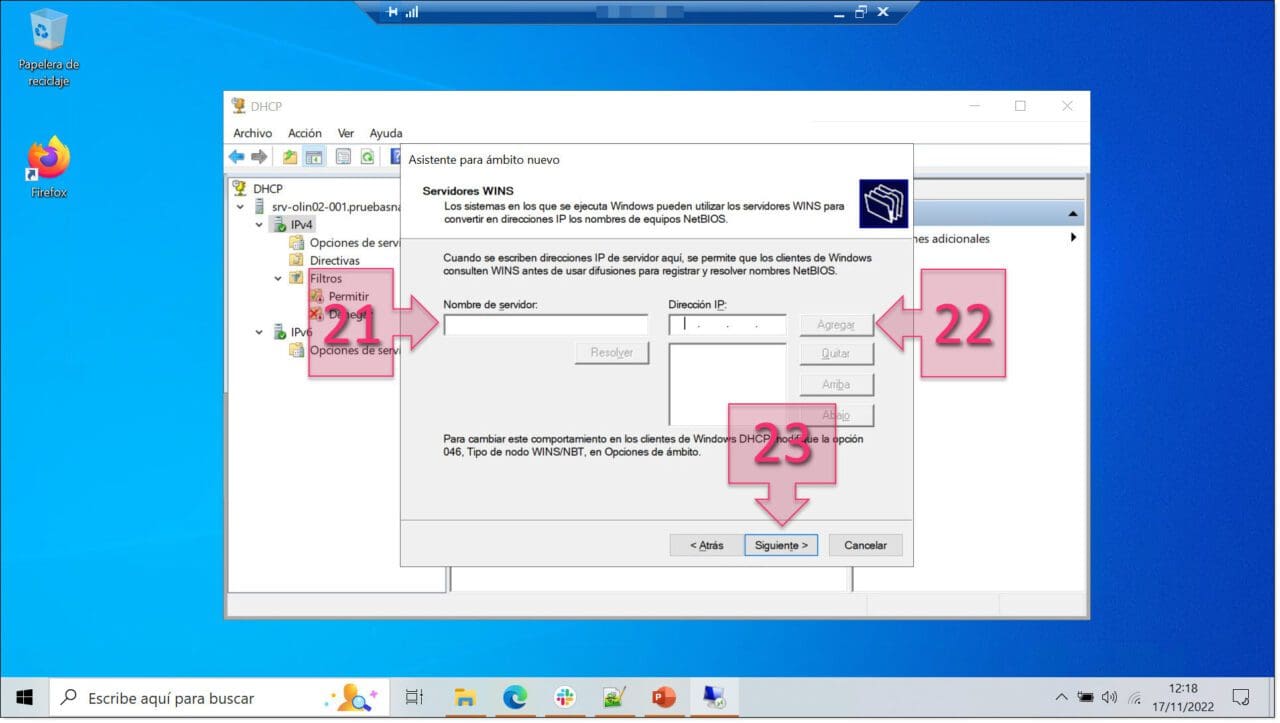
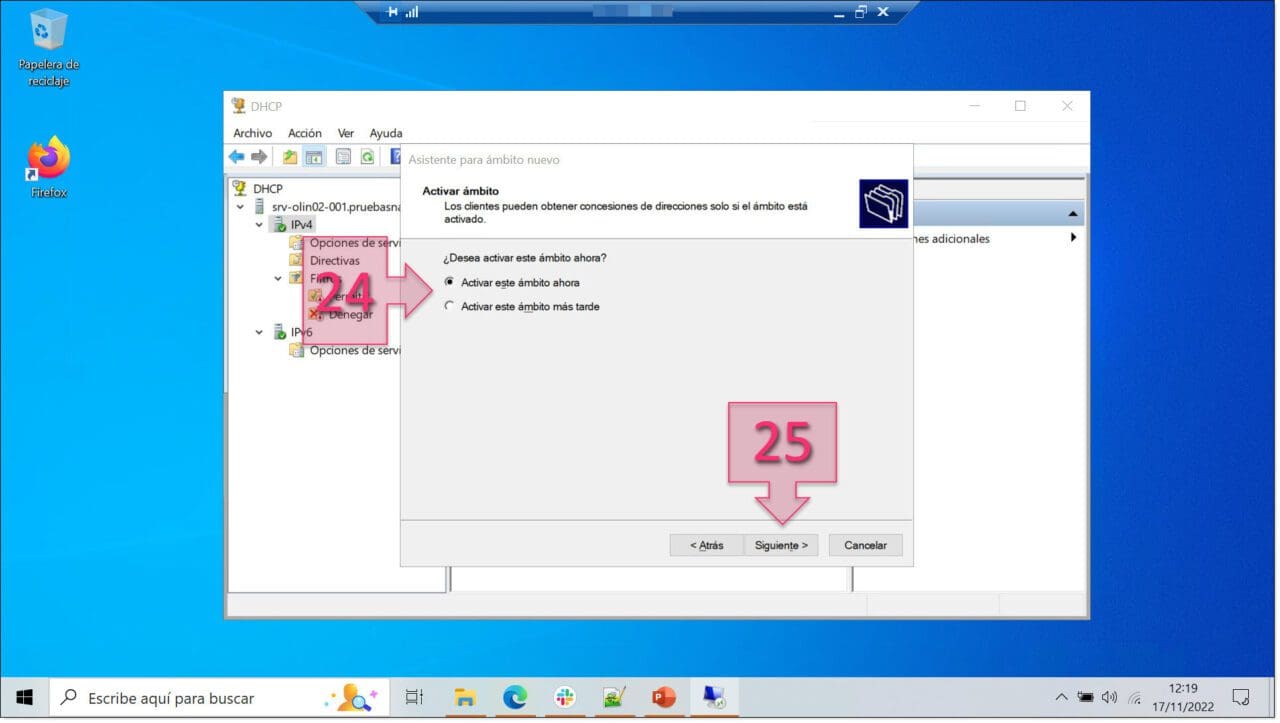
Once you have done all this, you need to choose whether to activate the scope now or later (24).
This is really up to you, but personally, I always choose to activate it later until I have finished creating all the scopes I need. Once you have made your choice, simply click on “Next” (25).
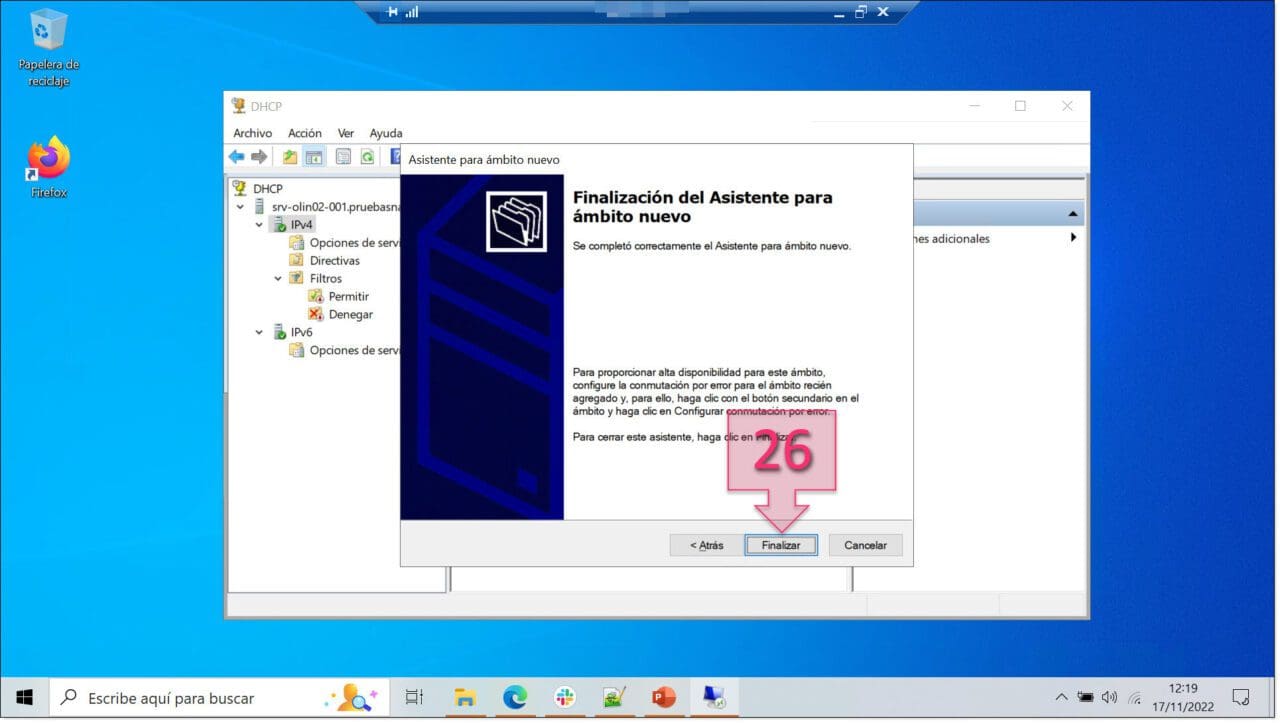
On the final screen, you’ll be reminded to configure failover for the new scope if you wish to provide high availability. Simply click on “Finish” (26).
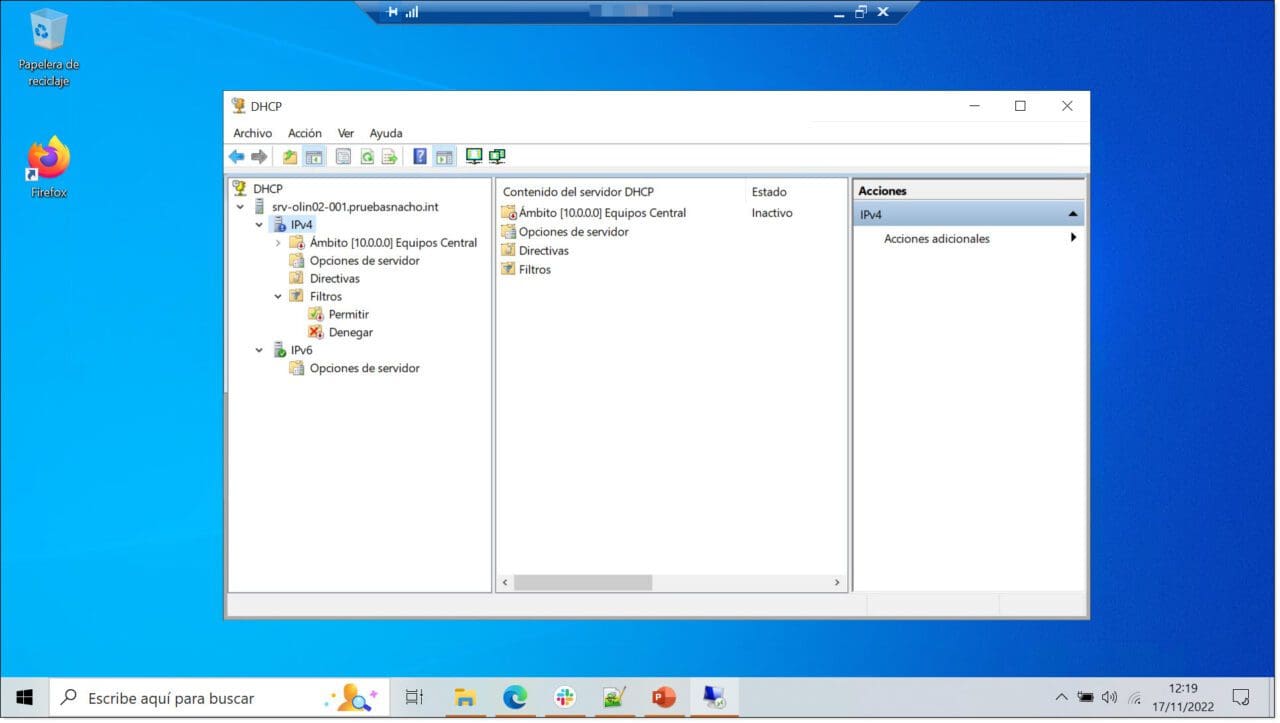
You should now be able to see your new scope available in the DHCP management tool.
Part 2 – Configuring Your DHCP Scope
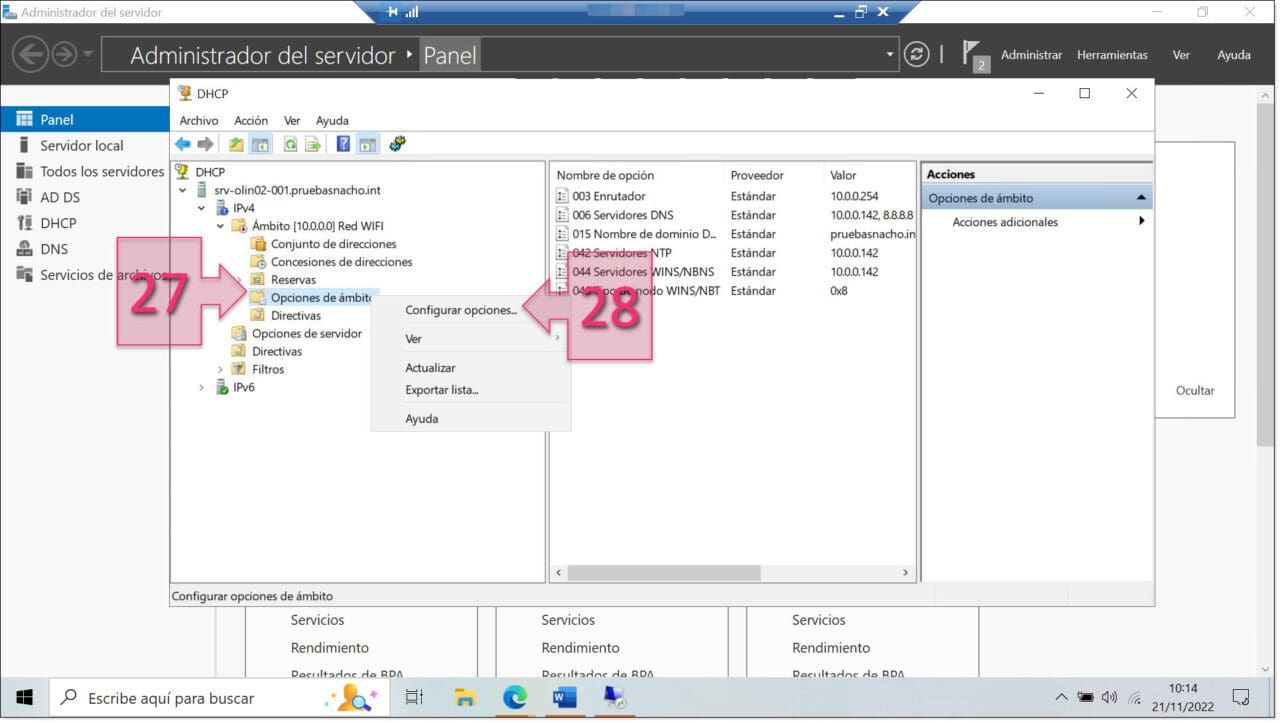
Now that you’ve created a new scope, it’s important to know how to change its parameters should you need to in the future. To do this, first select the scope that you wish to modify by expanding the tree on the left-hand side of the DHCP management tool. Once you’ve found the scope, right-click on “Scope Options” (27) and select “Configure Options…” (28).
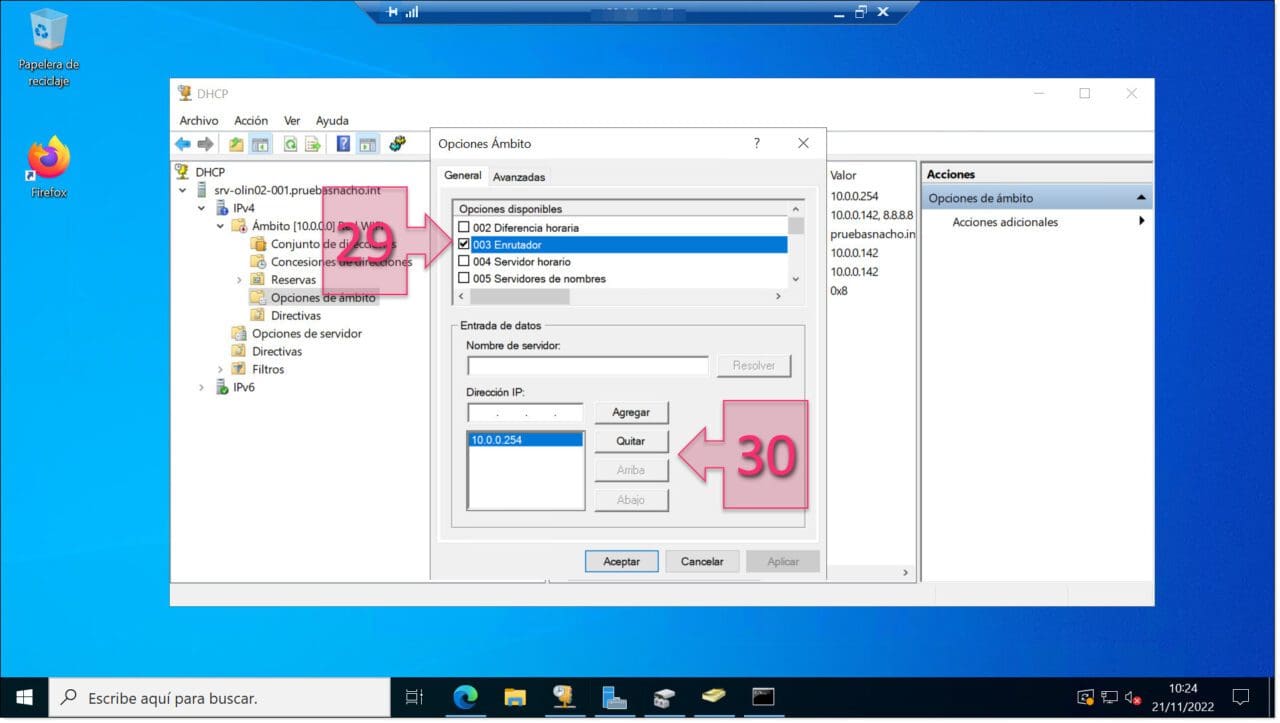
At this point, you will need to select the values (29) you wish to change and configure them accordingly (30).
Part 3 – Maintaining Your DHCP Scope
Aside from the changes we have already looked at, you can also perform the following basic tasks:
- Deactivate a scope
- Activate a scope
To disable a scope, simply go to the DHCP management tool, expand the tree on the left-hand side until you find the scope in question, right-click on it and select “Deactivate” (31).
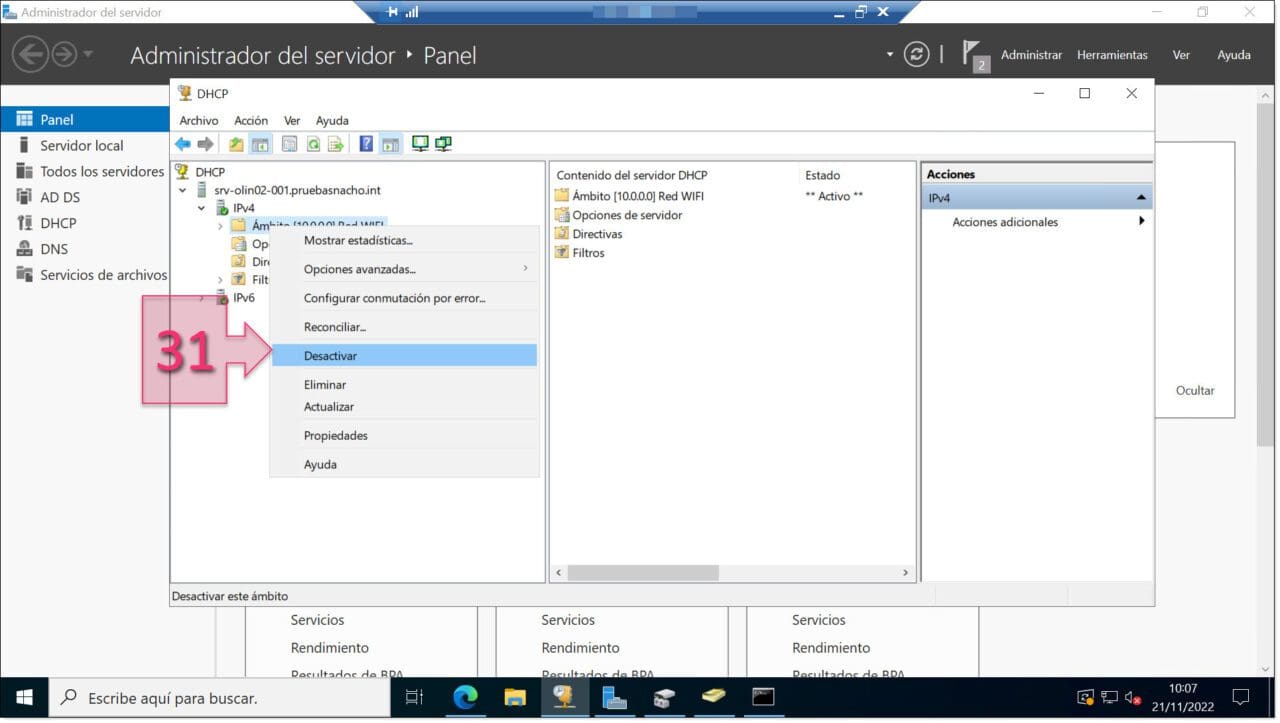
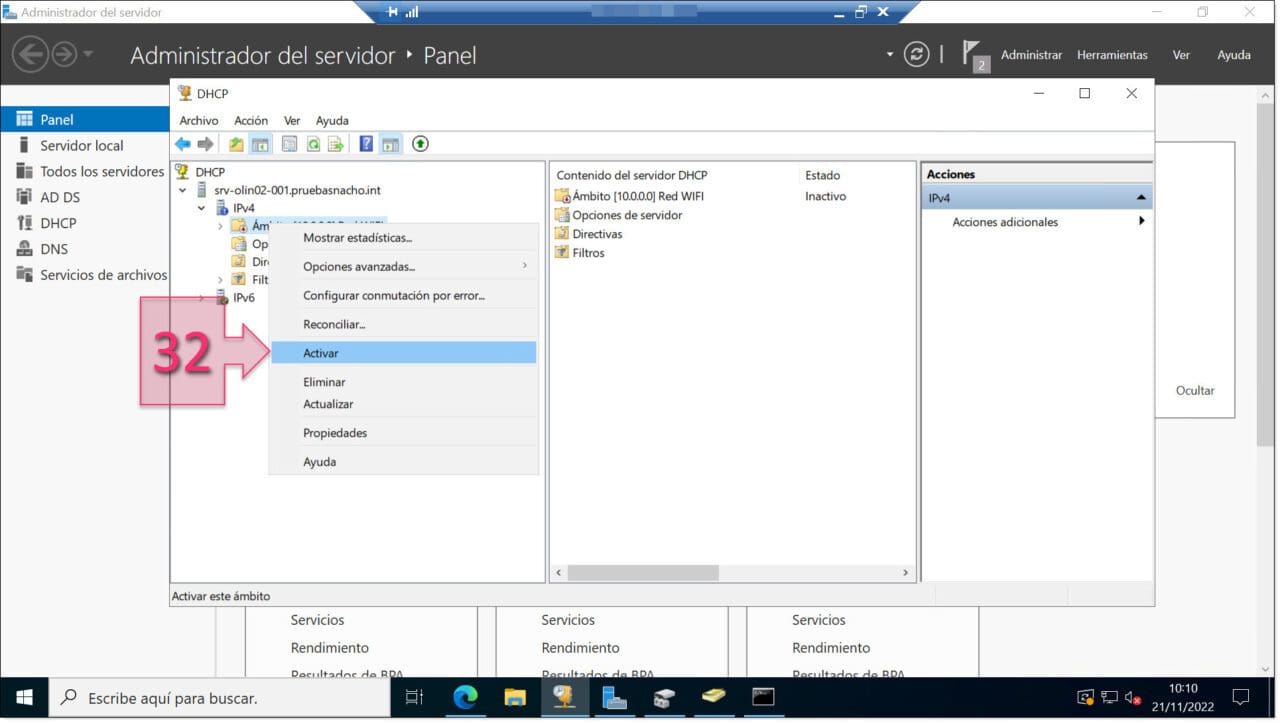
Similarly, to activate a scope, simply follow the same procedure but click on “Activate” (32).
Conclusion
In this tutorial, you have learned how to manage your DHCP scopes, including how to deploy new ones and configure them.
The steps detailed in this tutorial apply to Windows Server 2022 but are also valid for 2019 or 2016, and the procedure is remarkably similar for older versions like 2012, 2012 R2 or even 2008.
We hope that you are able to follow this quick guide without any issues, but if you do encounter problems, please don’t hesitate to get in touch with us so we can help you.
Thanks for choosing Jotelulu!


