In this article, we’ll take a look at how you can use BitLocker to protect your devices and drives from unauthorised access, even if they get lost or stolen.
You’re probably rather tired of hearing about the importance of security by now, whether it be at work or at home. People never stop telling us that no security measure is too much and that hackers and attackers are everywhere, waiting to pounce.
But today, we’re going to look at one security measure in particular and explain how you can use it to protect your data.
Let’s imagine that you’ve got a really expensive, latest-edition, top-of-the-range Surface Laptop Studio with all the extras; it costs almost €5,000, which to me seems rather ridiculous, no matter how good a device it is.
Now let’s suppose that you go to visit a customer to talk to them about a project. All the project information, the plans, designs, specifications, appendices and customer data, are on your laptop.
And actually, your laptop probably contains data about other customers too. You know, you’ve got an Excel spreadsheet or a database that contains the names and numbers of all your customers, including any quotes, orders, etc.
Now let’s imagine that you stop at a petrol station to fill up your tank. You go inside to pay, and during that brief lapse of concentration, someone steals your laptop right out of the car because you’ve made a very, very common mistake: you left it on the passenger seat.
This situation is actually not all that unusual. It happens a lot more than you’d think. But here, the problem is not just the fact that they’ve stolen your laptop; they’ve stolen your laptop, and now, they can get to your sensitive data.
In a situation like this, you could find yourself the victim of data filtering, or if your customer data is released, you could be slapped with a fine for breaching the GDPR and lose your customers’ trust entirely. It could even be a “targeted theft” by the competition.
So, what small security measure could we have taken to ensure that this situation remains an inconvenient theft and not a huge security breach?
Well, it’s as simple as activating BitLocker, a data protection solution offered by Microsoft for both business and home users.
But… What Is BitLocker?
BitLocker is a data protection feature included in Microsoft operating systems that allows you to encrypt your hard drive and thus prevent data theft.
Essentially, BitLocker prevents unauthorised users from accessing your data, even if the hard drive is removed and put in another device.
BitLocker first appeared as part of a Windows Vista update on 30 June 2007, and it can work on various different types of devices. However, it works best on devices that have TPM (Trusted Platform Module) 1.2 or later.
NOTE: The “TPM”, Trusted Platform Module, is a small chip embedded on the motherboard of modern devices and that allows you to store encryption keys for the operating system and thereby protect your most sensitive data.
However, if your device doesn’t have TPM 1.2 or later, you can still use BitLocker; you will just have to use USB sticks to store your recovery keys should you ever need them.
One of the main advantages of using BitLocker, aside from protecting your hard drive even if it is removed from your computer, is that it allows you to stop the system from booting up. With BitLocker enabled it will wait for the access key to unlock the disk before starting up the system.
What do you need to run BitLocker?
First, as we’ve mentioned, for optimal performance, your device will need to have TPM 1.2 or later. If you don’t, you’ll need some USB sticks.
If you do have TPM, you’ll also need to make sure that your UEFI or BIOS is TCG-compatible (Trusted Computing Group), as the UEFI or BIOS will establish a chain of trust for the pre-operating system startup. In either case, you’ll also need to be able to read and write to USB in the pre-operating system environment.
The hard drive that you’re working on should have at least two partitions: an initial NTFS-formatted one that contains the operating system and another of approximately 250-500MB that contains the boot data. These partitions are created automatically when Windows is installed.
The operating systems that support BitLocker are as follows:
- Professional, Ultimate and Enterprise versions of Windows 7, Windows Vista, Windows 10 and Windows 11.
- Windows Server 2008 and later.
How can I enable BitLocker on my device?
As tends to be the case with Windows systems, the answer is, “It depends”.
Firstly, for devices that belong to an AD DS domain, you can enable it using group policies, something that we’ll address in a future tutorial.
Then, the process will be different for modern devices and older versions of Windows, such as Windows 7.
For example, with Windows 7, we’ll need to prepare the TPM, which can be quite complicated. You’ll need to first access the BIOS or UEFI to activate the TPM , and you may need to install an additional controller for the operating system. You may also need to restart the computer several times for the changes to take effect.
Once you’ve done all this, the process is just as simple as the process for modern versions of Windows.
When working with Windows 10 or 11, or even 8 or 8.1, everything will already be prepared for you. All you need to do is select the drive that you want to protect.
Enabling BitLocker on a USB drive on Windows 10
In this example, we’re going to look at how to enable BitLocker on a USB drive on Windows 10.
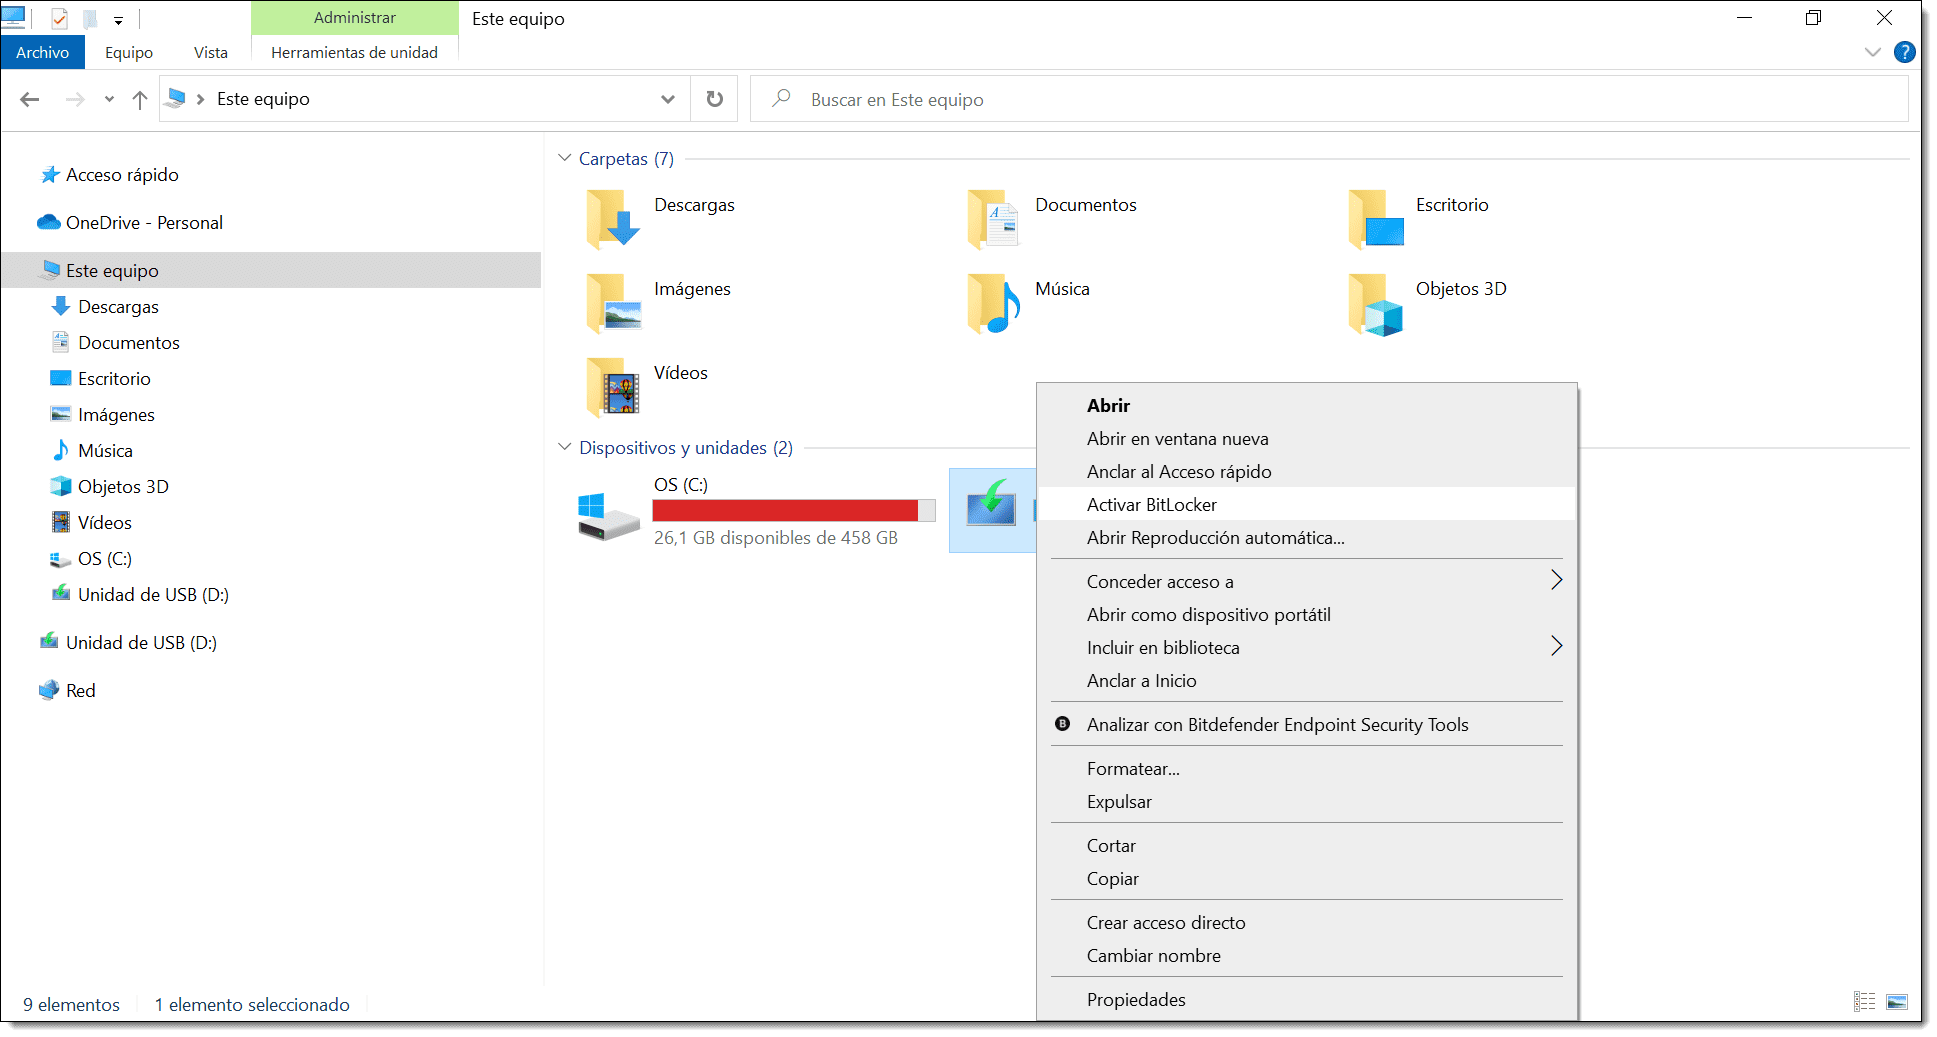
First, open Windows Explorer, right-click on the drive you’re interested in and select “Turn on BitLocker”.
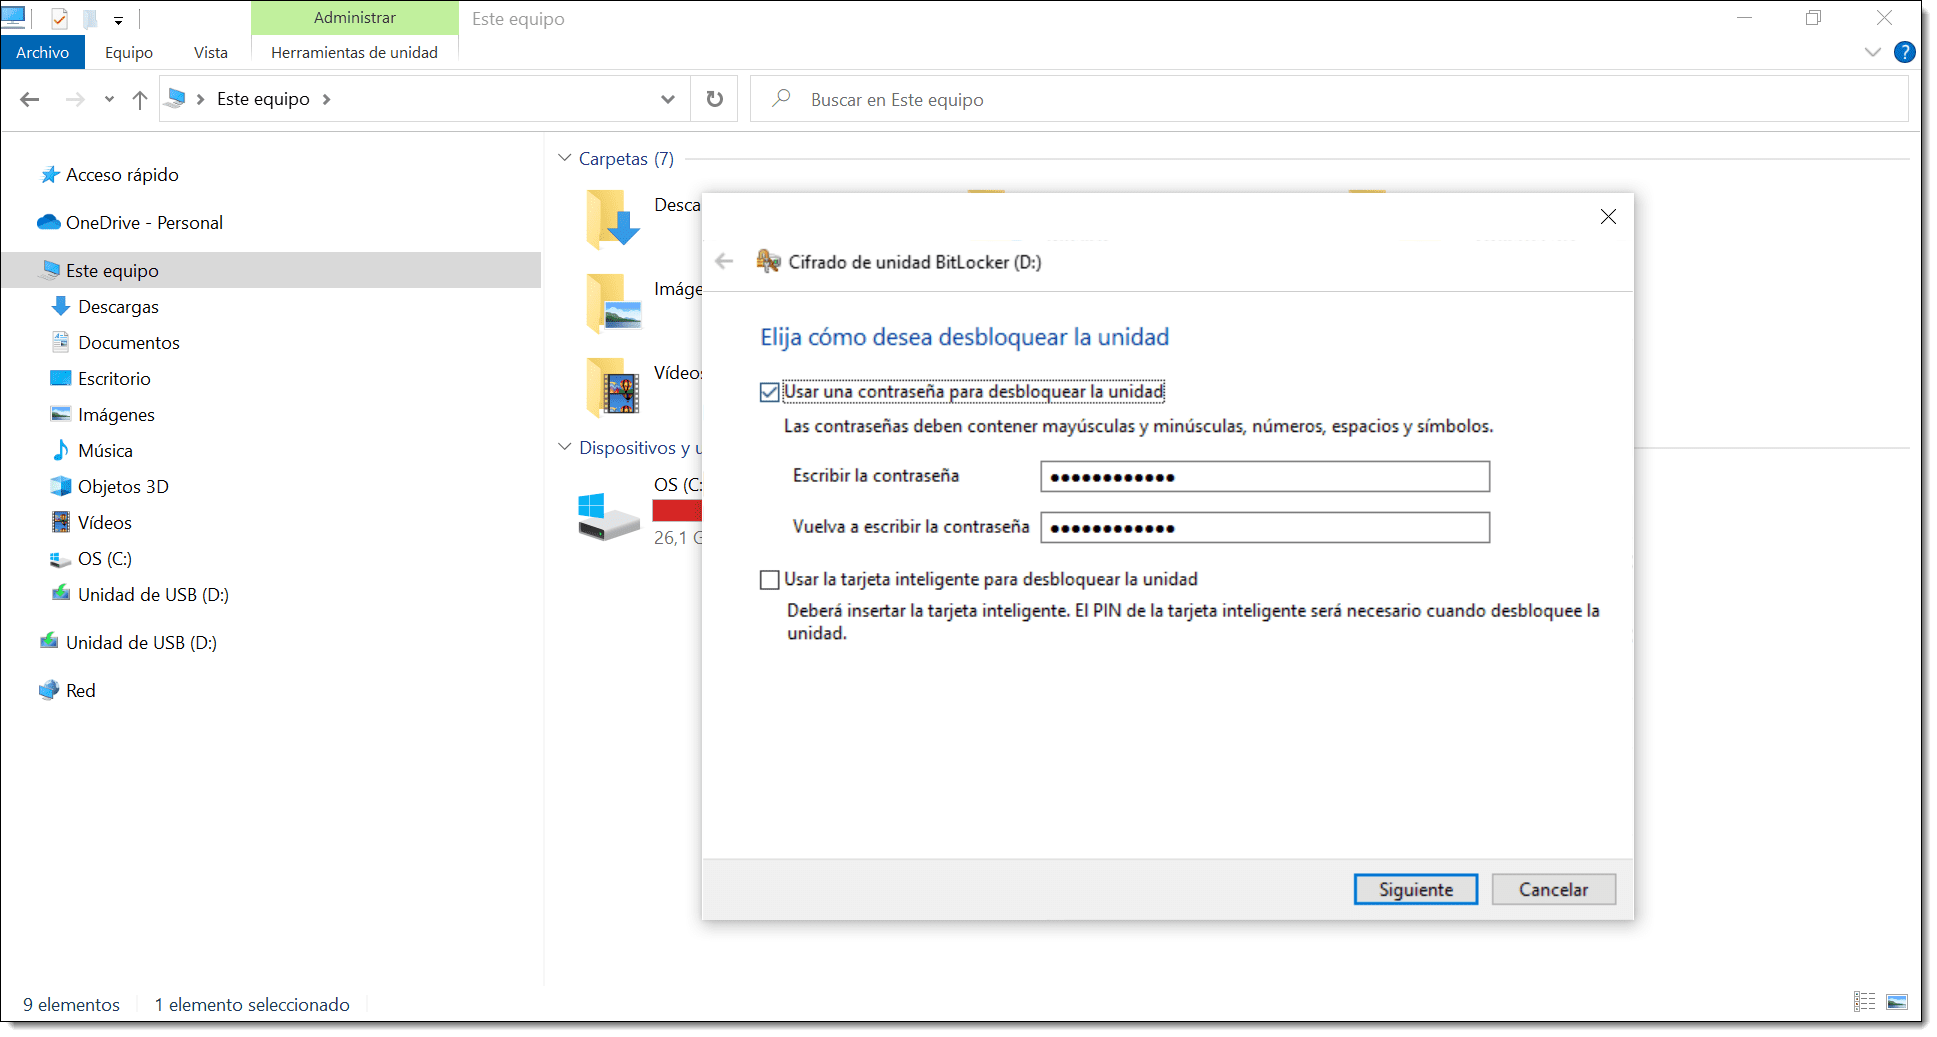
Next, you’ll see a window asking how you want to unlock the drive once encrypted.
Here, you have two options:
- Use a password to unlock the drive: If you select this option, you will need to enter the password twice.
- Use my smart card to unlock the drive: In this case, you’ll need to have a smart card, a compatible reader and a PIN.
For this example, we’ll choose the password option.
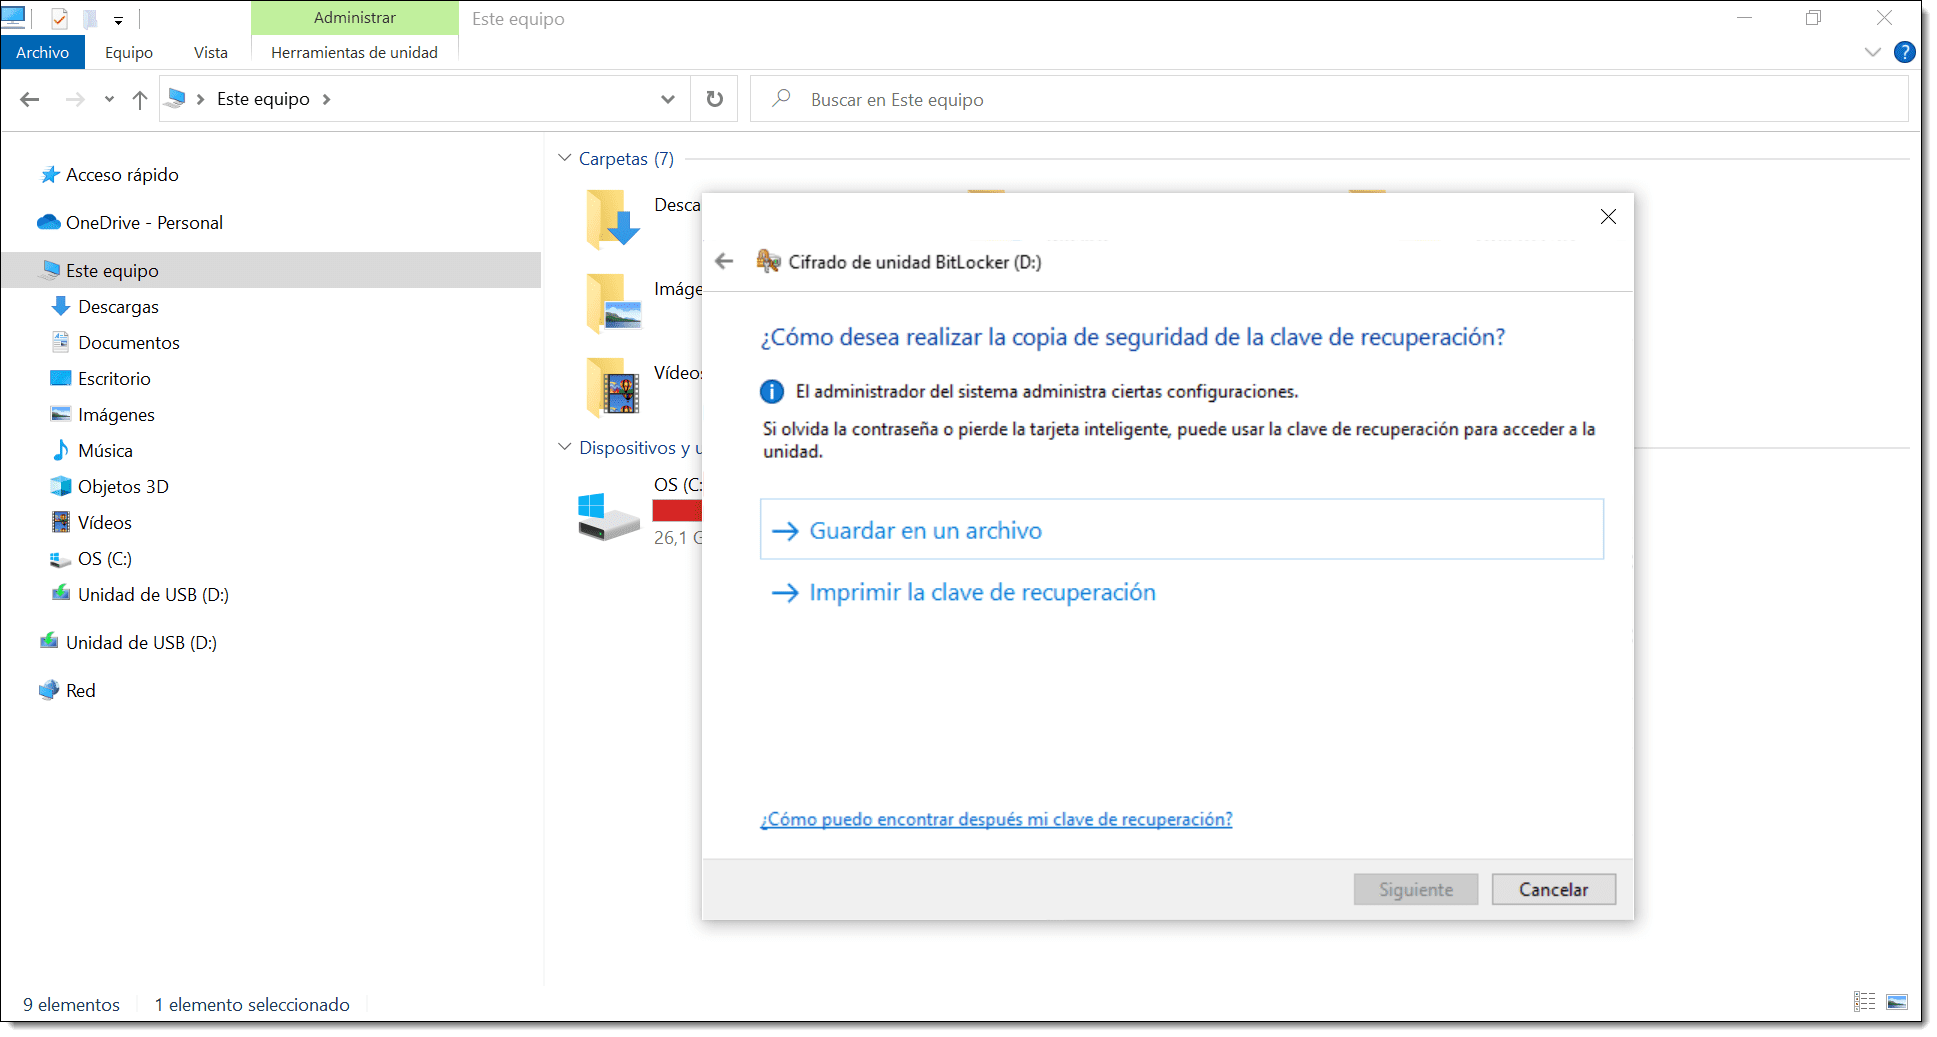
Next, you need to choose how you want to back up your recovery key for the BitLocker drive.
This is the key you will use if you forget your access password.
You have two options:
- Save to a file: This can NOT be saved on another encrypted drive.
- Print the recovery key: Can be printed to PDF.
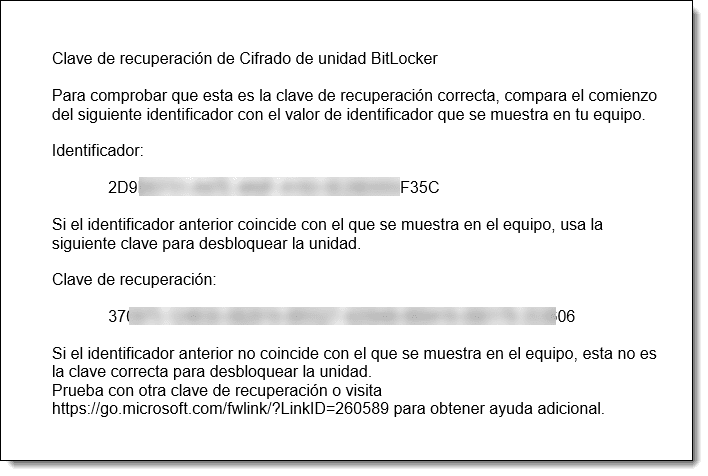
Below, you’ll see an example of a recovery key printout, where you can see both the identifier and the recovery key to use if you forget your password.
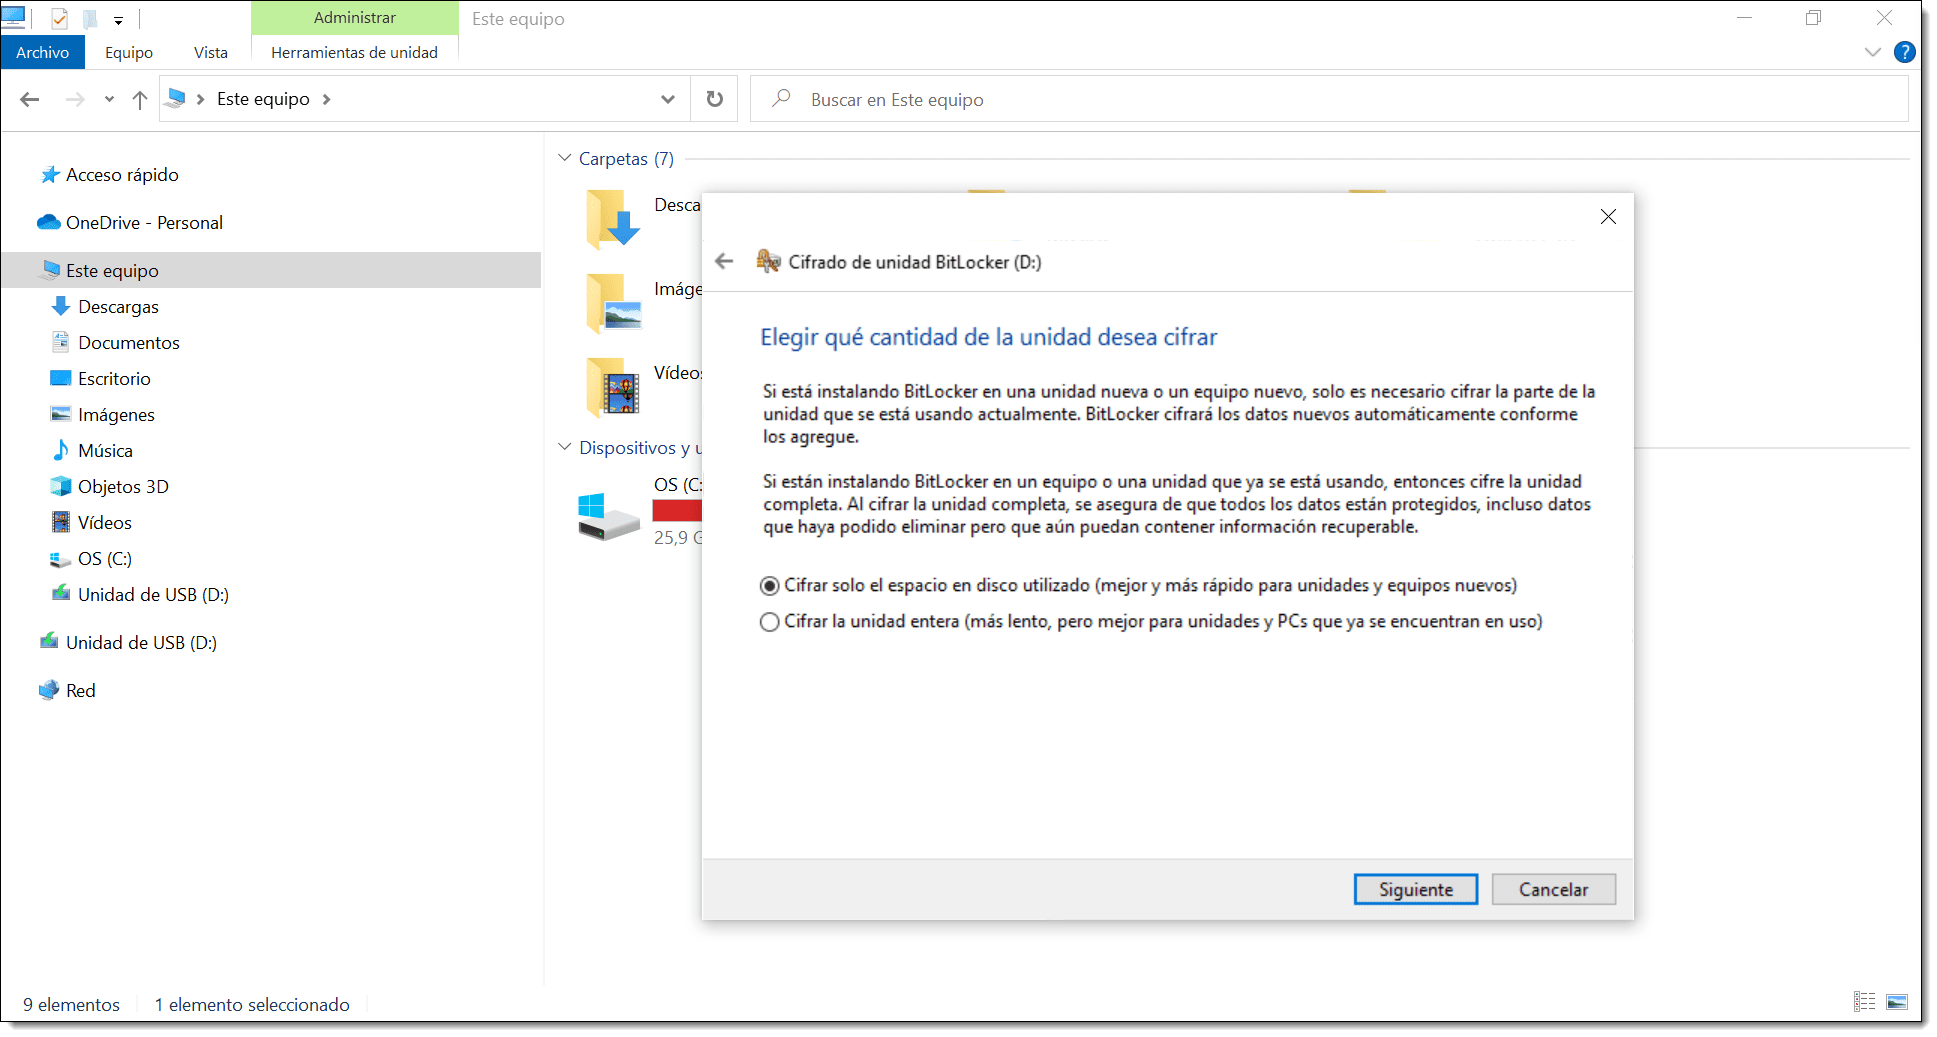
Next, choose how much of your drive to encrypt.
You have two options:
- Encrypt used disk space only (faster and best for new PCs and drives).
- Encrypt entire drive (Slower but best for PCs and drives already in use).
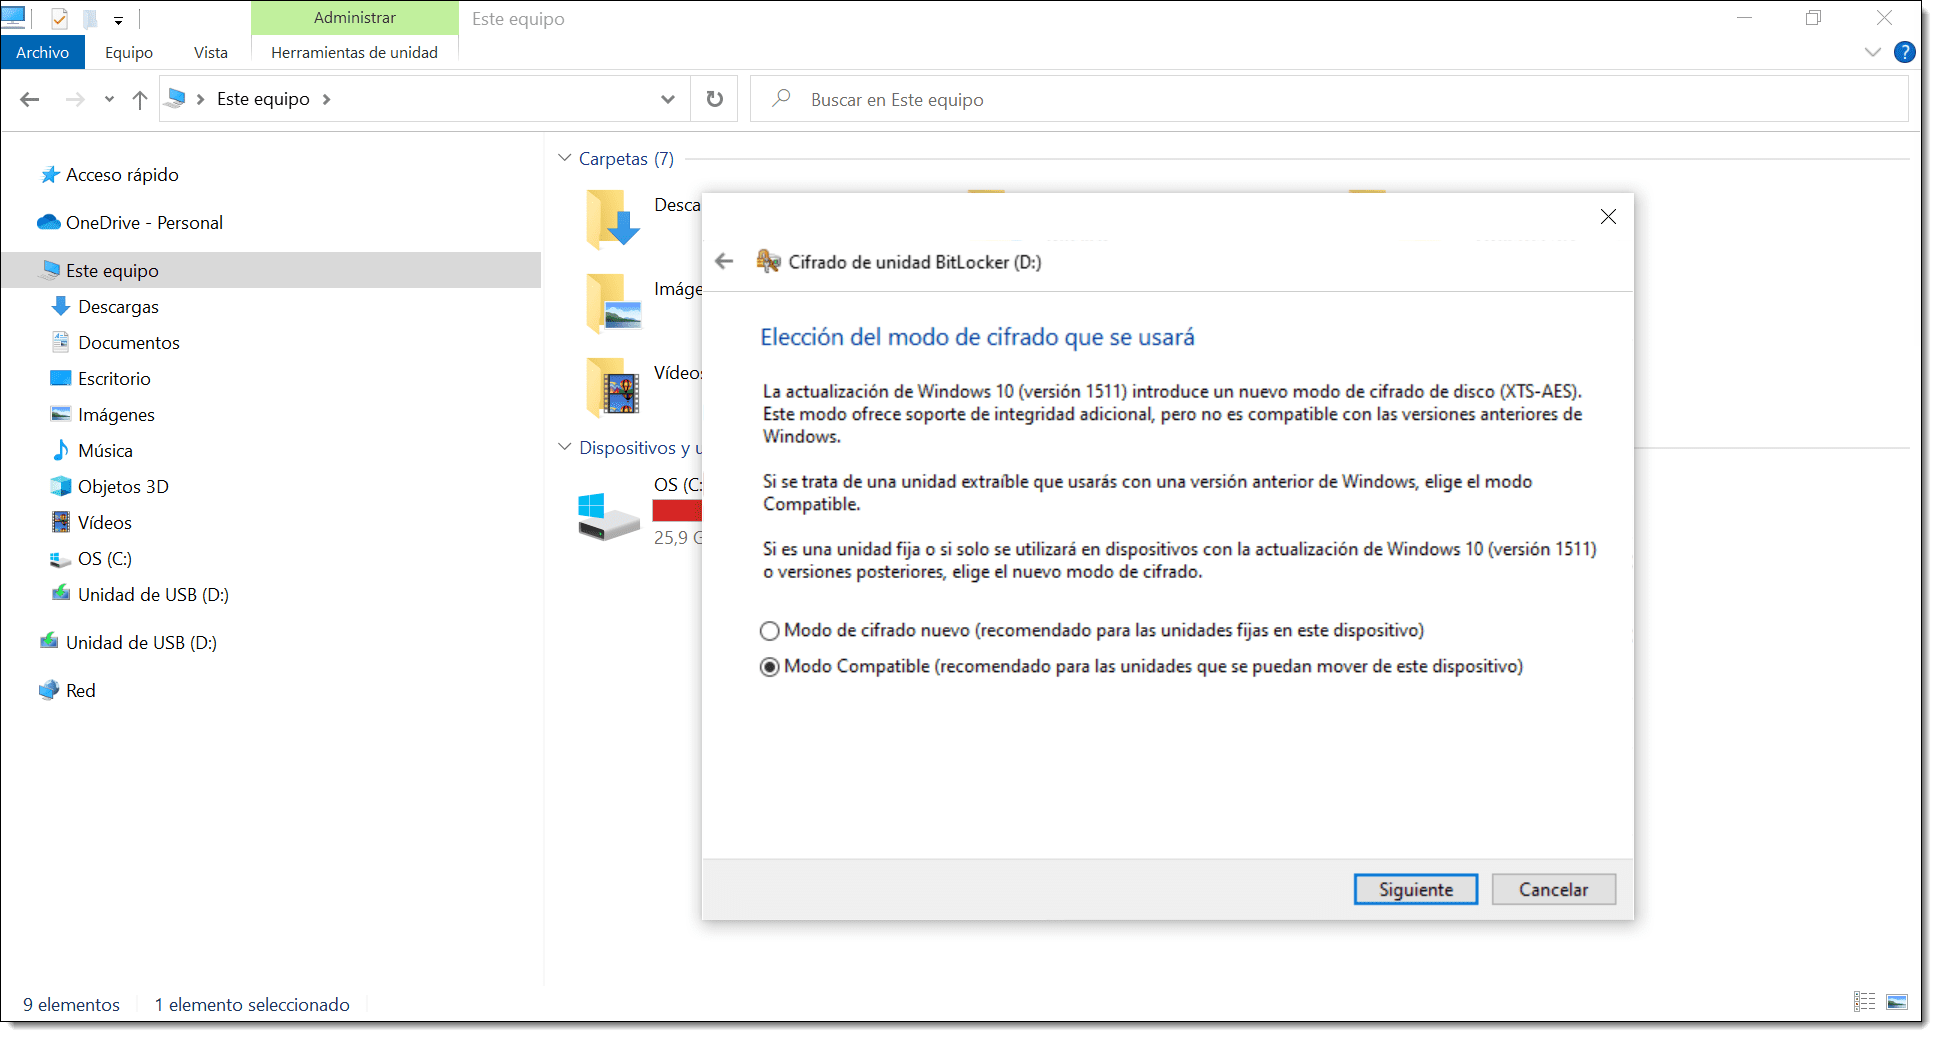
Next, you need to choose which encryption mode to use.
- New encryption mode (best for fixed drives in this device).
- Compatible mode (best for drives that can be moved from this device).
Here, we’ll choose the second option when using portable drives, particularly if we might need to mount it on an older operating system.
Finally, you just have to click on “Start encrypting” and get yourself a coffee while the process finishes. This will take quite a while, particularly for large drives.
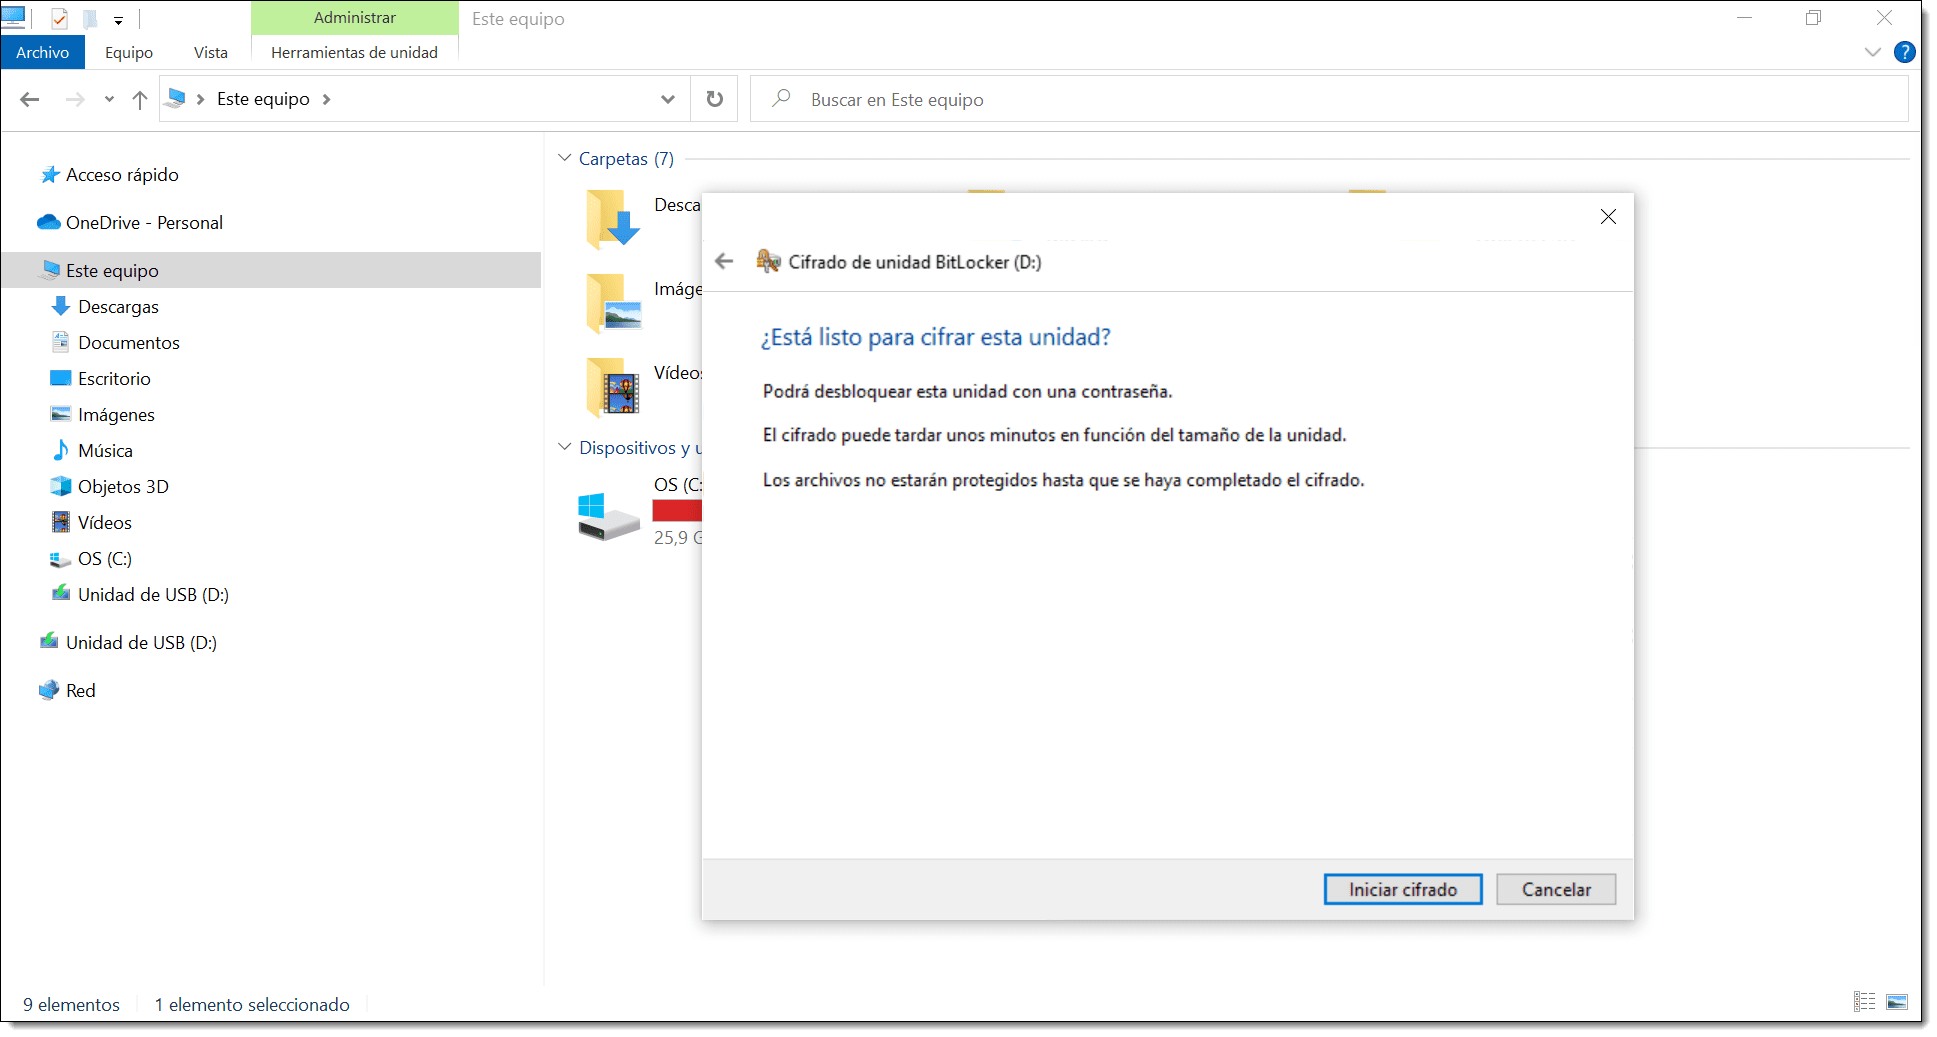
Once encryption has started, a padlock symbol will appear next to the drive, and you will see a window with a progress bar.
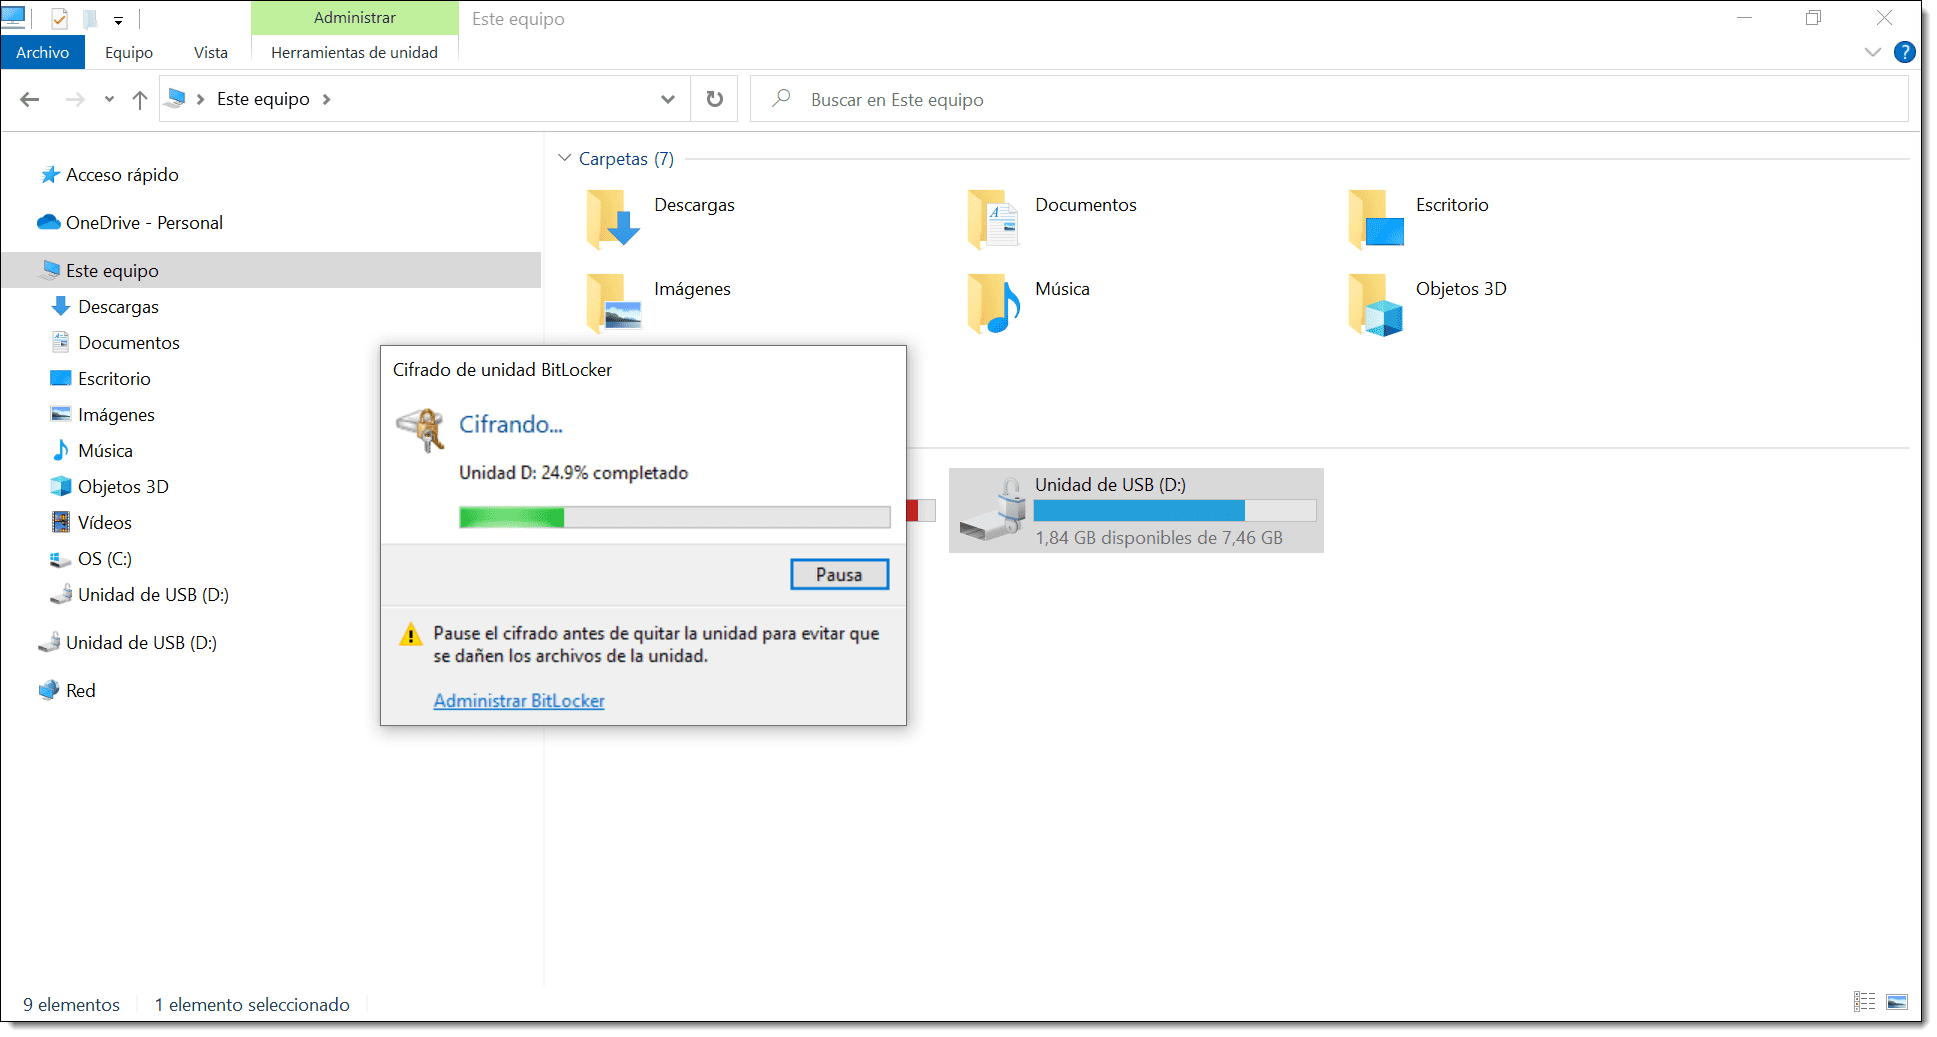
Now you simply have to wait for the encryption to finish.
Summary
As you can see, BitLocker is a simple system to implement on modern computers and allows you to protect your data. It’s especially useful for devices like tablets, laptops and computers using external hard drives or USB sticks.
In this article, we’ve talked a little about the advantages and shown you how you can activate it on Windows 10. If you’d like to learn more, check out our tutorial, How to Configure BitLocker on Windows.
We hope that this article has been useful for you!
Thanks for reading!
