In this short article, we’ll explain how you can set NTFS permissions to keep your user data protected from prying eyes.
Before we get started, you might want to read another article on our blog where we explain what NTFS is and talk about its main features. In this article, we’re just going to look at setting NTFS permissions. So, if you’re a beginner, check out the other article first and come back to this one afterwards.
NTFS Permissions
Basic permissions
NTFS permissions essentially determine the level of access that users have to a file or a folder. There are some basic permissions that you can allow or deny, and these are assigned to individual files or folders:
- Modify.
- Read & execute.
- List folder contents.
- Read.
- Write.
- Full control.
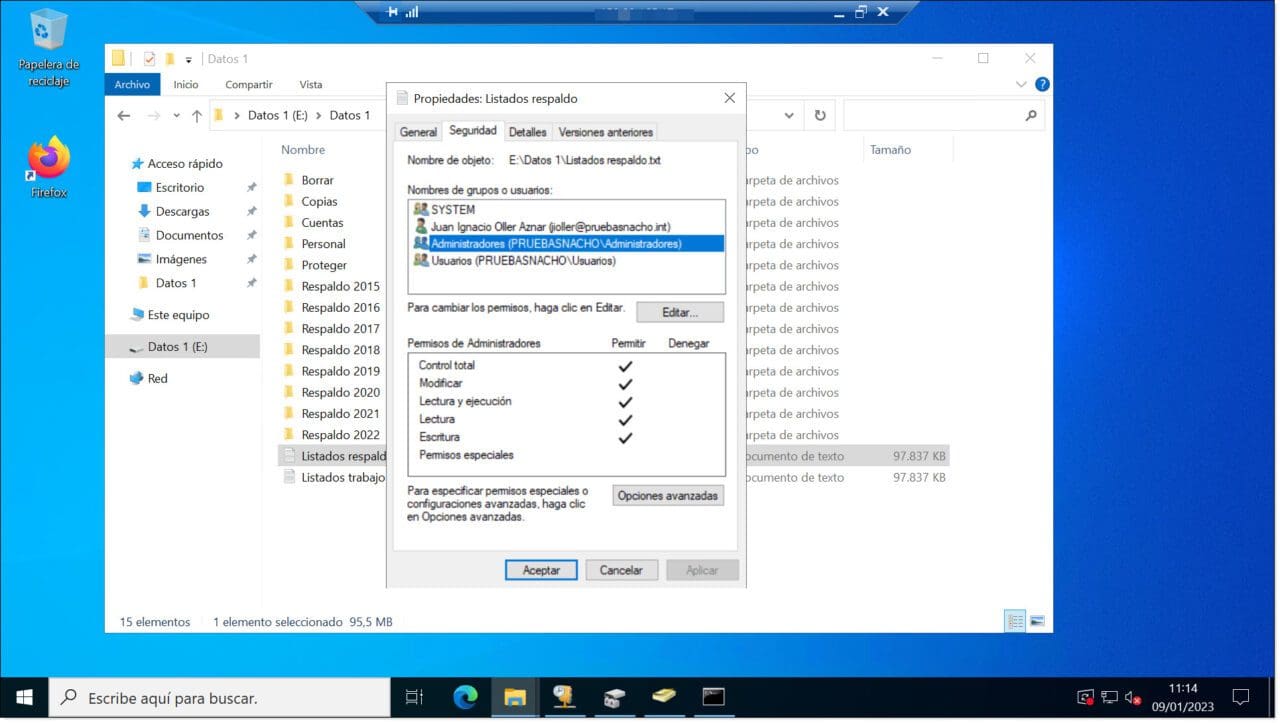
However, in practice, these permissions behave in different ways depending on what they are applied to. This means that, in reality, there is much longer list of specific permissions, which are:
- Traverse folder: Allows the user to browse folders even though they don’t have permission to change the contents.
- Execute file: Allows the user to run a program.
- List folder: Allows the user to see a list of files and folders contained within specific folder.
- Read data: Allows the user to open files and see their contents.
- Read attributes: Allows the user to see the attributes that the operating system uses to identify and catalogue a file.
- Read extended attributes: Same as above, but shows extended attributes linked to applications.
- Create files: Allows the user to create files within a folder.
- Write data: Allows the user to make changes to an existing file or even overwrite the contents.
- Create folders: Allows the user to create folders within other folders.
- Append data: Allows the user to add data to the end of a file but does not allow them to modify or delete previous content.
- Write attributes: Allows the user to change the attributes that the operating system uses to catalogue a file or folder.
- Write extended attributes: Allows the user to modify extended attributes previously established for an application.
- Delete subfolders and files: Allows the user to delete subfolders and files, even when the delete permission has not been explicitly allowed.
- Delete: Allows the user to delete files and folders.
- Read permissions: Allows the user to see the permissions for files and folders.
- Change permissions: Allows the user to modify previously allowed permissions for files and folders.
- Take ownership: Allows the user to set themselves as the owner of the file or folder so that they can modify permissions.
- Synchronize: Allows the user to specify a file handle in one of the wait functions for multi-process programs and synchronize with other processes that are in a signalled state.
Below is a table summarising what is allowed and denied for each basic permission.
| Modify | Read & Execute | List Folder Contents | Read | Write | Full Control | |
| Traverse folders / Execute file | Yes | Yes | Yes | Yes | ||
| List folder / Read data | Yes | Yes | Yes | Yes | Yes | |
| Read attributes | Yes | Yes | Yes | Yes | Yes | |
| Read extended attributes | Yes | Yes | Yes | Yes | Yes | |
| Create files / Write data | Yes | Yes | Yes | |||
| Create folder / Append data | Yes | Yes | Yes | |||
| Write attributes | Yes | Yes | Yes | |||
| Write extended attributes | Yes | Yes | Yes | |||
| Delete subfolders and files | Yes | |||||
| Delete | Yes | Yes | ||||
| Read permissions | Yes | Yes | Yes | Yes | Yes | Yes |
| Change permissions | Yes | |||||
| Take ownership | Yes | |||||
| Synchronize | Yes | Yes | Yes | Yes | Yes | Yes |
Table – Detailed NTFS permissions
Inheritance
When talking about permissions for files and folders, it’s important to consider the concept of inheritance. Inheritance is basically the way that permissions assigned to a folder are then assigned to any files and folders that it contains.
So, by default, any permissions assigned to a parent folder will be assigned to all the files and folders that it contains.
NOTE: Inherited permissions can sometimes get a little confusing, but they’re much easier to manage than permissions that are set individually.
Explicit permissions, unlike inherited permissions, are set individual for a specific resource. In other words, they are deliberately set for a single file or folder.
Essentially, once you have set the permissions for a parent folder, all the files or folders that it contains will automatically be assigned the same permissions. However, if you want some of these files or folders (also referred to as “child objects), to have different permissions, you will have to set them individually.
Managing inheritance for NTFS permissions
Sometimes, it might be that you don’t want permissions to be automatically inherited by child objects. You might want the contents of a folder to have different permissions entirely.
In cases like this, you essentially have three options:
- Re-assign permissions explicitly for each child object.
- Remove the inheritance for a child object.
- Remove the inheritance at the parent folder level, which will mean that none of the folder’s contents will inherit any permissions from the parent folder.
Removing inheritance from the parent folder
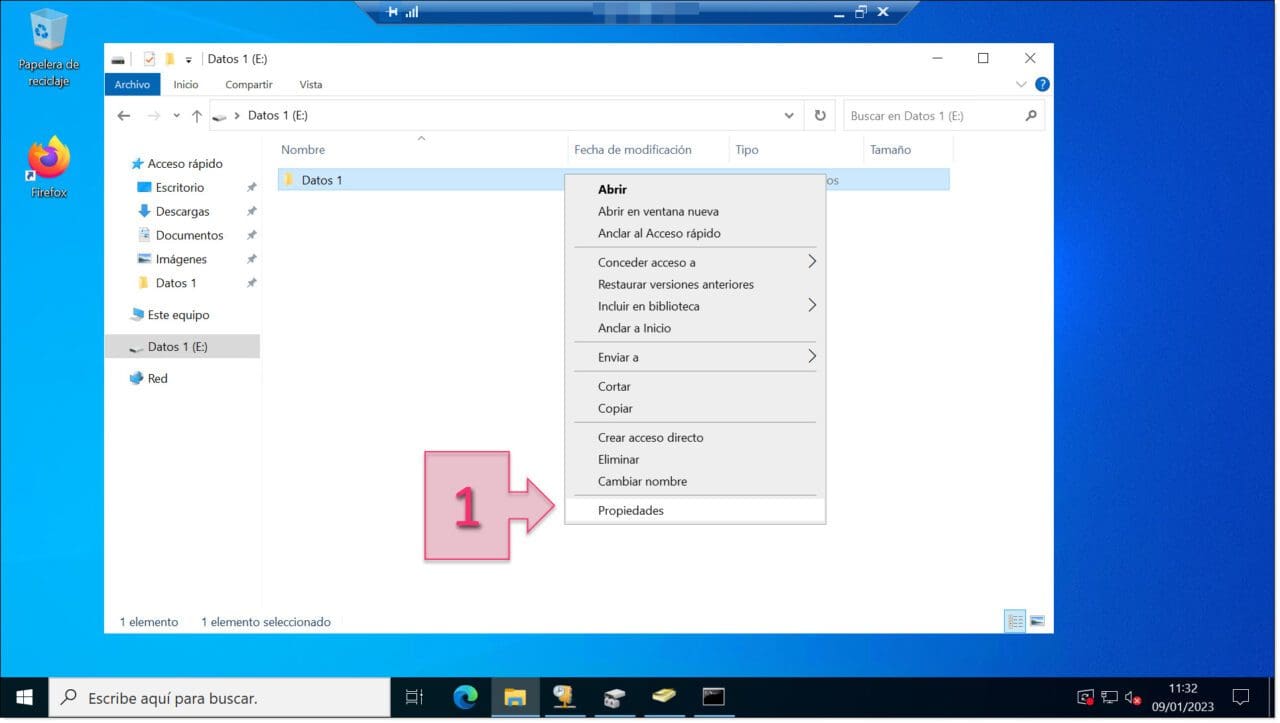
To stop all child objects from inheriting a parent folder’s permissions, first, right-click on the folder in question and select Properties (1).
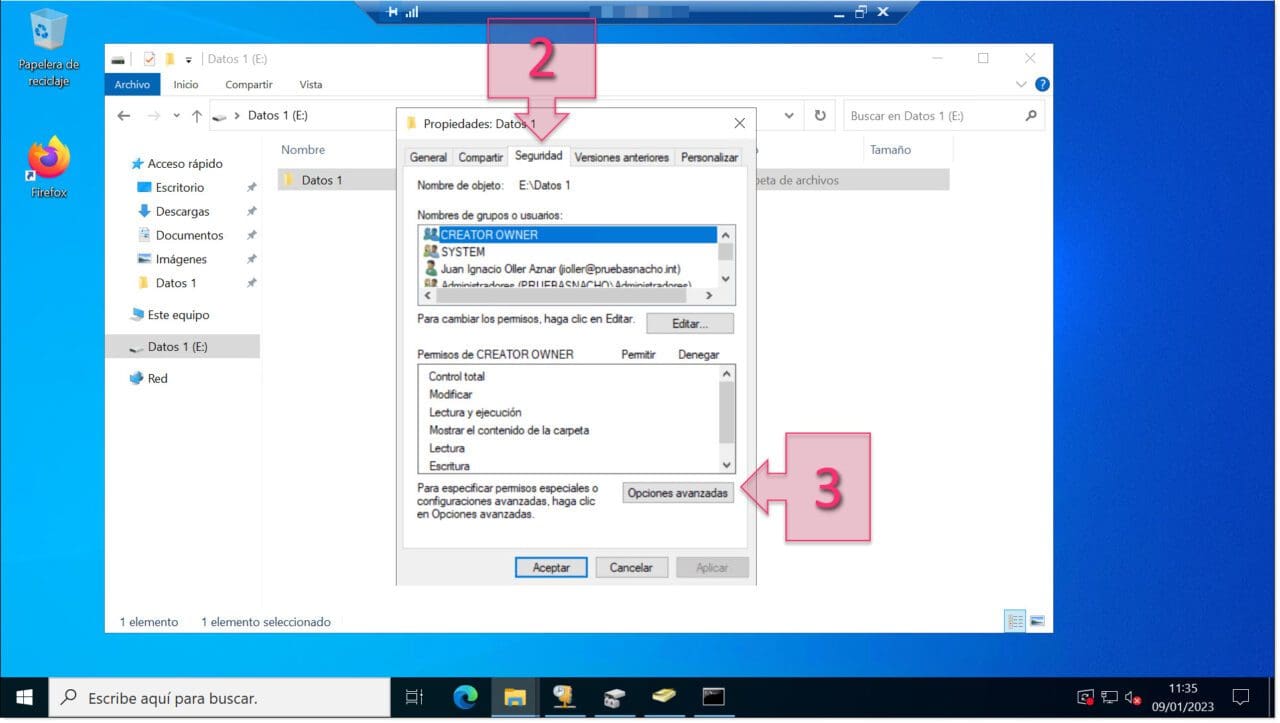
Next, click on the Security tab (2), select the group for which to remove the inheritance and click on Advanced (3).
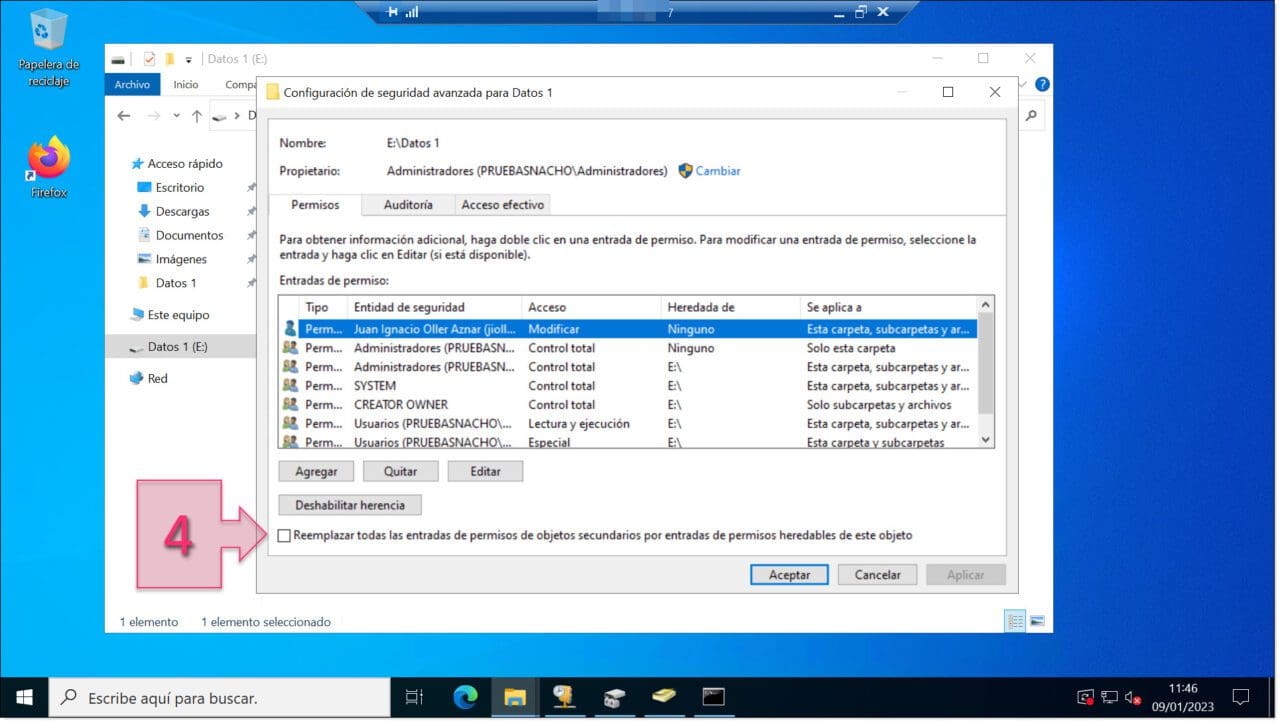
Before you make any changes, make sure that you have ticked the checkbox next to “
Before making the relevant changes, you need to mark the “Replace all child object permission entries with inheritable permission entries from this object” (4).
NOTE: Depending on what you wish to achieve, you can make changes to the parent folder’s permission before you remove the inheritance.
Removing inheritance at the child object
If you want to change the permissions assigned to a child object, you need to do things a little differently as it will have already inherited permissions from the parent folder.
It might seem like the obvious way to do this would be to simply change the permissions for the parent folder. But that could cause some serious problems for other files and folders. You might end up allowing access to a user who shouldn’t have it or block access to someone who should, and many other complications besides.
Instead, the correct way to do this is to change the permissions for the specific child object in question.
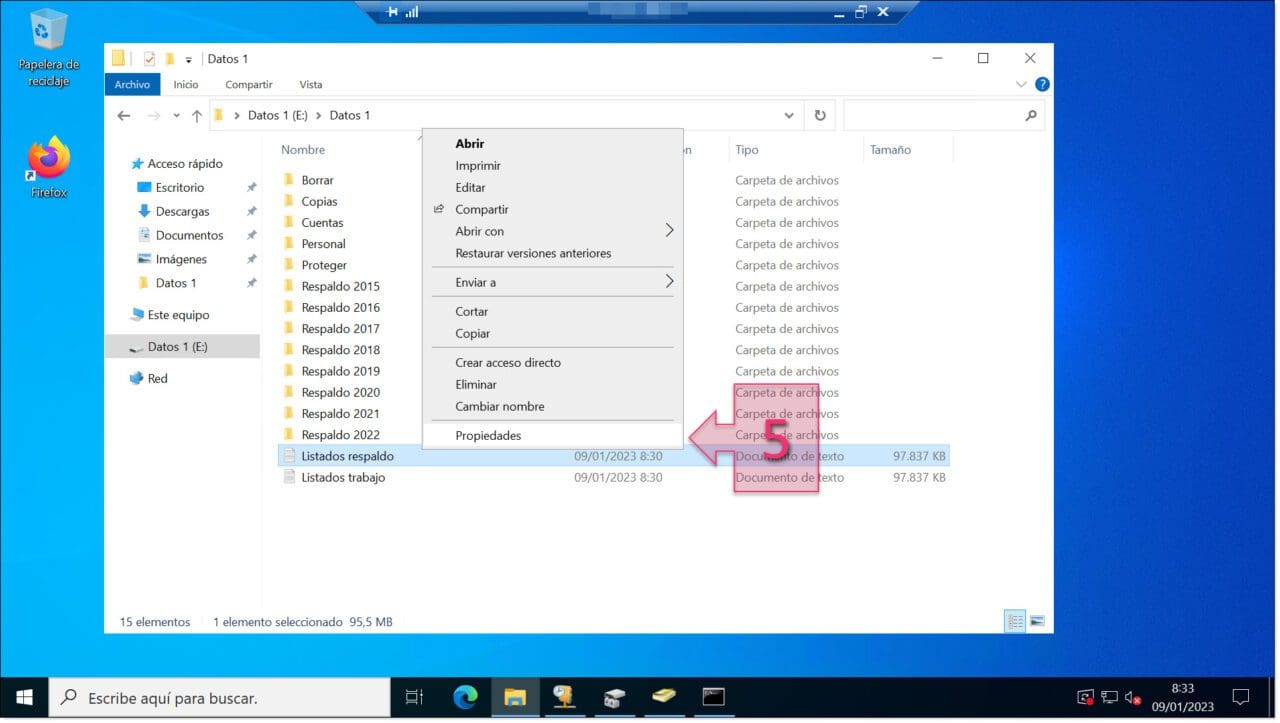
To do this, find the file or folder you want to modify, right-click on it and select Properties (5).
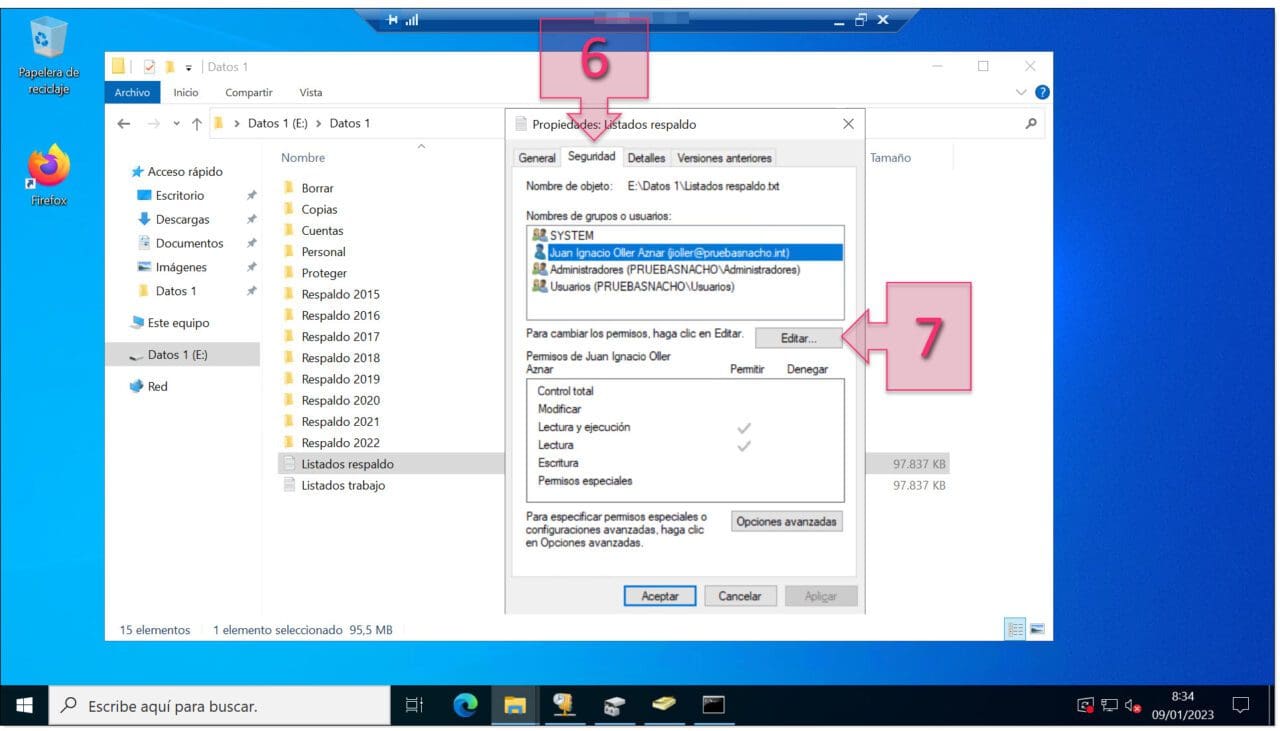
Next, open the Security tab (6) and click on Edit… (7).
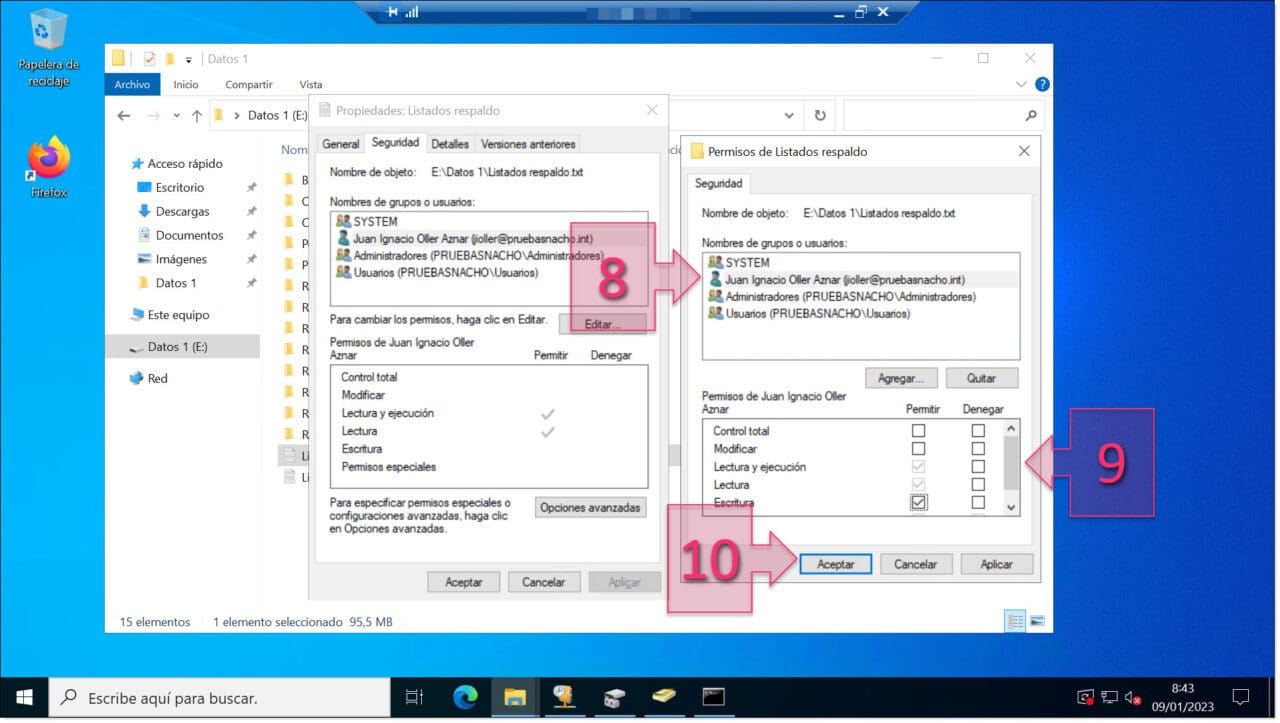
At this point, you will be able to change the permissions for the file or folder. First, you need to select the user that these changes will apply to (8), then, select the permissions you wish to change (9) and finally, click on Apply and OK (10).
Once you have done this, the changes will take affect and you will be able to see them in the Security tab (11).
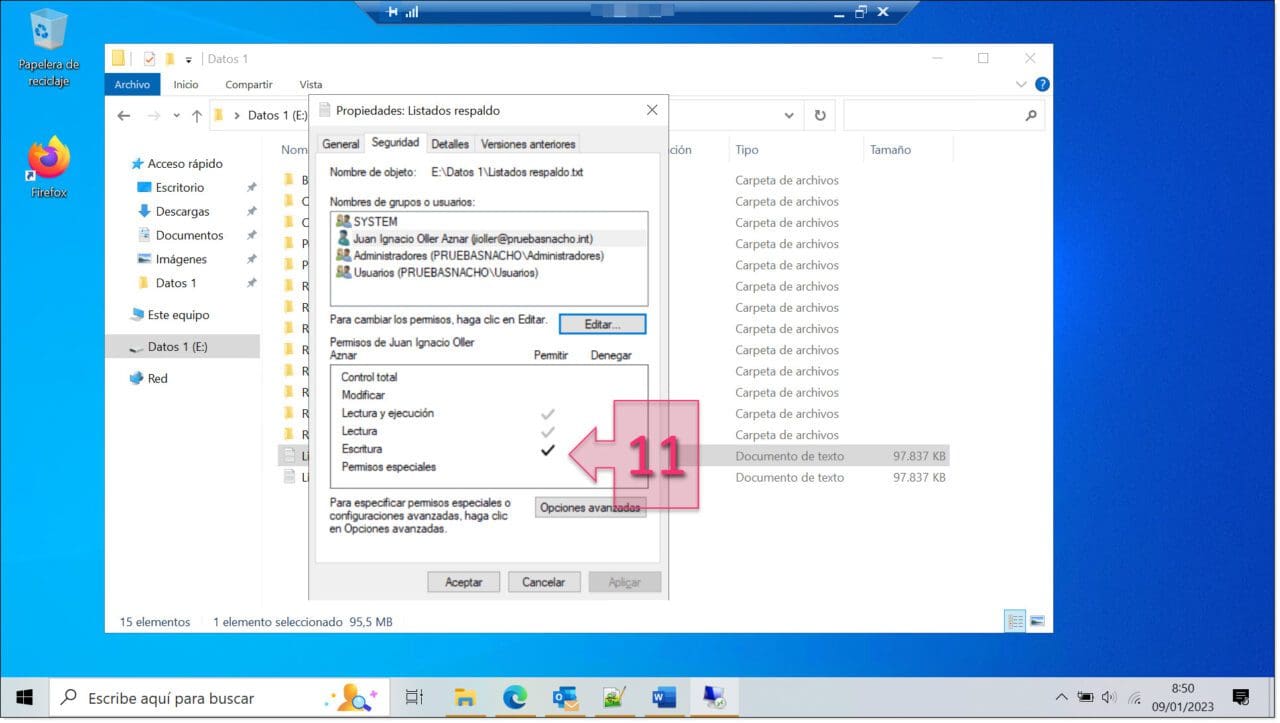
NOTE: When looking at the permissions displayed in the Properties window, you will see some checkmarks in grey and some in black. The grey checkmarks correspond to permissions that have been inherited from the parent folder and cannot be changed, while the black checkmarks correspond to the explicit permissions for that file or folder.
Another way of changing the permissions for a child object is to remove the inheritance. To do this, right-click on the file or folder in question (child object) and select Properties (12).
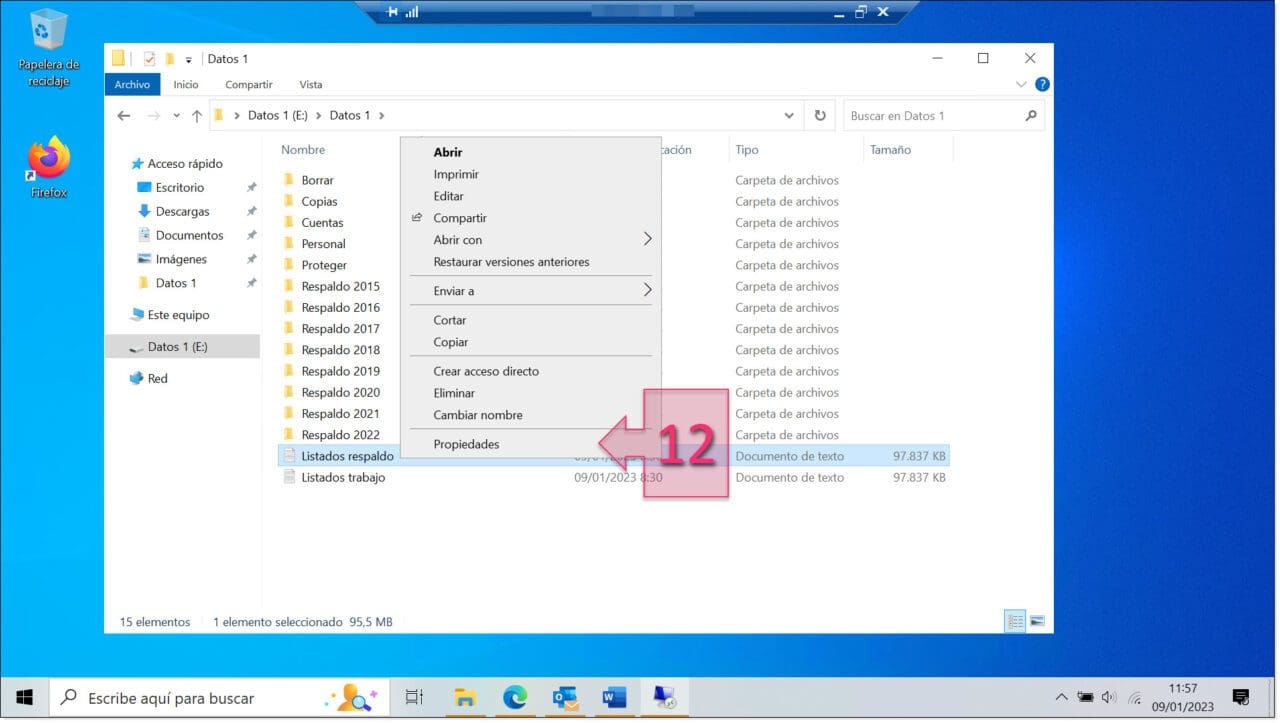
Next, click on the Security tab (13) and click on Advanced (14).
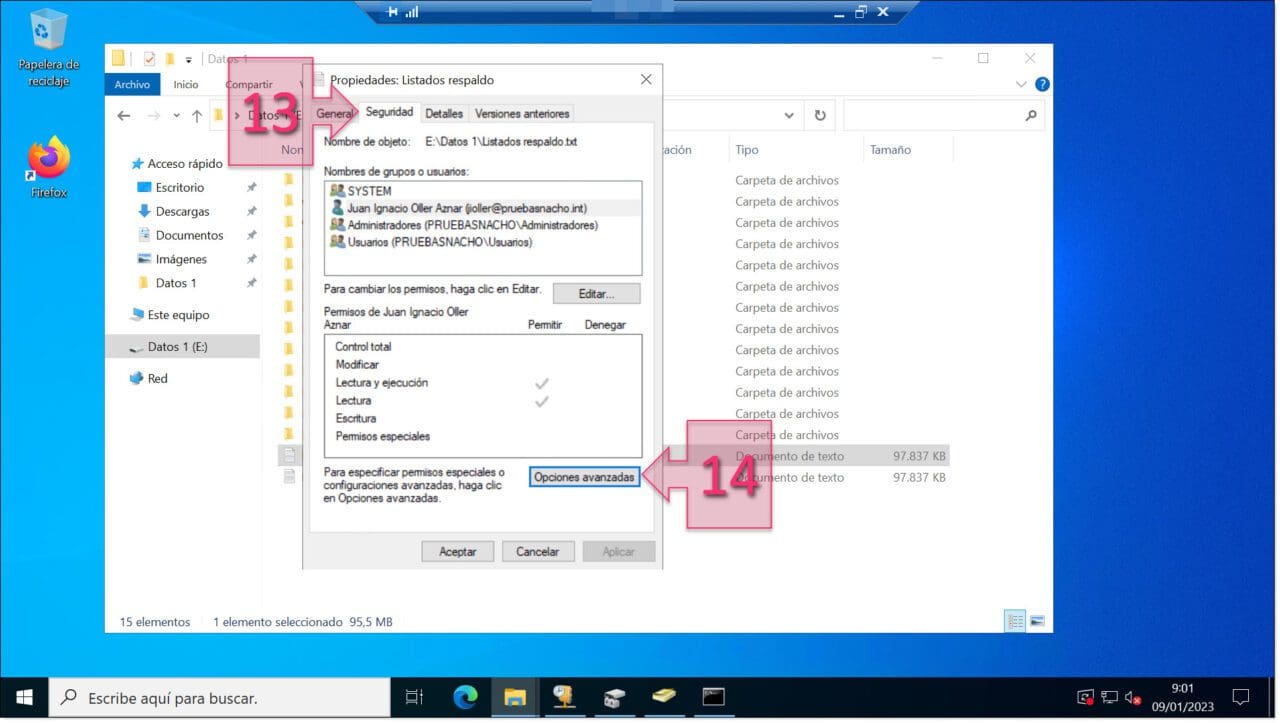
Then, click on the Permissions tab (15) and click on Disable inheritance (16).
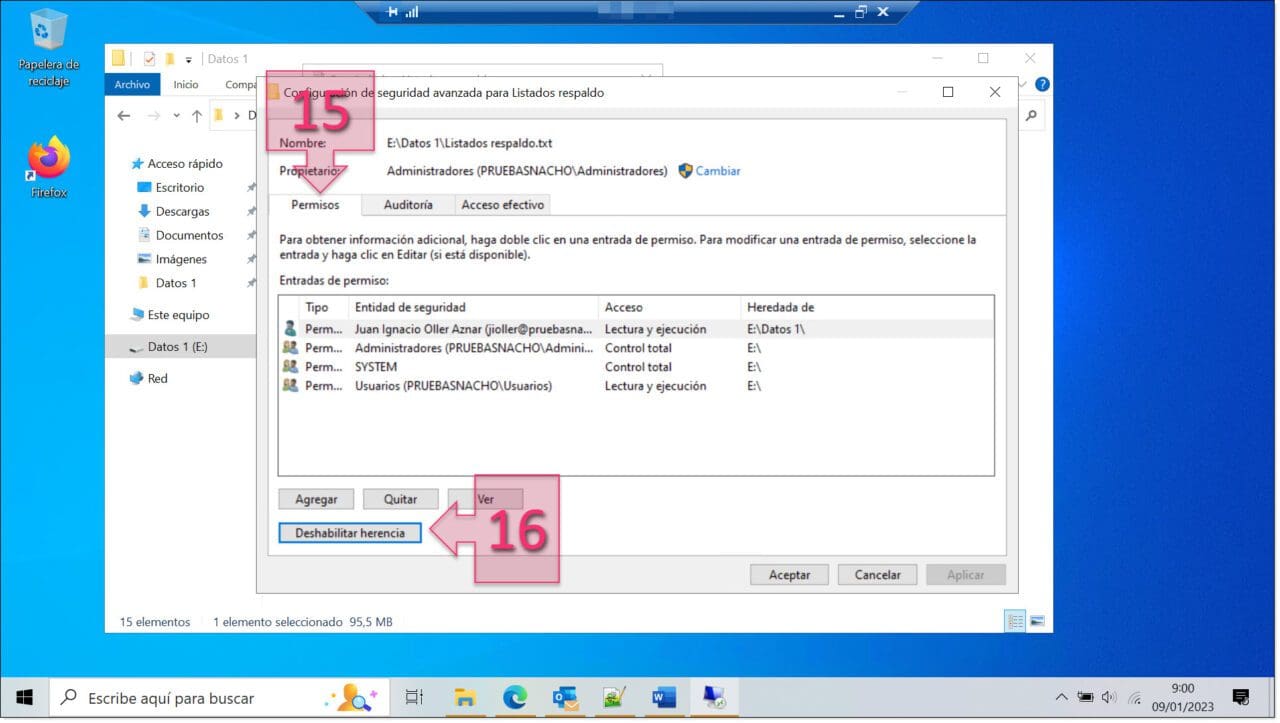
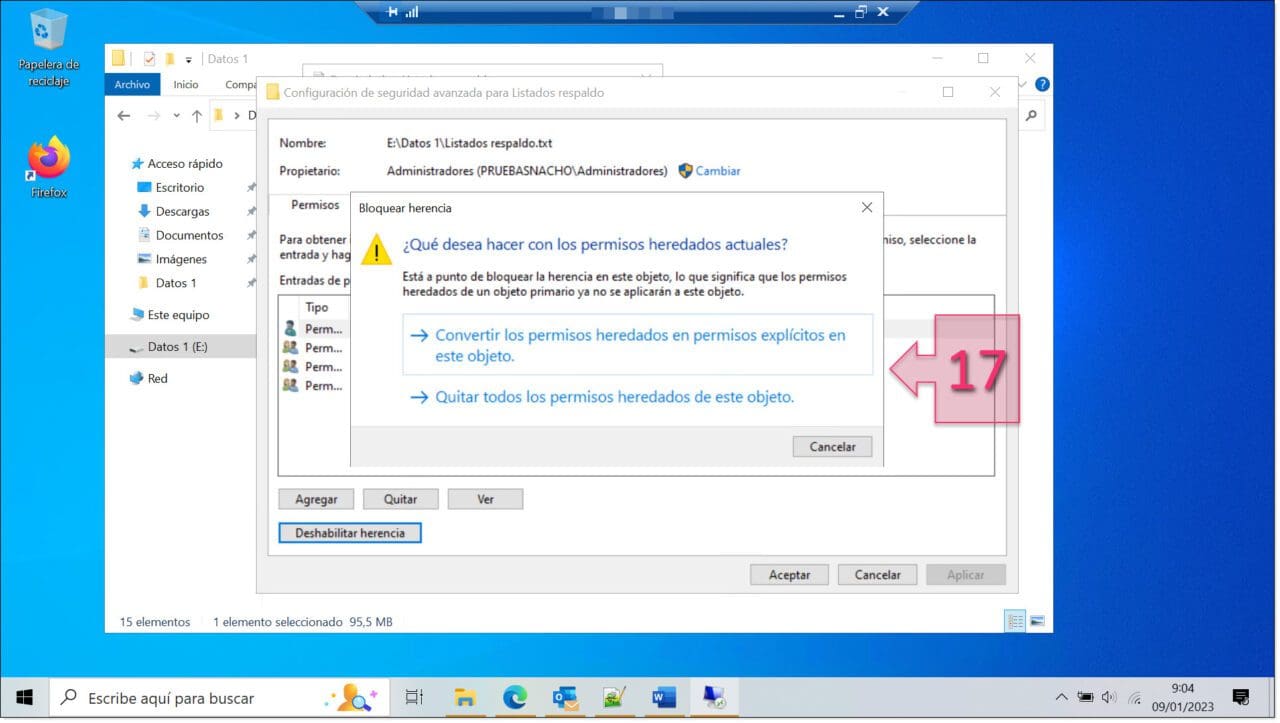
At this point, a window will appear asking, “What would you like to do with the current inherited permissions?”. Here, you have two options (17):
- Convert inherited permissions into explicit permissions on this object.
- Remove all inherited permissions from this object.
Which option you choose will depend on the changes you want to make.
If you’re going to make a lot of changes, it’s probably best to remove all the inherited permissions and start from zero. On the other hand, if you’re only going to make a few changes, you should probably opt to convert the existing inherited permissions into explicit ones.
Once you have made your choice, you now need to redefine the permissions for the file or folder.
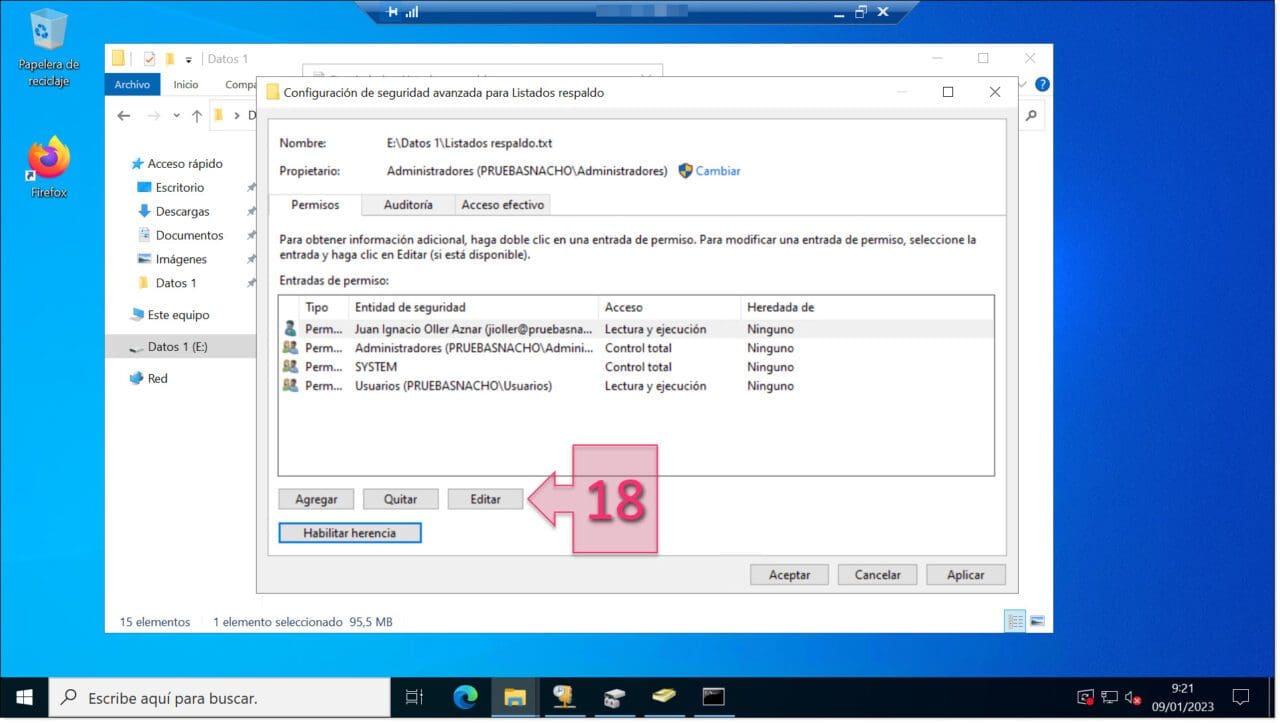
To do this, first click on the user or group that you wish to change and then, click on Edit… (18).
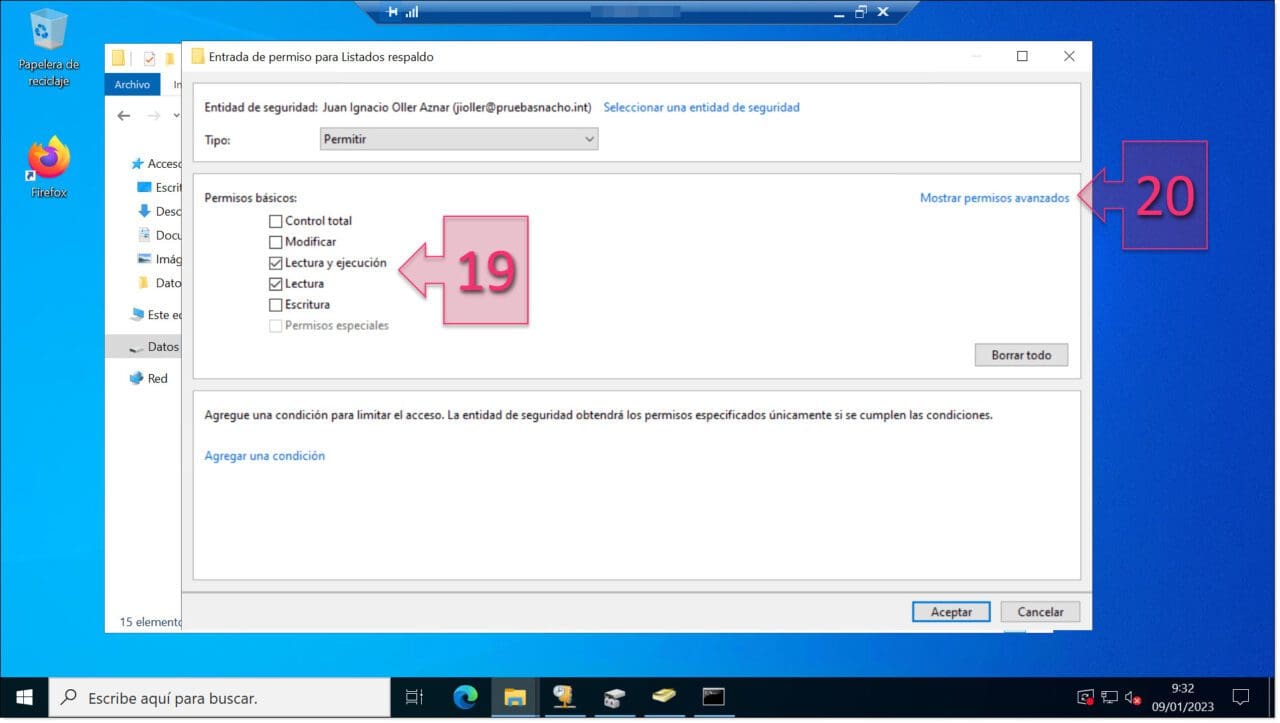
At this point, you will see a window where you can set the new permissions for the file or folder (19). Aside from this basic permissions, you can also click on Show advanced permissions (20) to select more specific options.
Congratulations! You have now set your new NTFS permissions.
Summary
In this article, we’ve taken a look at how to set NTFS permissions to keep your user data secure. We’ve seen what permissions are available and we’ve explained the difference between inherited and explicit permissions. We’ve also covered how inheritance works and how you can disable it.
This is only a brief article, but we hope that you will find it useful as you get started managing permissions for your network resources.
If you would like to find out more about this topic, we recommend checking out Microsoft’s NTFS Overview.
Thanks for reading!


