Learn how to configure an FTP server on Windows using IIS (Internet Information Server). All you need to do is install the FTP server, set up your users, set up your download folders and configure an FTP site.
How do I configure an FTP server on a Jotelulu Windows server using IIS?
Before you get started
To successfully complete this tutorial and configure your FTP service using IIS, you will need:
- To be registered with an organisation on the Jotelulu platform and have logged in to that organisation.
- To have registered for a Servers subscription
- To have an operating Windows server associated with that subscription.
Part 1 – Installing the FTP server
To install an FTP server using IIS, the first thing that you need to do is access the server using a remote connection. Once connected, open the Server Manager (this should be open by default unless it has been disabled).
Next, click on “Manage > Add Roles and Features” (1).
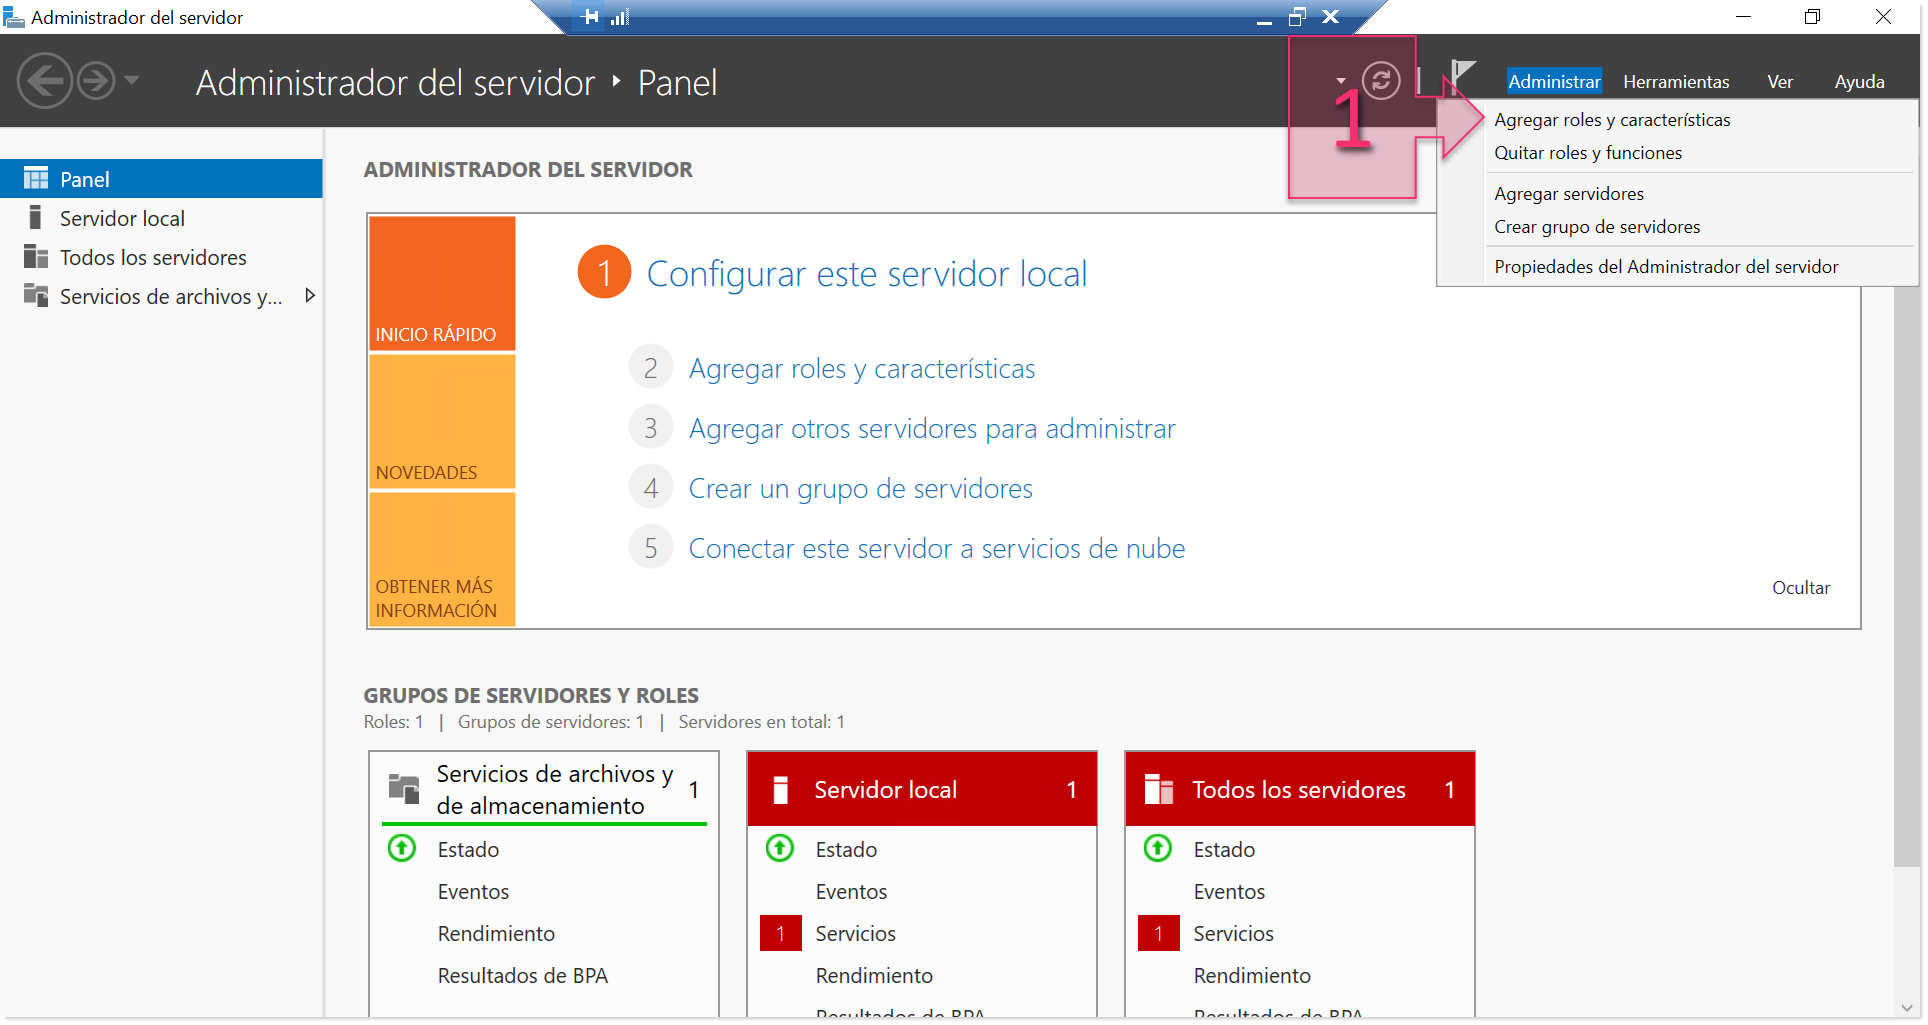
Part 1 – Add a role
This will launch the Roles and Features installation window which is used to install services on the server.
As often happens with Microsoft, you won’t have to change anything in the first few windows that you see. You simply have to click “Next”. So, we will jump straight to those windows where you do have to make some changes.
First, you will need to select the installation type. In this tutorial, we will choose “Role-based or Feature-based Installation” (2).
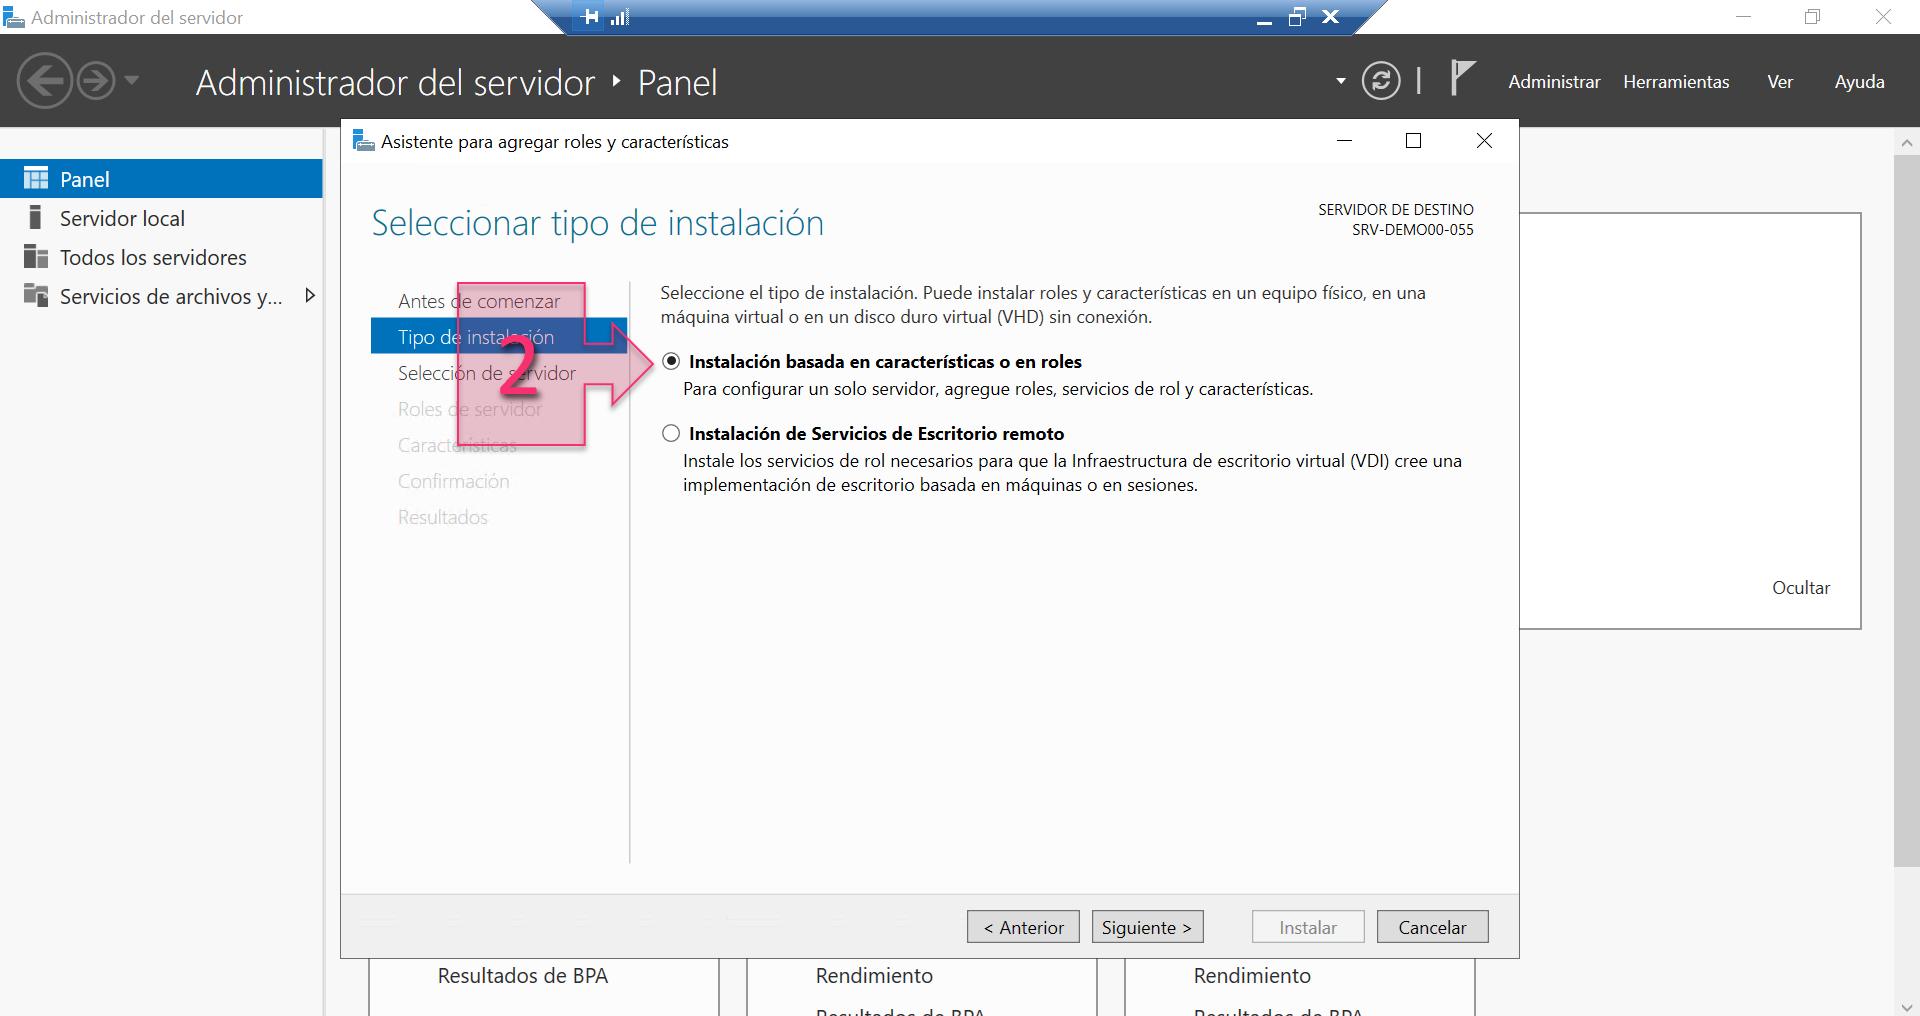
Part 1 – Select the installation type: featured-based installation
Next, you will need to choose the target server. Choose “Select a server from the server pool” (3) and then choose the server that you want to install the feature on (4). In reality, this can be left as it is since we are going to install the service on the server that we are already working on.
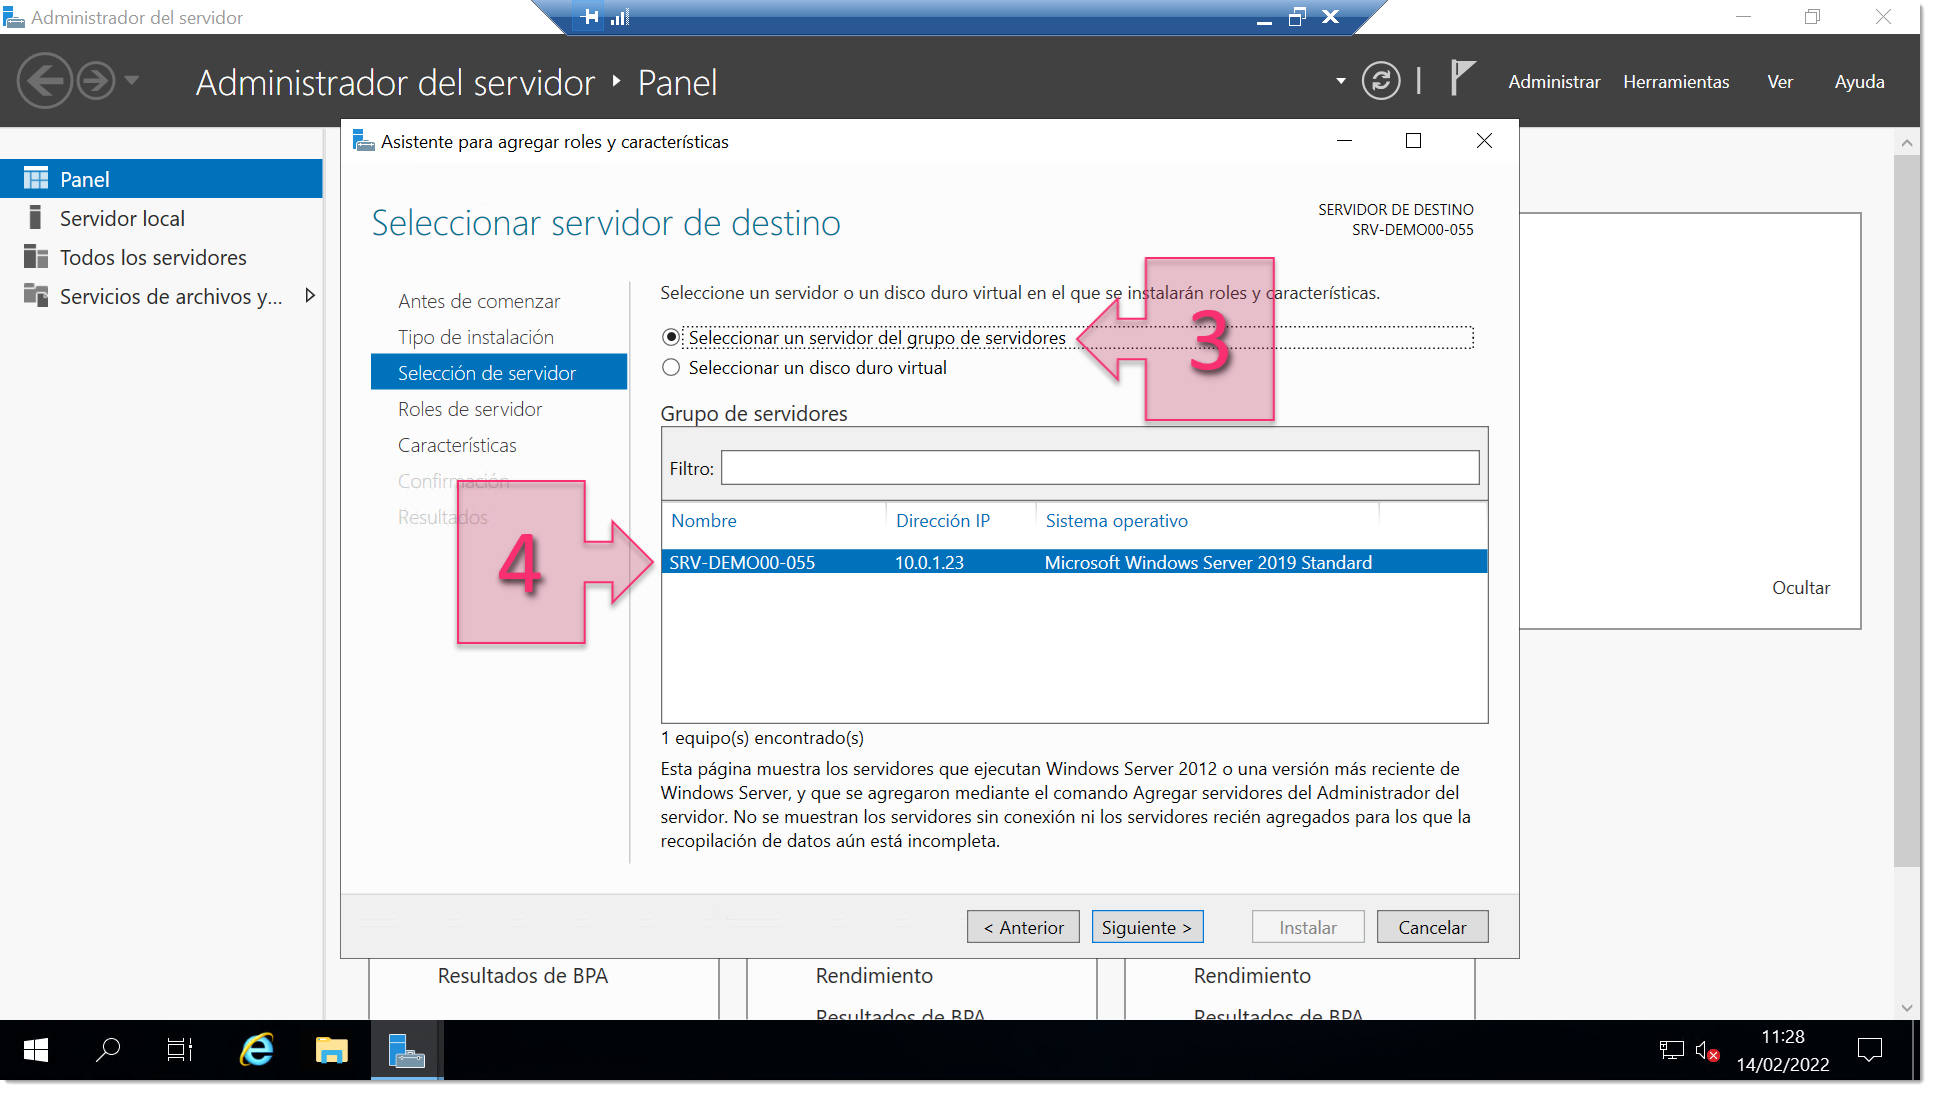
Part 1 – Select the server on which to perform the installation
Next, you will need to select the server role to install, which in this case will be Web Server (IIS) (5). A window will appear containing the required features for the server (IIS). This is necessary so that the server will operate following installation, so leave all the settings as they are and click on “Add Features” (6).
Note: We always recommend ticking the checkbox “Include management tools (if applicable)” so that the system configures the necessary options without requiring any additional action from you.
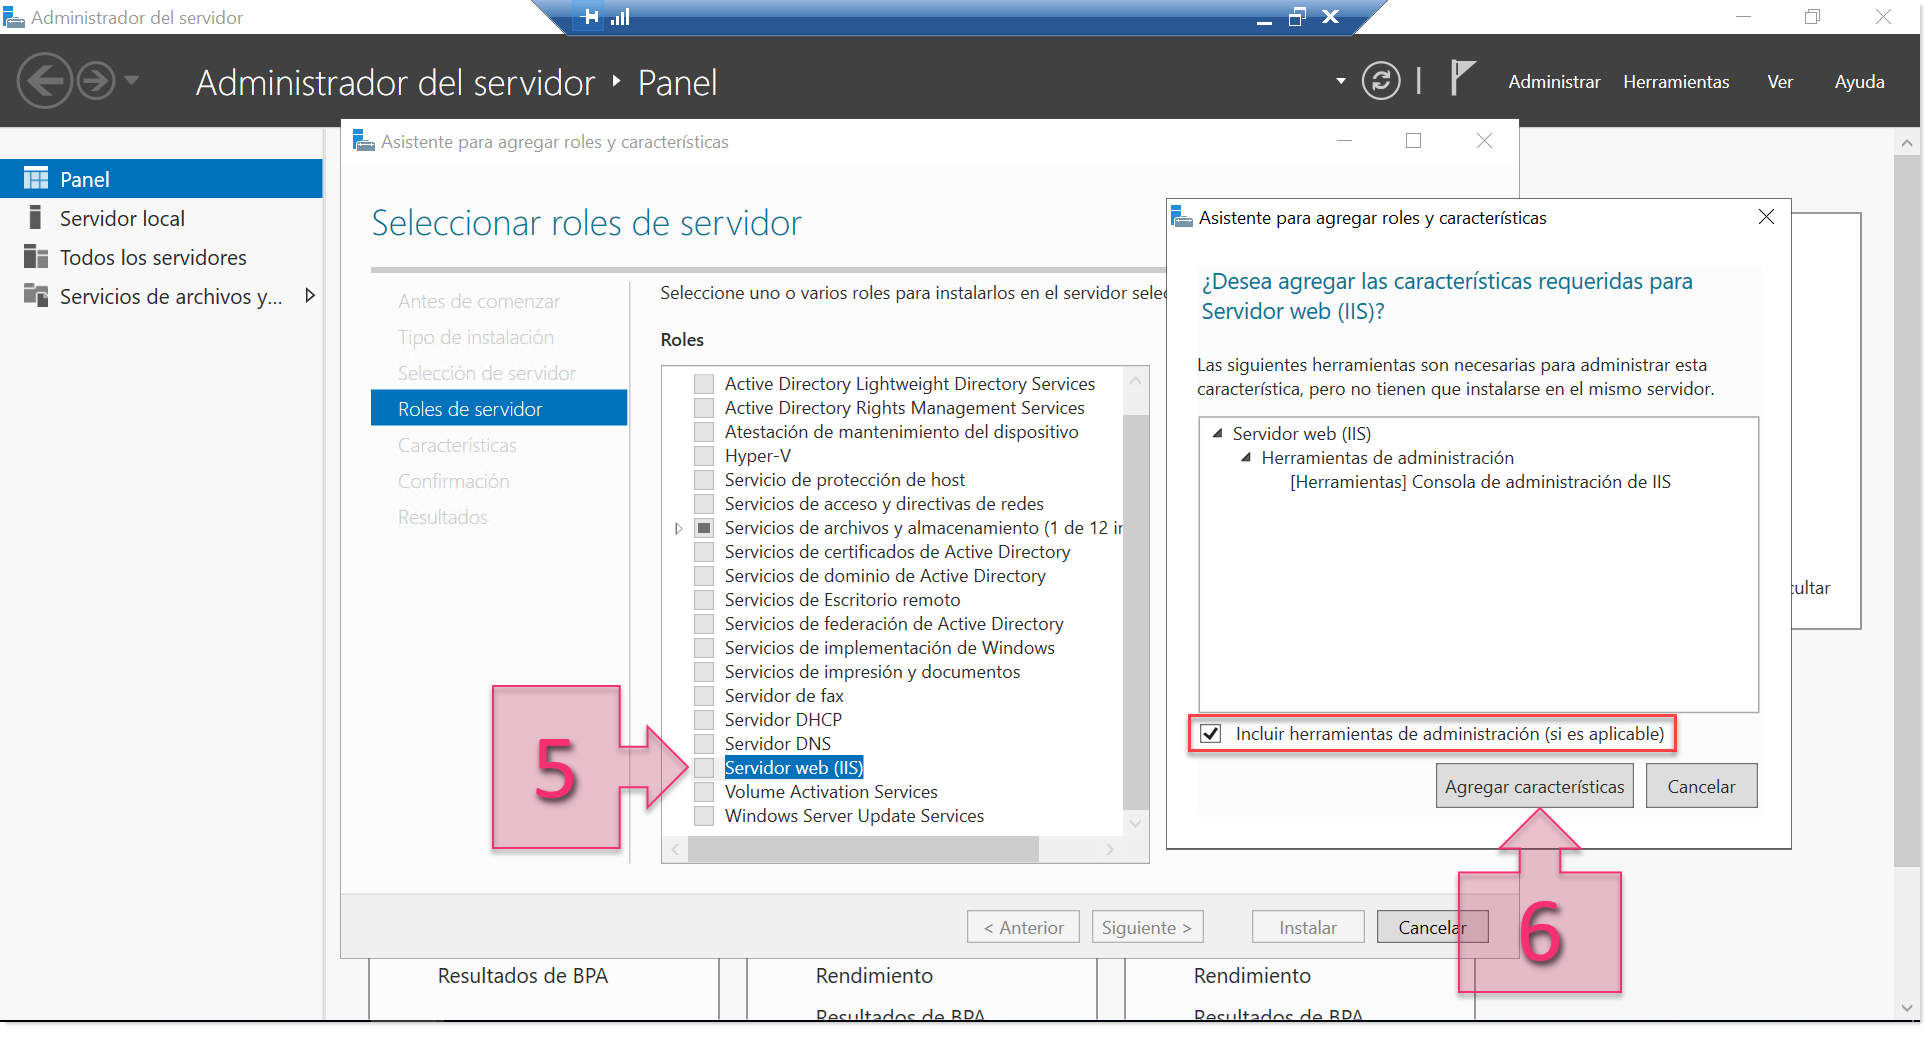
Part 1 – Select the IIS role and its associated features
At this point, you will see that FTP Server (7) is selected. Click on “Next” to continue with the installation.
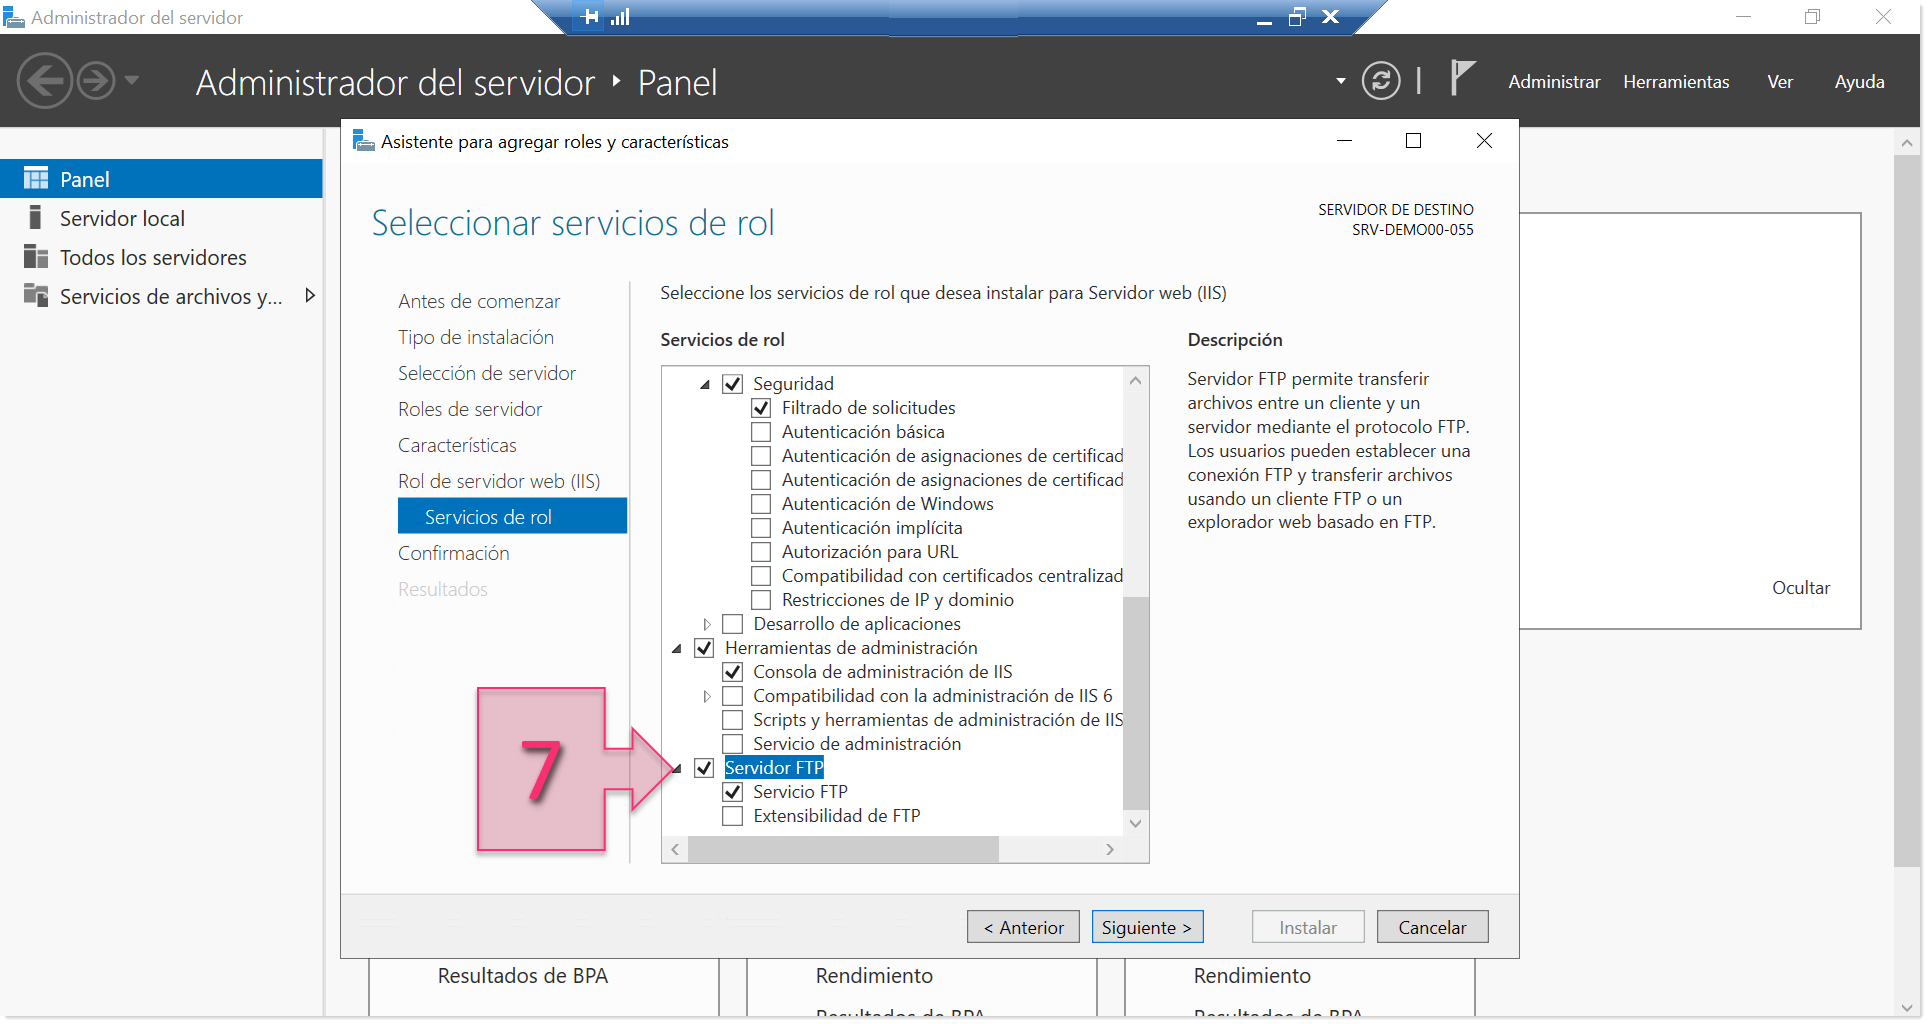
Part 1 – Check that FTP service is selected
Once all the necessary options have been selected, you will need to confirm your installation selections. Once you have checked that everything is correct, click on “Install” (8).
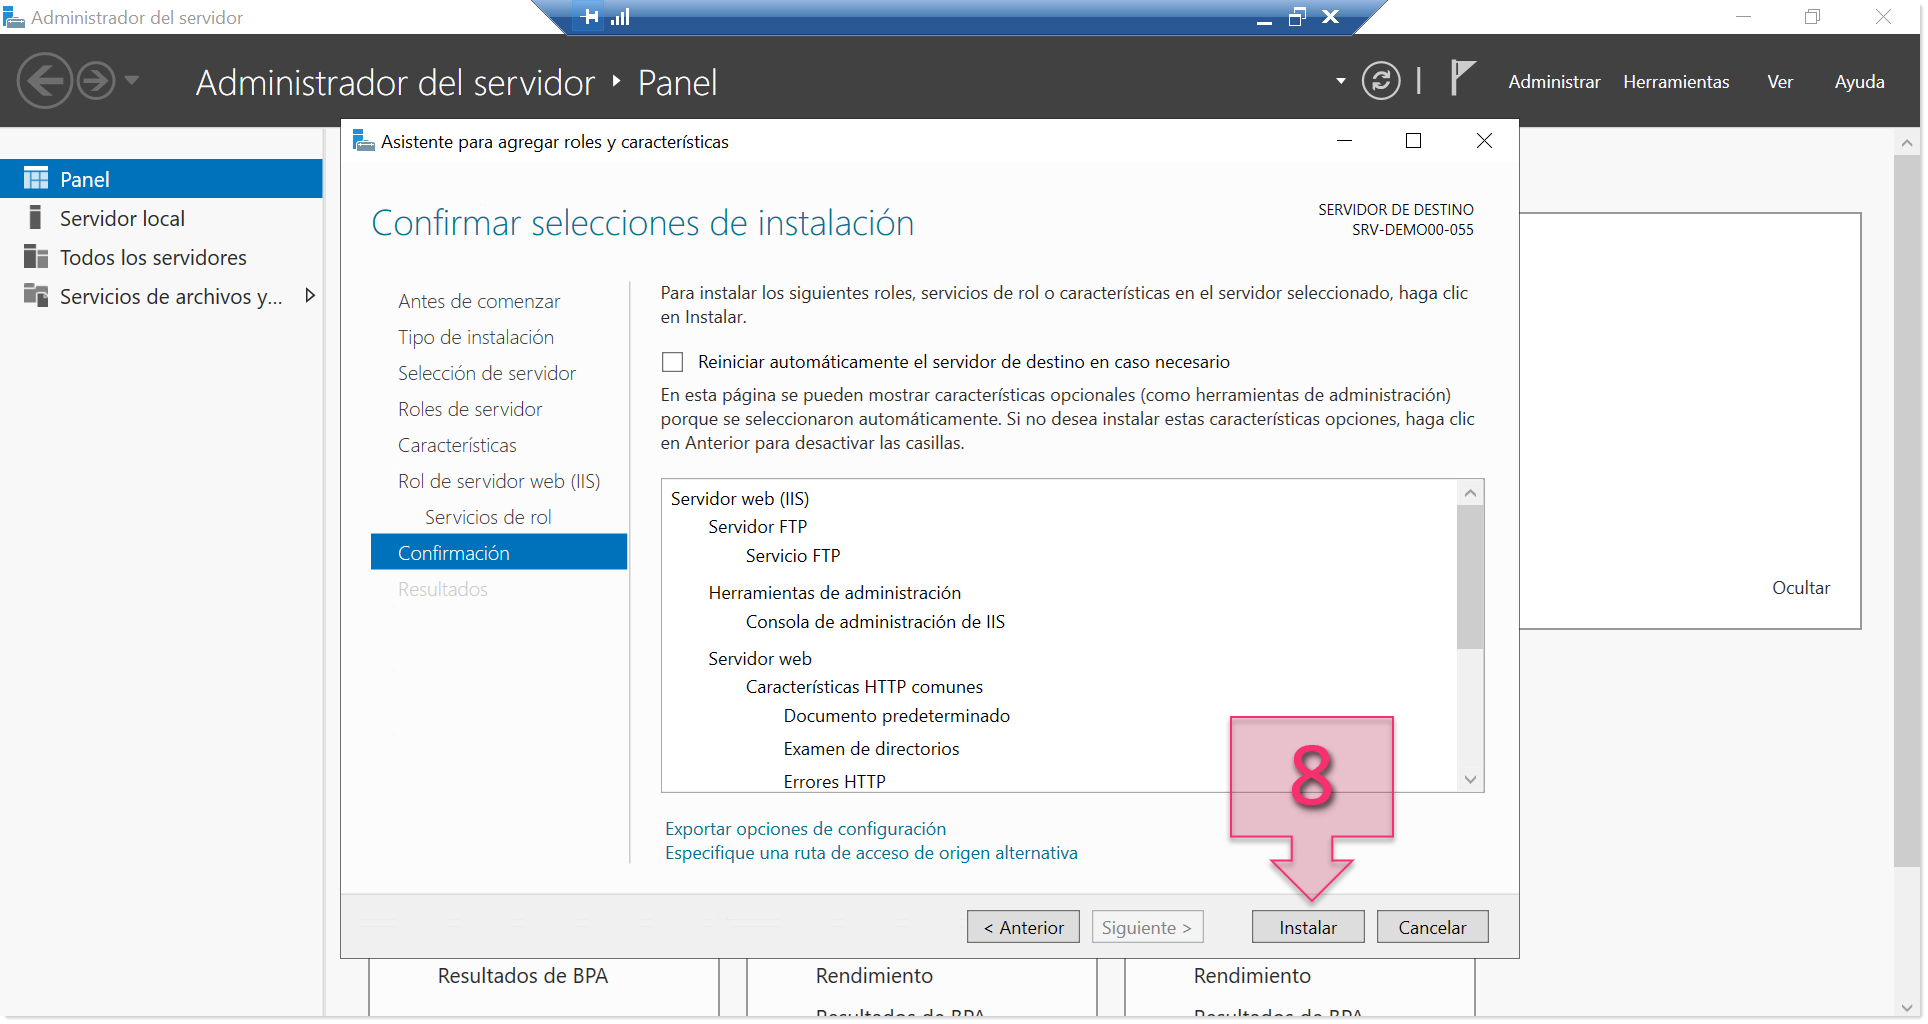
Part 1 – Check selections and begin installation
At this point, the progress bar (9) will appear, showing the different stages of the installation. You can close (10) the window before the progress bar has finished because the installation will continue in the background.
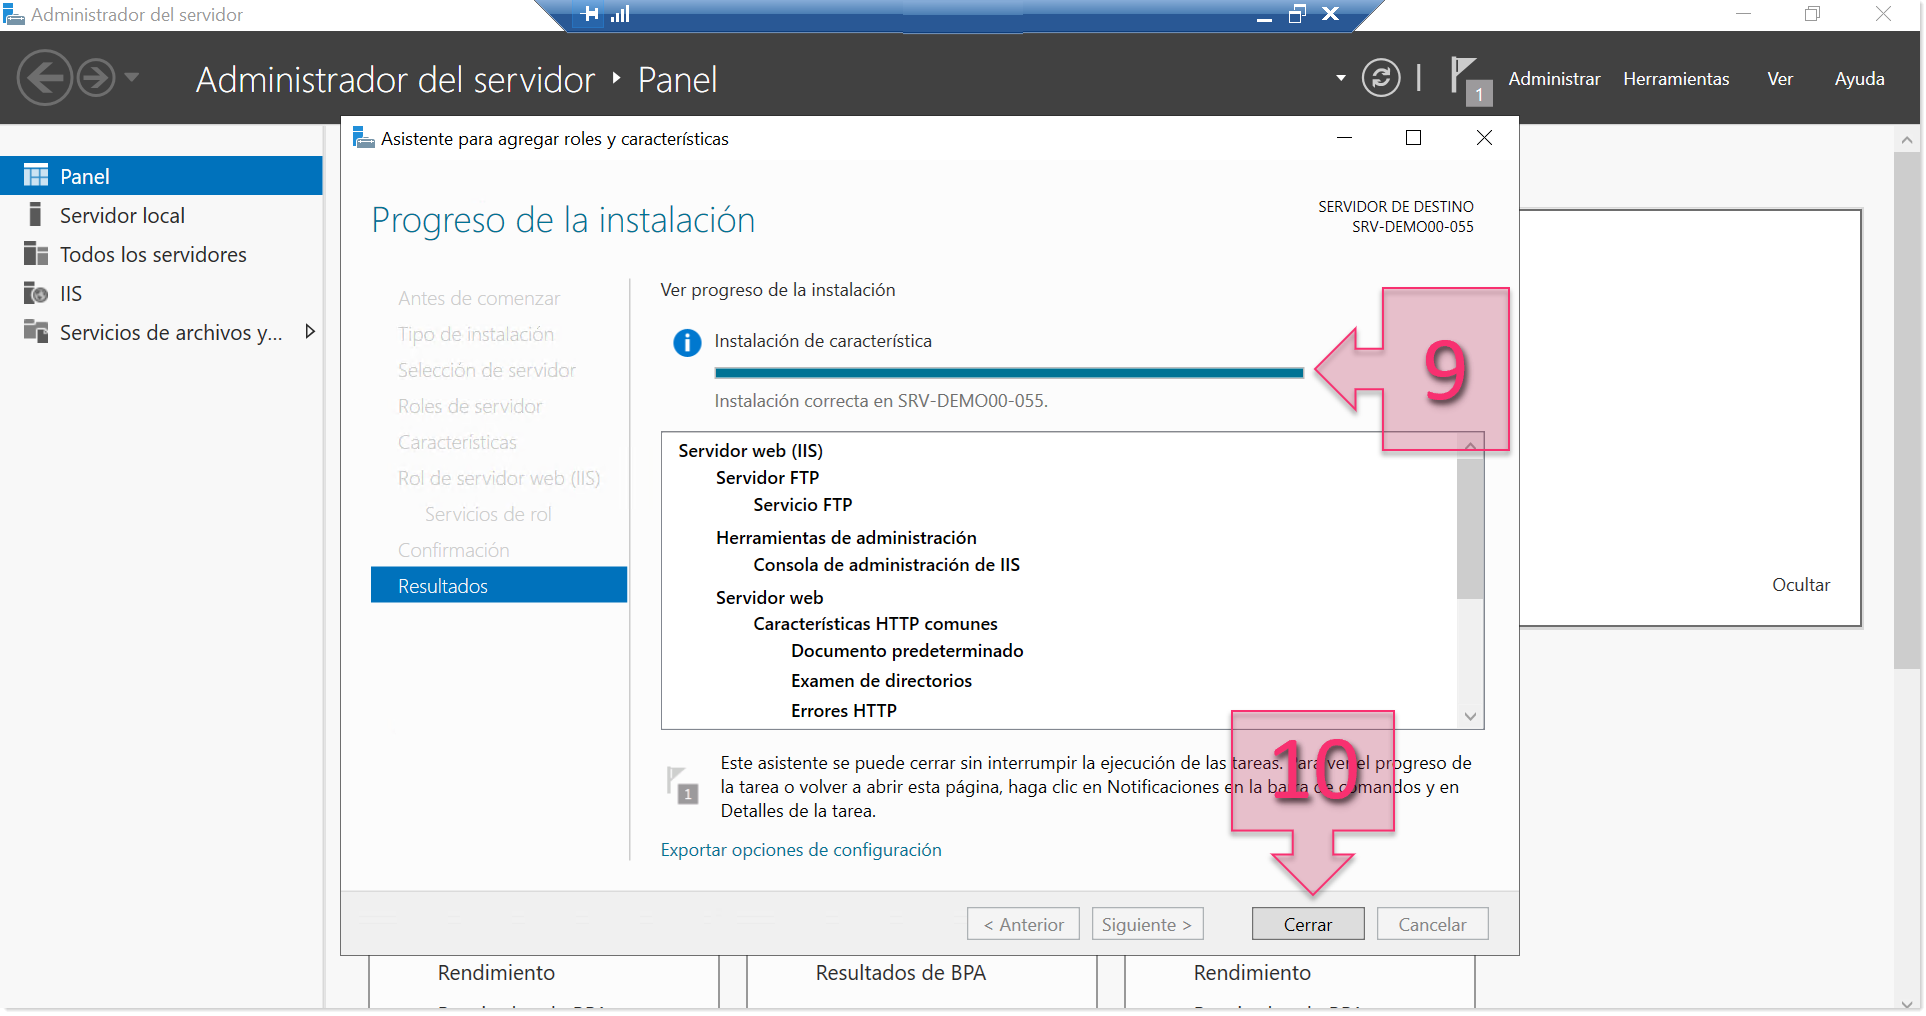
Part 1 – Check the installation progress
If you close the window, you can open it again by clicking on the flag in the upper right-hand corner and clicking on Feature Installation (11).
You have now successfully installed the feature and can begin setting up your users.
Part 2 – Setting up users and groups
Once the FTP service has been installed, you will need to create a user and a group to use the FTP service. This will restrict users so that they can only upload content without having more permissions than necessary or download content from specific folders.
You can create a number of users depending on your needs.
To launch the user management panel, click on the search bar and type “users” (12) and select “Add, edit or remove other users” (13).
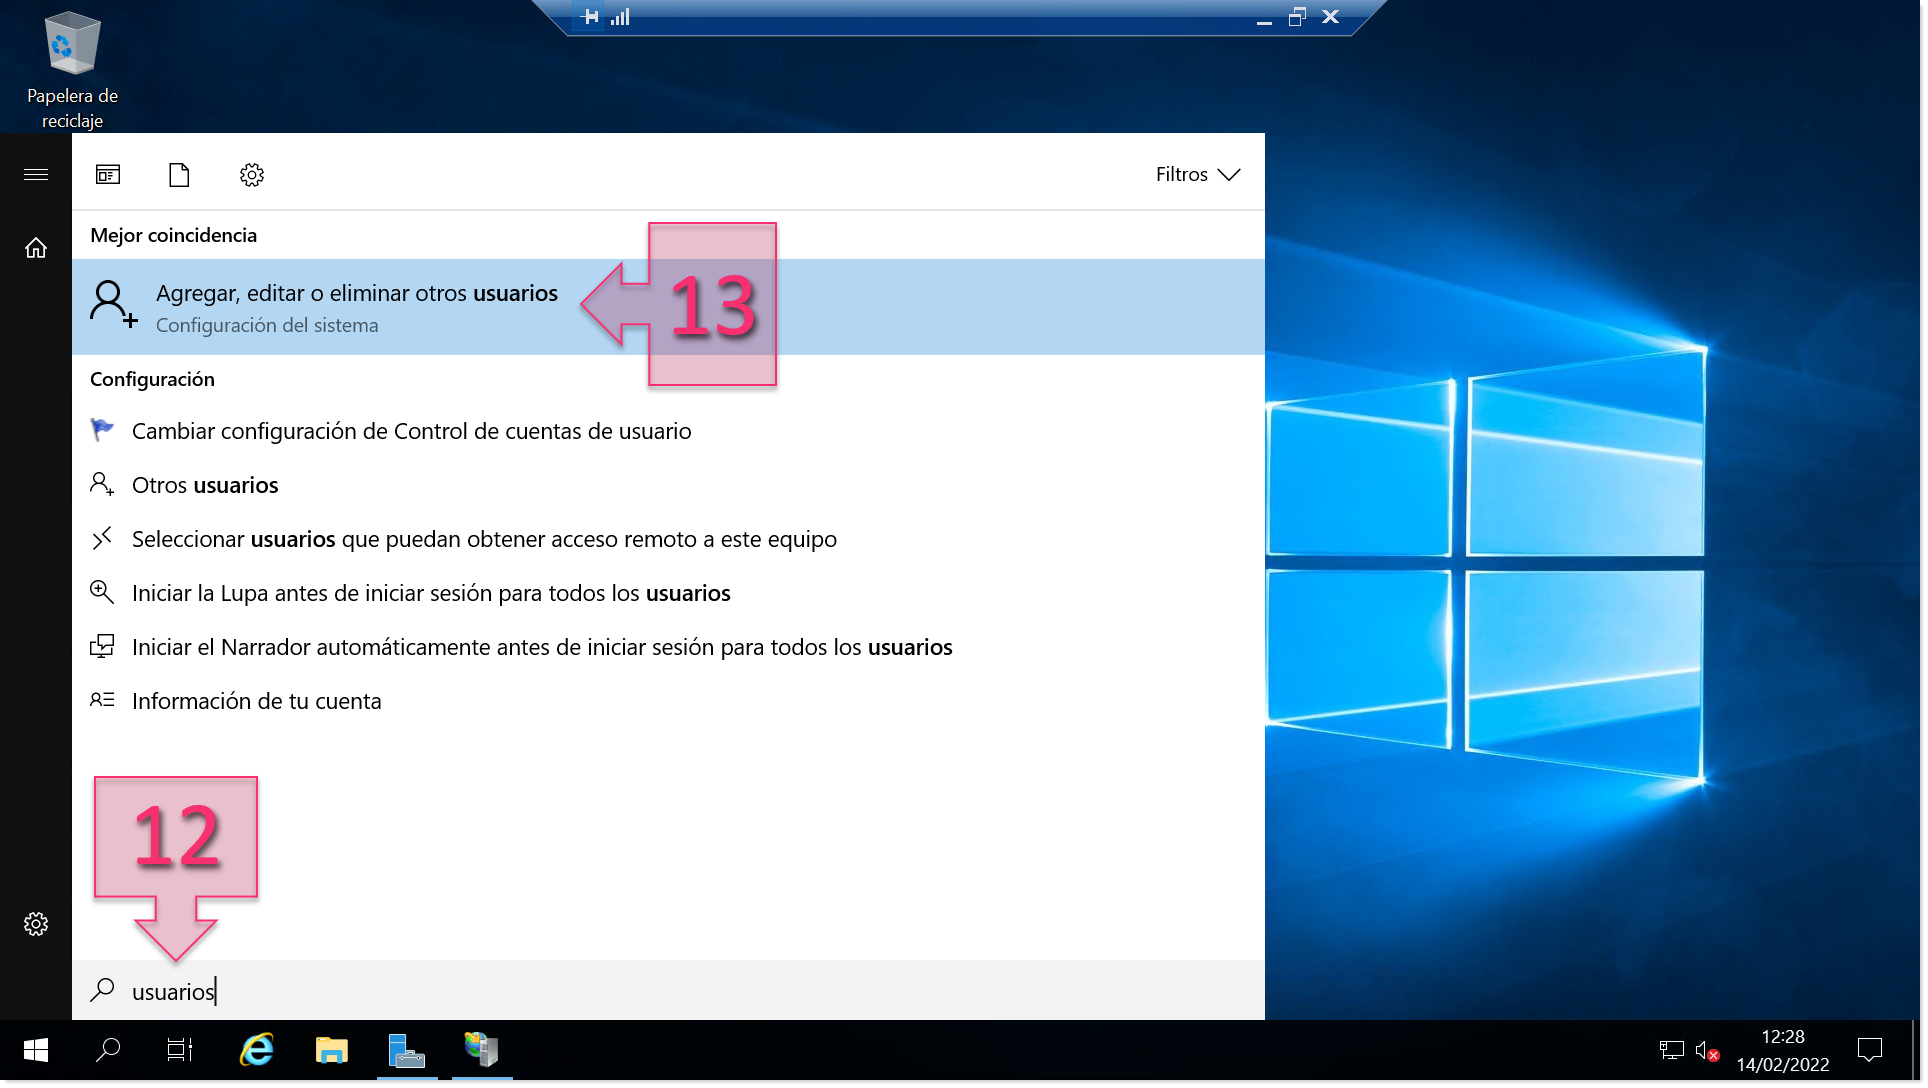
Part 2 – Launch the user management panel
In the window that appears, click on “Add someone else to this PC” (14), which will open another window.
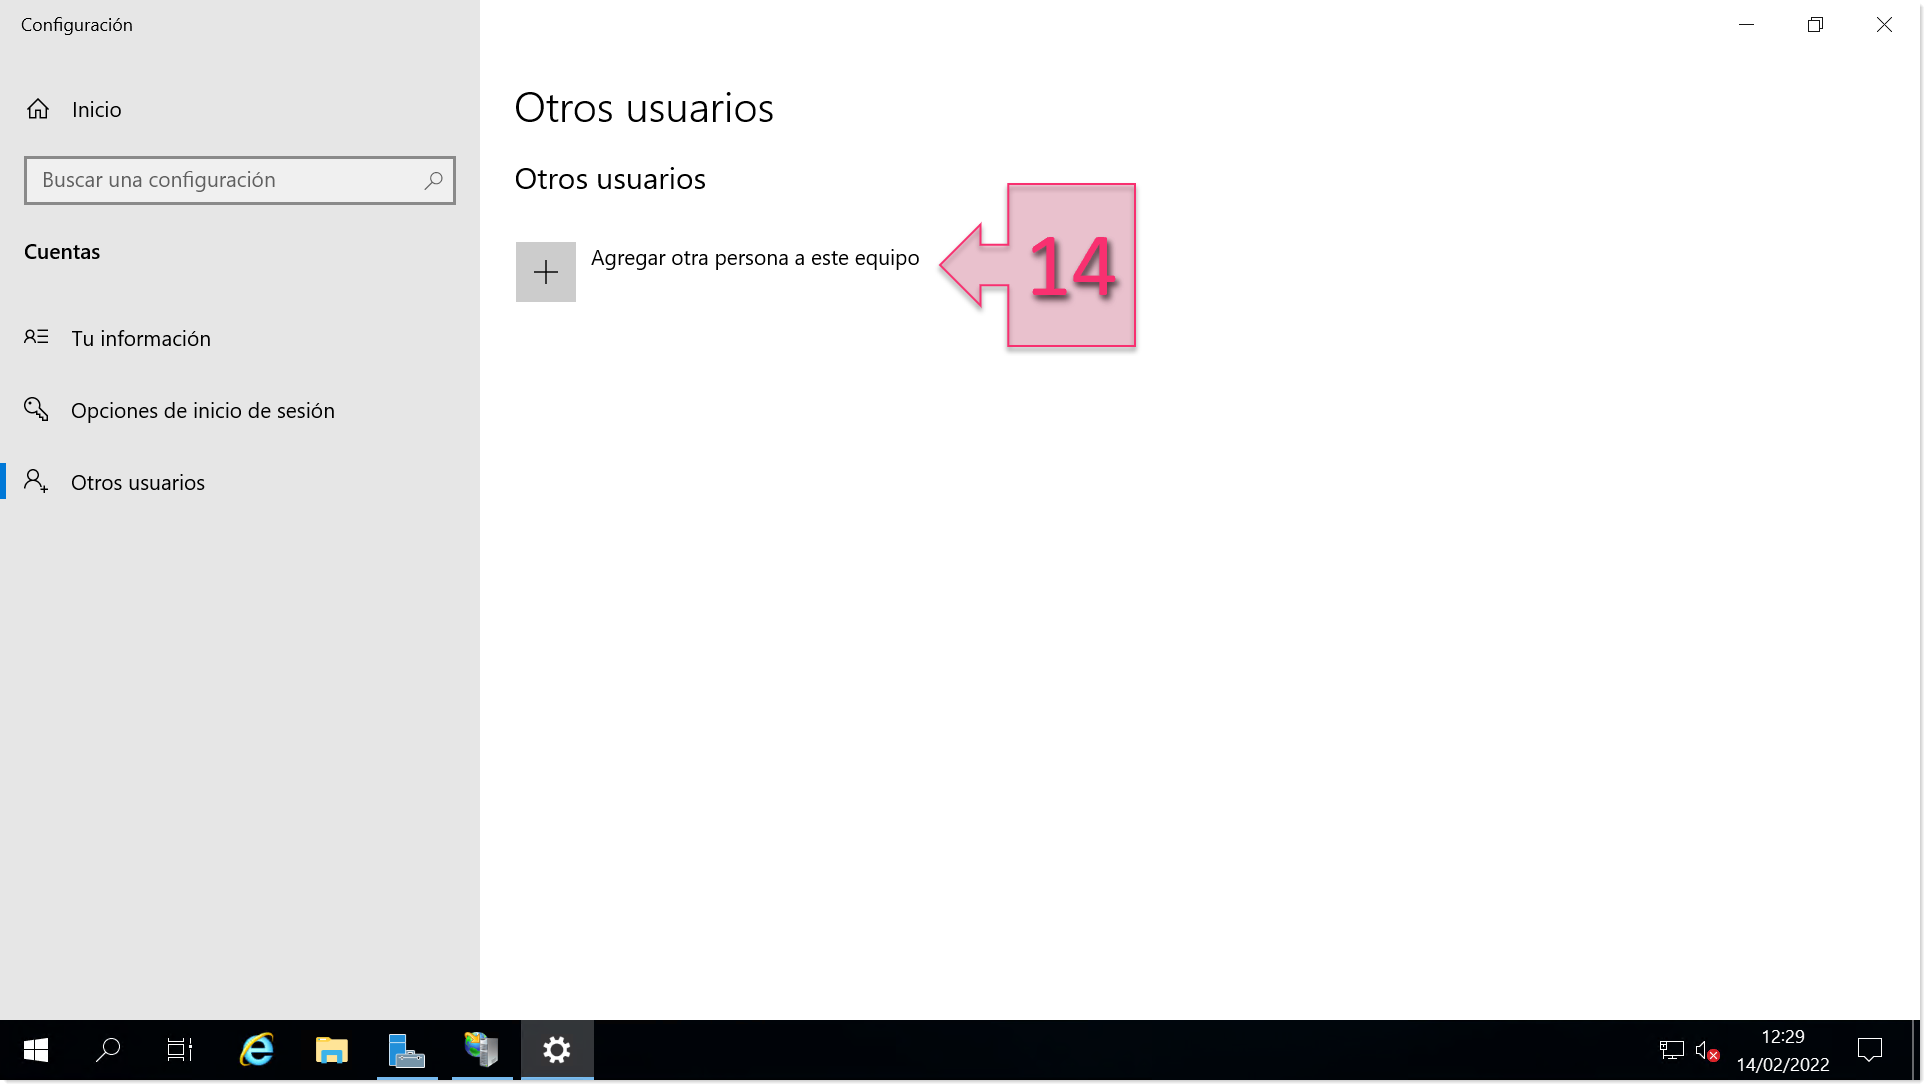
Part 2 – Click on “Add someone else to this PC”
In the Local Users and Groups section, right-click on the Users folder. Select “Create a user” and then enter the details for the new user (17). These will be a username, full name and description. The username is the only mandatory field.
Once you have completed this, you will need to add other additional details (18), such as a password and other related settings.
In this tutorial, this user will only upload data, so we will choose the settings so that the user cannot change their password and their password will never expire. However, you made need to choose different settings depending on the way the user will use the FTP service.
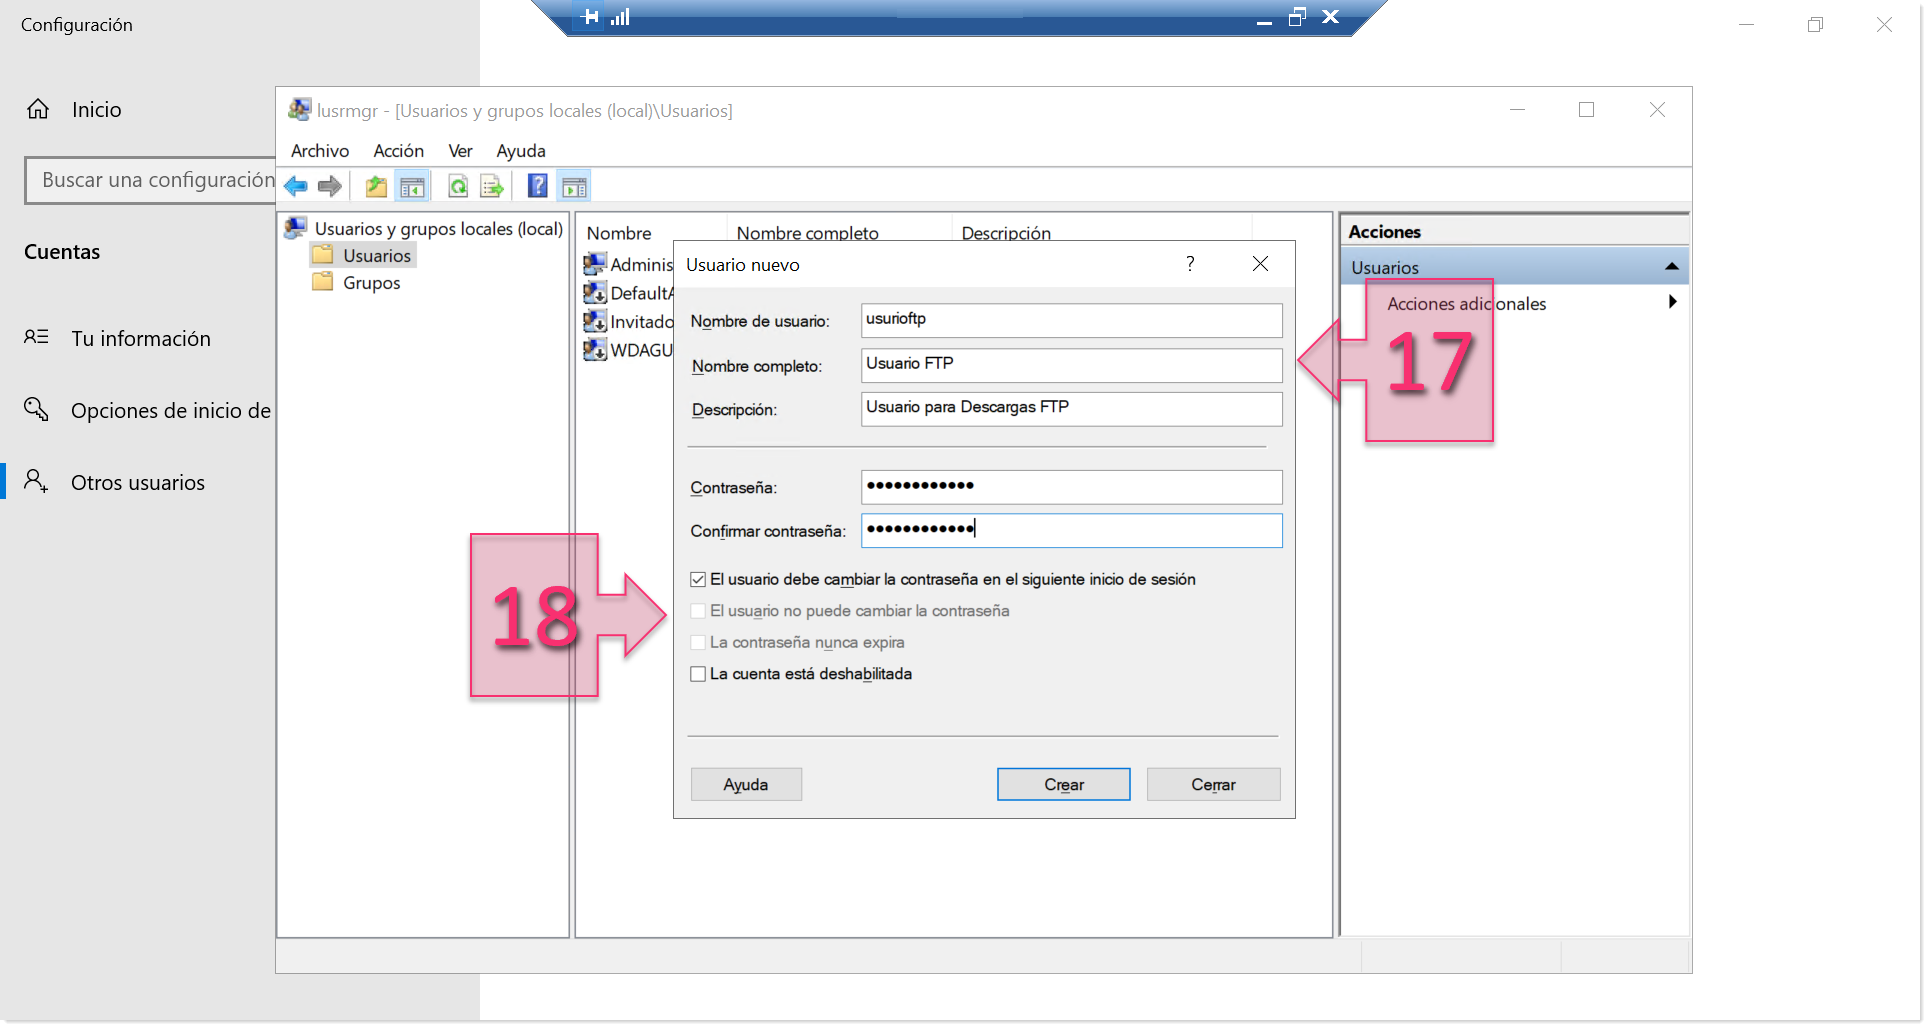
Part 2 – Enter the FTP user details
Next, you will need to create a group. Even if you only have one user at the moment, it may be very convenient in the future if you decide to have multiple users with the same permissions. To do this, right-click on Group or on an area of white space inside this folder and click on “New Group…” (19).
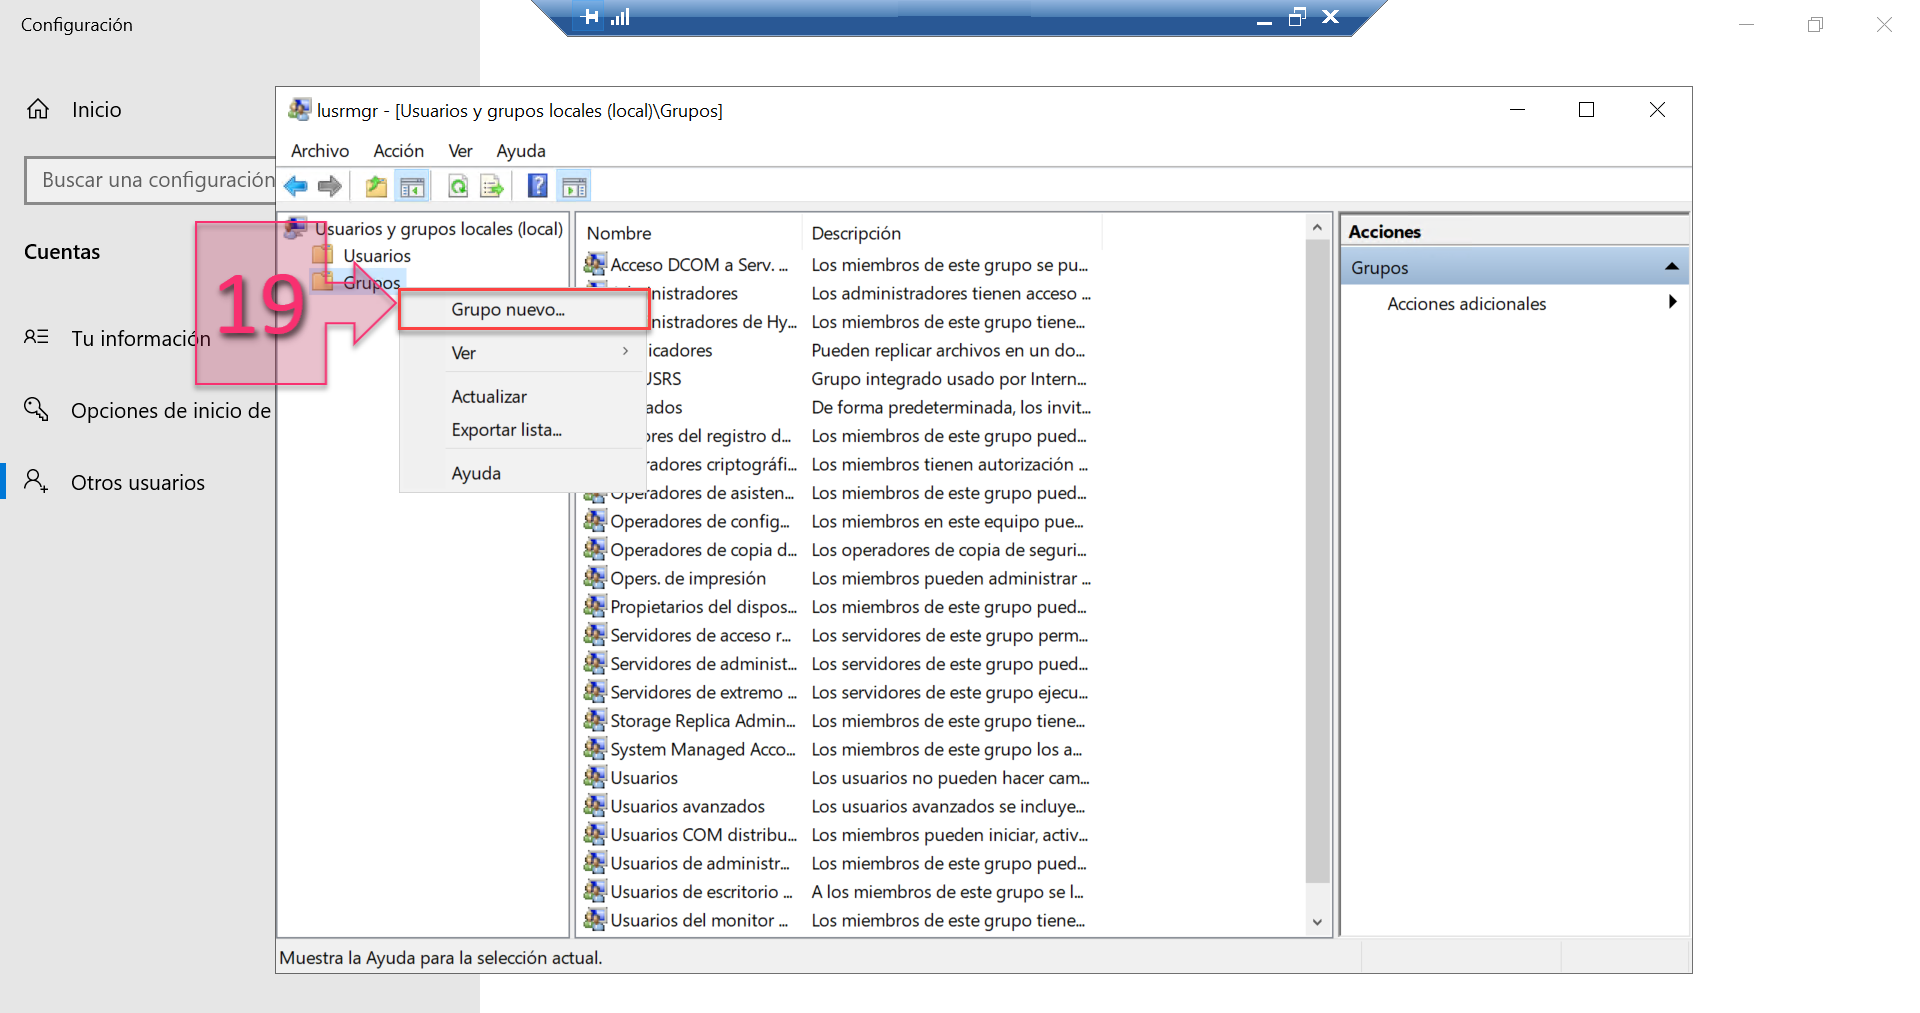
Part 2 – Create a new group for FTP users
In the New Group window, you will need to enter a name and description for the group (20). Then, click on “Add” (21) to add users to the group. Once complete, click on “Create” to create the group.
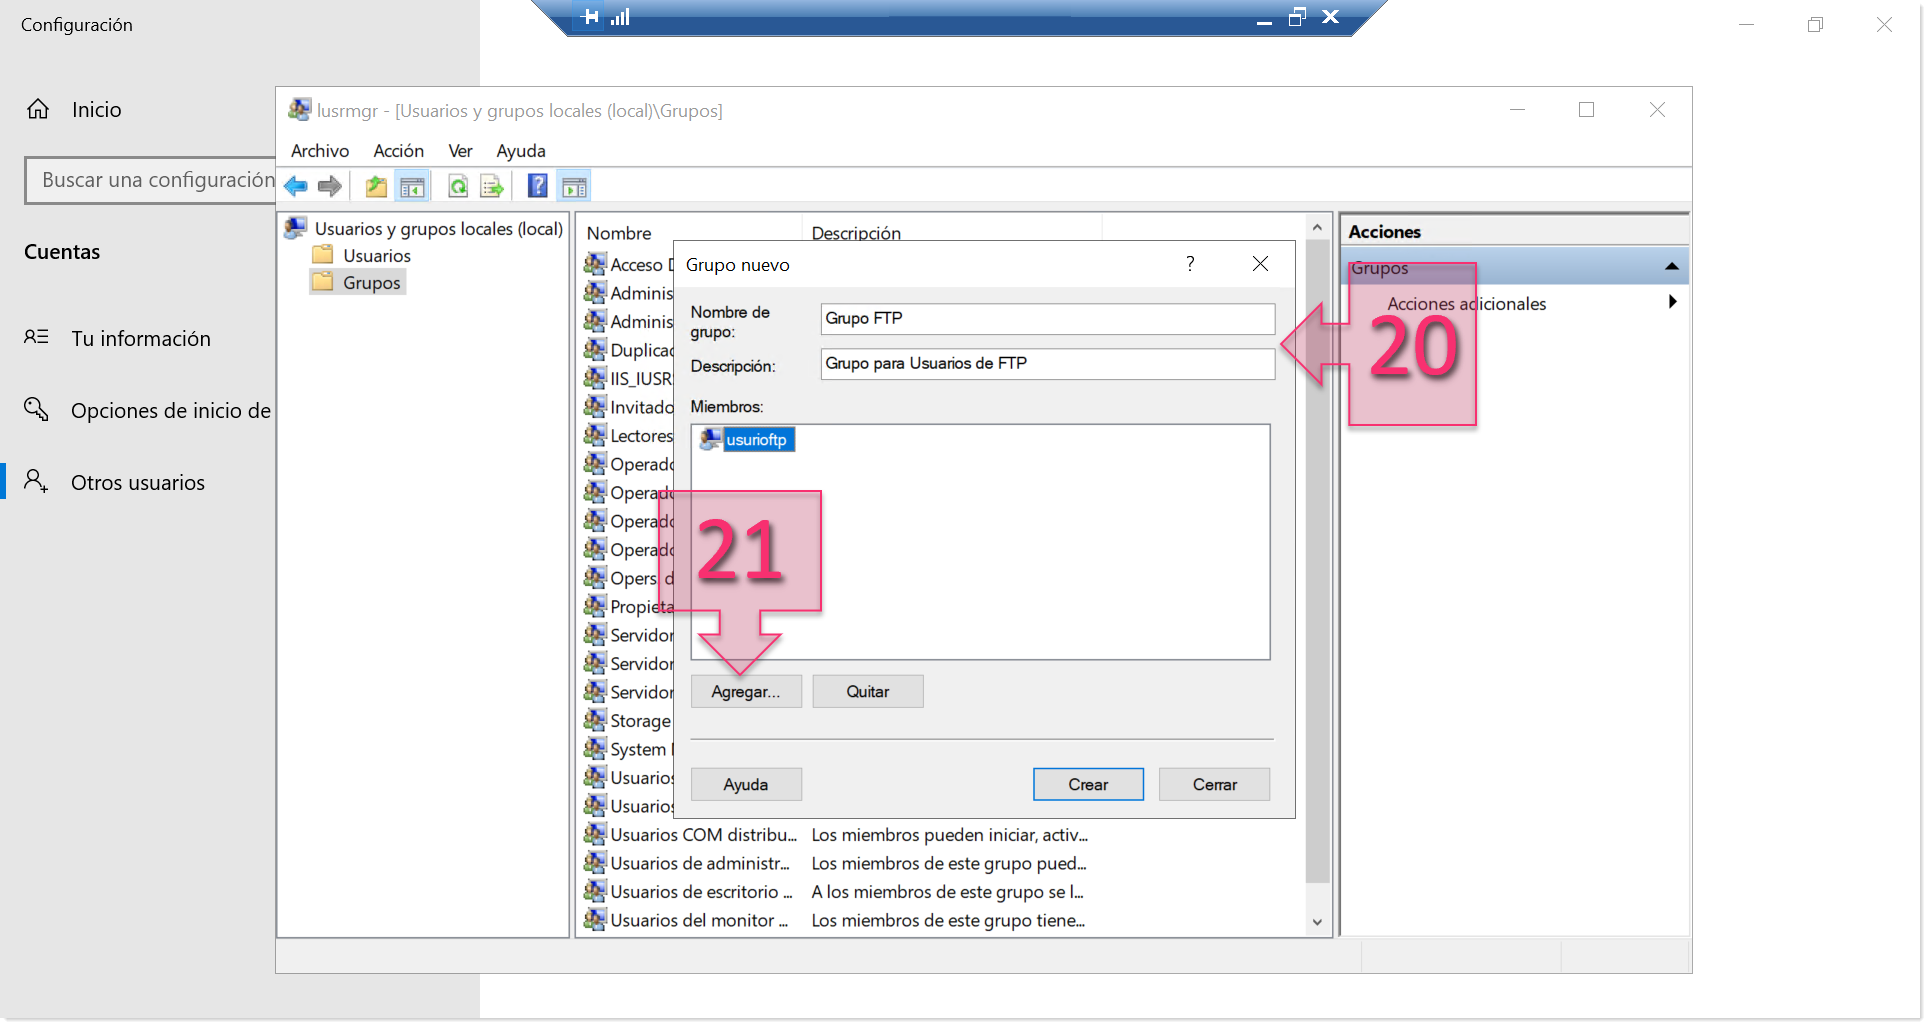
Part 2 – Enter group information
Part 3 – Setting up the FTP Folder
So far, you have installed the FTP server and created a user that can upload and download files. However, you don’t yet have a folder where you can store these files.
To create a folder, open Windows Explorer and create one in a convenient place. In this tutorial, we have created one at “C:\\FTP” (22).
Once created, you will need to change the folder permissions, which you can do by right-clicking on the folder and clicking on “Properties” (23).
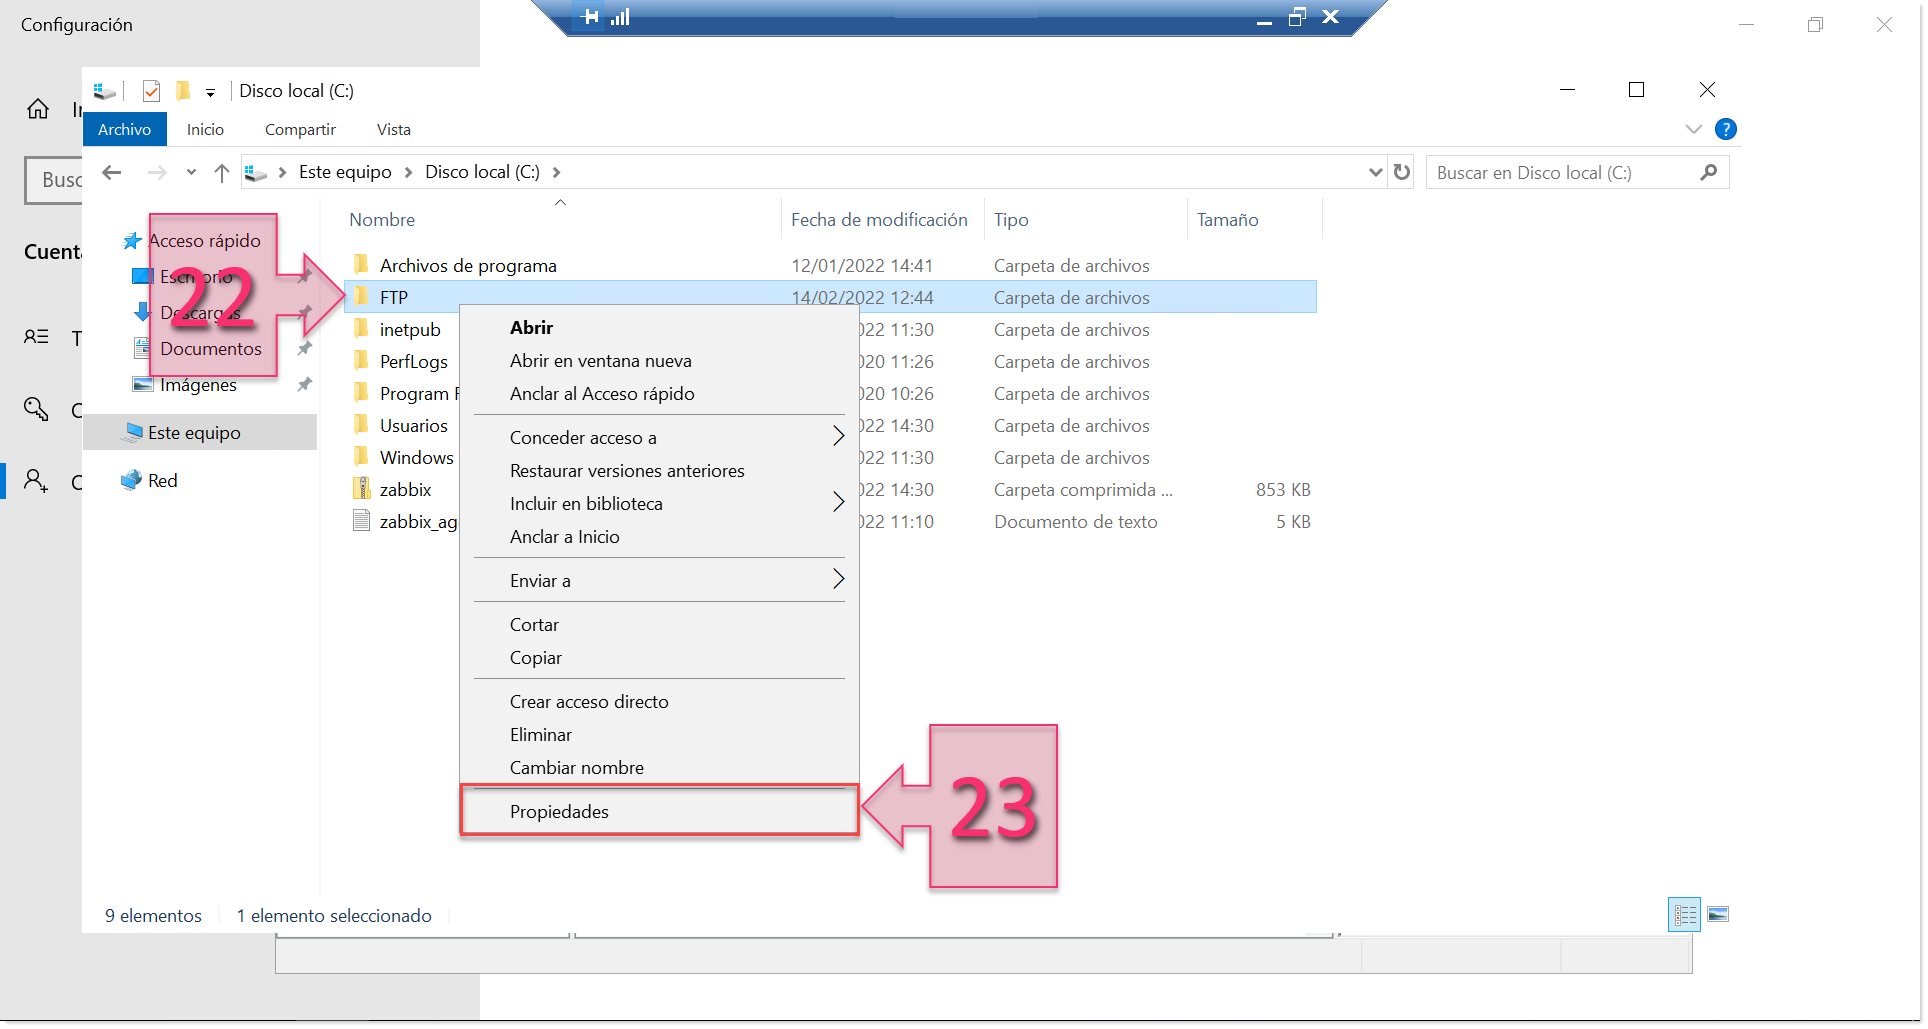
Part 3 – Edit the FTP folder properties
In the Folder Properties window, click on the Security tab and click on “Advanced” (24).
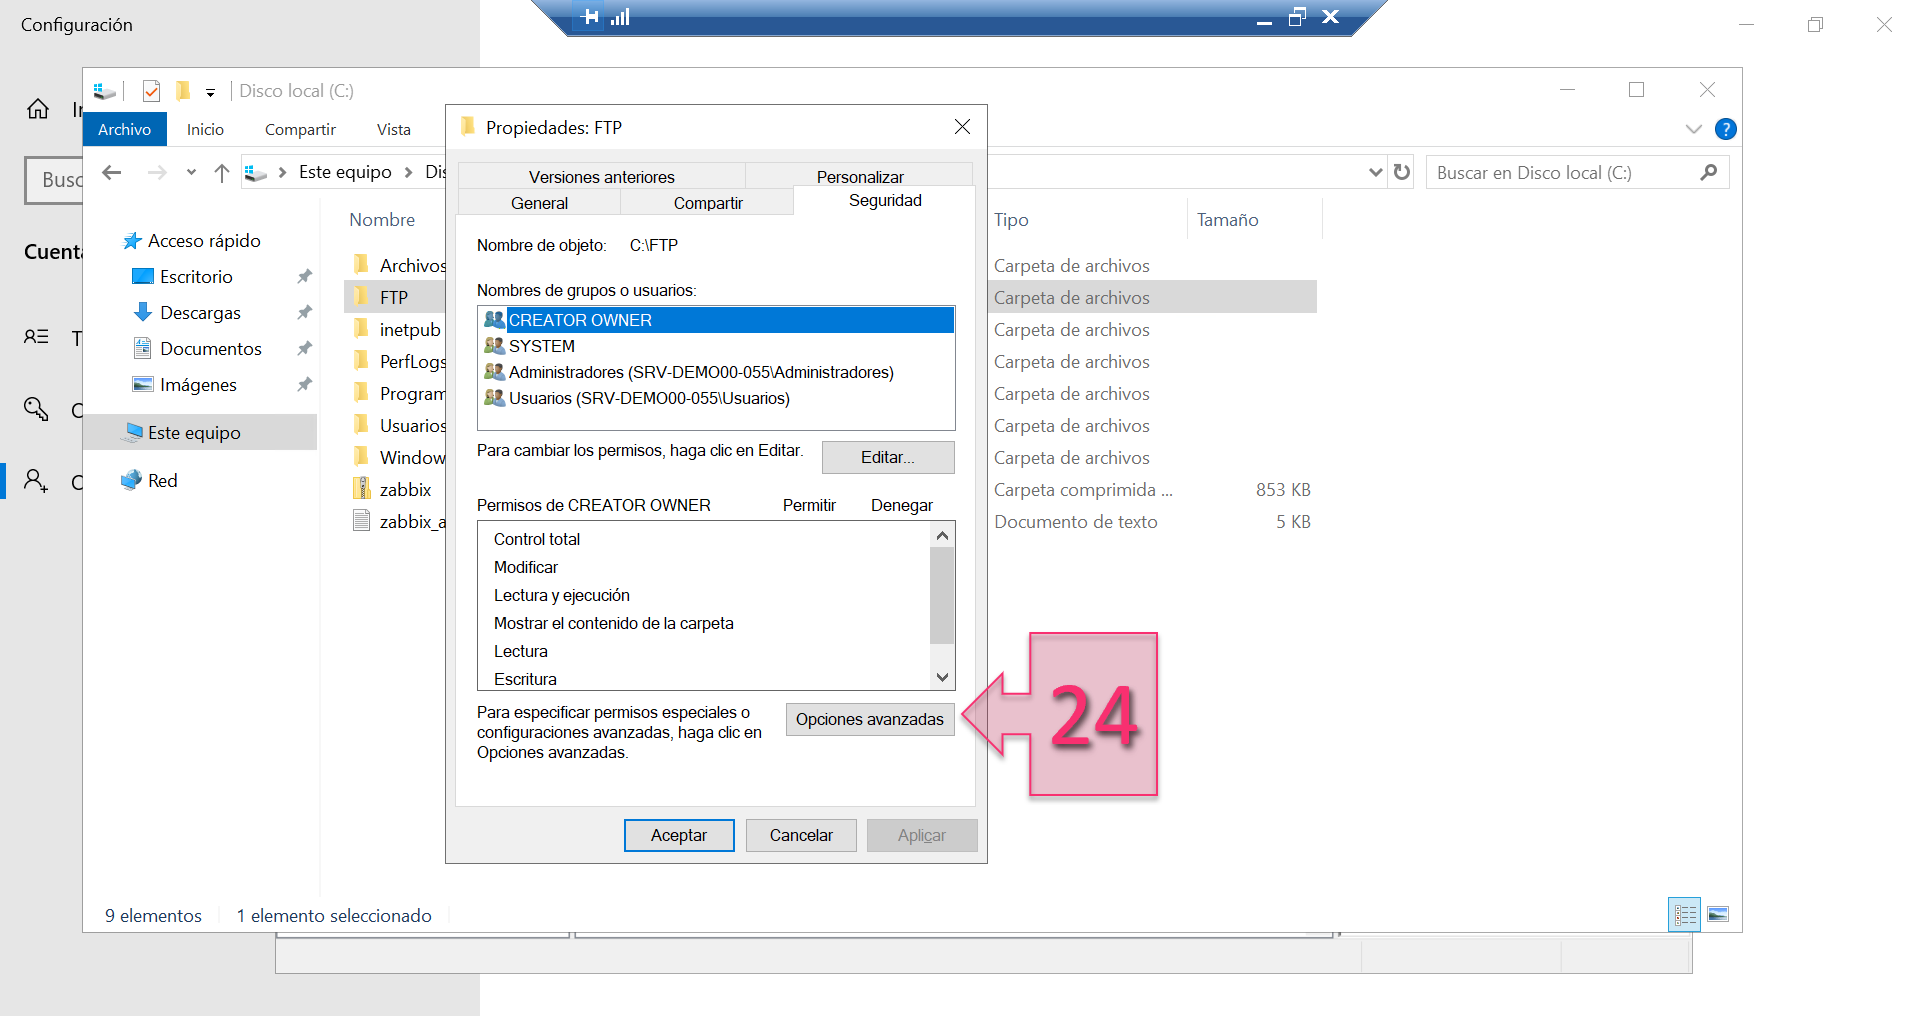
Part 3 – Open FTP folder advanced options
We need to disable the inheritance of the rest of the disk as we want to configure access manually. To do this, click on “Disable inheritance” (25).
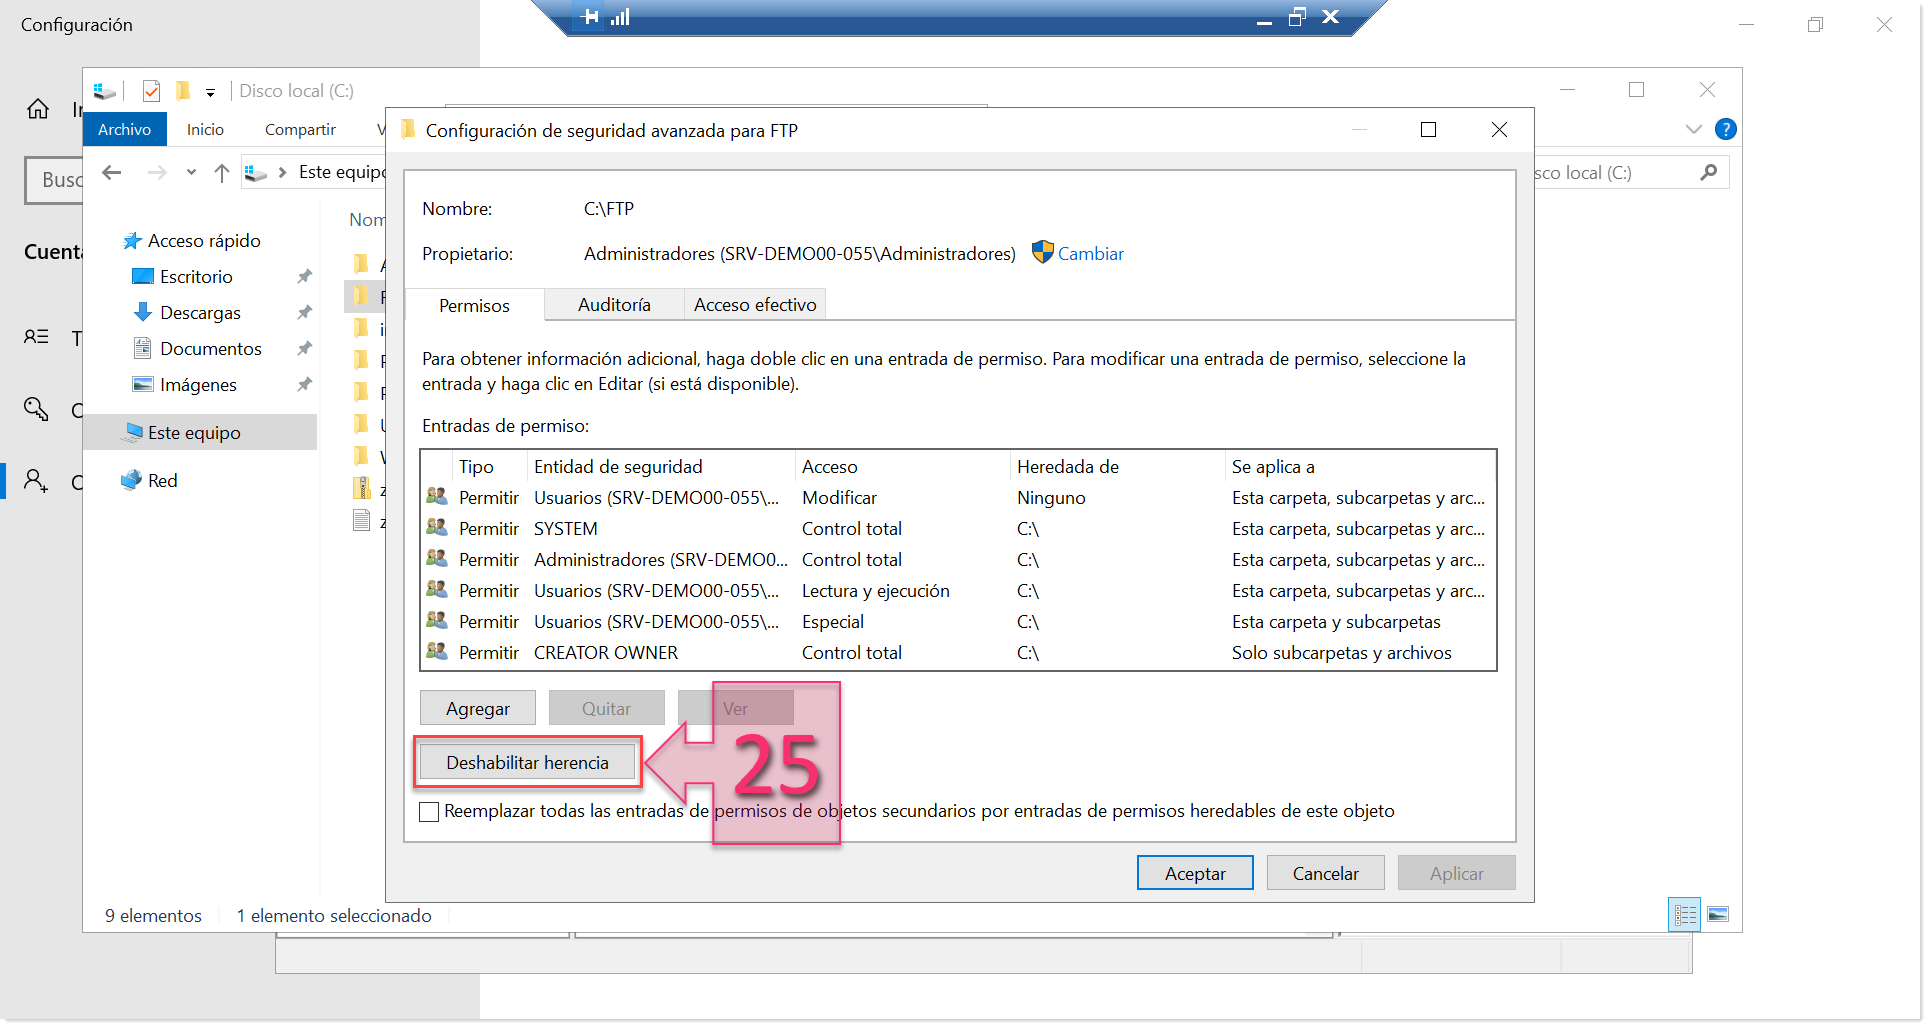
Part 3 – Disable inheritance
Next, a window will appear in which you should select the option “Convert inherited permissions into explicit permissions on this object” (26).
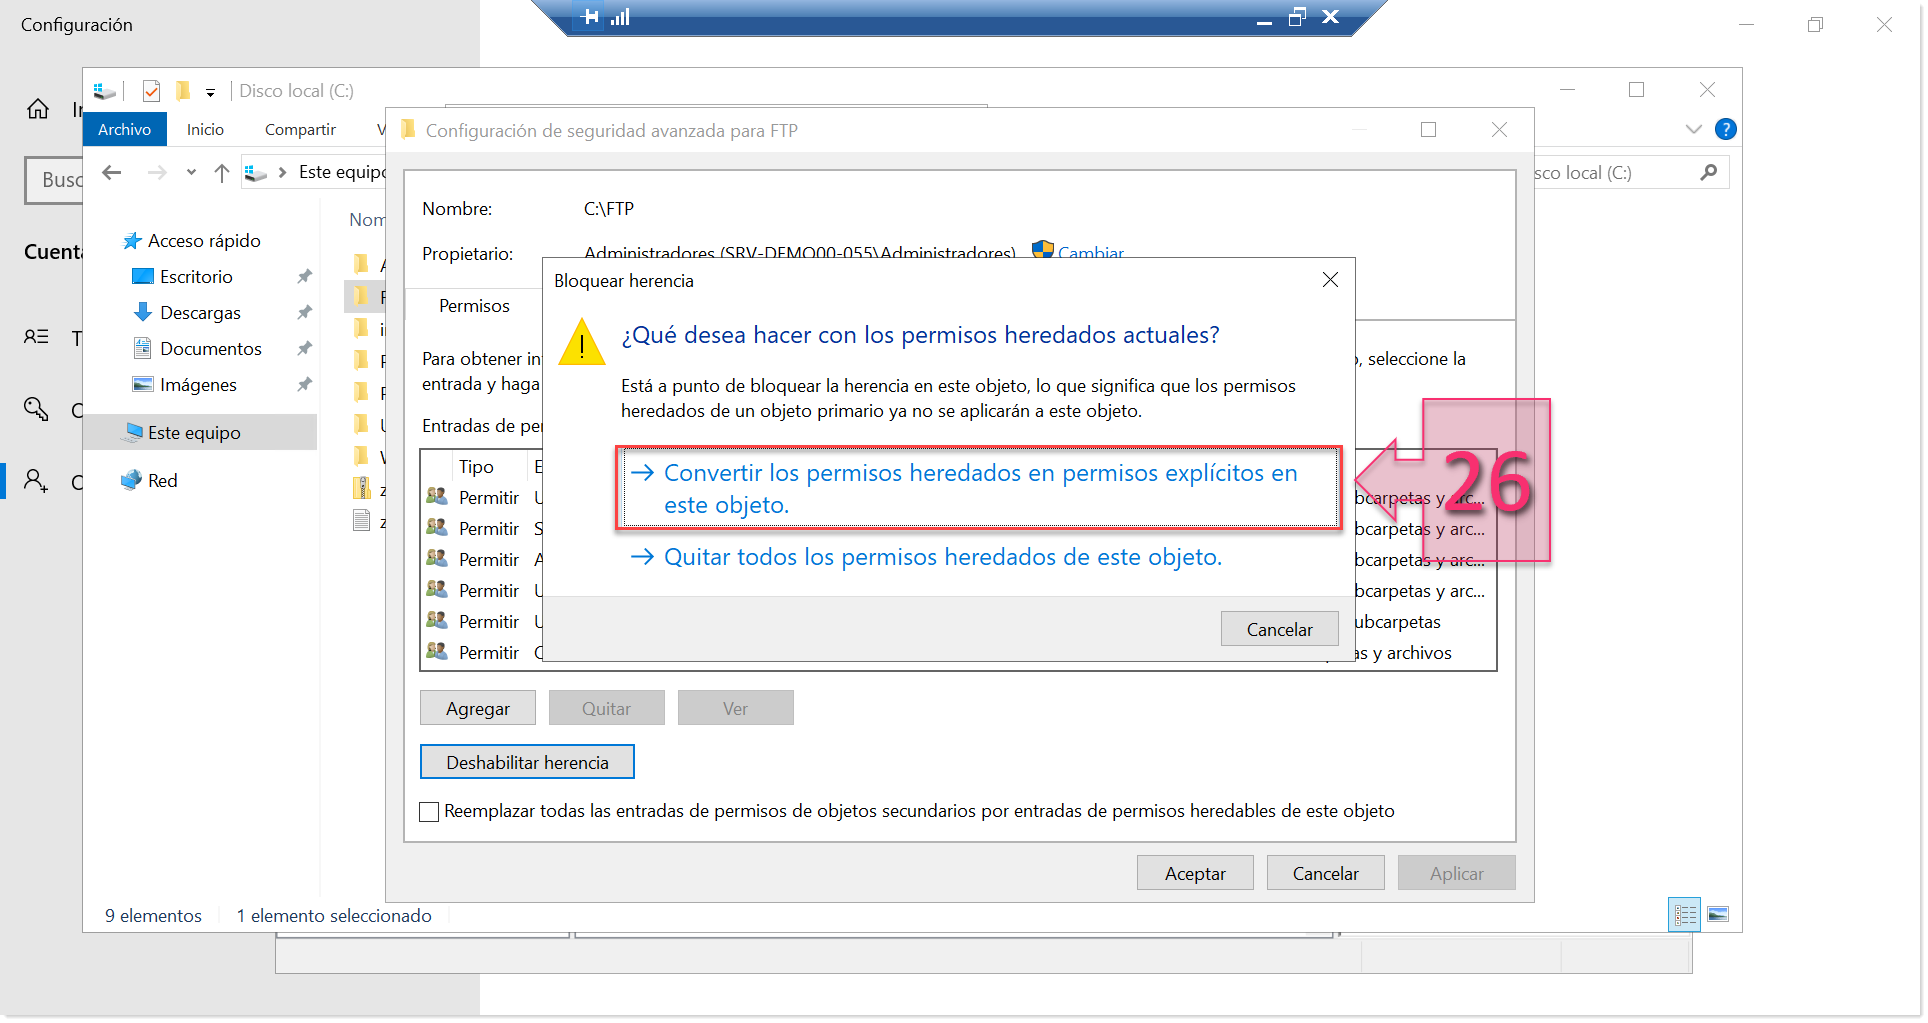
Part 3 – Disable inheritance
Next, click on “OK” to save your changes (27).
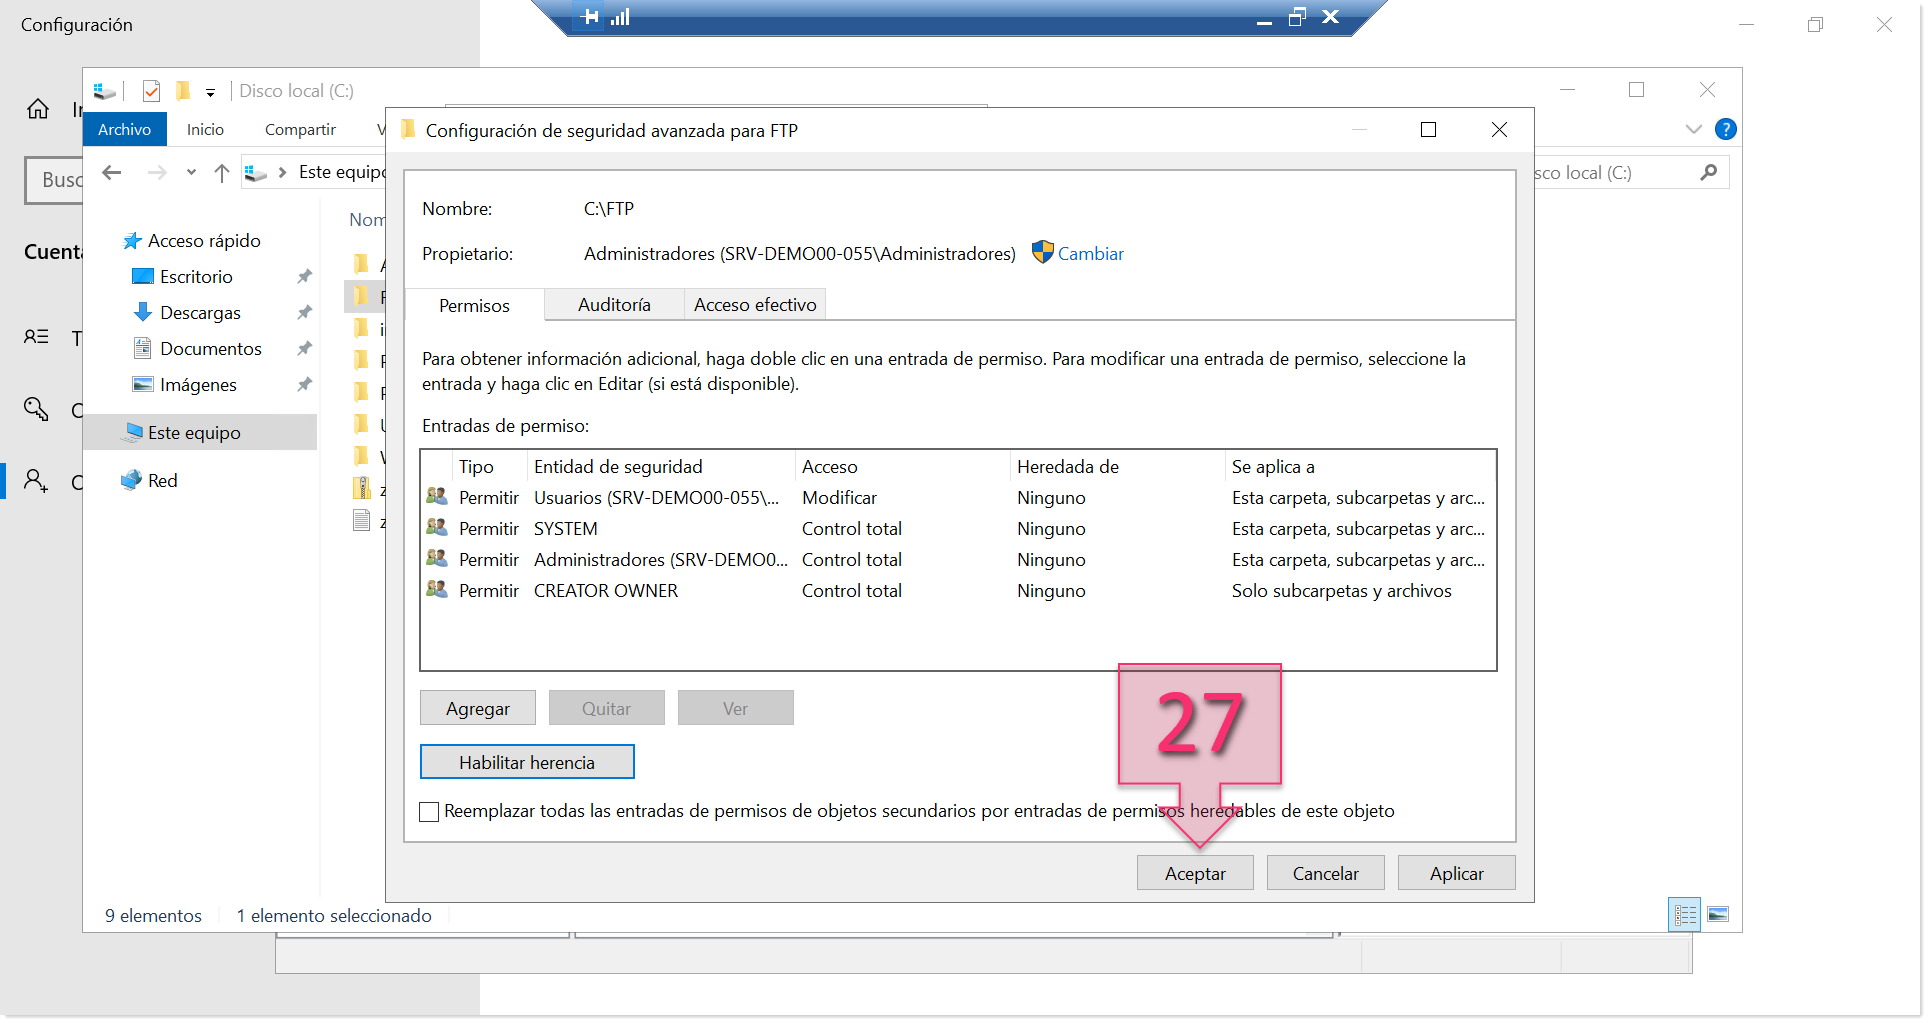
Apply the changes made so far
In the Folder Properties window for the FTP folder, click on “Edit…” (28) to continue making changes to the security options.
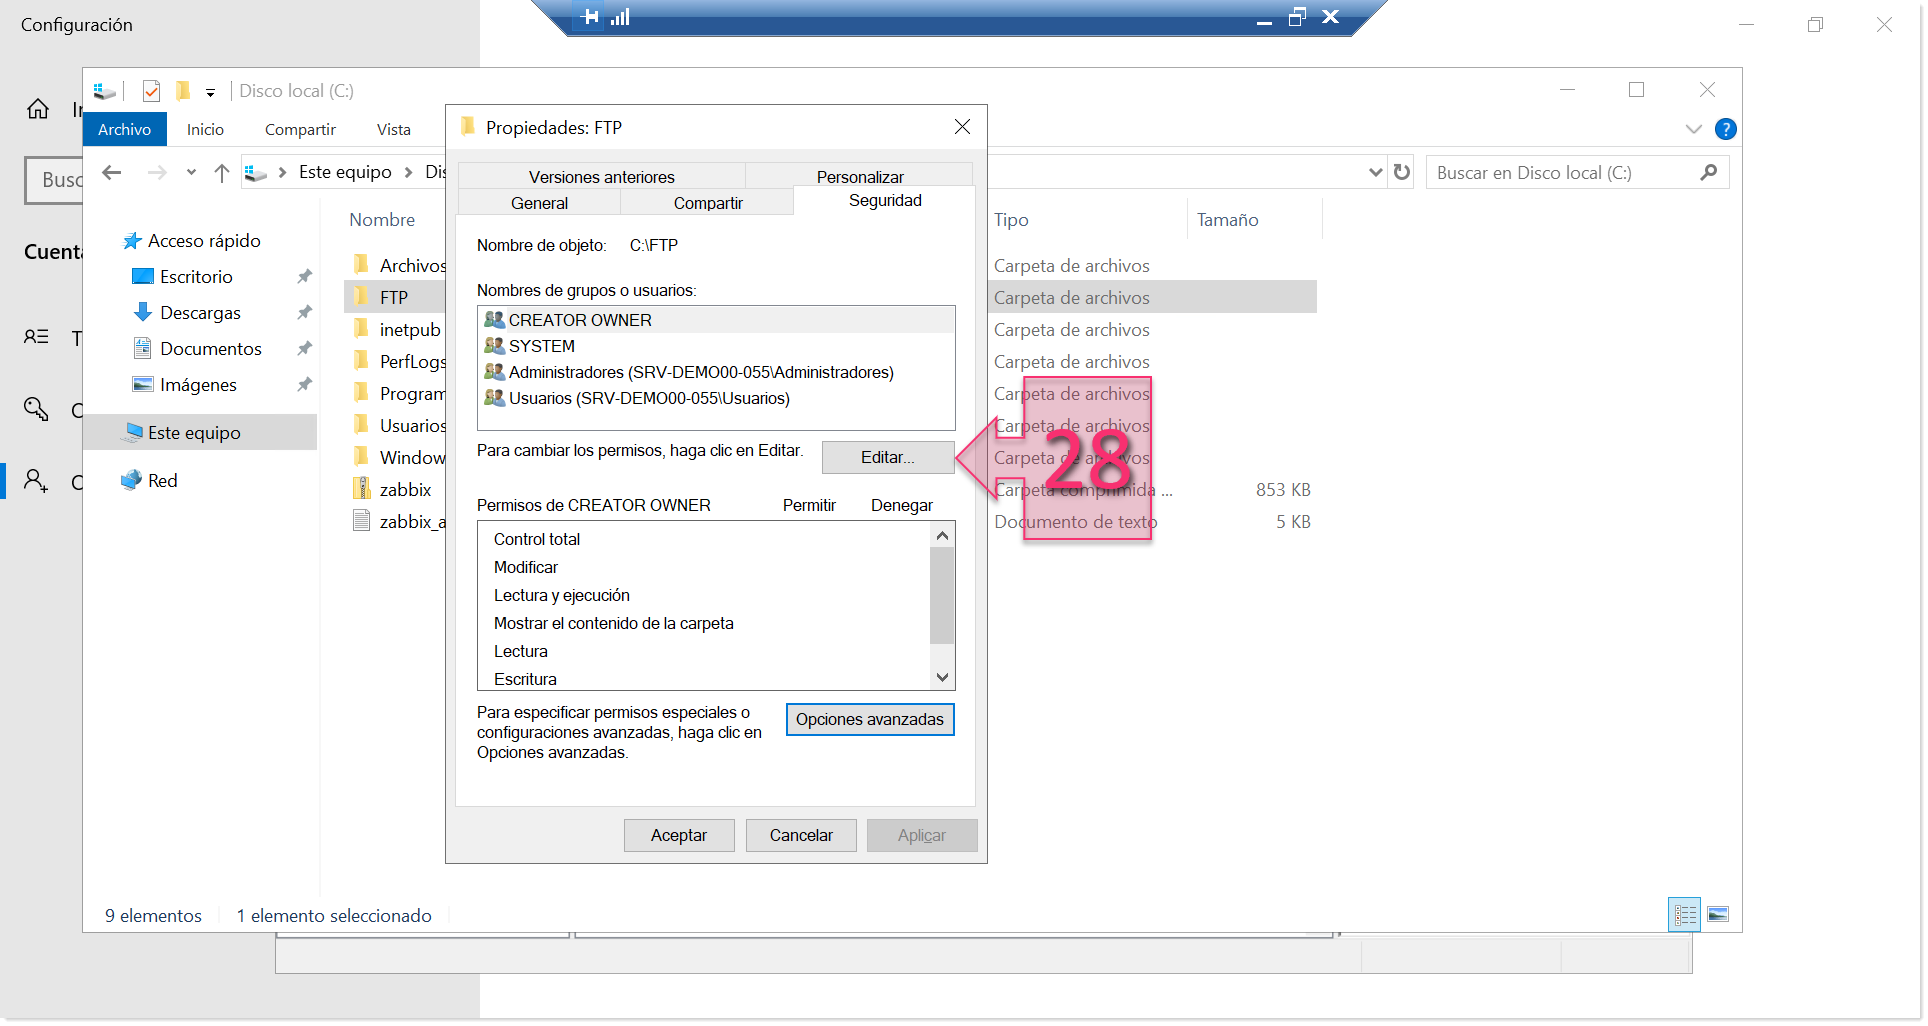
Part 3 – Edit access to the FTP folder
At this point, it is a good idea to apply the principle of least possible access, removing all users that do not need to access the folder. To do this, in the Security tab, select the users to remove (29) and click on “Remove” (30).
In this example, we have chosen to remove “Users”, which means all the users on this machine.
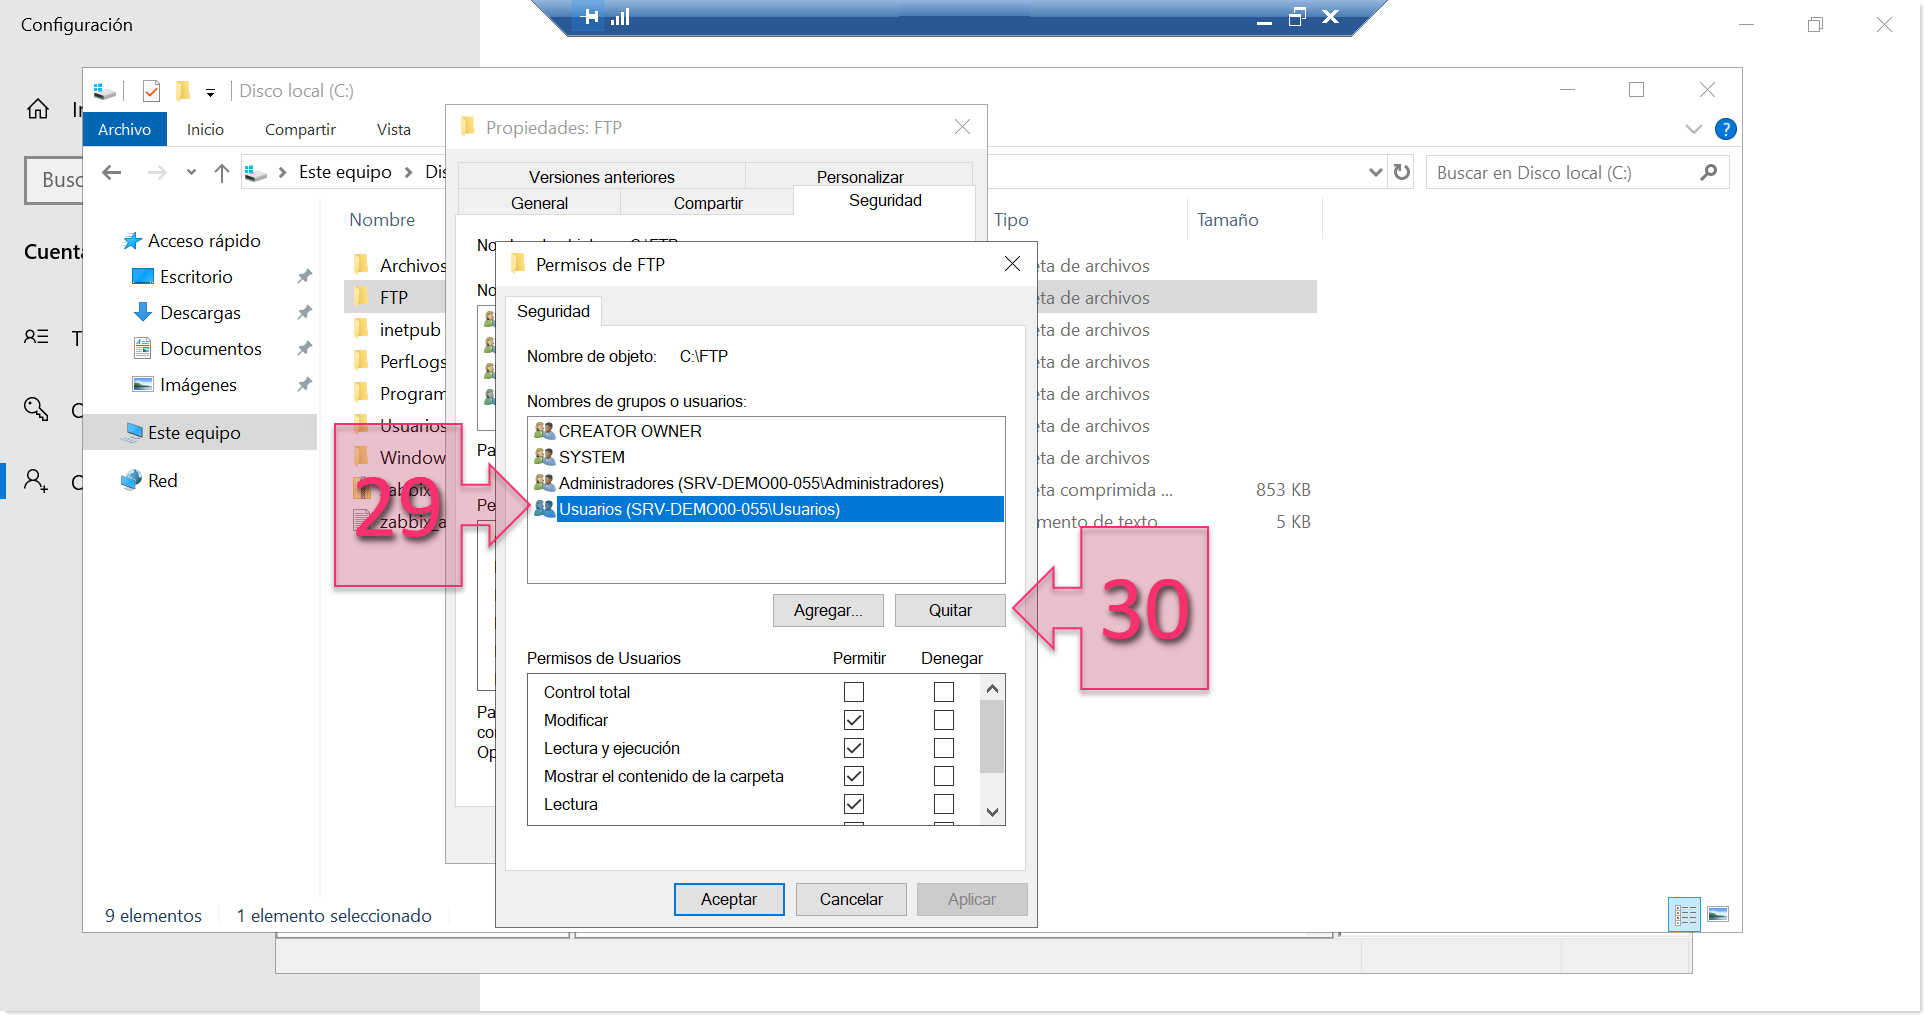
Part 3 – Remove users who do not need access
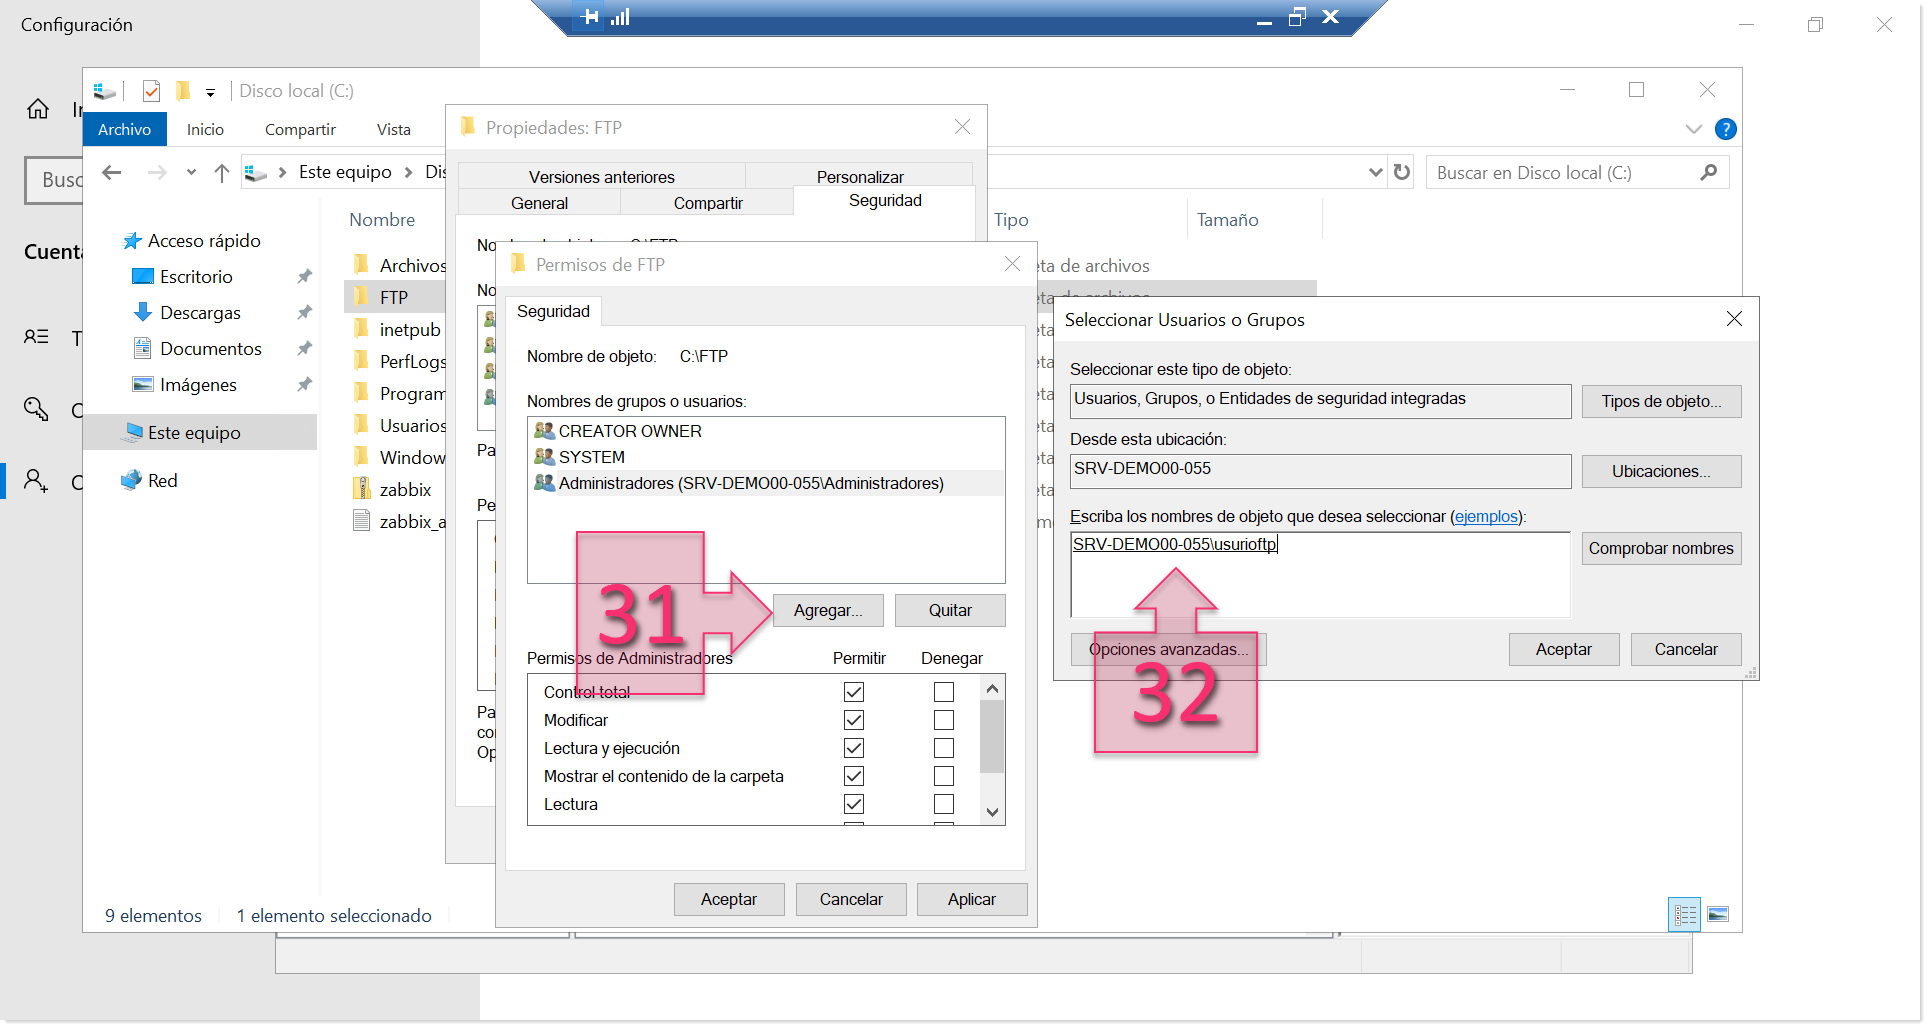
Part 3 – Add a new user
Once you have added your new user(s), you need to give Full Control (33) to the user for that folder so that they can delete and copy files, etc.
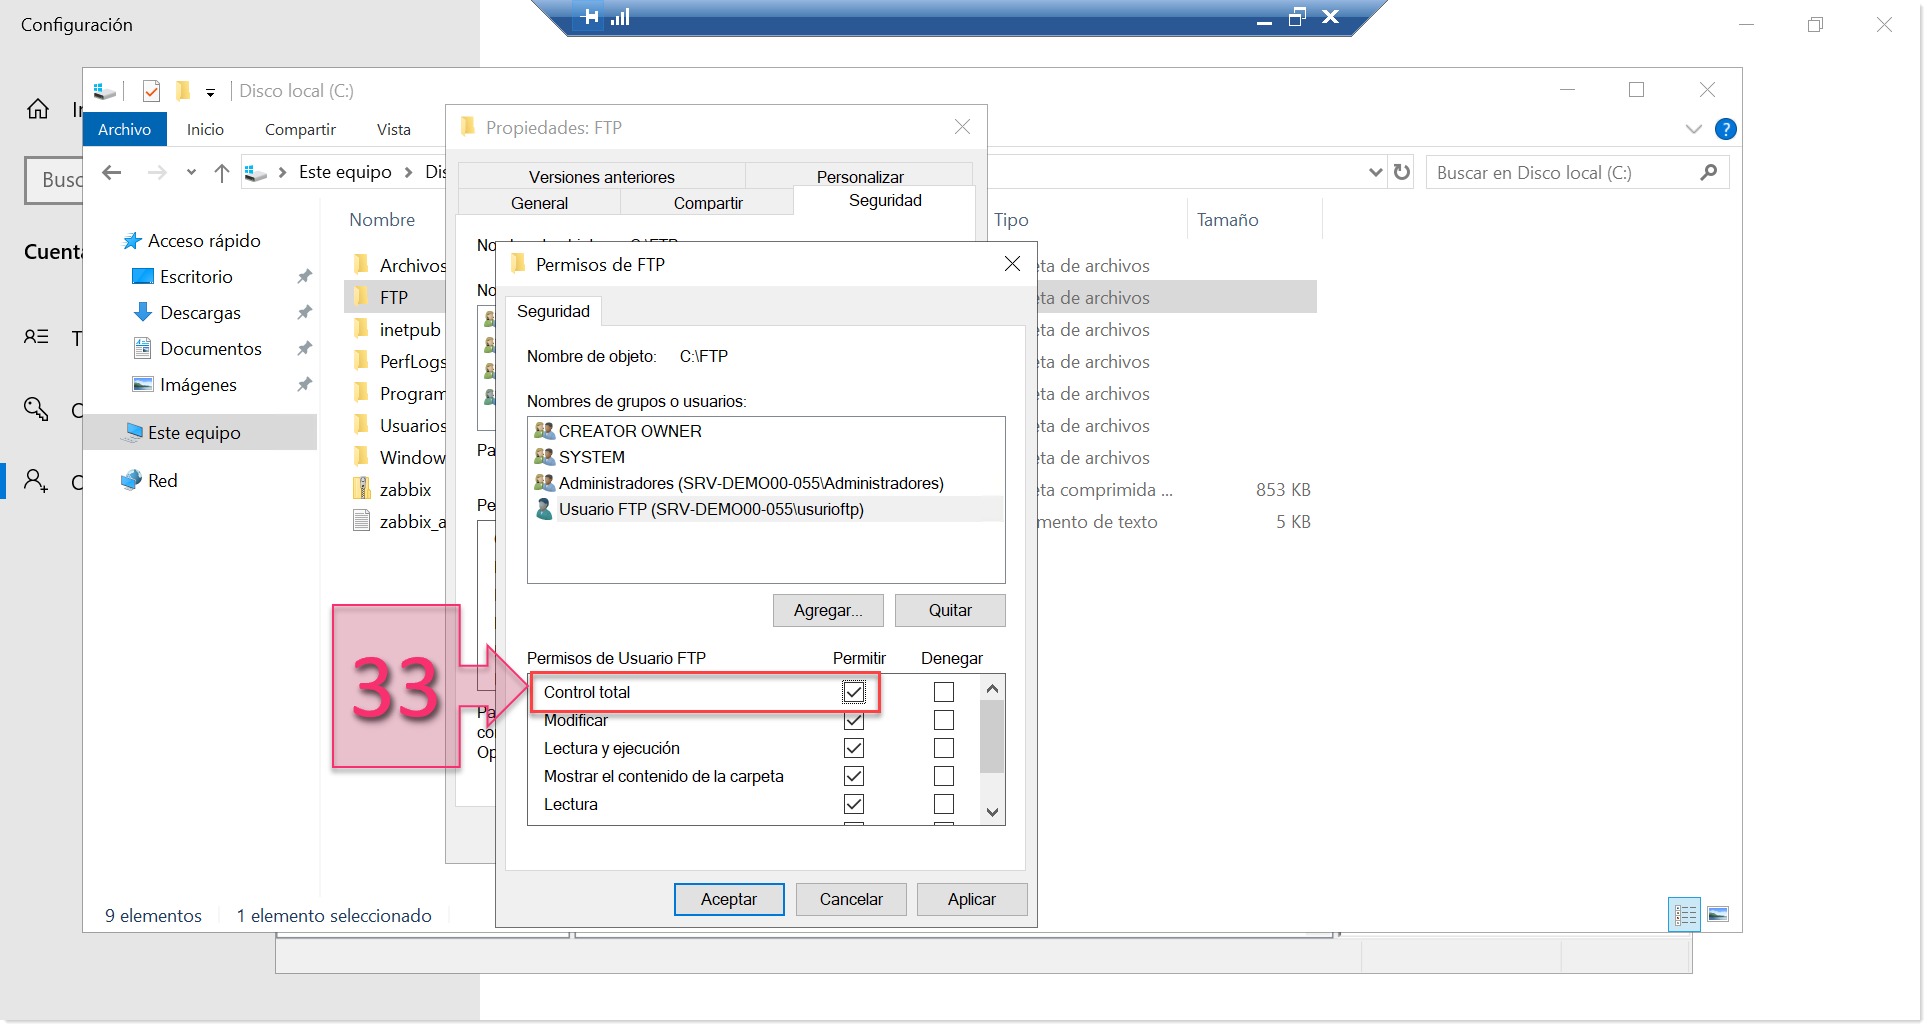
Part 3 – Give full control to FTP users for this folder
Part 4 – Configuring the FTP Site
At this point, you have already completed quite a lot of the work, but you still need to configure the FTP site in order to authorise connections, deny unauthorised access, etc.
First, open the Internet Information Services Manager and click on “Sites” in the top left-hand corner of the window. From the drop-down menu that appears, click on “Add FTP Site…” (34).
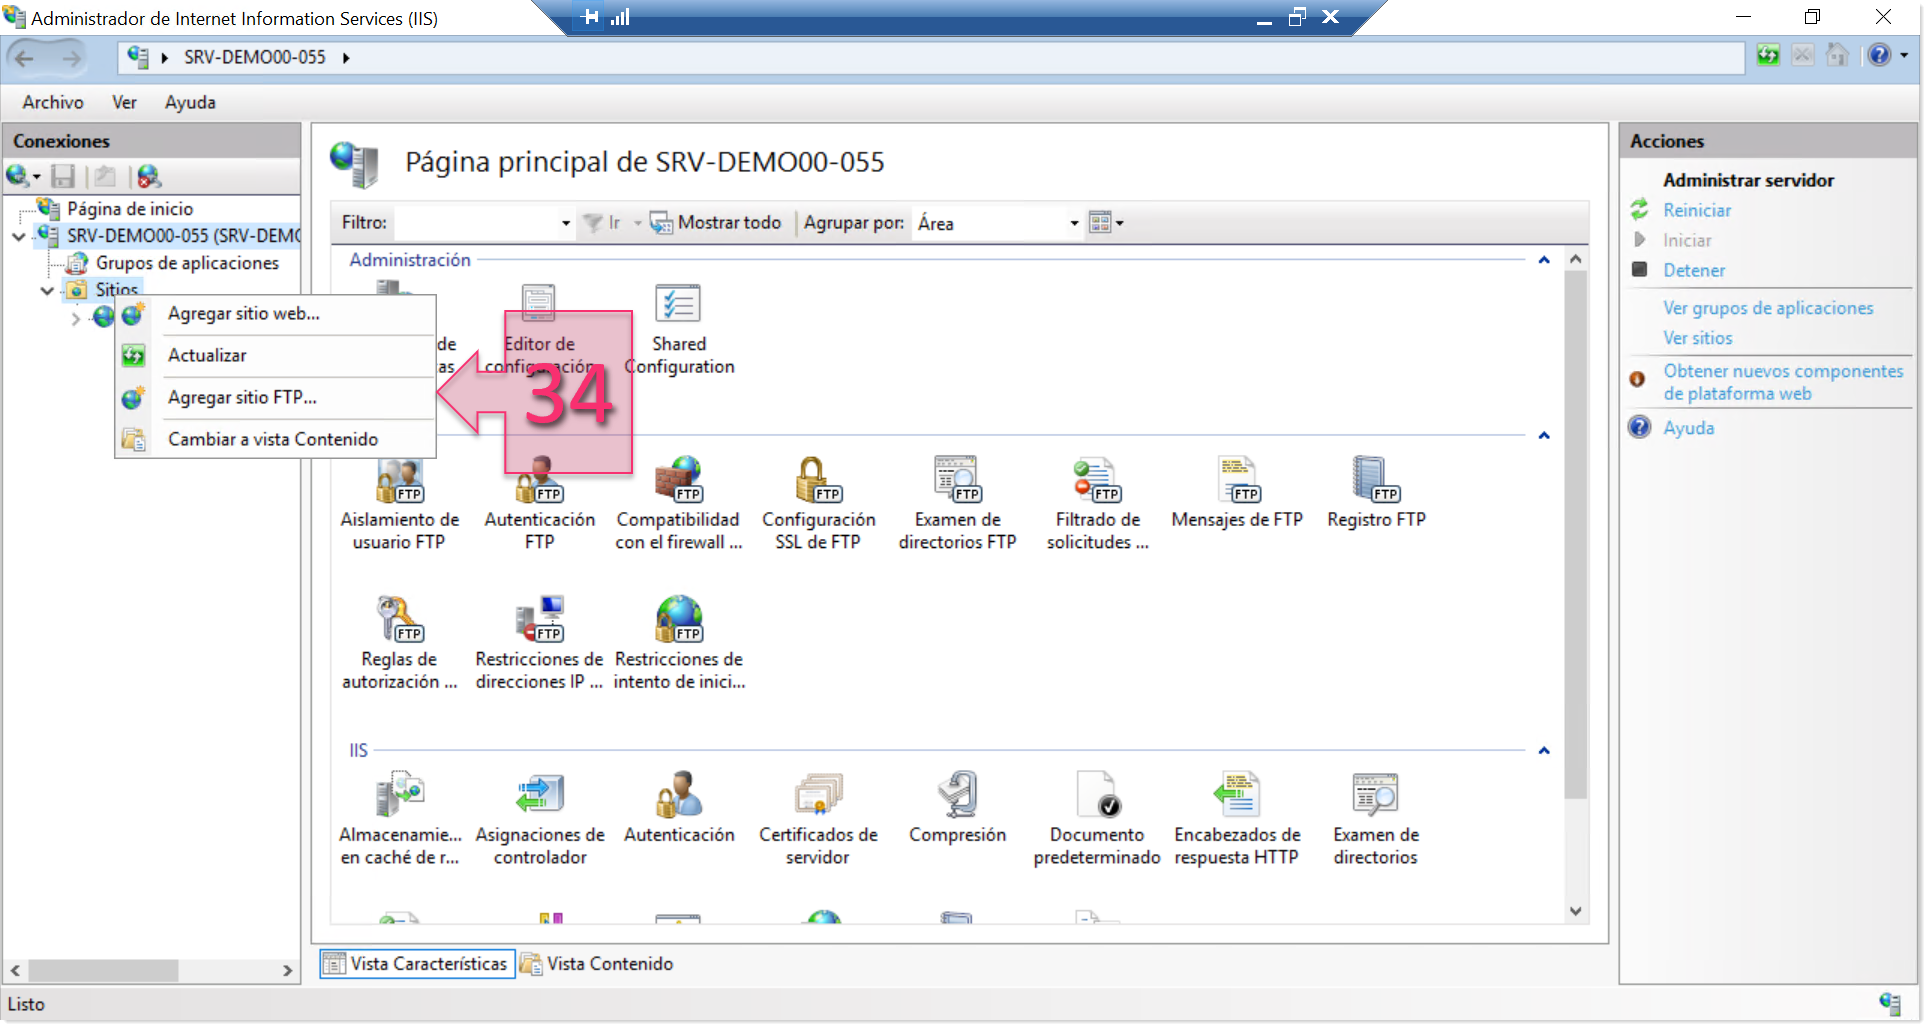
Part 4 – Add an FTP site
In the window that appears, you will need to enter the name of the site that you are going to create and the physical path (35) where you would like data to be saved. This folder will be “HOME” for the application. Once you have entered these details, click on “Next”.
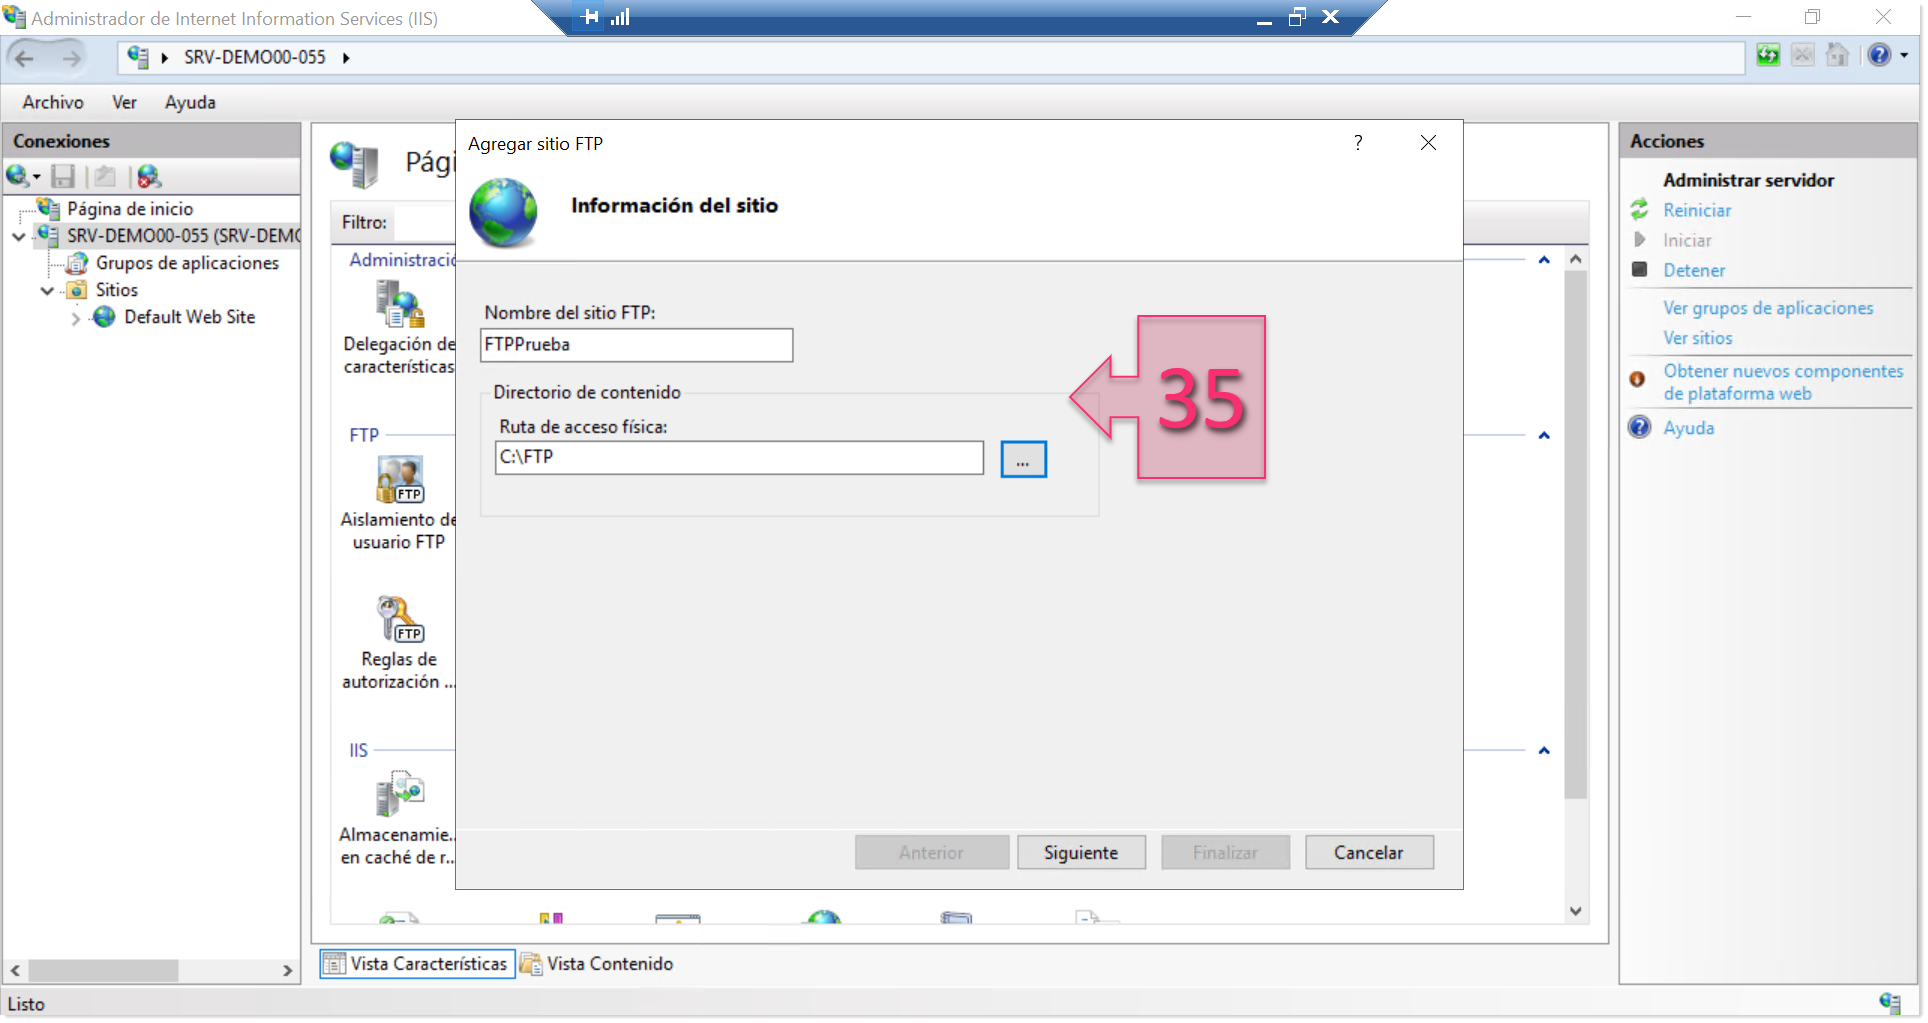
Part 4 – Enter a name and folder path for the new FTP site
Next, you need to configure the IP address and port (36) that will listen to FTP requests. You also need to configure whether to start the FTP site automatically and whether or not you wish to use SSL (37). Once you have made your choices, click on “Next”.
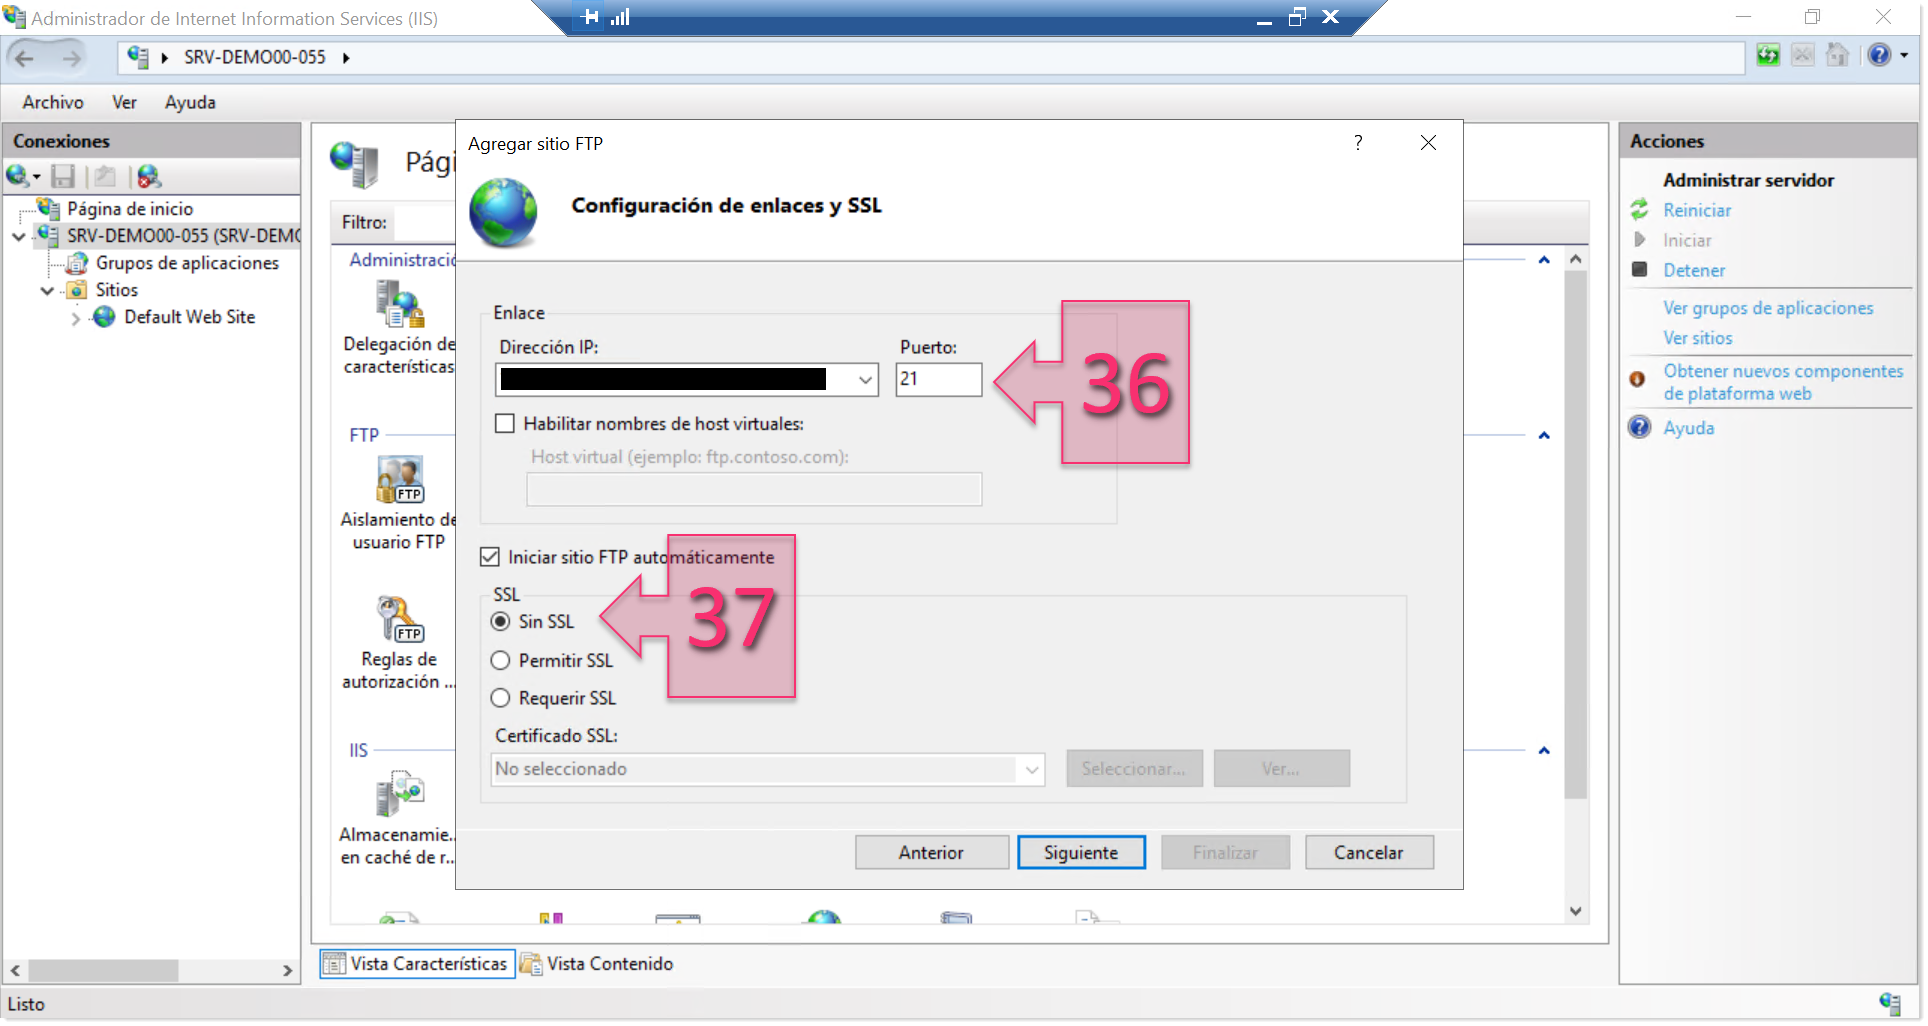
Enter FTP connection details
At this point, you will need to configure the authentication and authorisation settings. In the Authentication section (38), you can select Anonymous and Basic authentication. We do not recommend allowing Anonymous authentication, and in this tutorial, we will opt for Basic only.
In the Authorisation section, you need to choose who has access to the service (39). You can select “All users” or “Specified roles or user groups”, after which you can, for example, block all users apart from one.
Lastly, you will need to decide whether users have Read or Write permissions or both (40).
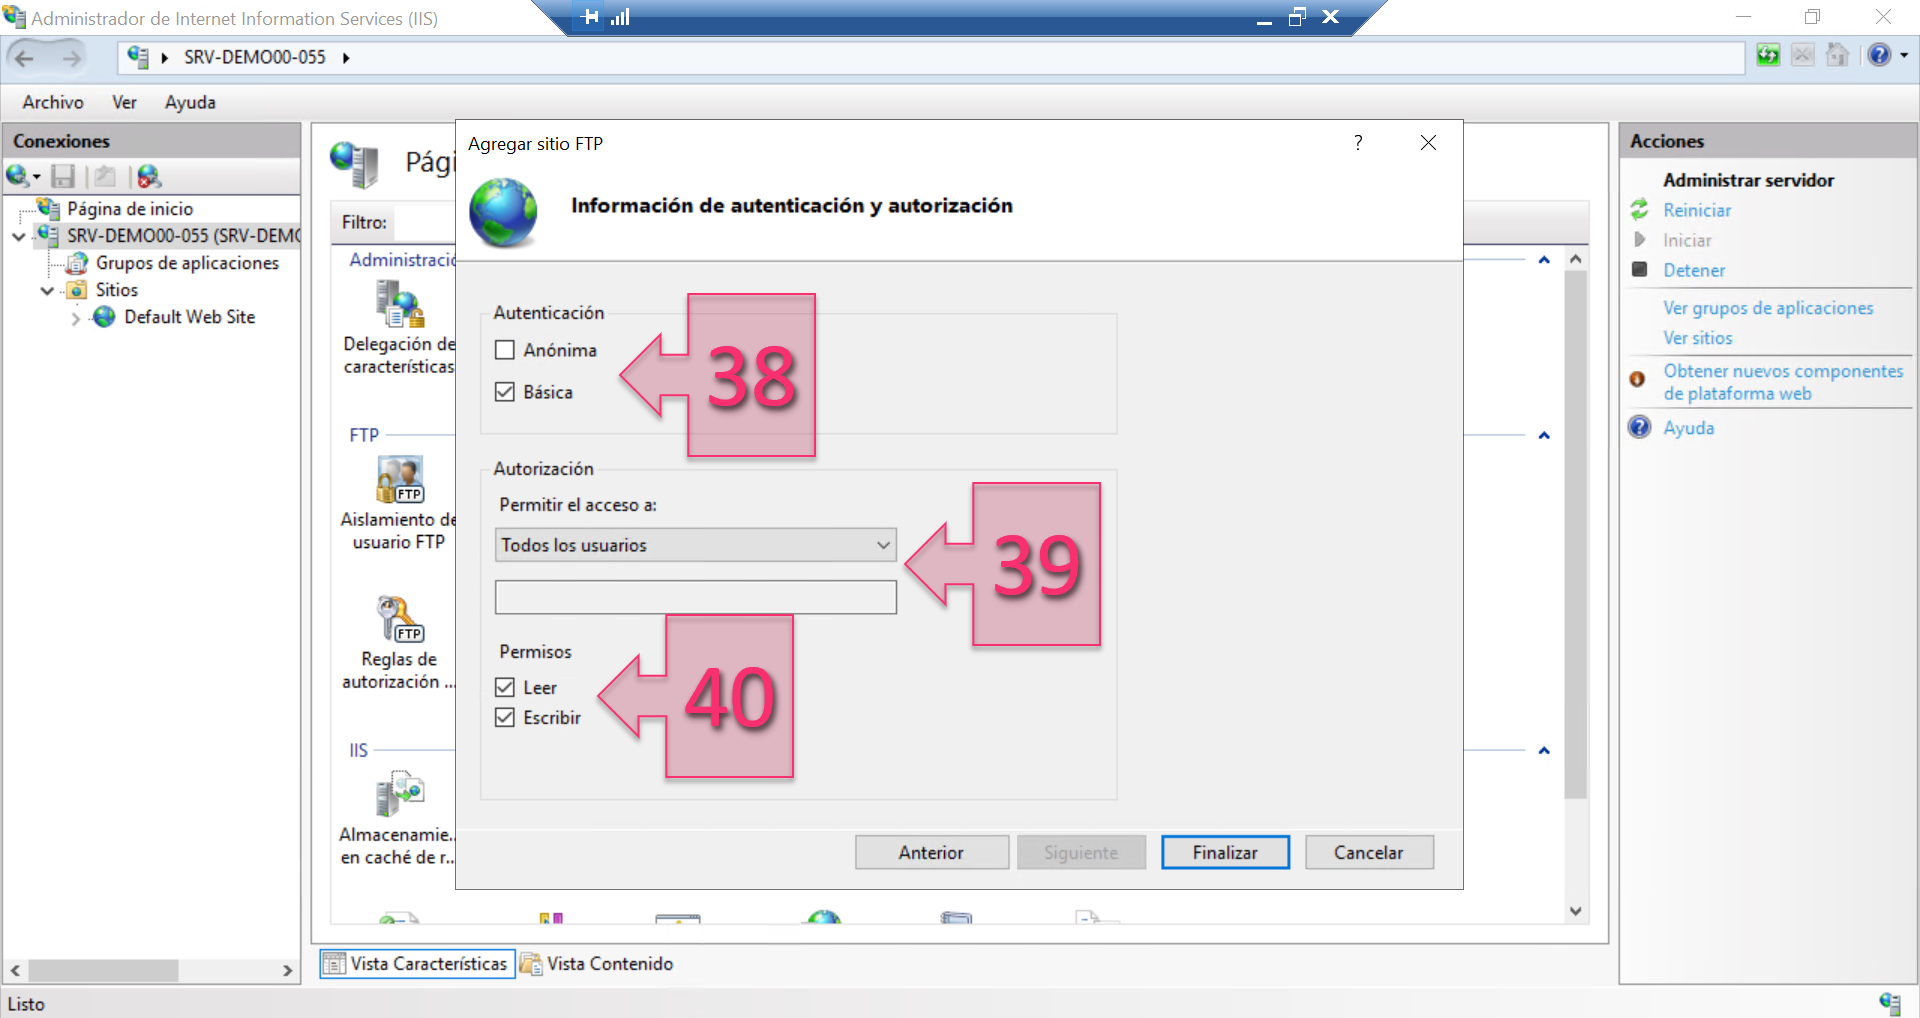
Part 4 – Enter authentication and authorisation information
You have now finished configuring your FTP server.
Part 5 – Checks
To check that everything has been configured correctly, you should try to connect to the FTP service. You can attempt this from the machine itself first before attempting again using a remote connection.
We recommend connecting in the following way:
First, open a command prompt and establish a connection by typing:
# ftp IP_Of_Server
Once connected, you will be asked for a username and password in order to gain access. Use the user that you configured previously.
Once connected, check that you can upload a file and that it appears in the FTP folder.
To do this, use the “put” command to upload a file.
# put file.extension
It is possible to enable a feature whereby you can see the upload progress in the form of the “#” symbol on the screen. To do this, simply type “hash”.
The result of this check may look something similar to the screenshot below.
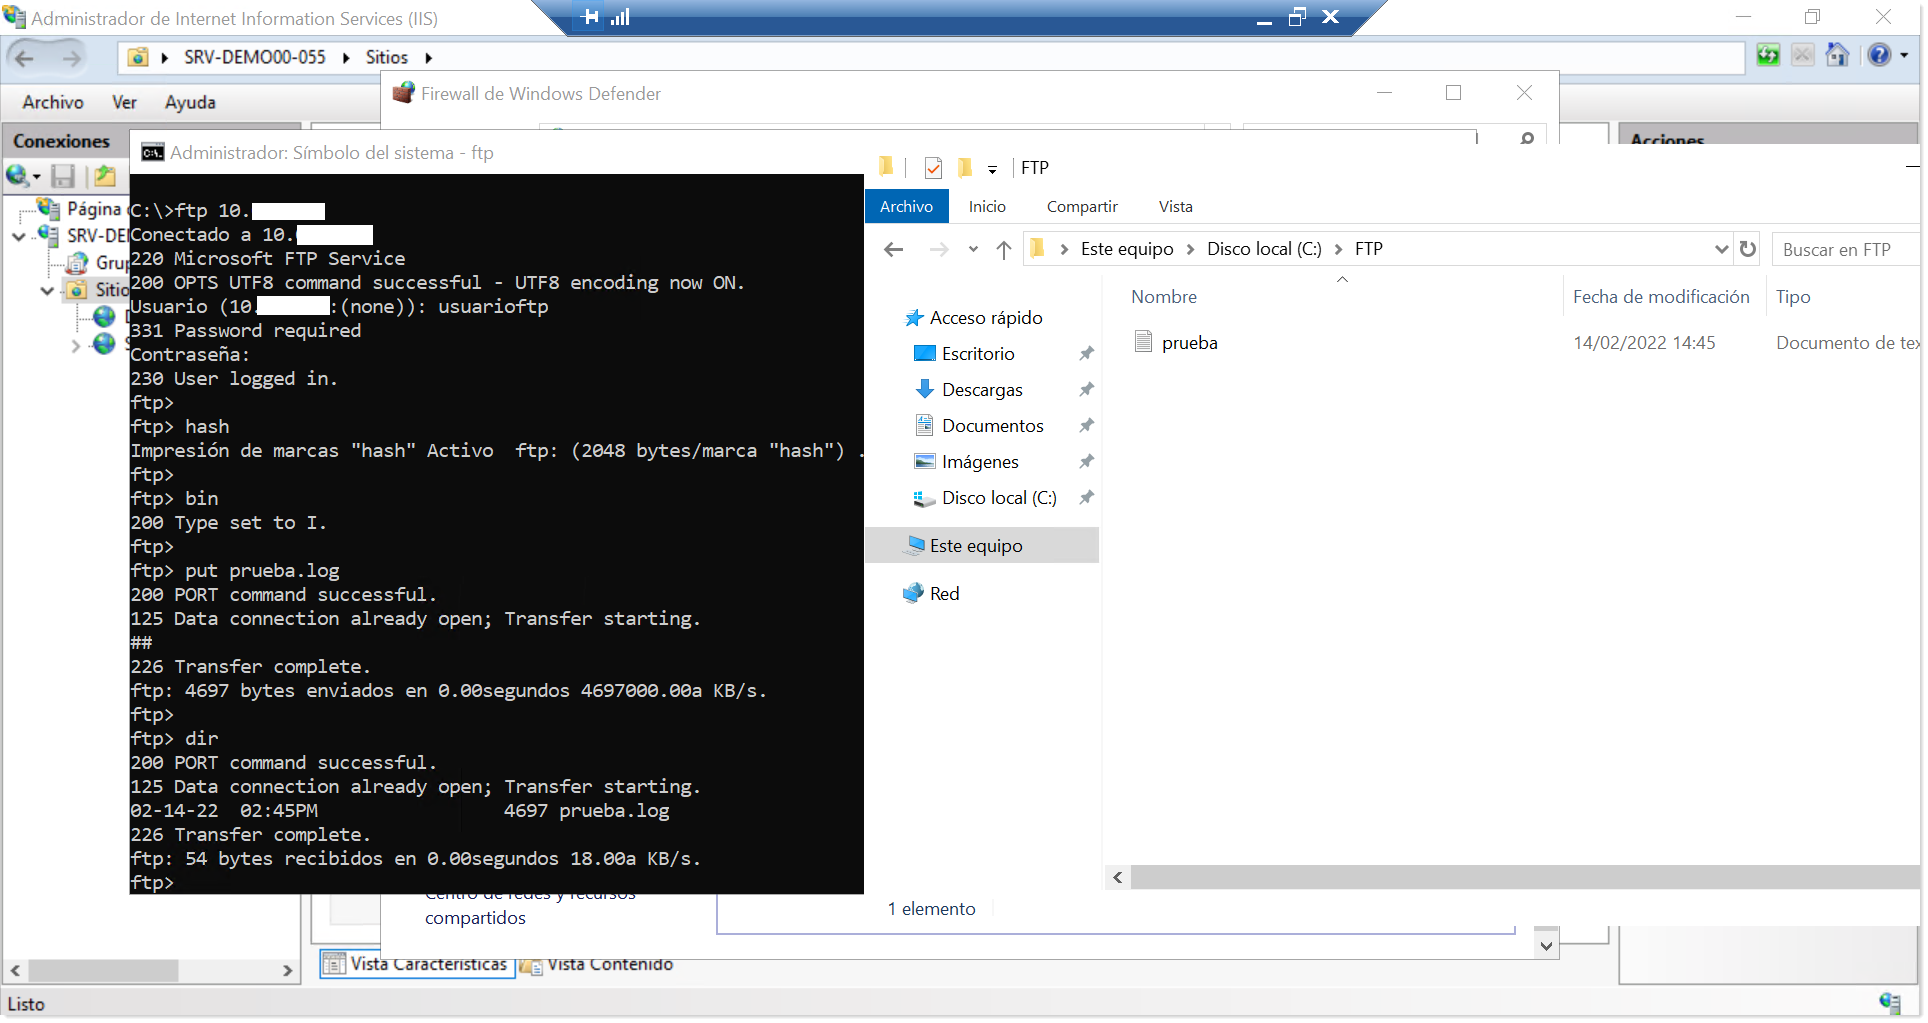
Part 5 – Check the connection and upload a file
Once you have checked that everything is working correctly, you can also check that it is possible to access the FTP from Windows Explorer. To do this, simply open Windows Explorer and type “ftp IP_Of_Server” in the address bar.
You will then be asked for a username and password. If all is working correctly, the FTP folder will open and you will be able to see the folder contents.
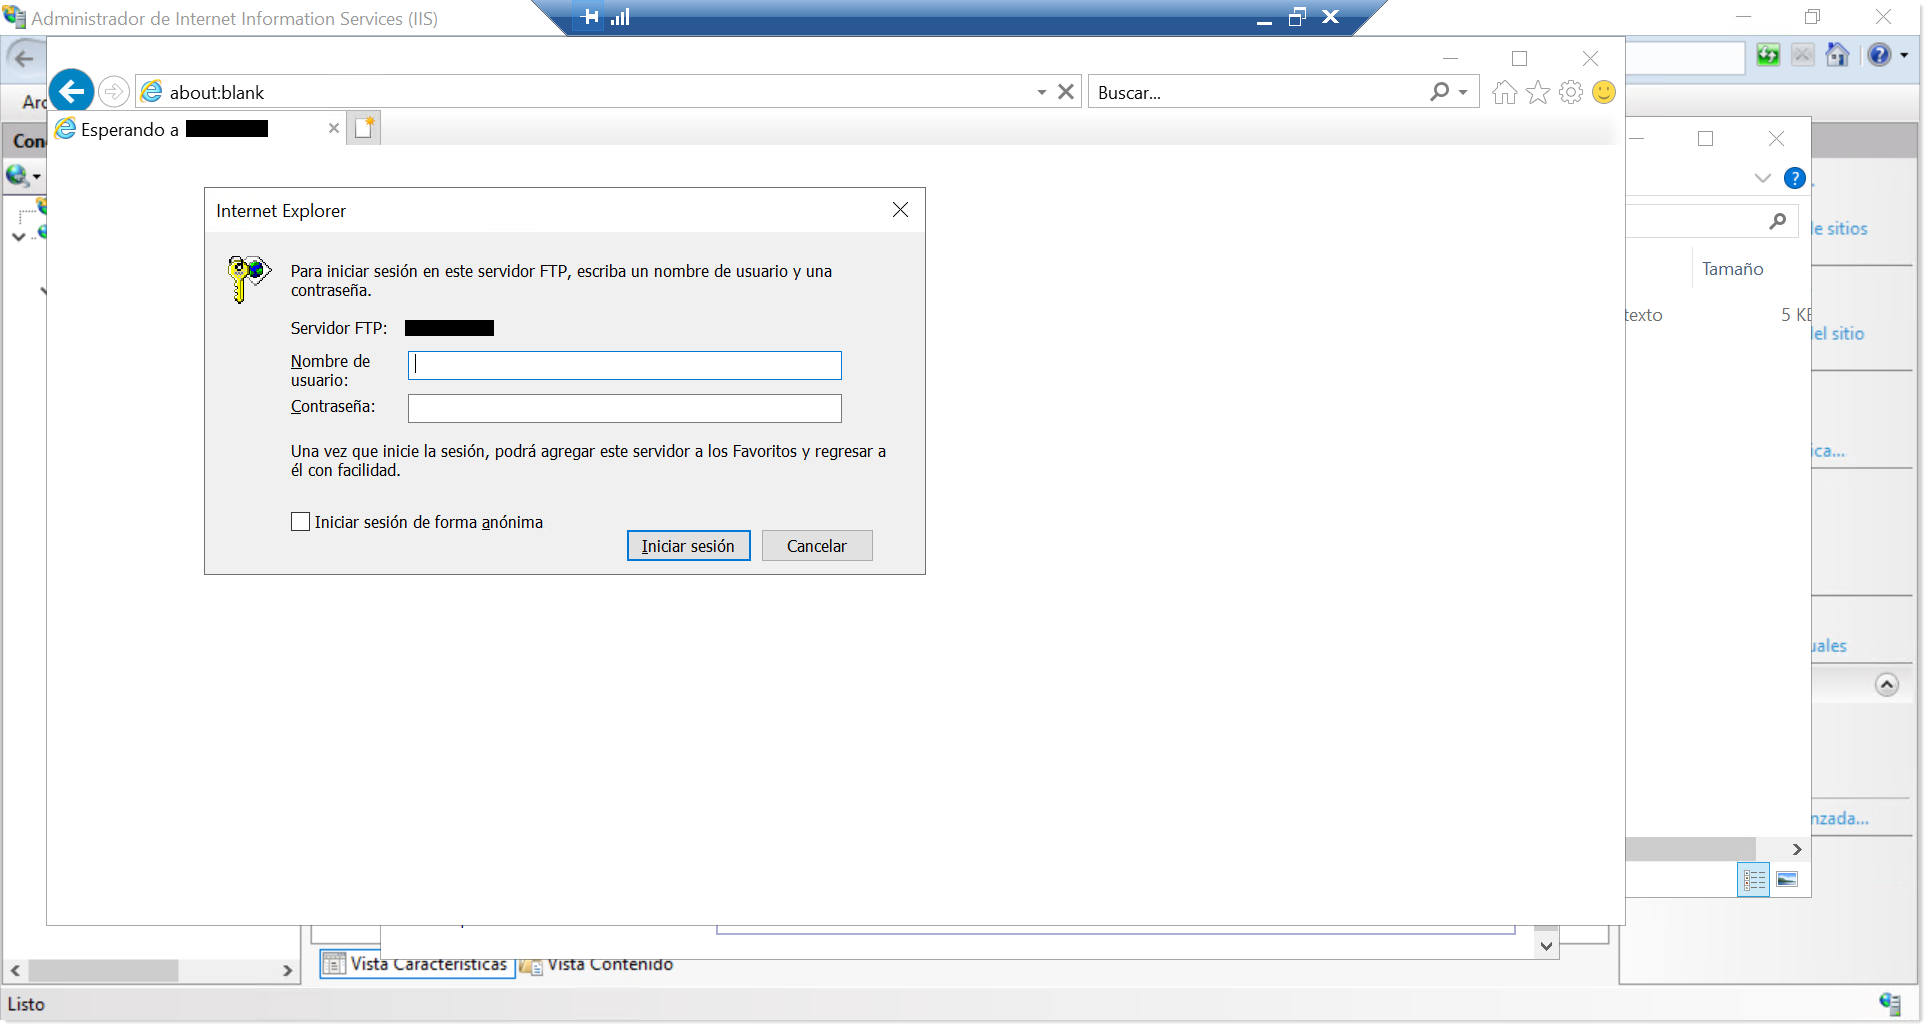
Part 5- Checking the FTP service using Windows Explorer
If both processes work correctly, your FTP service is now fully up and running.
Conclusions and next steps:
In this tutorial, you have learned how to install and configure an FTP Server using IIS on a Windows server hosted by Jotelulu.
If you found this tutorial useful and would like to learn more about other related services, the following tutorials may also be of interest to you:
- How the Deploy a New Server on Jotelulu.
- How to Create a Site-to-site VPN Tunnel on Jotelulu.
- How to Create a Server Image to Use When Configuring a New Remote Desktop.
- How to Create a VPC and Link Tier Networks on Jotelulu.
We hope that this tutorial helps you to set up your FTP server quickly and without any problems. However, if you do encounter any issues, please don’t hesitate to contact us so that we can help you.
Thank you for reading!


