In this tutorial, you will learn how to move files to Jotelulu using FTP. Simply install an FTP server, configure the program and you’re ready to go!
How to move your files to Jotelulu using FTP
Before you get started
To successfully complete this tutorial and establish a remote access VPN connection between your client device and server, you will need:
- To be registered with an organisation on the Jotelulu platform and have logged in.
- To have registered for a Servers subscription.
Part 1 – Install an FTP server on the server
The first step is to download and install an FTP server. There are many different options available on the market, but in this tutorial, we will use Filezilla since it is widely used, user-friendly and, importantly, free.
To download the program, simply go to the Filezilla website and go to the downloads section.
In this tutorial, we are going to set up the program in order to upload files to a server hosted by Jotelulu. This means that you will need to access the server and launch the download from there. Don’t worry if the server has only been recently installed; the server images used by Jotelulu are already configured to allow downloads without needing to make any changes.
Once you have downloaded the file, launch the installer as an administrator.
First, you will need to accept the license agreement (we always recommend reading it in full first) by clicking on “I agree” (1).
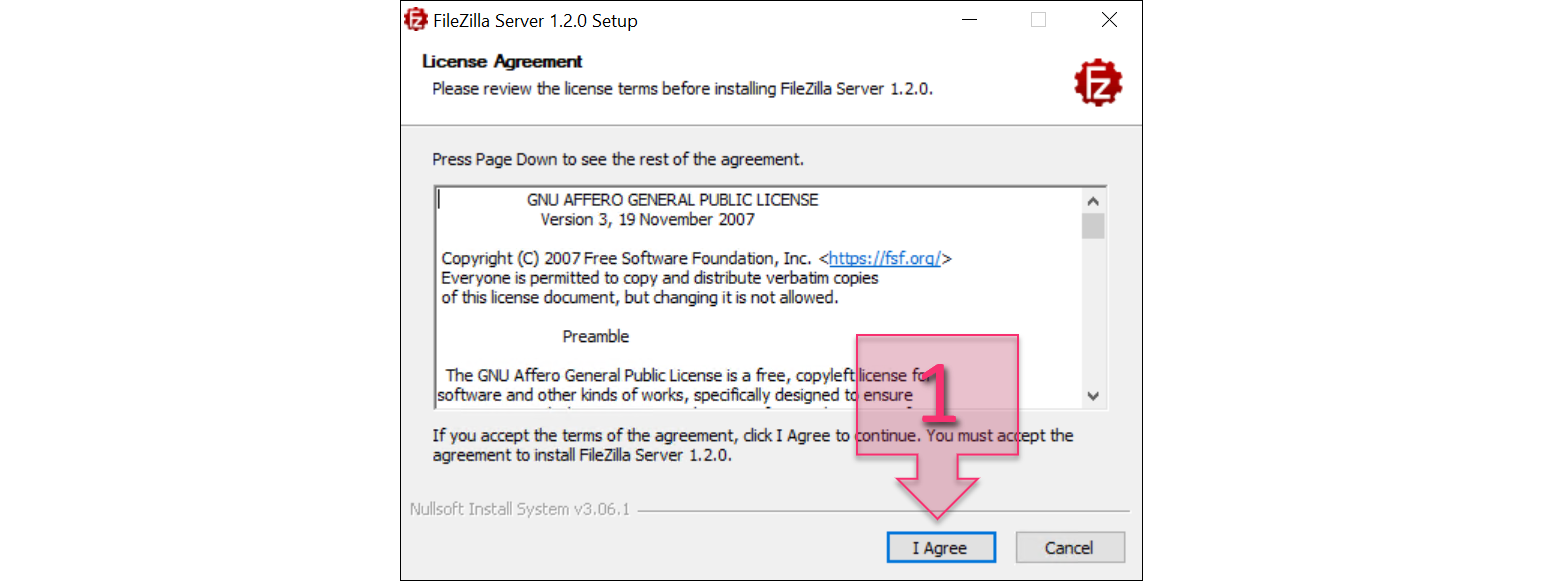
Part 1 – Accept the Filezilla License Agreement
Next, you need to select the components to install (2). Leave all the default options exactly as they are and click on “Next” (3).
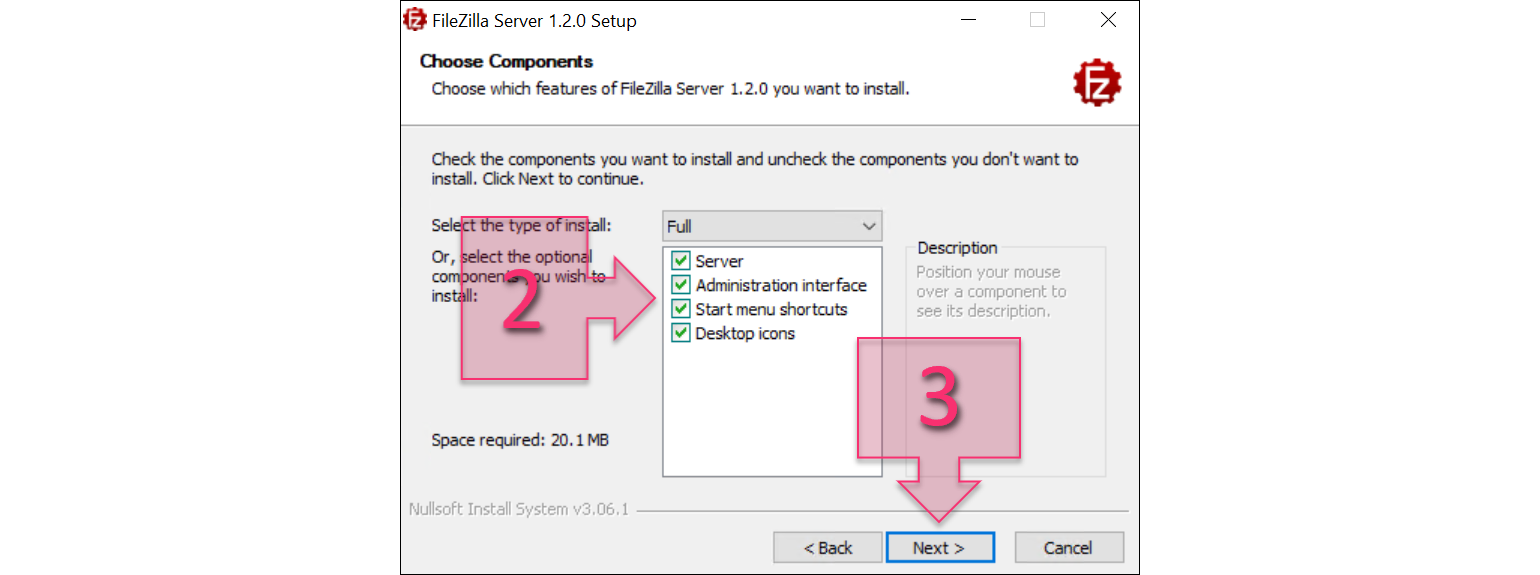
Part 1 – Select the Filezilla components to install
Next, you need to choose a destination folder for the program. Unless your company has a particular policy regarding where programs are installed, we recommend leaving the default path as it is. If you wish to change it, simply click on “Browse…” (4) and choose a different folder.
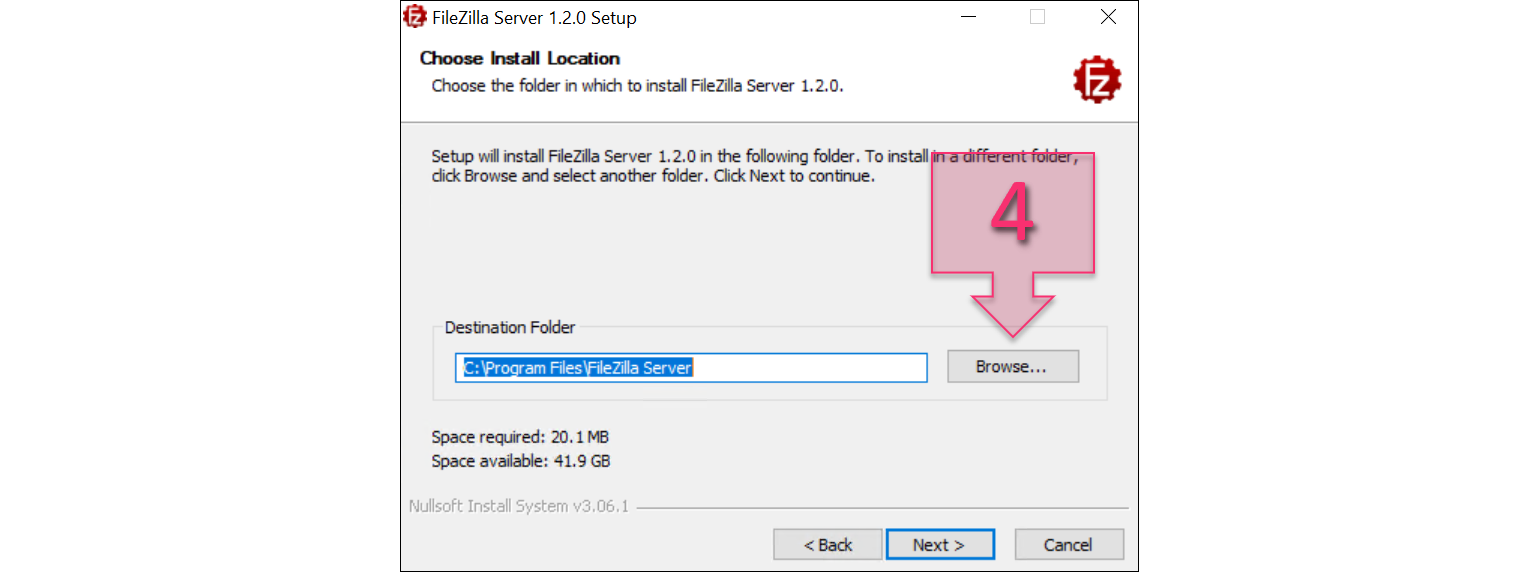
Part 1 – Select a destination folder for the installation
You will now need to choose a startup folder, which by default will be “FileZilla Server” (5). Once again, you can leave this as it is.
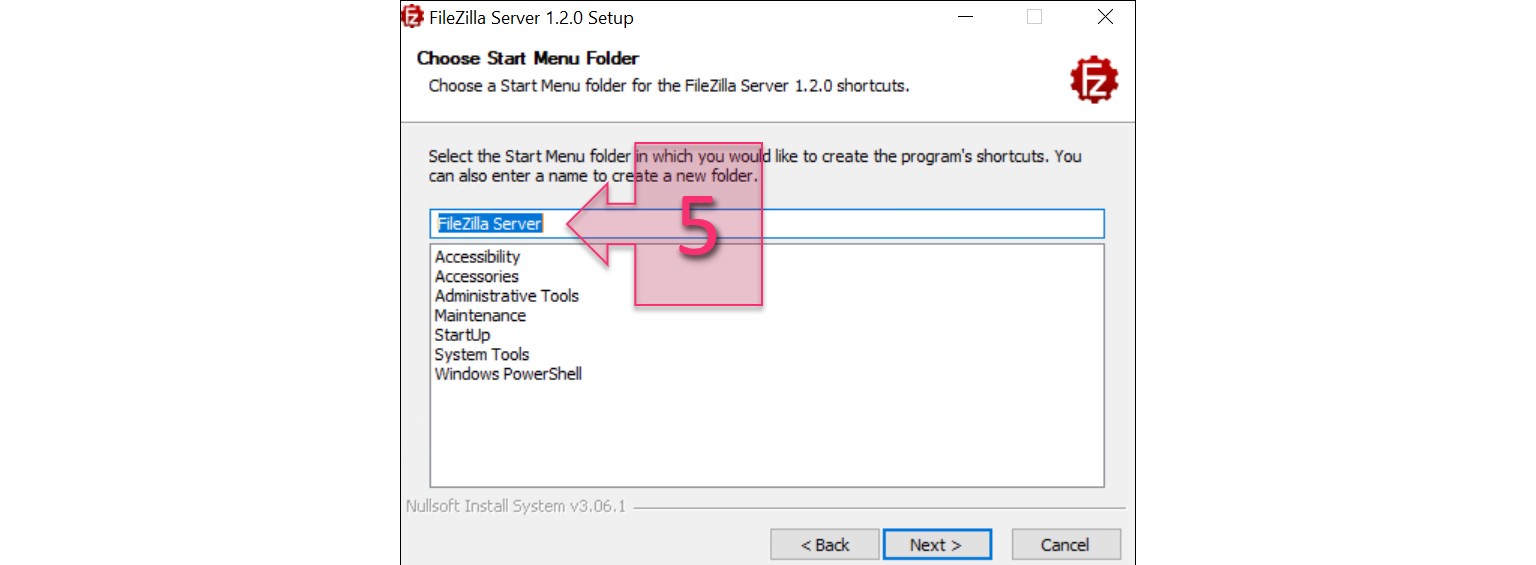
Part 1 – Choose a startup folder
The next step is to configure the basic settings for the FTP server. At the top of the list, you will see the option of whether to boot the service at start up or not, which by default is set to “Install as service, started with Windows (default)” (6). Next, you will see a field to enter the port number used for administration (7), which is “14148” by default. Finally, you will need to set a password (8) for the FTP administrator. Once you have entered these details, click on “Next”.
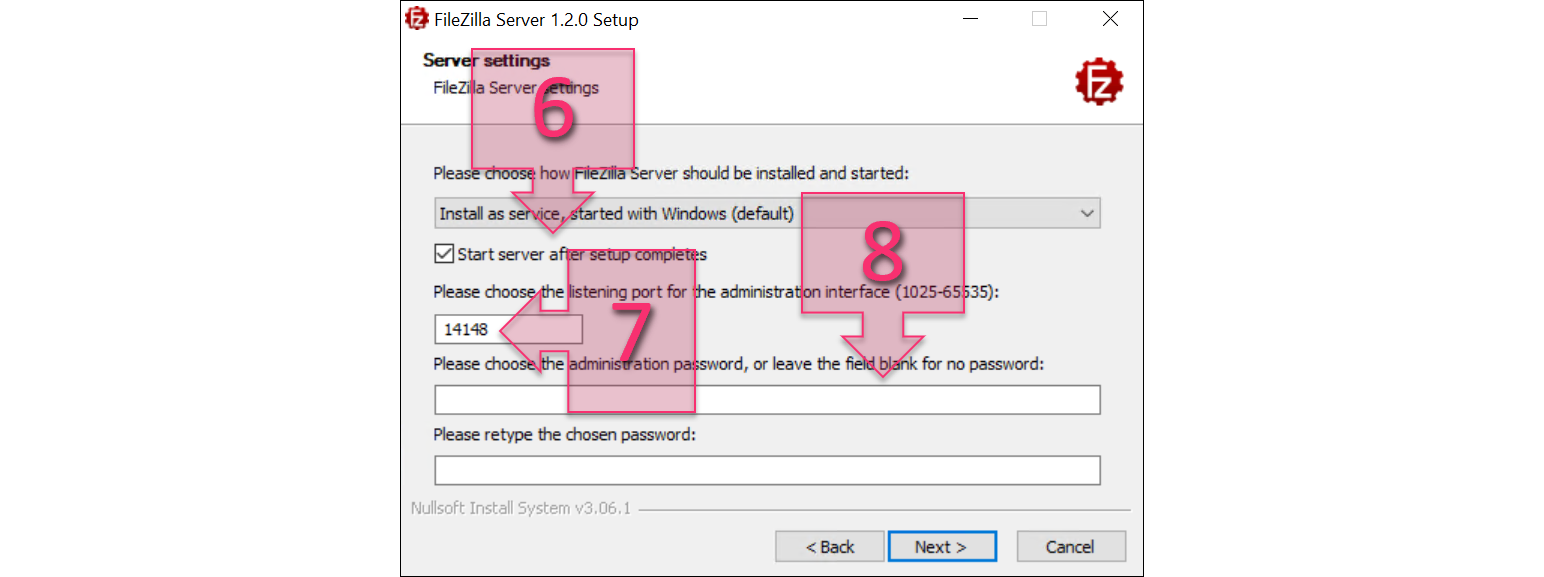
Part 1 – Configure the initial server settings
The next screen will ask you how you want to start the administrator interface (9). We recommend using the default setting and clicking on “Install” (10).
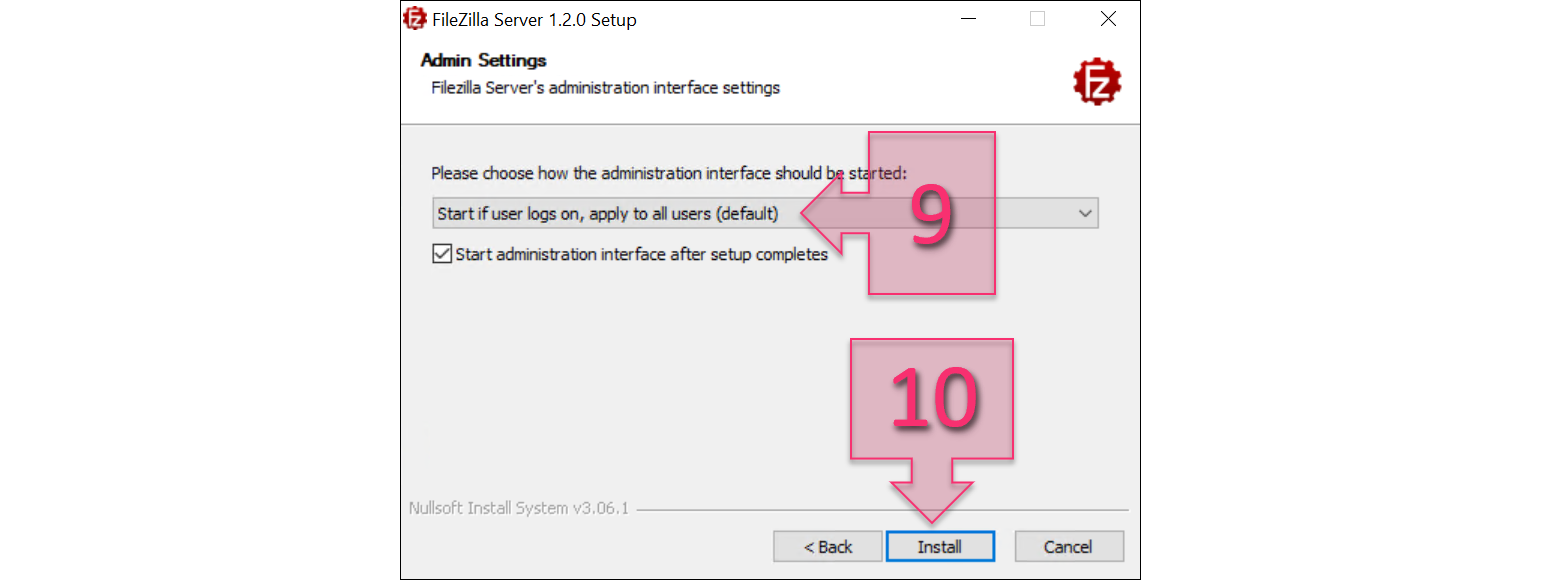
Part 1 – Configure administrator settings
A progress bar will appear along with an installation log whilst the program is installed. It won’t take long to complete, but if you encounter any problems, you will be able to see the details in the installation log. Once the installation is complete, simply click on “Close” (11).
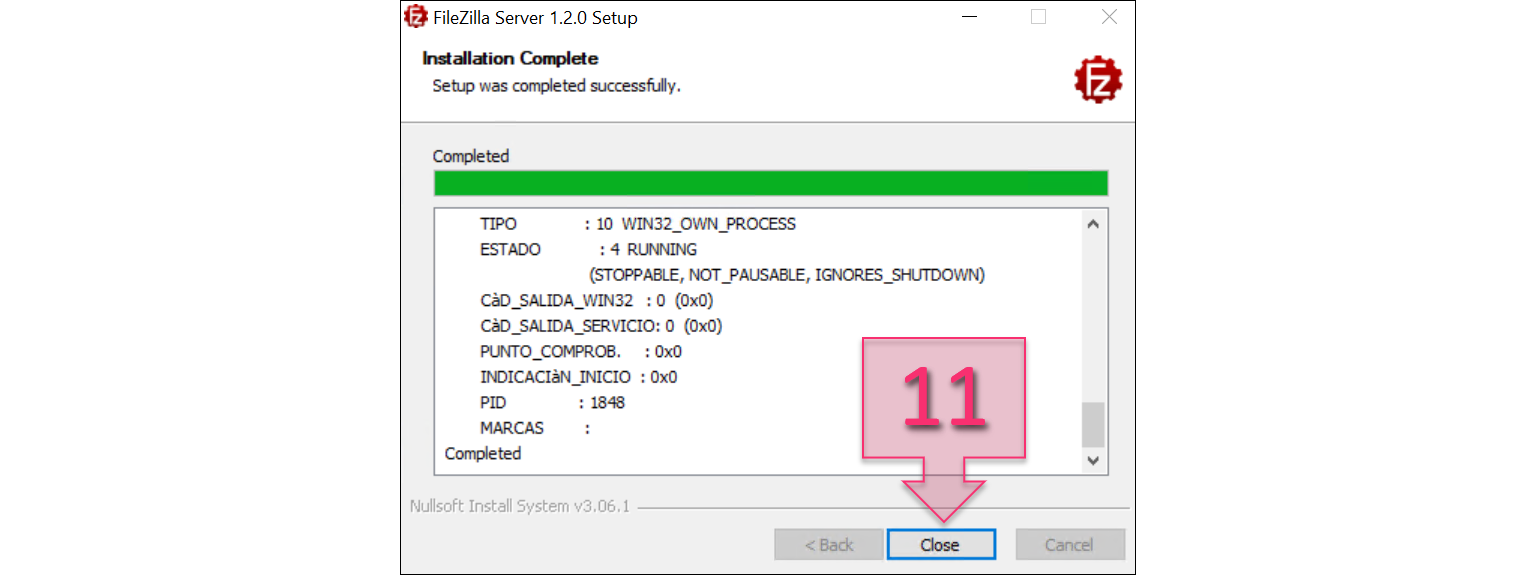
Part 1 – Install the program and close the window when finished
You have now successfully installed an FTP server on your server.
Part 2 – Configuring the FTP server
Once installed, the program will be configured to use the default basic settings. You will need to make changes in order to use it with Jotelulu.
To do this, you will need to change the following settings:
- FTP username.
- Access ports.
- IP filtering on the FTP server.
- Windows firewall.
- Jotelulu firewall for the server.
We are going to look at these settings step by step.
Once you have launched the program, click on “Connect to FileZilla FTP Server” (12).
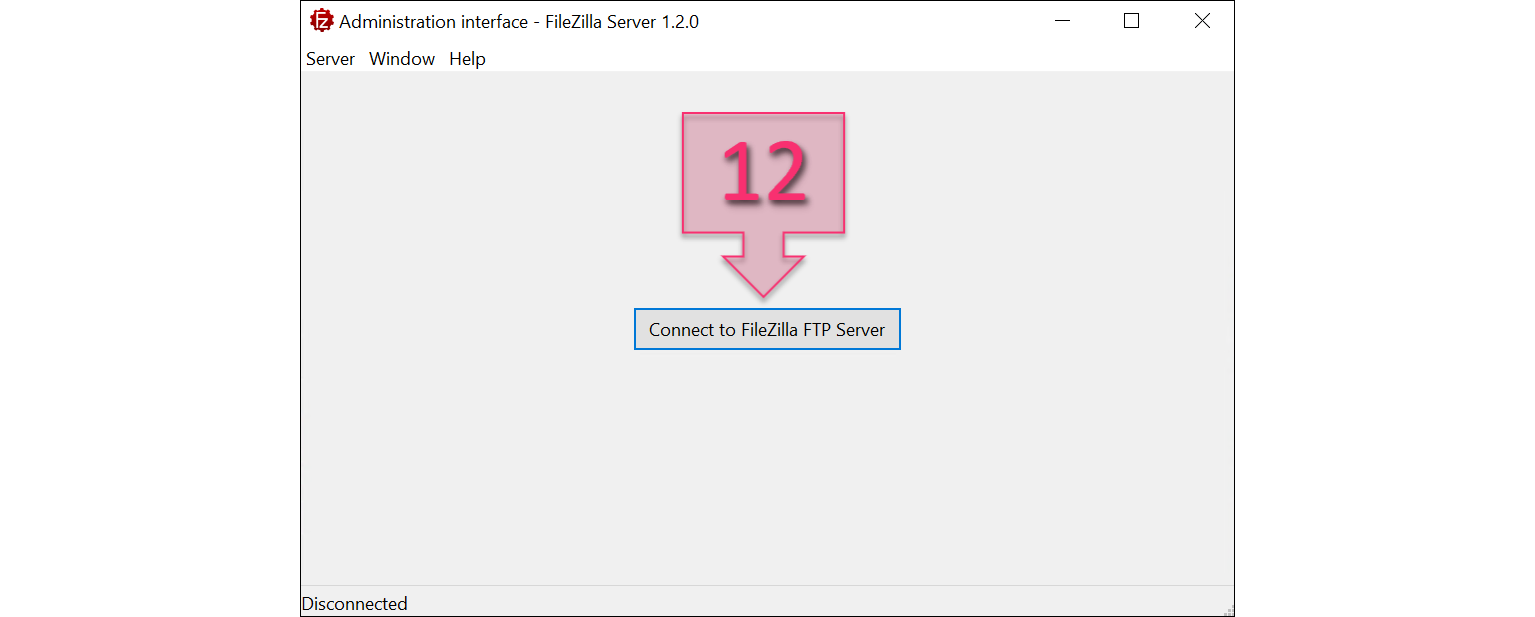
Part 2 – Connect to the administration interface
The connection window will show that you are going to connect to host 127.0.0.1 (the local machine) using port 14148, which is the port normally used by Filezilla. There is no need to enter a password at this point, so you can simply click on “OK” (13).
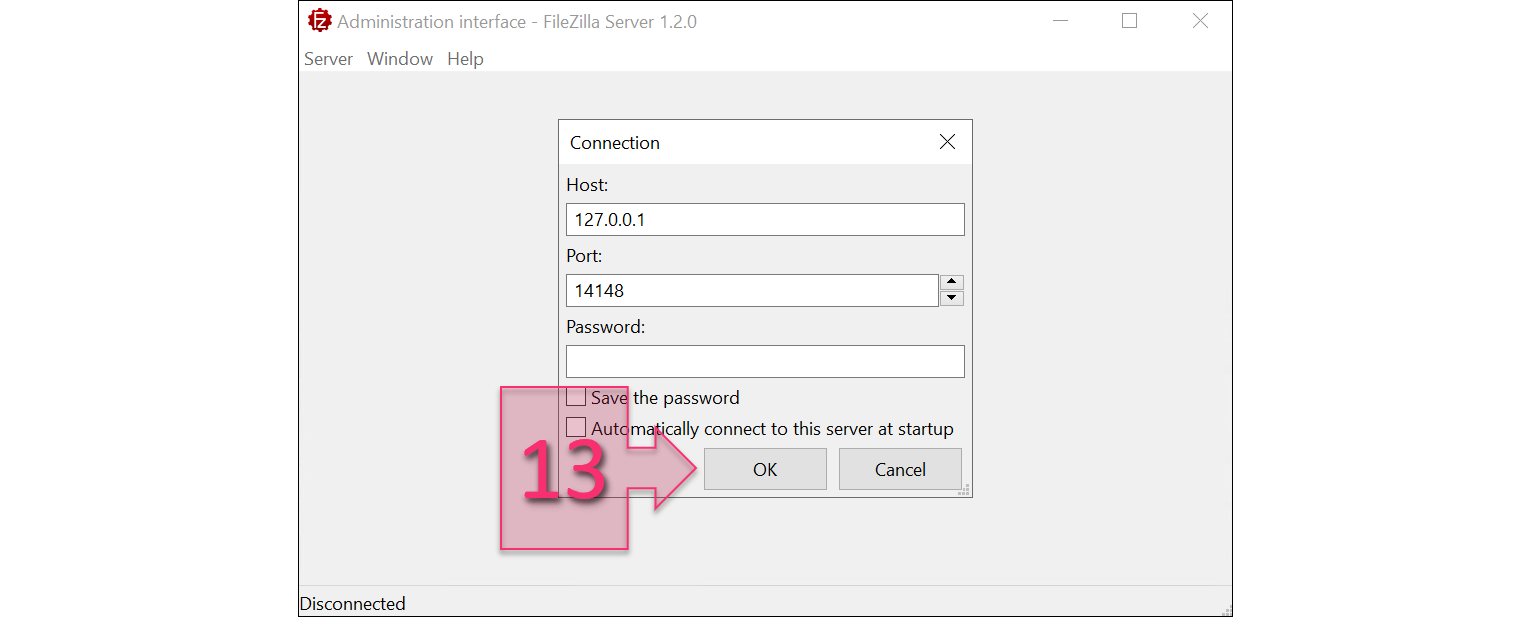
Part 2 – Providing the localhost connection details
Once connected to the server, you need to go to the configuration menu. Simply click on the “Server” menu and select “Configure” (14).
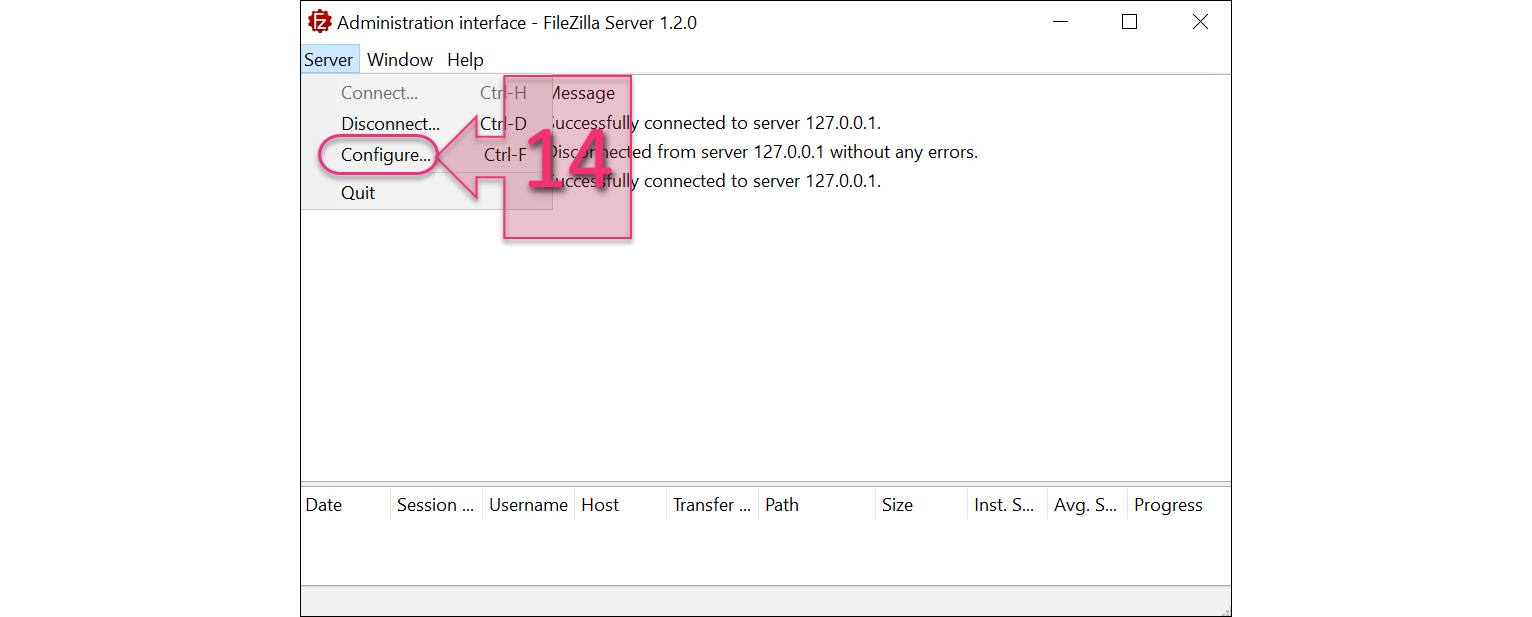
Part 2 – Open the configuration menu
First, you will need to set up the username that you will use to connect remotely since using an administrator to connect remotely is not recommended for security reasons. To create a new user, click on “Users” (15) which will open the FTP users menu. Then, click on “Add” (16).
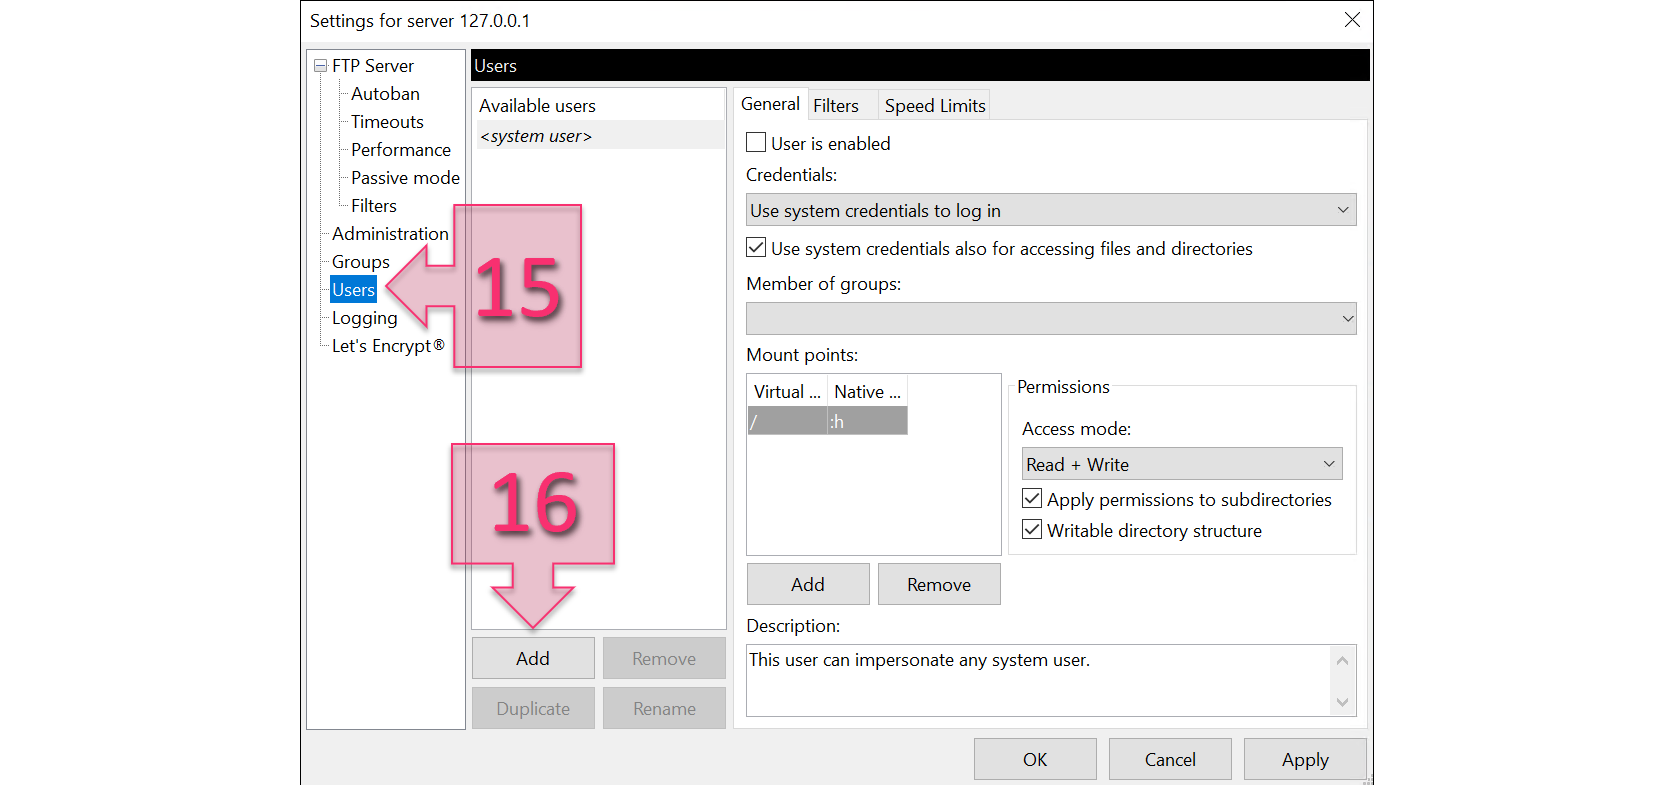
Part 2 – Add a new user
Enter a name (17), which can be as descriptive as you wish, then select “Require a password to log in” (18) and enter a new user password (19).
Note: To avoid any problems, we recommend clicking on “Apply” after every change that you make. That way, if there is an issue with the program and you need to exit, your changes will have been saved.
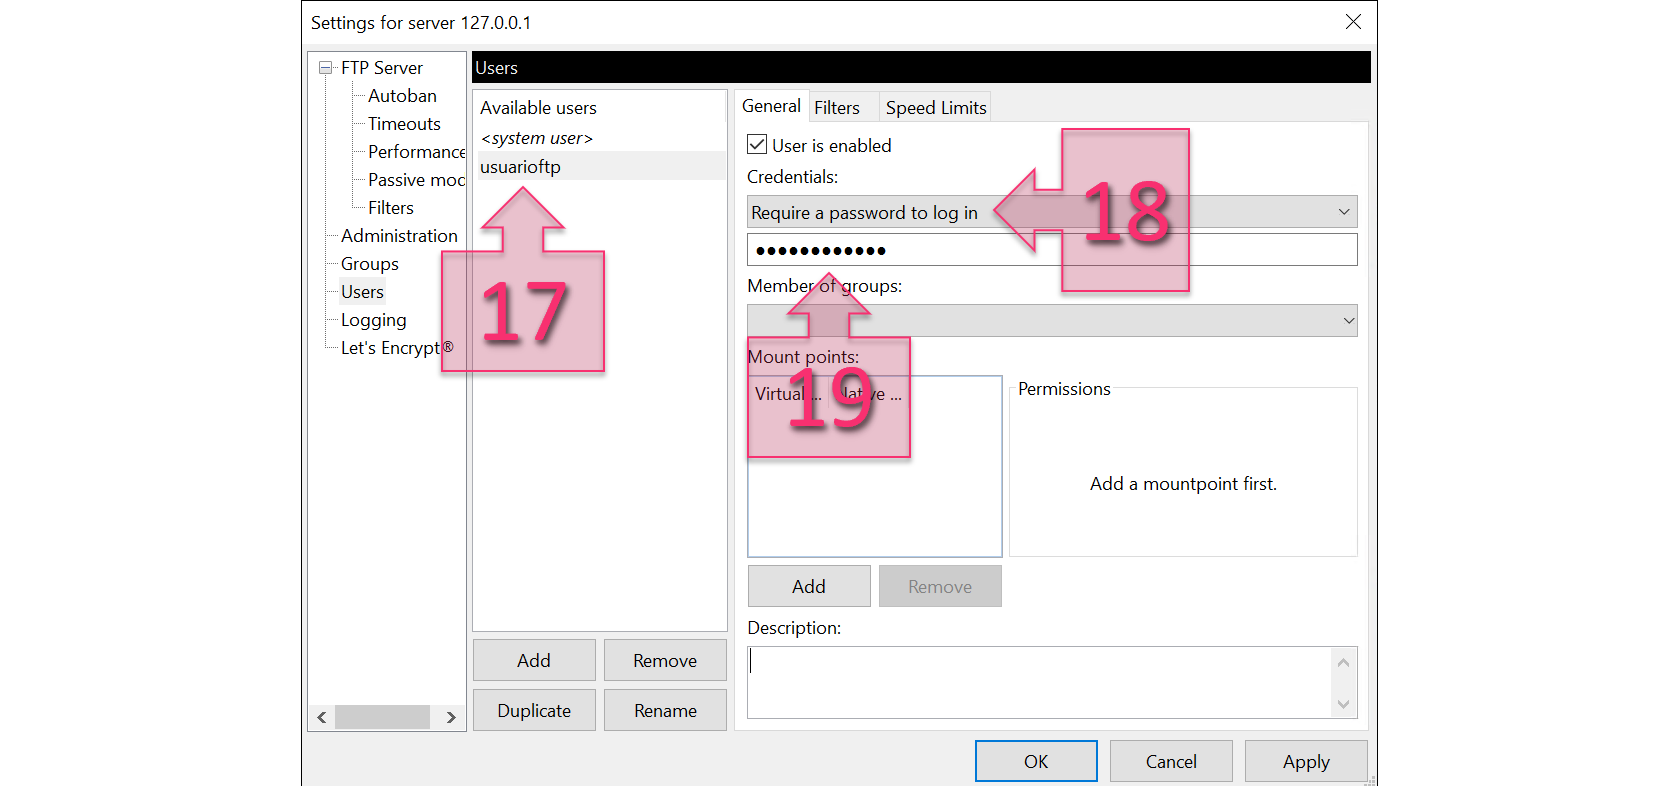
Part 2 – Configure a new FTP user
Once you have created the user, we recommend setting a mount point, which will be the FTP user’s root directory. This will also ensure that the new user only has access to a certain part of the folder structure. Should someone gain unauthorised access, only part of the system will be exposed.
To set a mount point, we recommend creating a specific folder in Windows (e.g., C:\ftp\) and then adding that folder as the mount point (20). The mount point has two components:
- Virtual Path: This is the path that the user sees. In this example, it is set to “/”.
- Native Path: This is the Windows path that is considered the root directory for the FTP user. In this example, it is set to “C:\ftp\”.
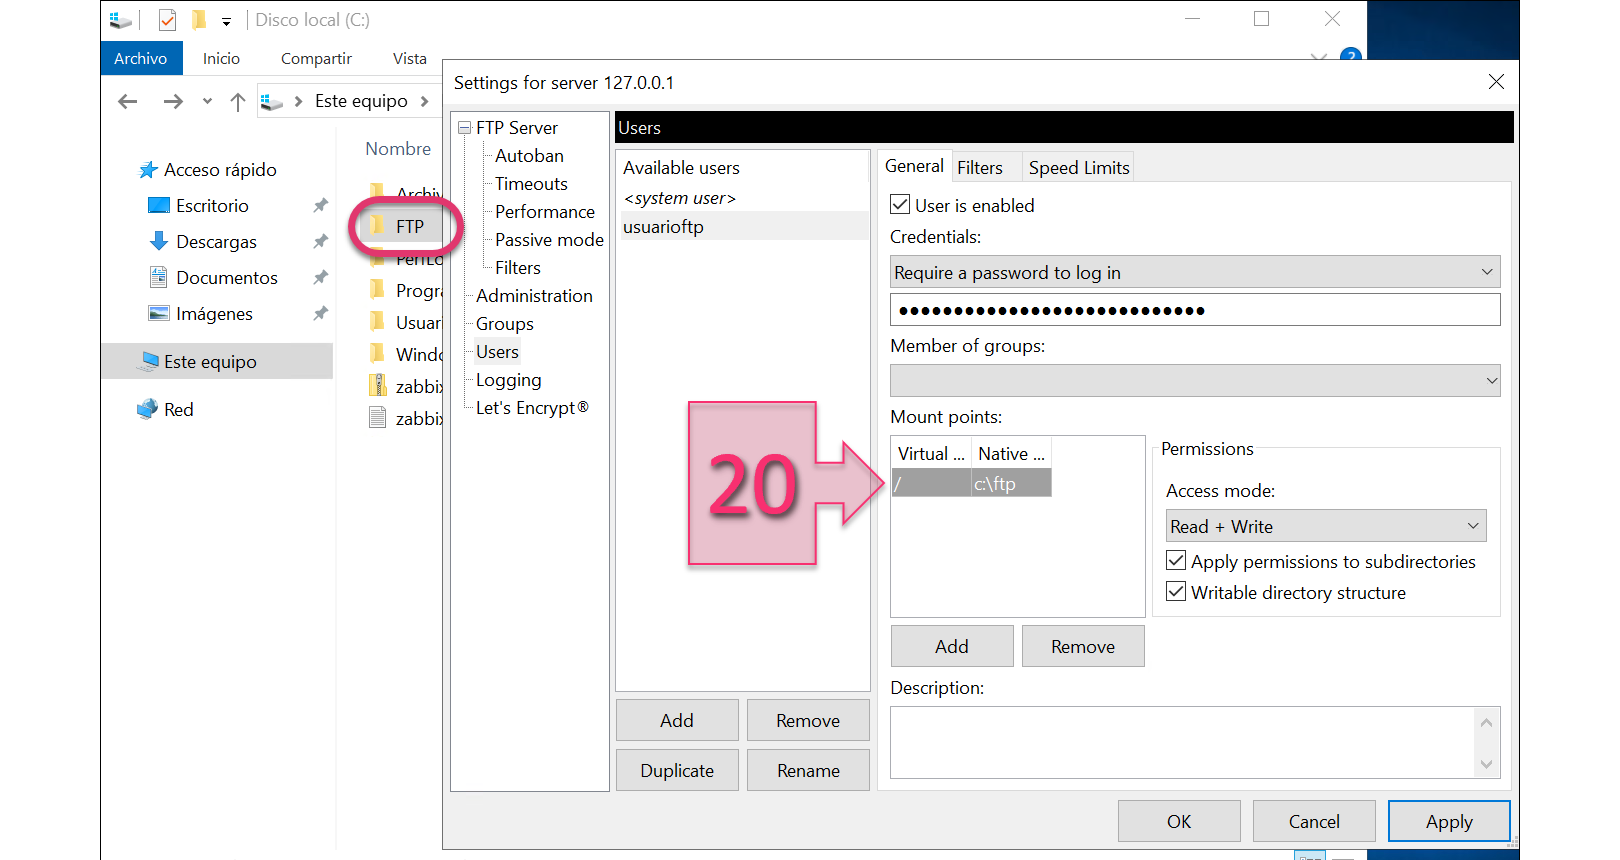
Part 2 – Configure the FTP user mount point
Next, if required, you can set IP filters for access to the service. Go to “FTP Server > Filters” (21). Here, you can add Allowed IP ranges” (22) in CDIR format, entering the IP address followed by a “/” and the number of mask bits (e.g., 192.168.1.0/24).
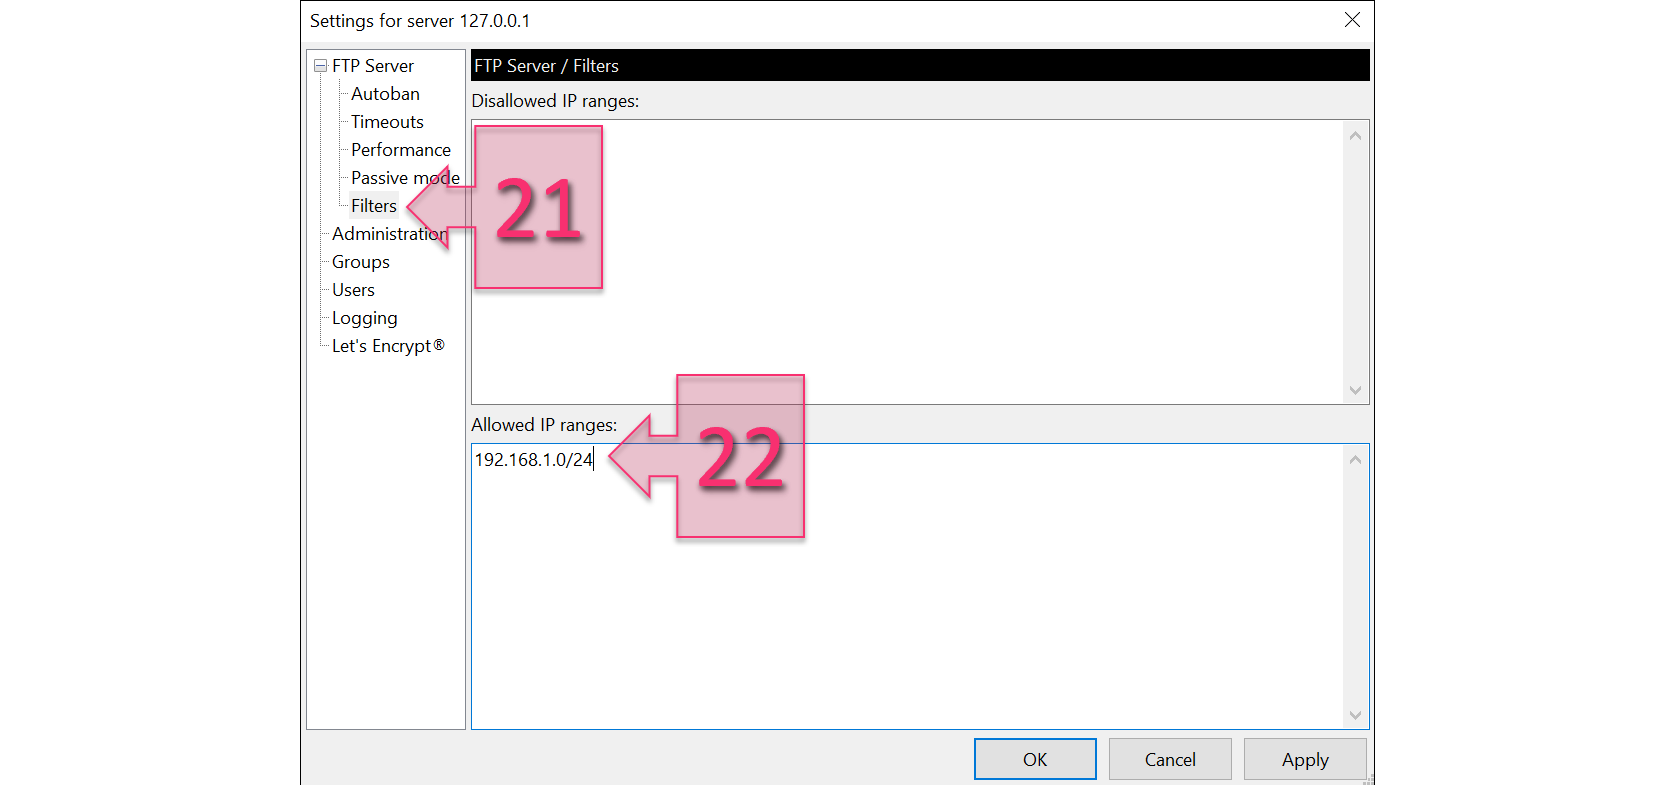
Part 2 – Set allowed IP ranges
Next, click on the “Passive mode” section from the left-hand menu and check the tick box next to “Use custom port range” (23). At this point, you have the option to limit the number of available ports, which in most cases is highly recommended. However, for this tutorial, we already have two other filtering points (the Jotelulu firewall and Windows firewall), so this filtering is unnecessary.
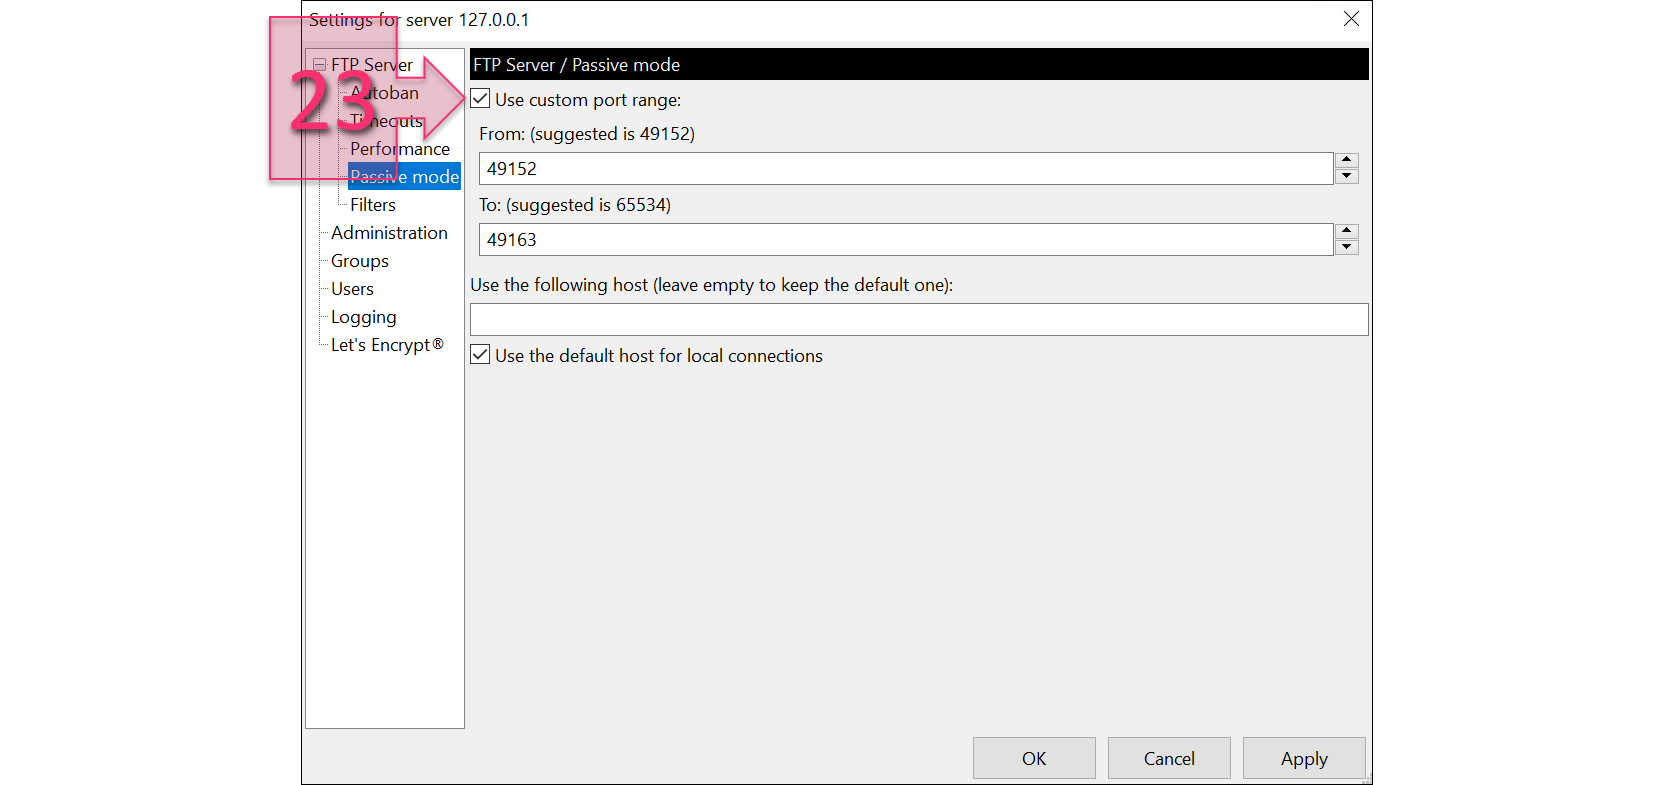
Part 2 – Configure passive mode ports
It is now time to configure the Jotelulu firewall on the server on which the FTP server was installed. To do this, log in to the Jotelulu platform and select the Servers service (24) that hosts the server.
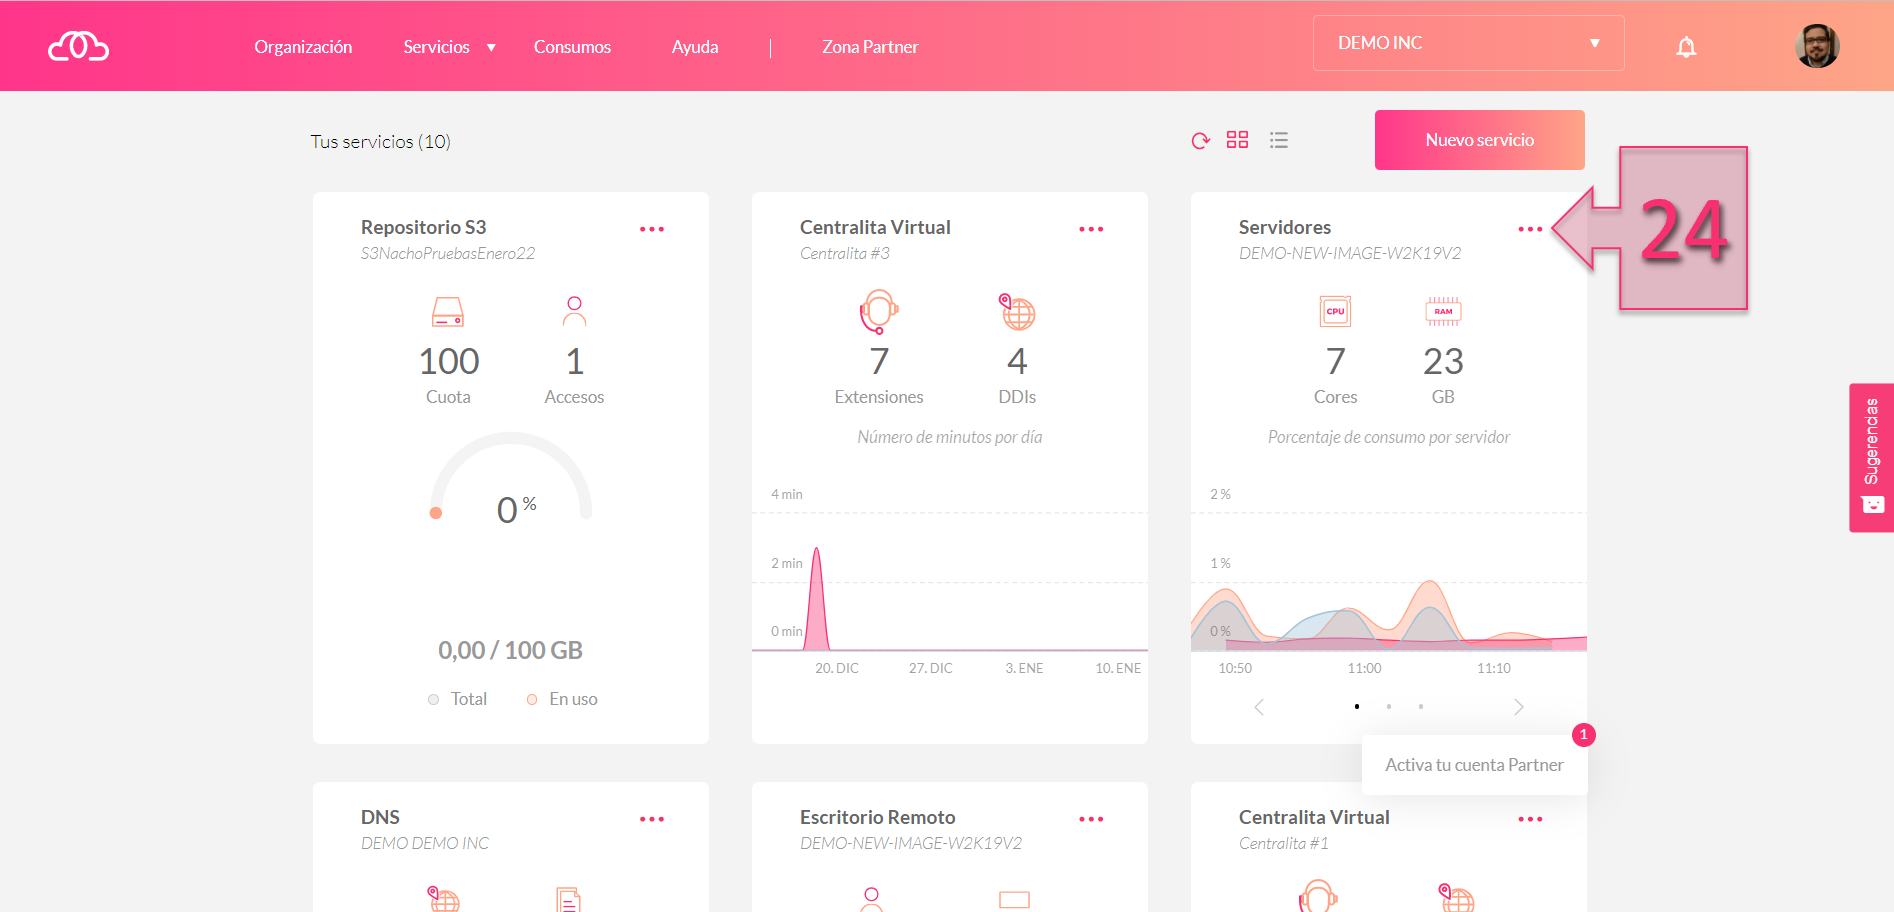
Part 2 – Open the Servers section
Next, click on “Servers” in the left-hand menu (25).
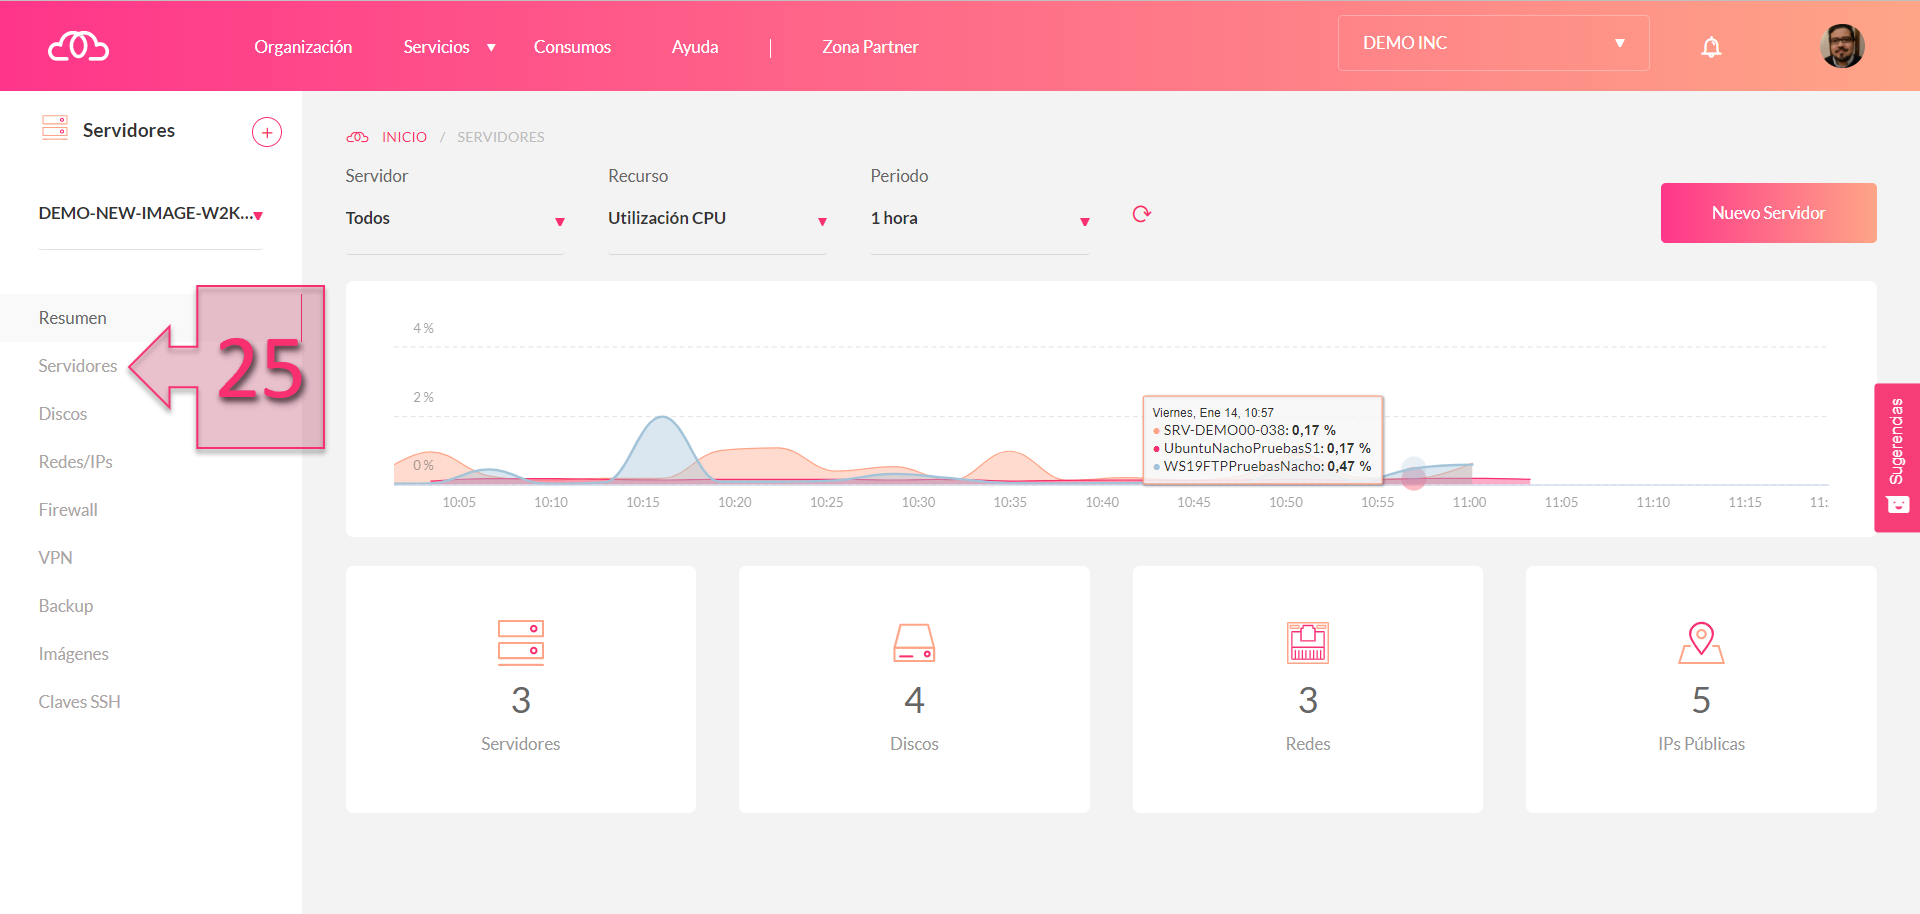
Part 2 – Open the Server menu
Click on the server from the server list (26) and then open the “Firewall” section from the left-hand menu (27).
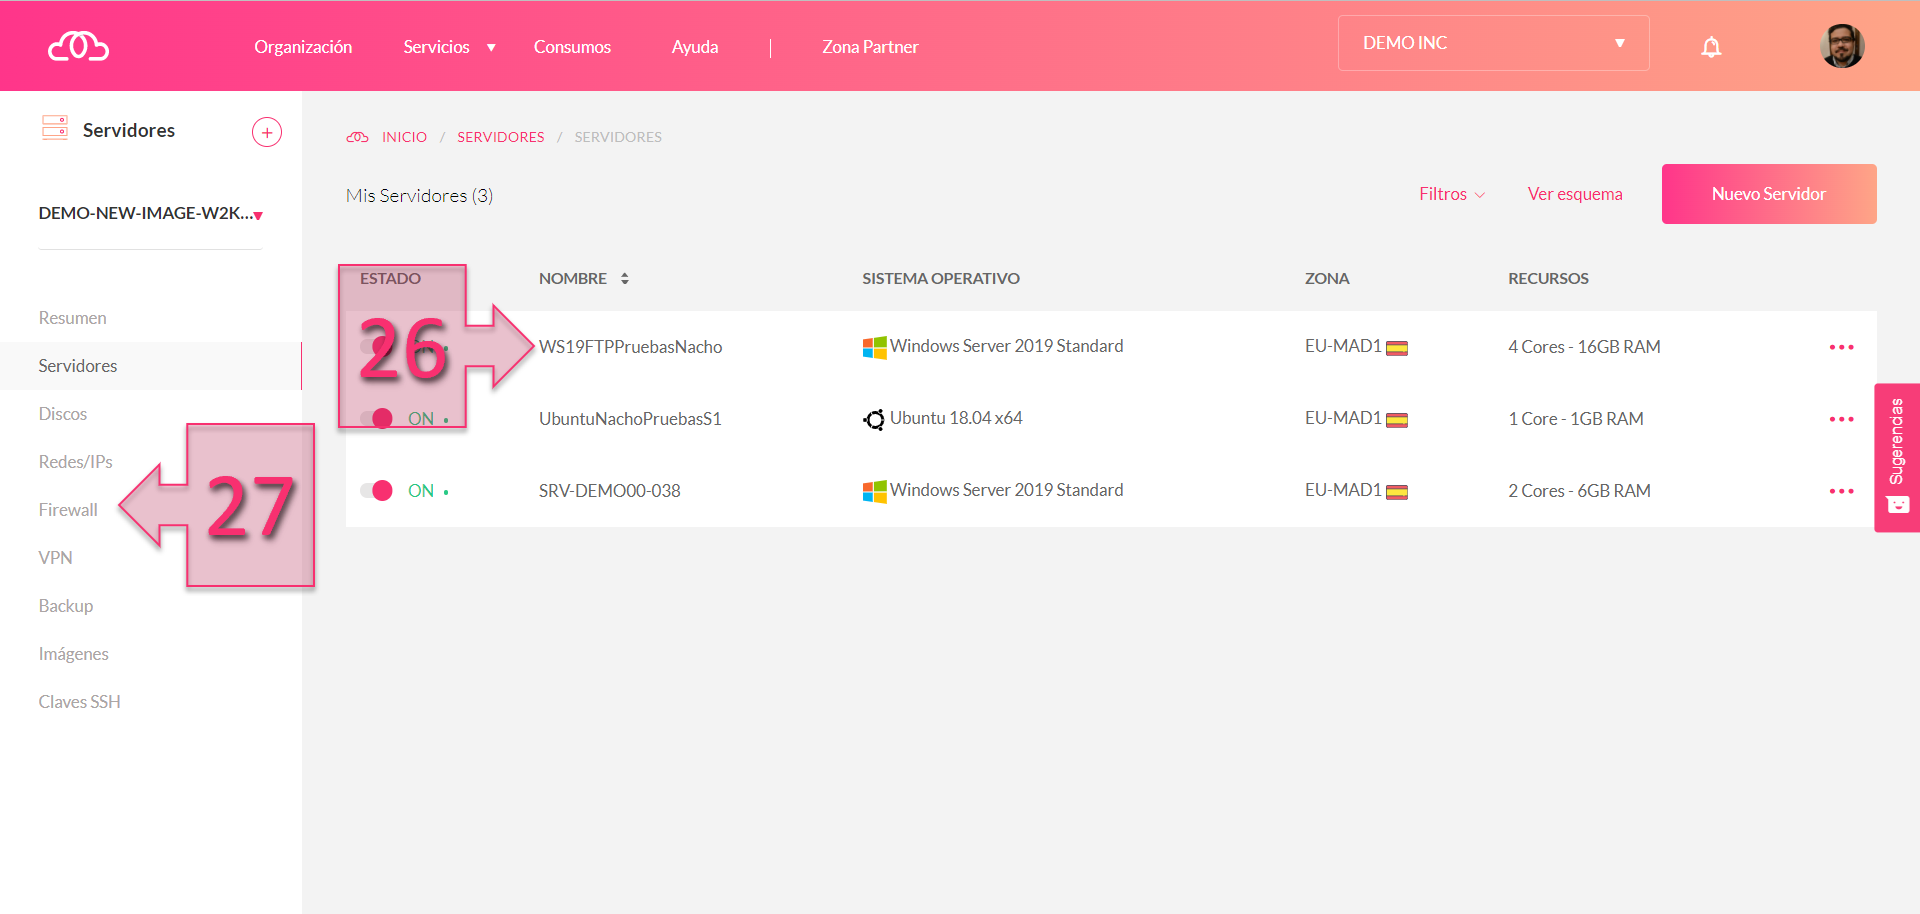
Part 2 – Select the server to configure
We are now going to configure the Jotelulu firewall for this server. First, set the “Origin IP or Network” (28). In this example, this has been set to “Any IP”, but in practice, it is a good idea to limit access to some specific IP address. In fact, we recommend that you only provide access to office IP addresses if they are the only devices that need access. This will prevent any unauthorised outside access from other networks.
Select the “Public IP” (29) that you are connecting to, marking the “Public Ports” (30) that will be allowed, which in this case are 20 and 21, the ports used by the FTP service.
Check the “Private Ports” (31) that you are going to connect to, which should match the ports configured in point (23).
Once you have entered these details, click on “Continue” (32) to save and apply your changes.
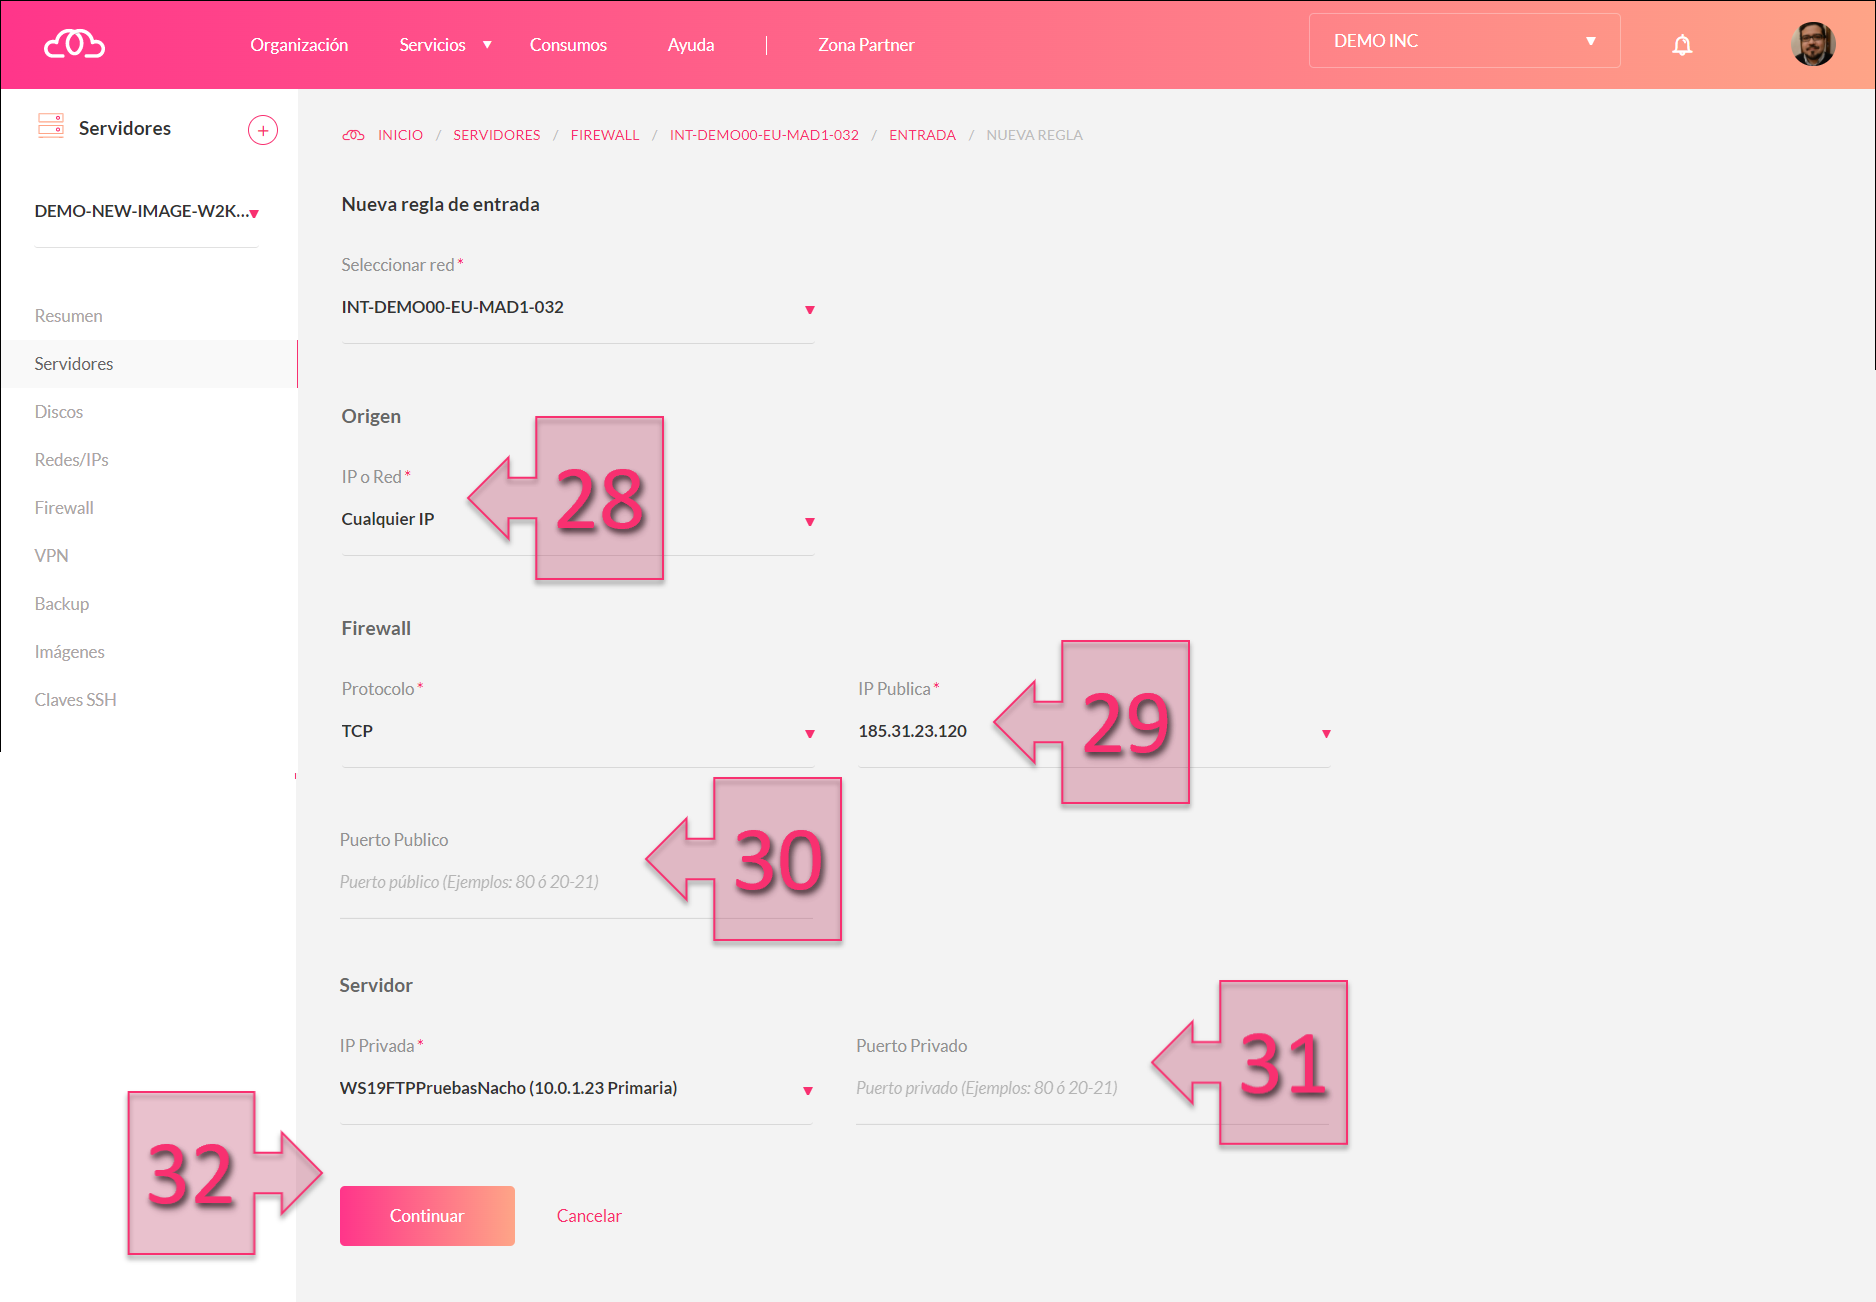
Part 2 – Configure the server firewall
Lastly, you will need to configure the firewall on the server itself so that it can accept remote connections. To launch the firewall console, simply type “firewall” in the search bar and select “Windows Defender Firewall” (33).
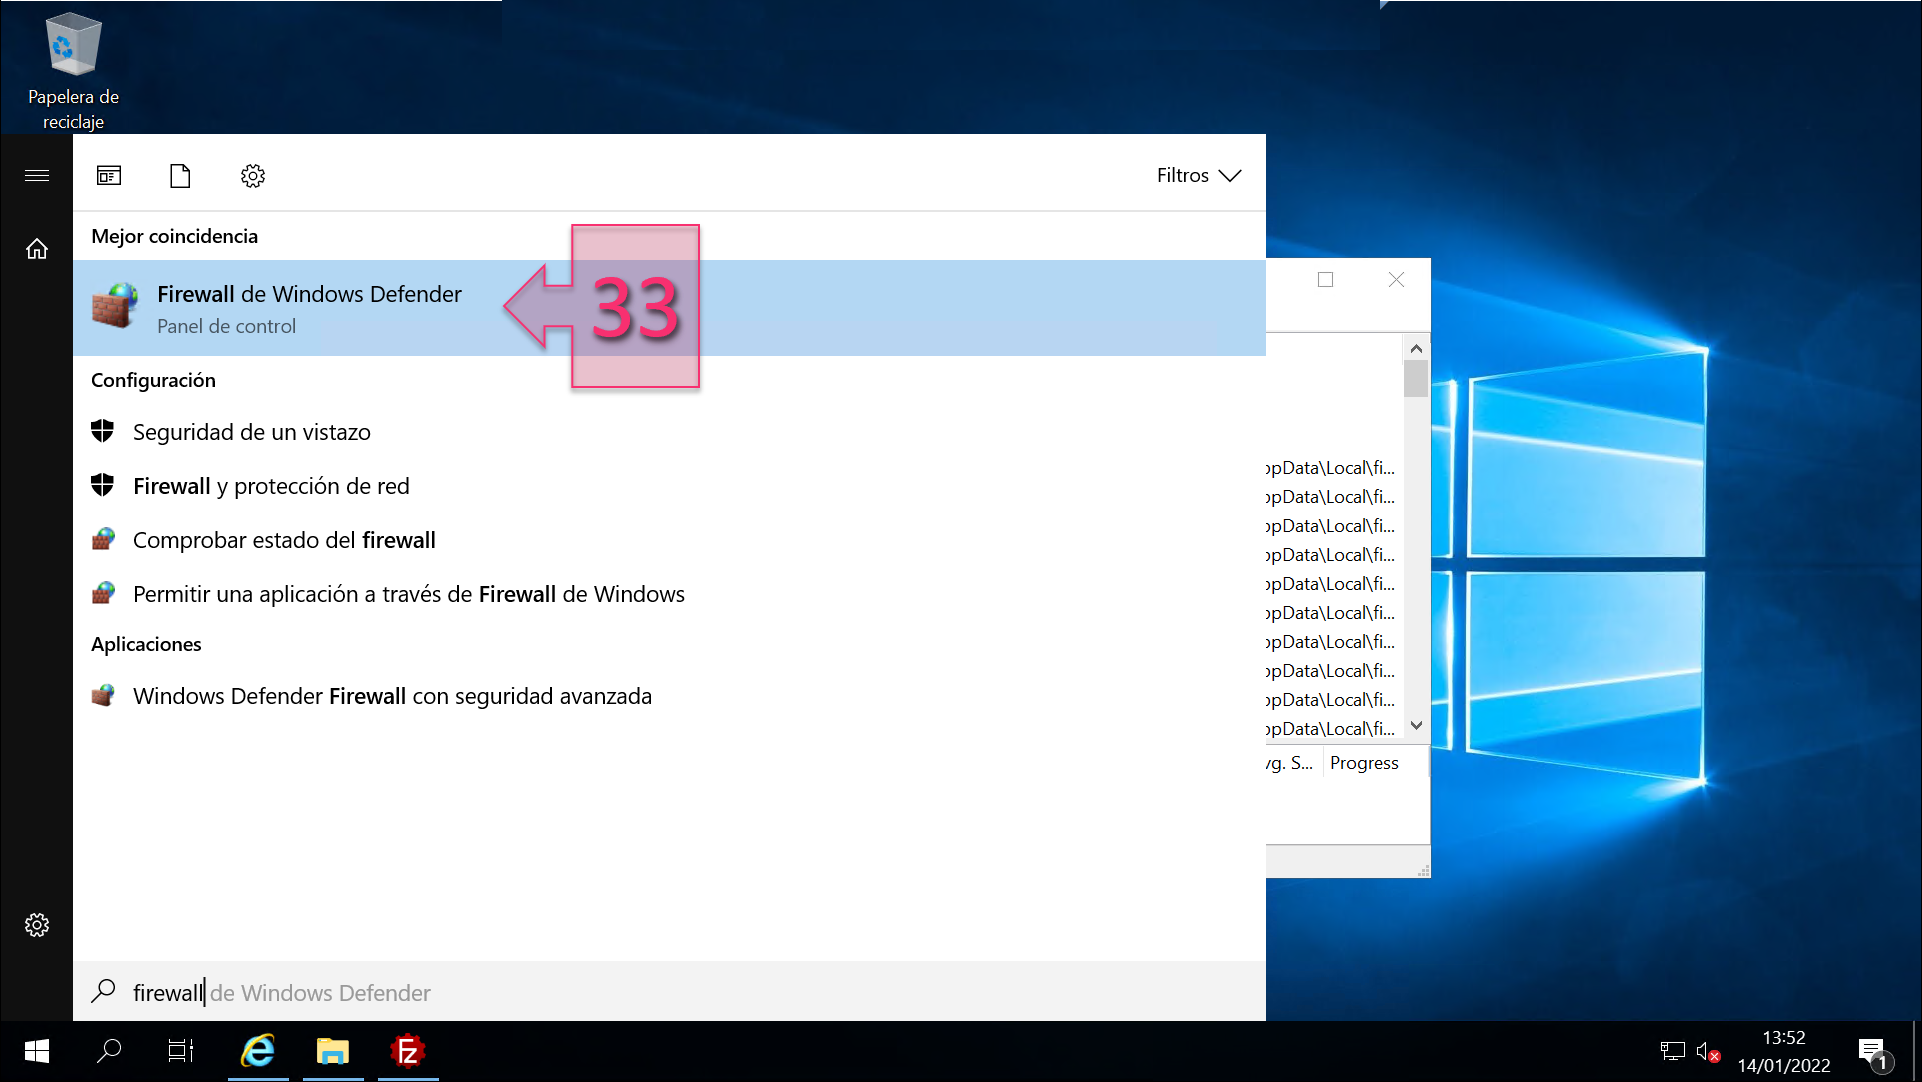
Part 2 – Launch the Windows Defender Firewall
In Windows Defender Firewall, select “Advanced Settings” (34) to configure the access rules for the FTP service.
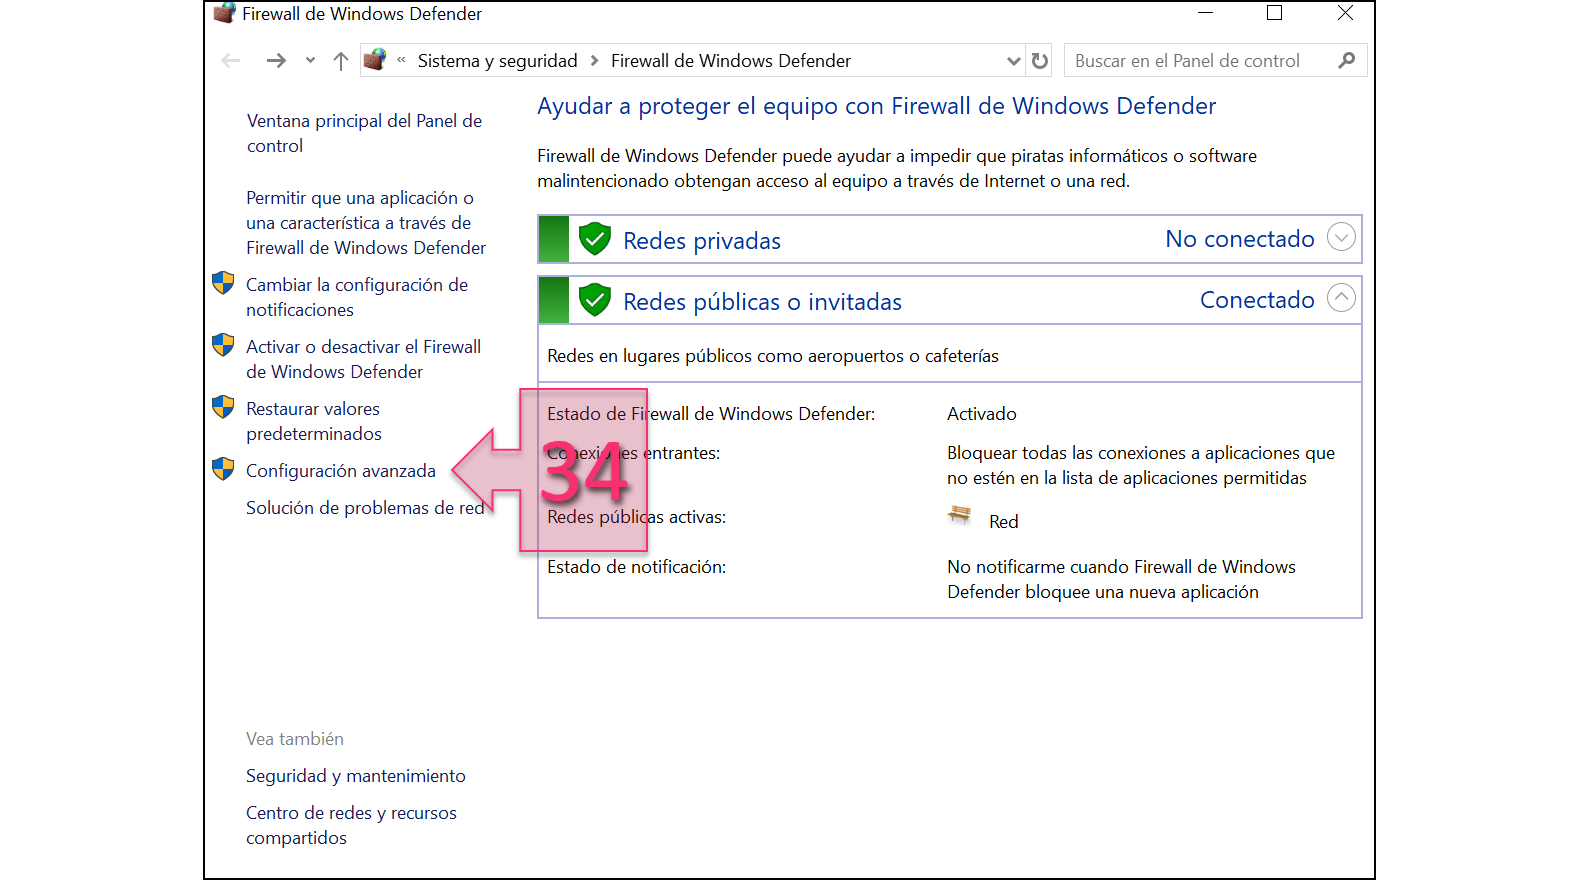
Part 2 – Open Advanced Settings
Click on “Inbound Rules” (35) and then “New Rule” (36).
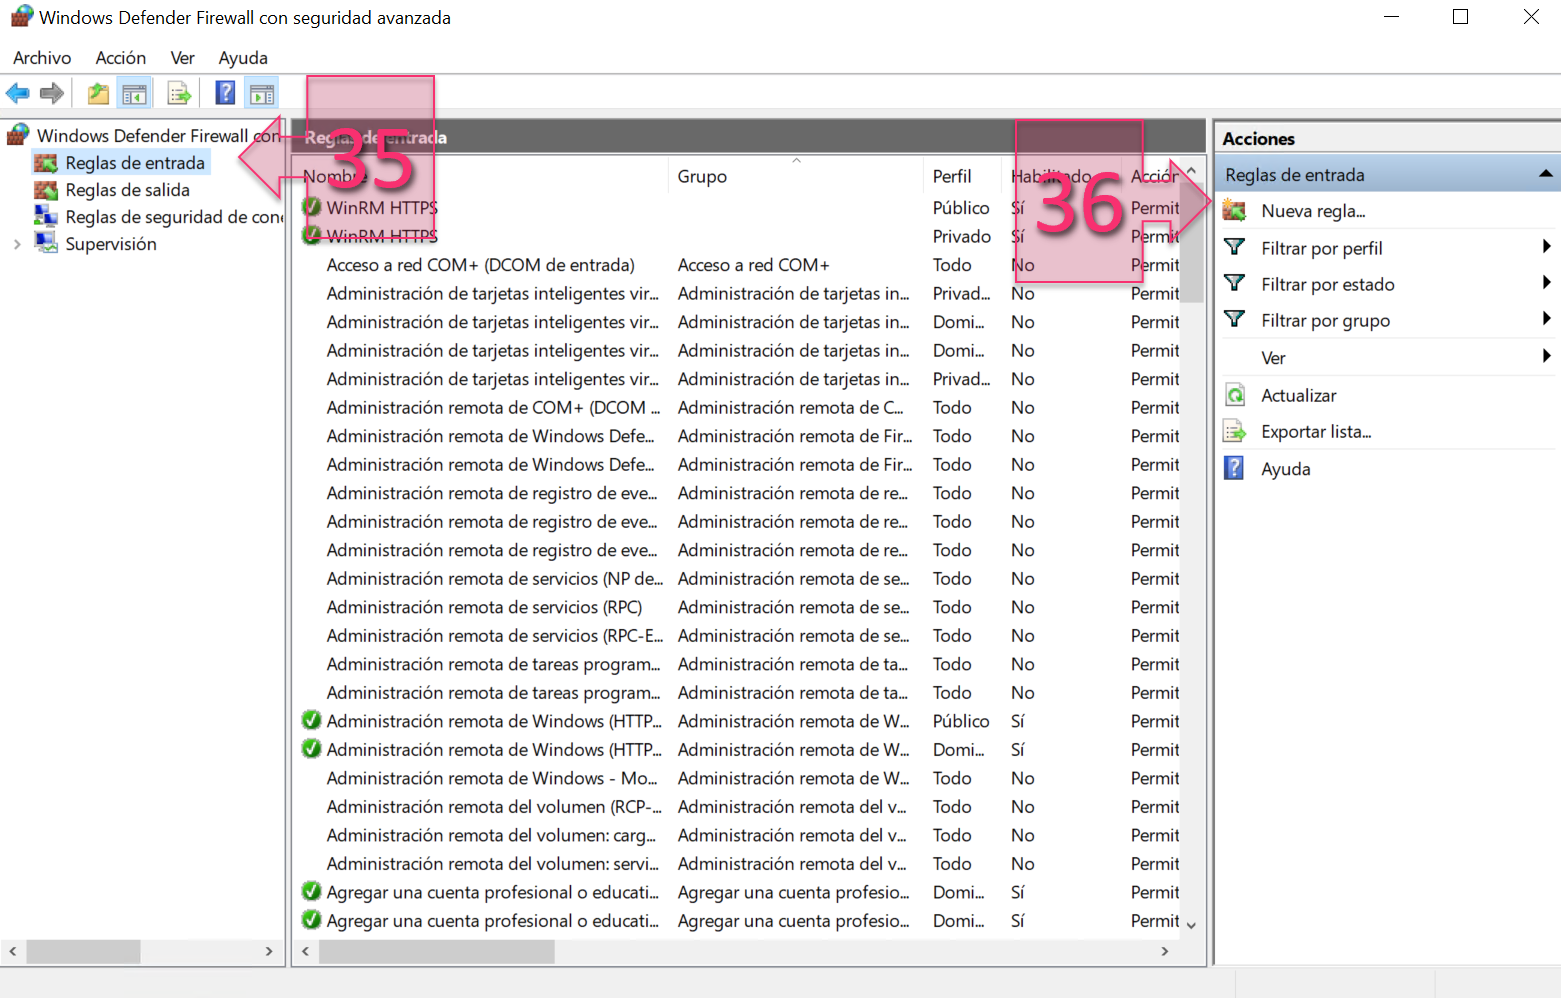
Part 2 – Create a new inbound rule
Select “Port” (37).
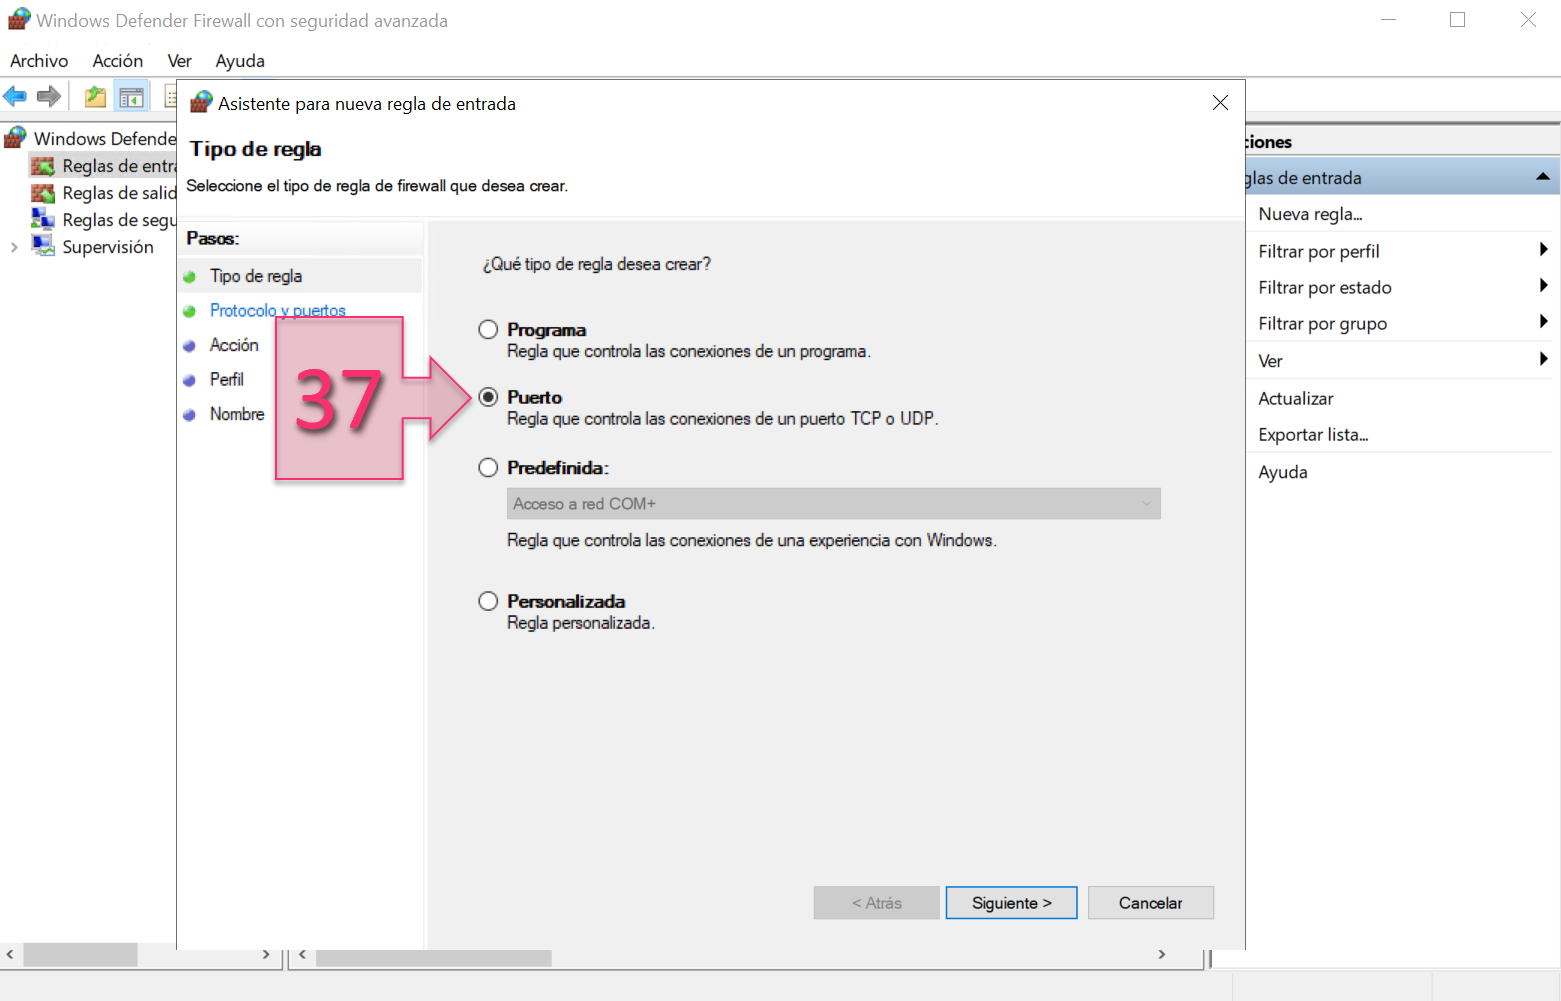
Part 2 – Choose port filtering
Next, select “TCP” (38), and “Specific local ports” (39). Then, enter the ports that you wish to open.
NOTE: If you wish to enter a range, they should be separated by a hyphen. If you wish to specify individual ports, these should be separated by a comma.
See the image below for an example.
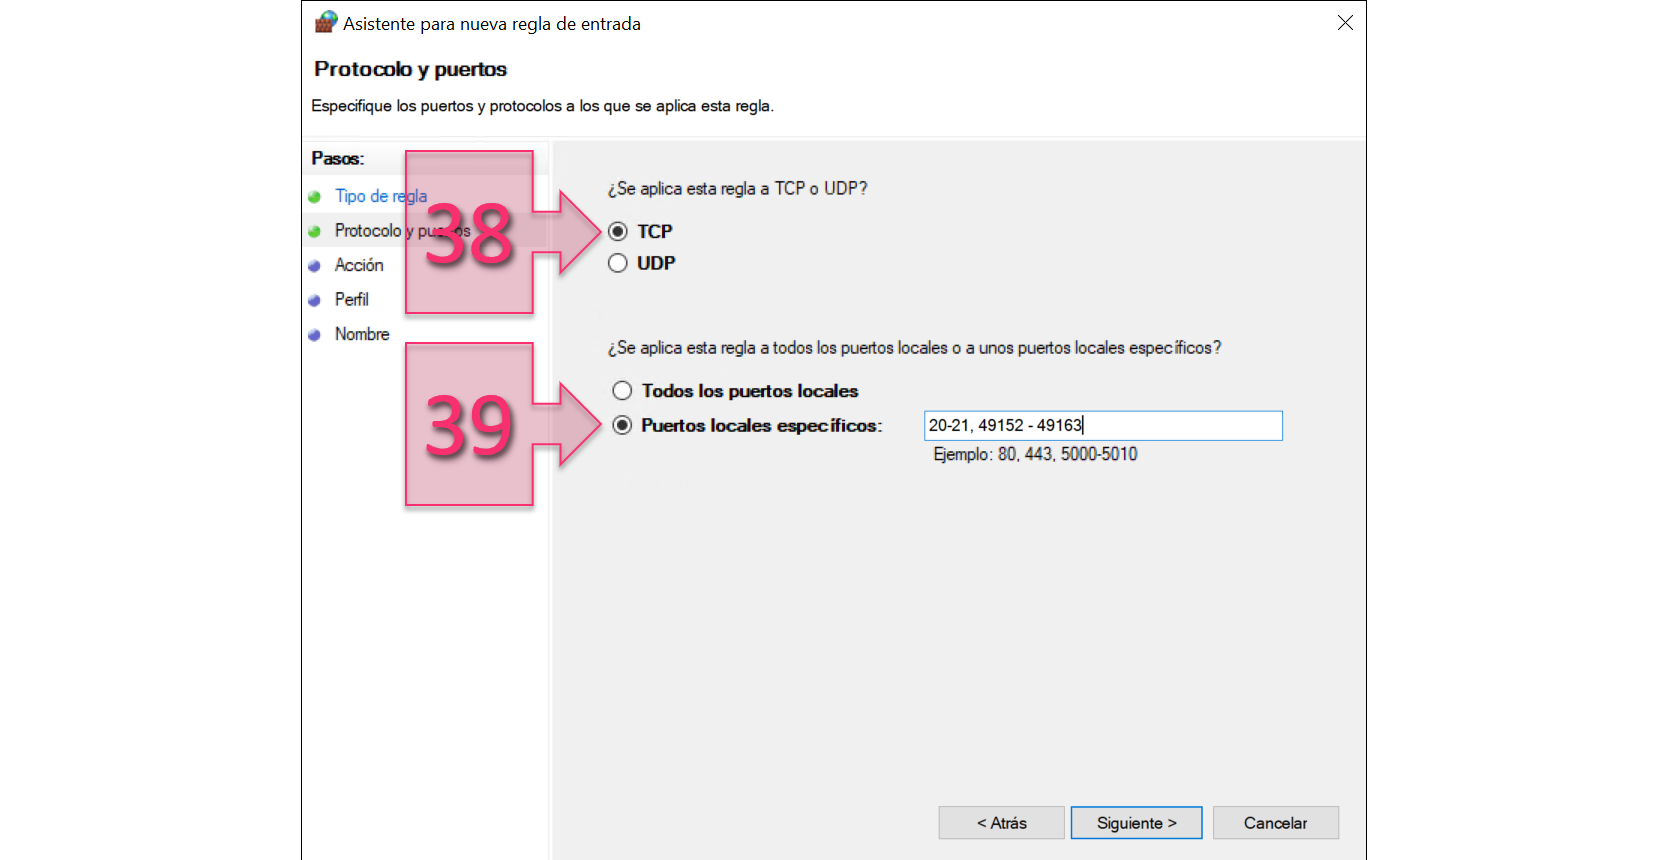
Part 2 – Specify ports for access
On the next screen, select “Allow the connection” (40).
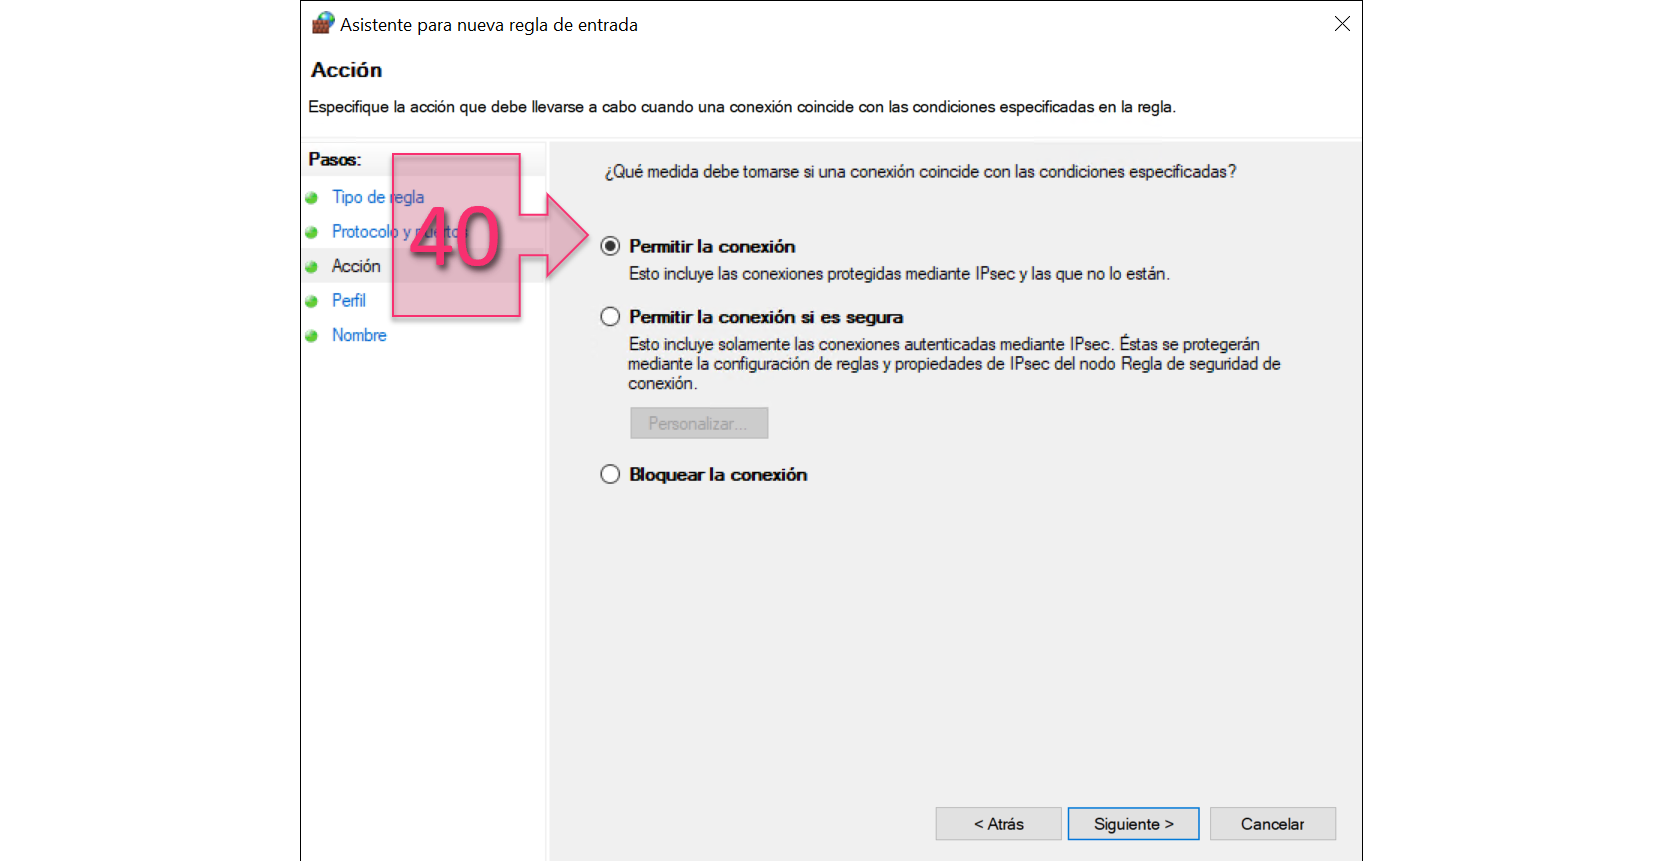
Part 2 – Choose the firewall action to apply to the ports
Next, you will need to specify the rule profile, whether to apply the rule to the domain, the private network or the public network. For this tutorial, we believe that it is best to apply the rule to all three profiles (41).
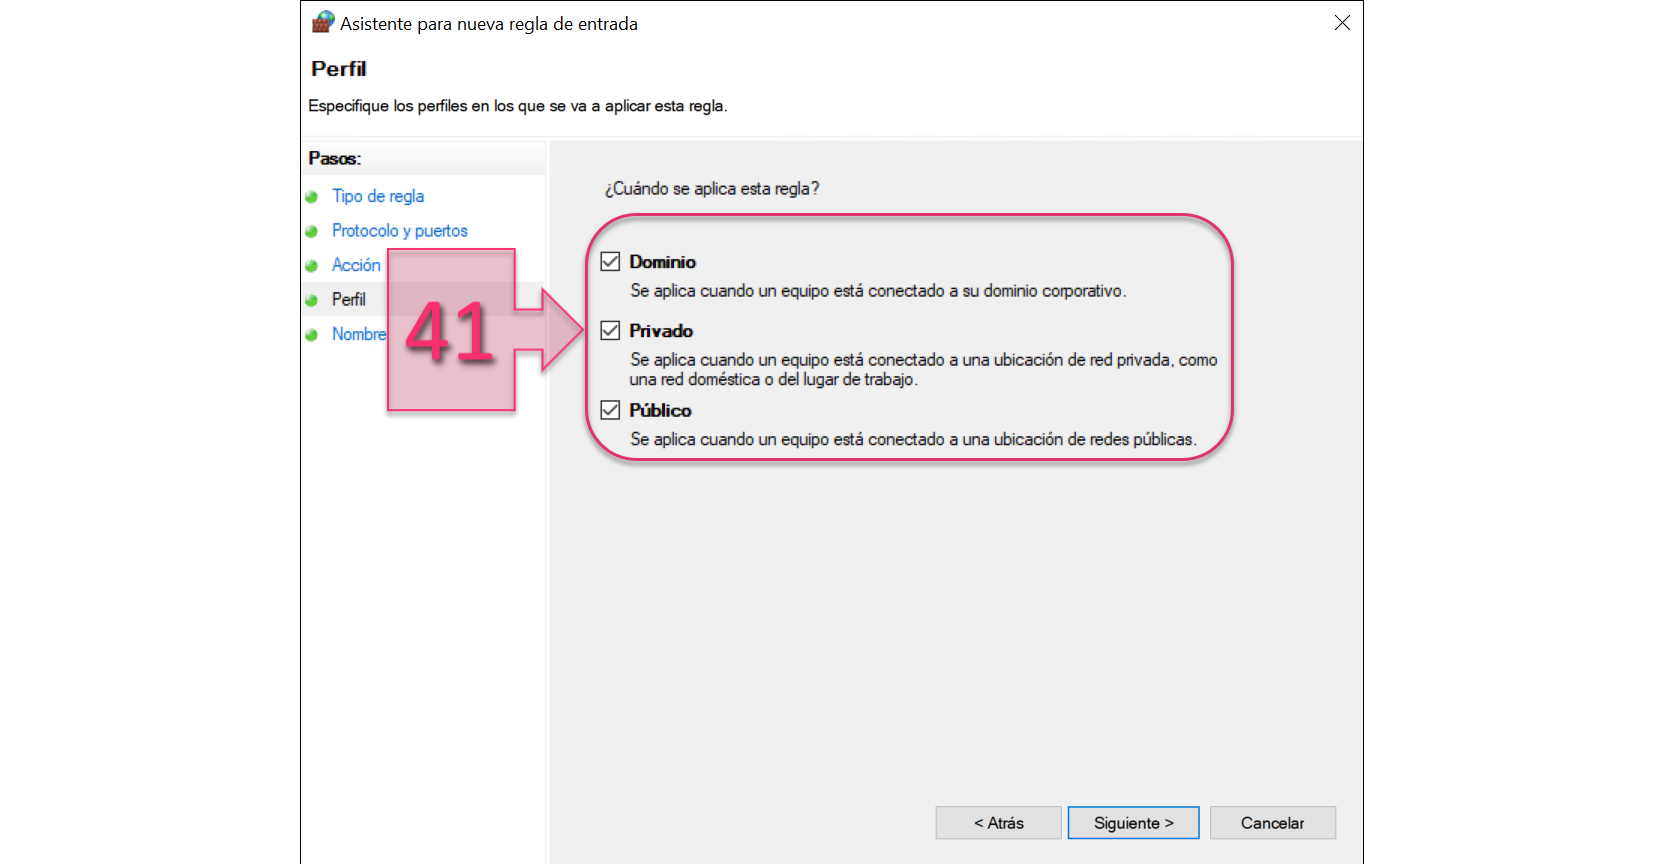
Part 2 – Configure the rule profile
Lastly, give the rule a “Name” (42) and click on “Finish” (43).
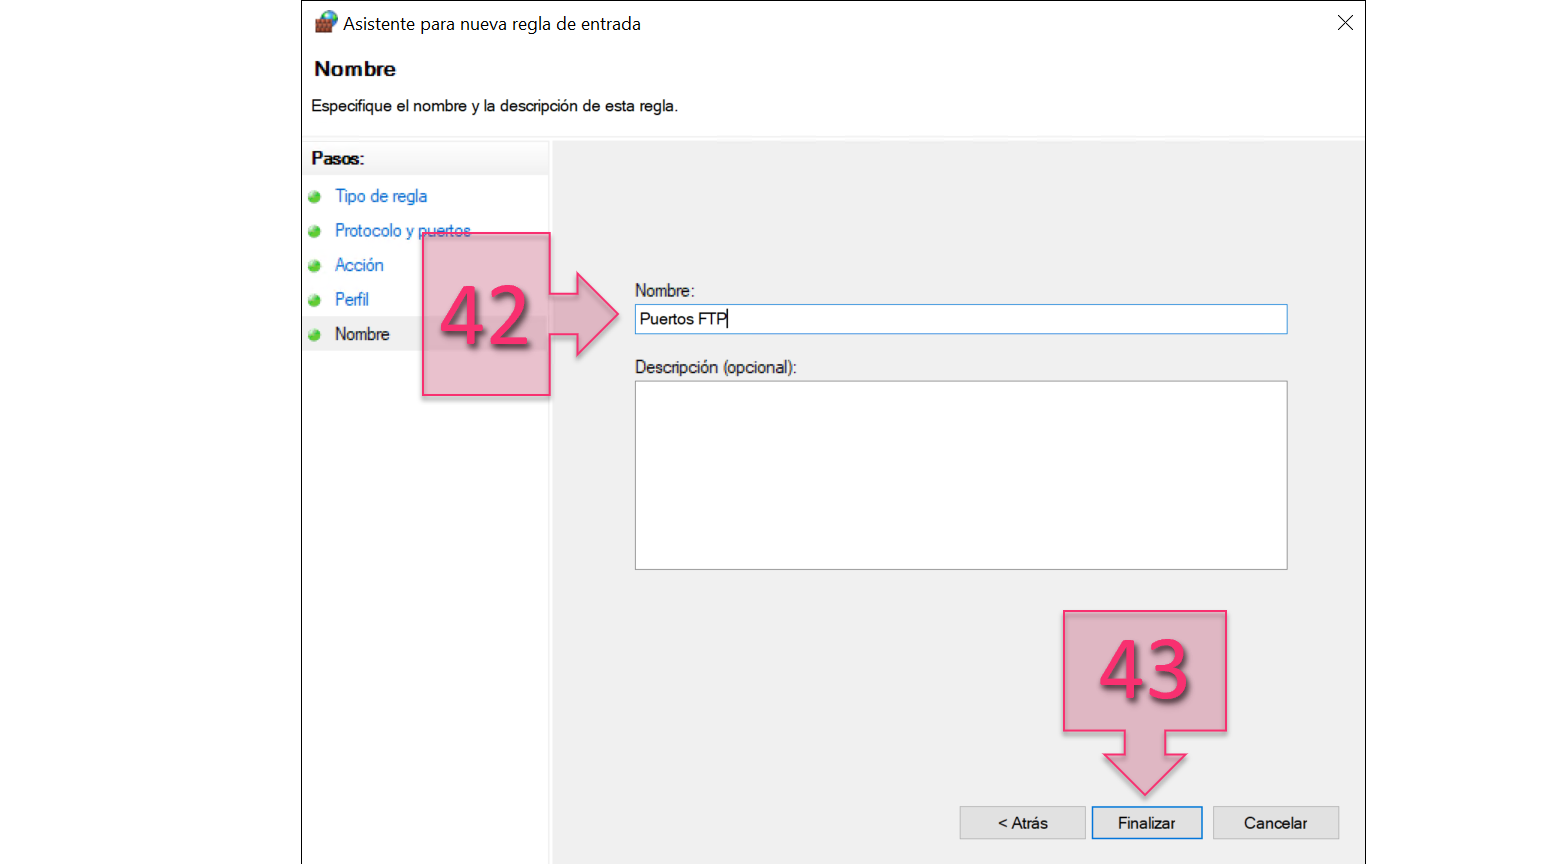
Part 2 – Give the rule a name
You have now successfully configured FileZilla with Windows Server.
Conclusions and next steps:
In this tutorial, you have learned how to install and configure FileZilla on a Windows server hosted by Jotelulu.
If you found this tutorial useful and would like to learn more about related services, the following tutorials may be of interest to you:
- How to Deploy a New Server on Jotelulu.
- How to Create a Site-to-Site VPN Tunnel on Jotelulu.
- How to Create a Server Image to Use When Deploying a New Remote Desktop.
- How to Create a VPC and Link Tier Networks on Jotelulu.
We hope that you do not have any issues configuring your FTP server, but if you do encounter any problems, please don’t hesitate to contact us so that we can help you.
Thanks for reading!


