In this tutorial, you will learn how to install and configure a DHCP server in order to automatically assign IP addresses to your client computers.
The DHCP service (Dynamic Host Configuration Protocol service) is one of the most important services when it comes to efficiently managing any home or business network. This service allows you to automatically assign IP addresses and set other network configuration parameters such as the network mask, default gateway and DNS server.
Along with AD DS Server (Active Directory Domain Services) and DNS (Domain Name Service), this service forms part of the foundations of any Windows Server-based infrastructure.
In this tutorial, we will take a look at how to deploy the service and configure the basic settings.
NOTE: The steps in this tutorial have been performed using Windows Server 2022, but the installation process will be the same for Windows Server 2016 or 2019.
How to Install and Configure a DHCP Server
Before you begin
To complete this tutorial successfully and install a DHCP server, you will need:
- To be registered with an organisation on the Jotelulu platform and have logged in.
Part 1 – Installing the DHCP Server Role
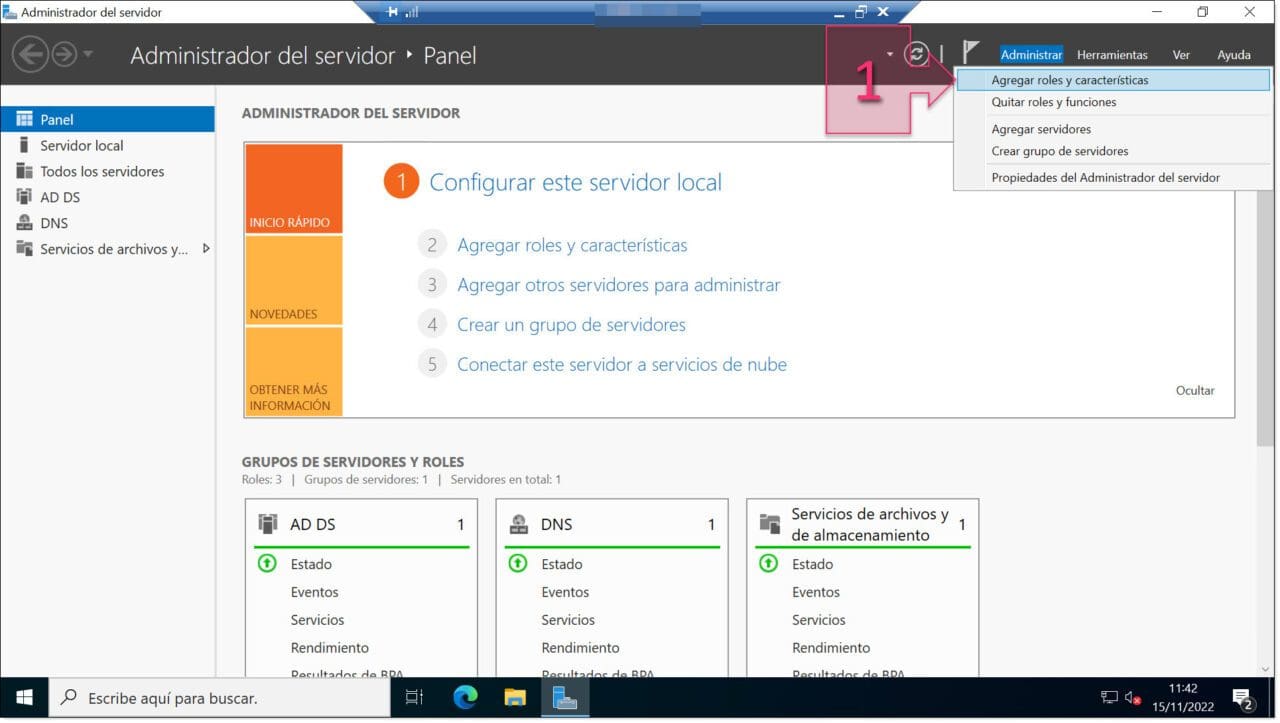
To install the DHCP server role, first open Server Manager and then click on Manage > Add roles and features (1).
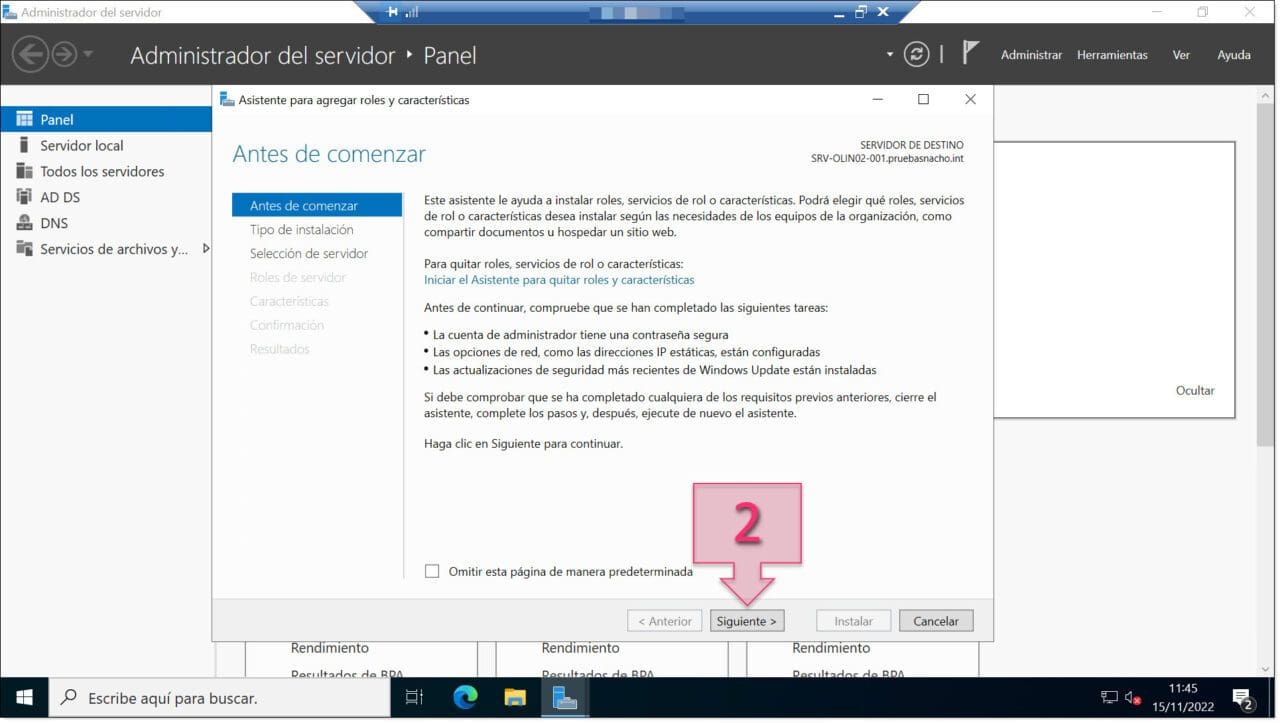
As always, the first screen you will see when the Add Roles and Features Wizard starts will be the welcome screen.
It is possible to omit this screen, but we don’t recommend this. Omitting it saves no time and it’s always good to have a landing screen when you start an installation.
The welcome screen will contain a series of recommendations that we always recommend that you check first.
Once you have read them all, simply click on “Next” (2).
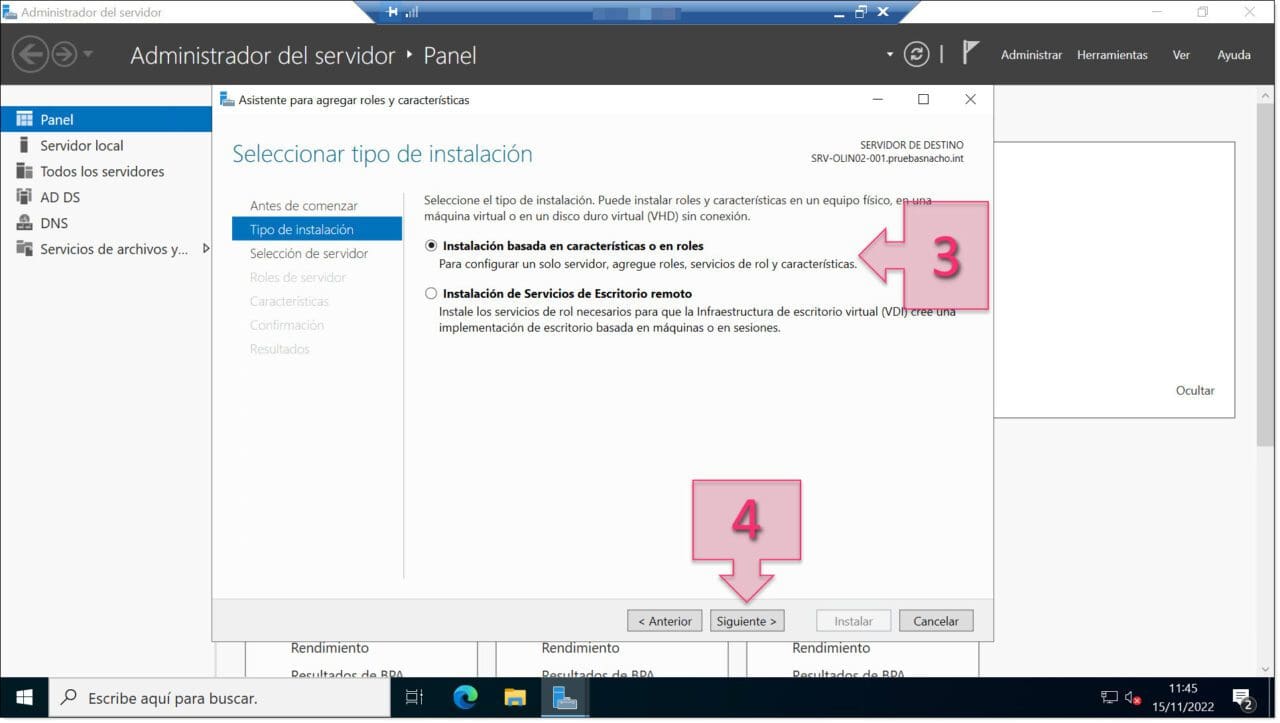
Next, you need to select an installation type from the two options shown:
- Role-based or feature-based installation: to configure a single server.
- Remote Desktop Services installation: for deploying a VDI.
Select the first option (3) and click on “Next” (4).
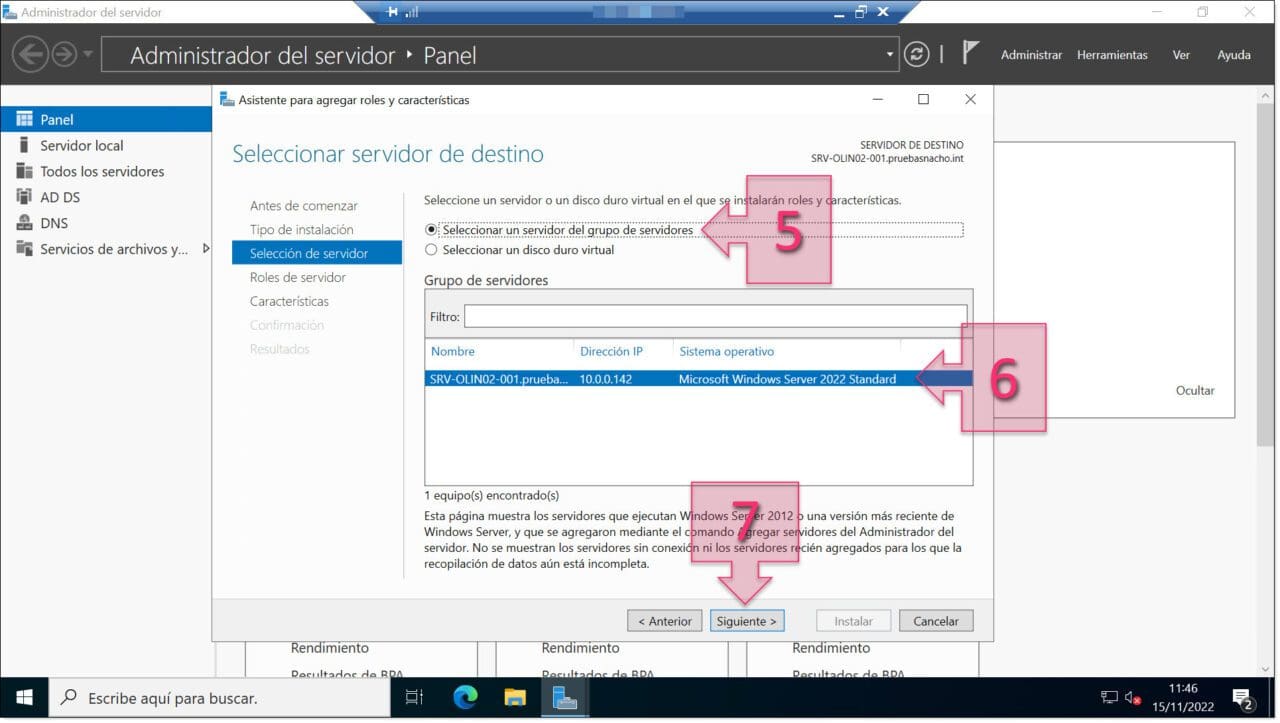
Then, you need to select the destination server where the DHCP server role will be installed. First choose the option “Select a server from the server pool”(5) and a list of servers will be shown below. Click on the server you wish to install the role on (6) and click on “Next” (7).
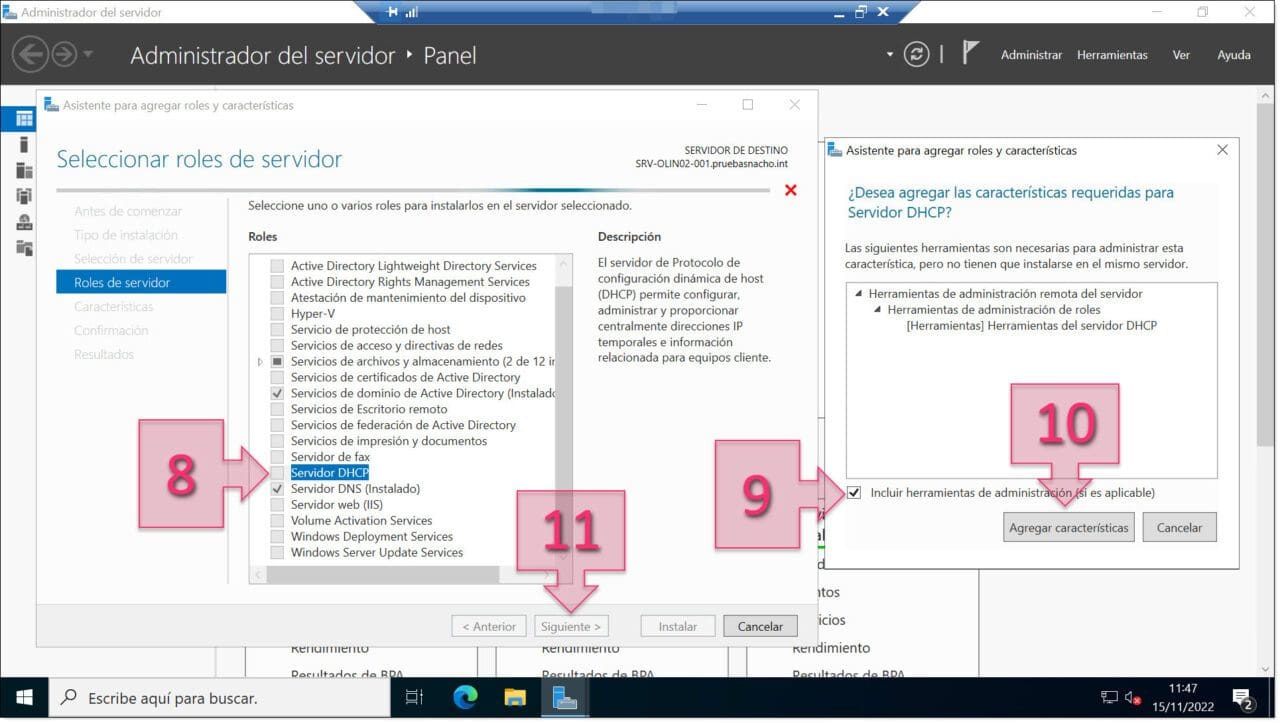
Next, you need to select the server role you wish to install, which in this case will be the DHCP service.
To do this, scroll down the list of roles until you find “DHCP Server” and click the corresponding checkbox (8). You will then see a new window asking whether you wish to add features required for the role with a list of features below.
Ensure that the checkbox “Include management tools (if applicable)” is ticked (9) and click on “Add features” (10). Then, click on “Next” (11).
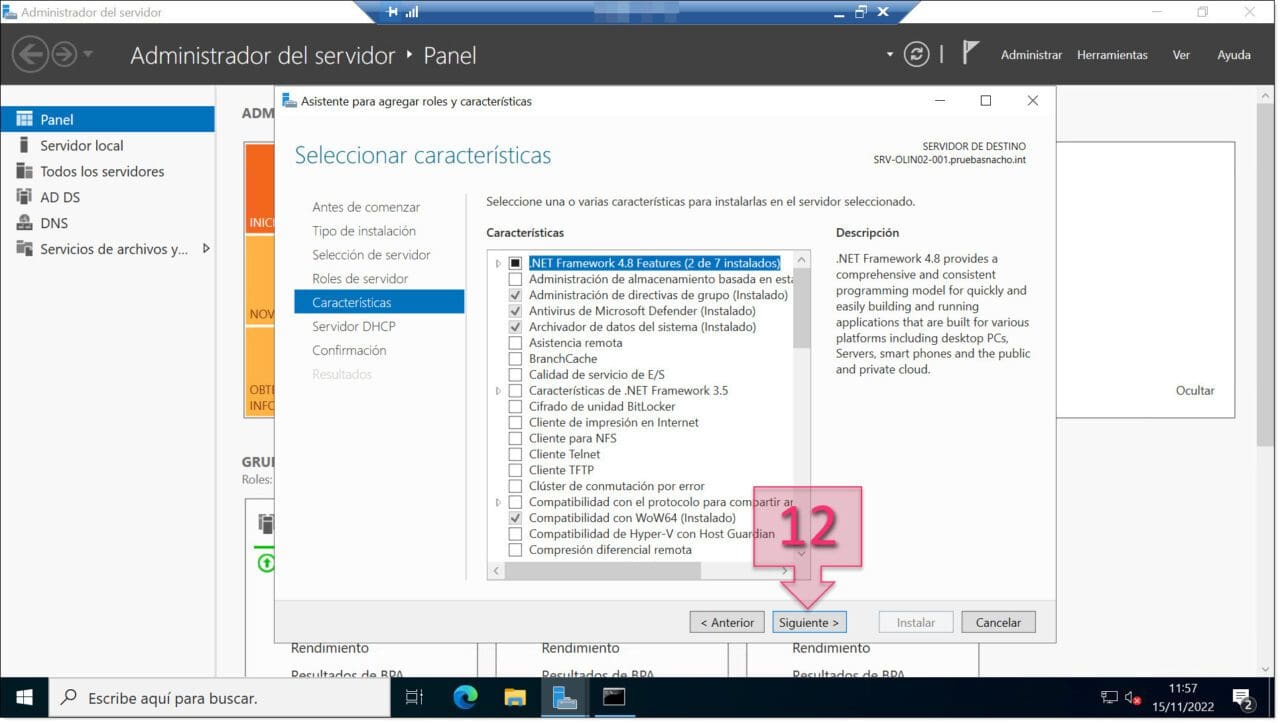
On the Select features screen, simply leave everything as it is (unless there are other features you wish to add) and click on “Next” (12).
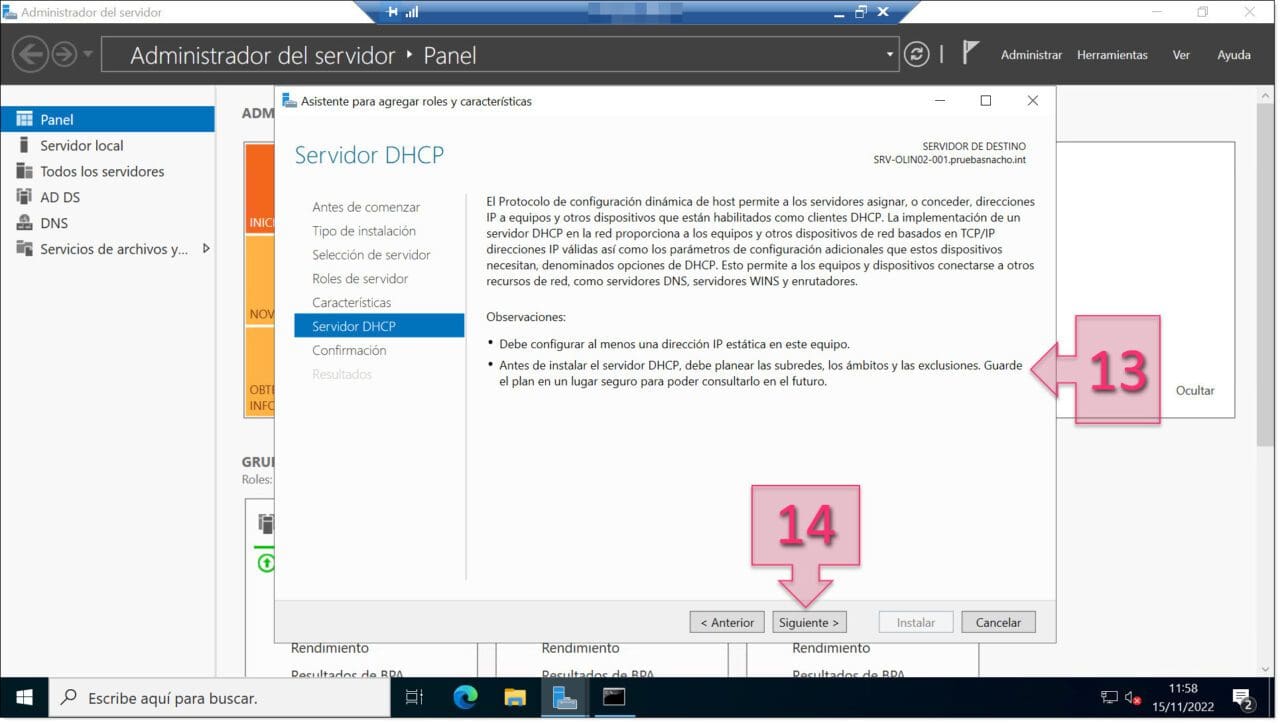
Similarly, there is not much to do on the DHCP Server role screen. Simply take the time to ready the additional information shown (13) and then click on “Next” (14).
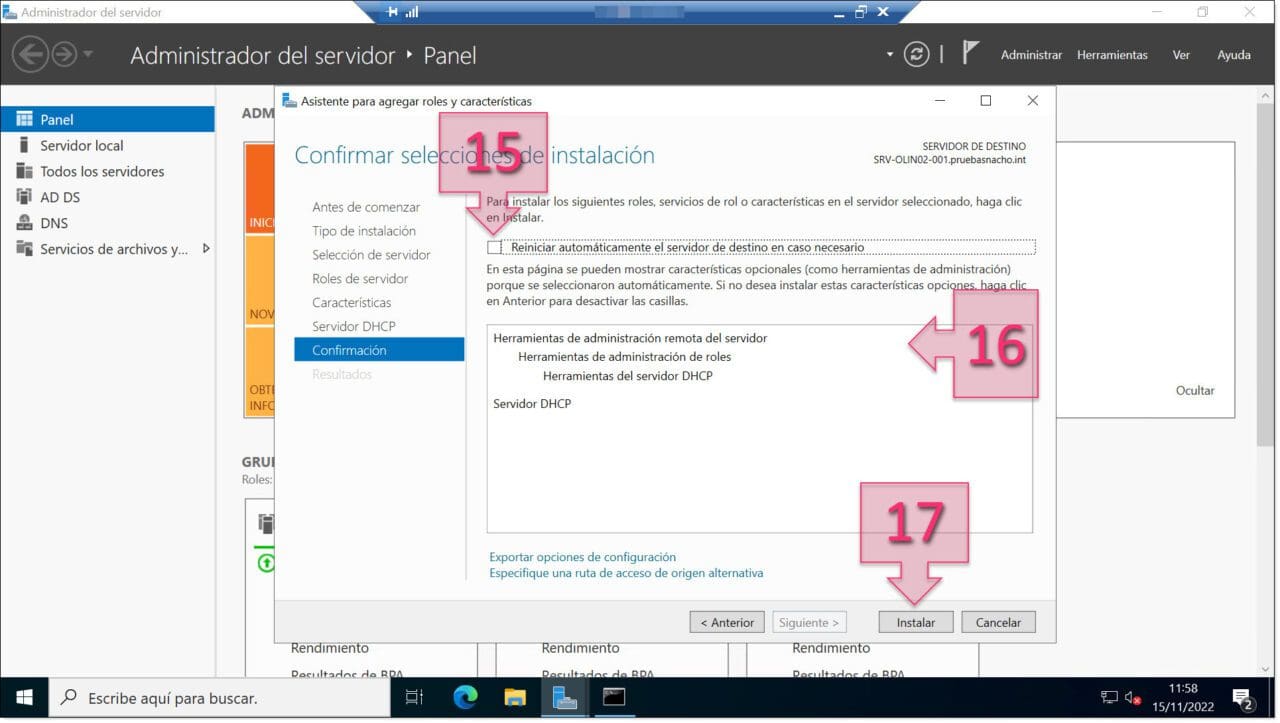
All that is left now is the “Confirm installation selections” screen. I personally do not recommend ticking the option to “Restart the destination server automatically if required” (15) as I prefer to remain in full control.
Check all of your choices for the installation (16) and then click on “Install” (17).
At this point, the installation will now begin and you will see the progress bar (18). Once finished, click on “Close” (19).
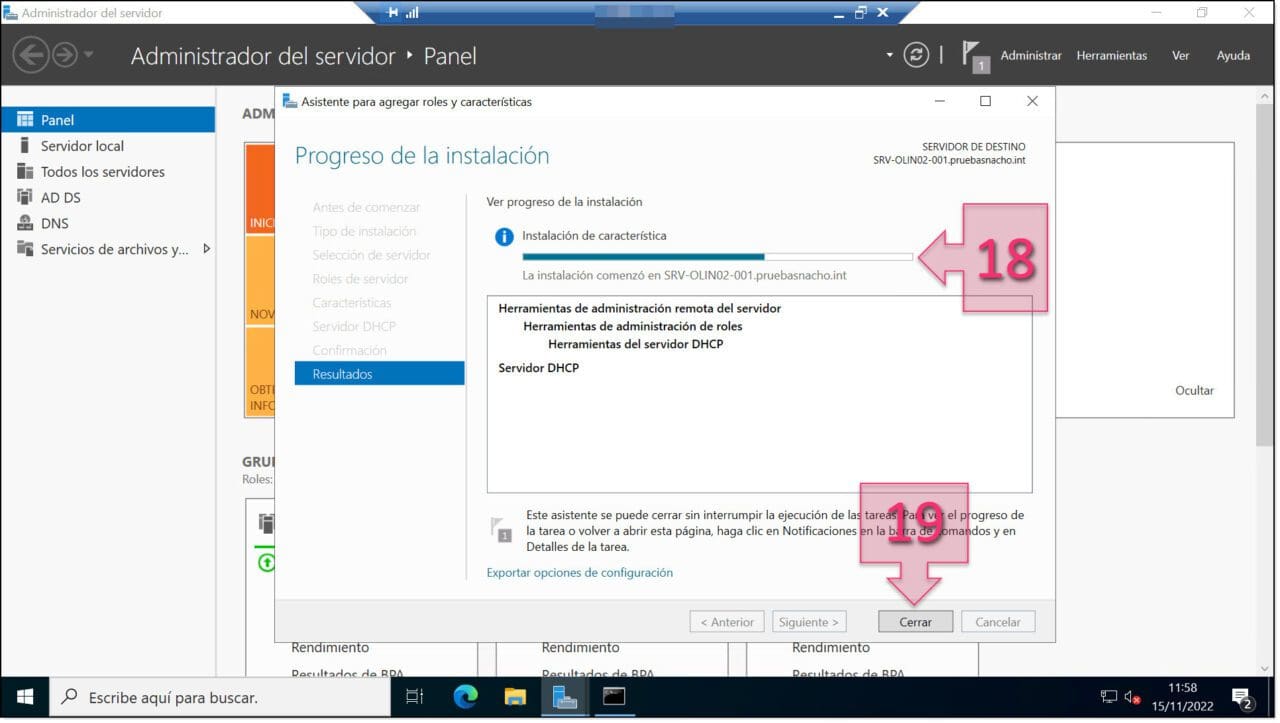
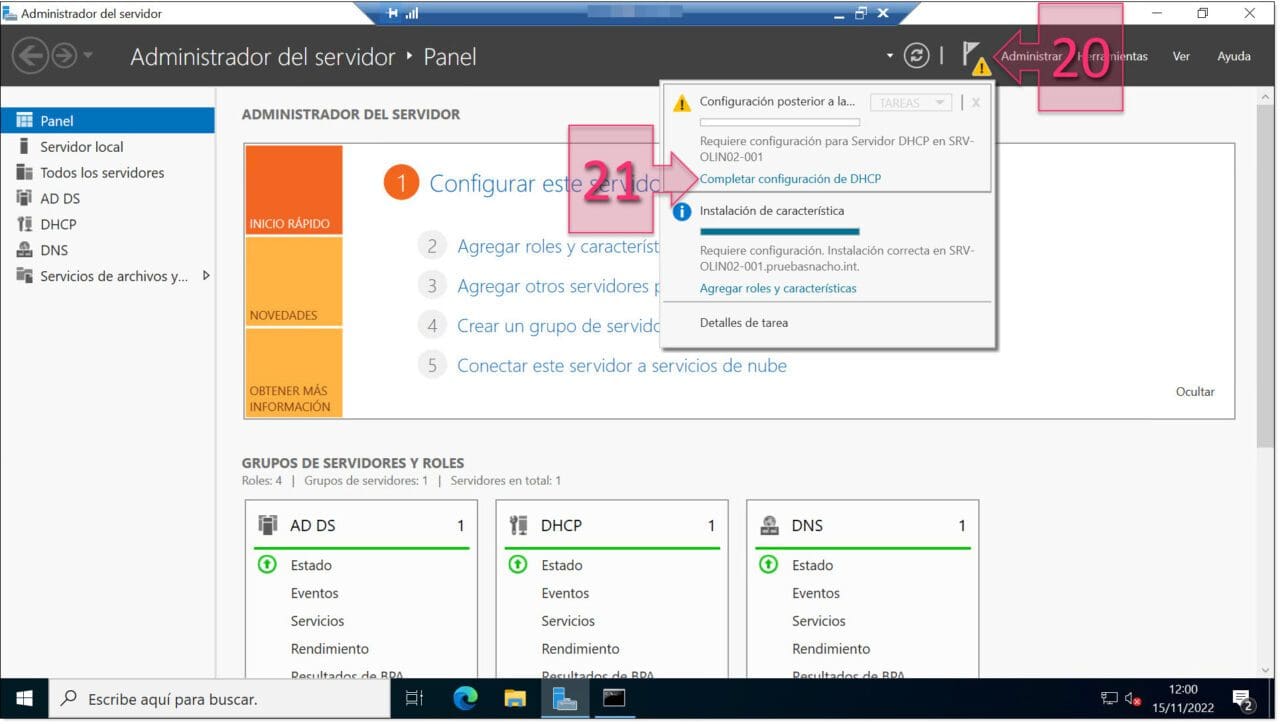
If you accidentally close the wizard before the installation finishes, don’t worry. You can still see the installation progress by clicking on the Alert icon in the menu (20).
Once the installation has finished, you will need to click on “Complete DHCP configuration” (21) to configure the basic settings for your DHCP server.
Part 2 – Configuring the DHCP Server
After clicking on “Complete DHCP configuration”, you will see the DHCP Post-installation configuration wizard. Now that you have installed the server role, all that remains is to configure the basic parameters to have your new DHCP server up and running.
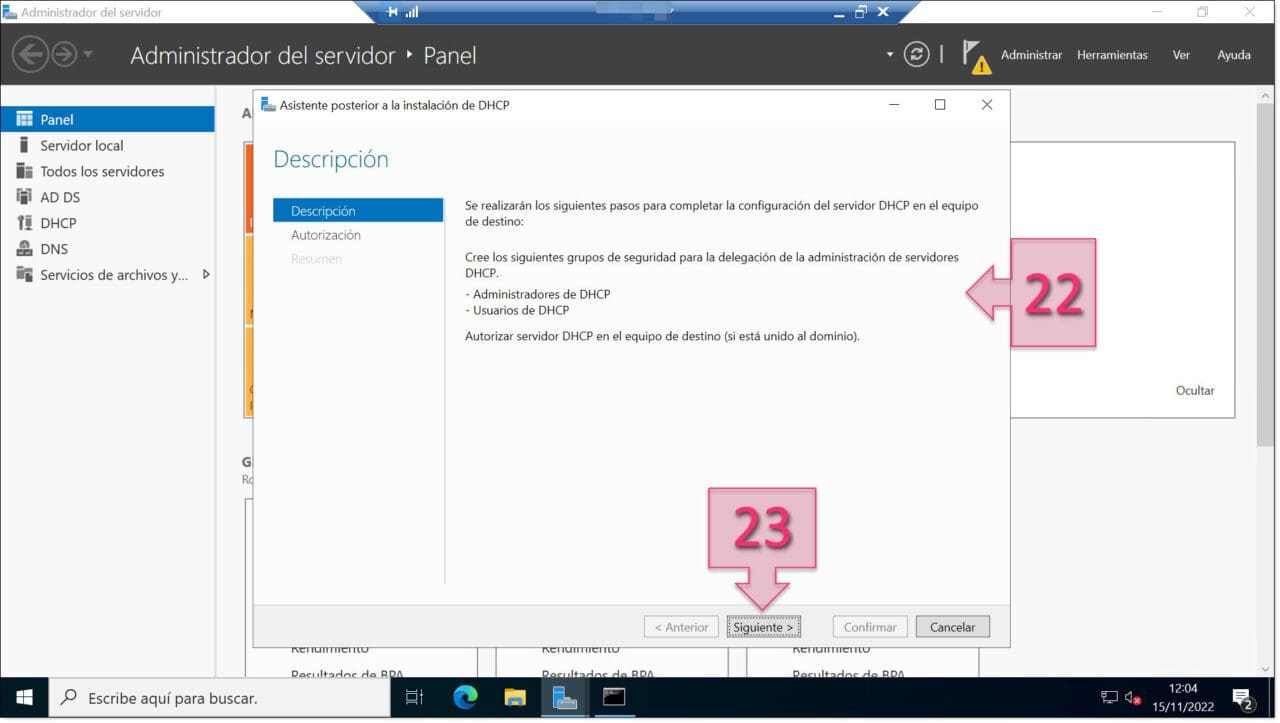
Once again, you will first see a welcome screen. This screen will inform you that you need to create security groups for administrators and users in order to delegate DHCP server administration. It will also say that you need to authorise the DHCP server on the target computer.
Once you have read this information carefully (22), click on “Next” (23).
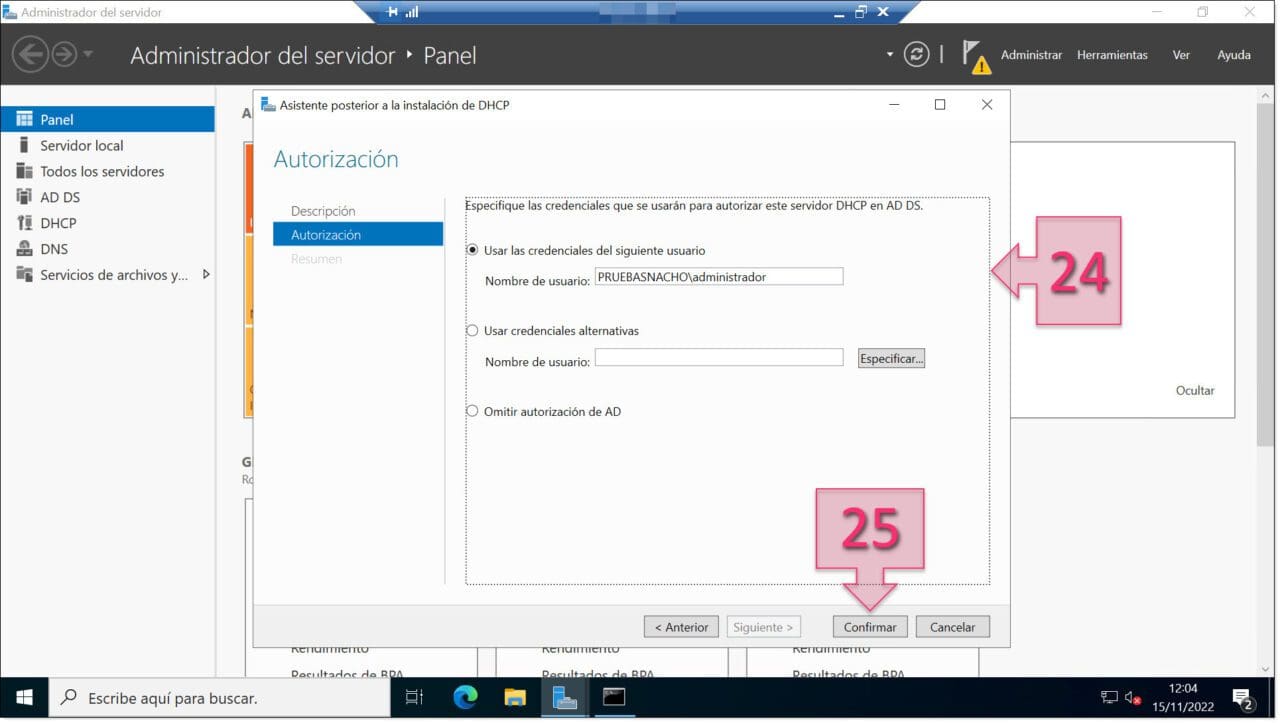
On the Authorization screen, you will need to enter your specific credentials that will be used to authorise this DHCP server in AD DS. You first need to choose from the following options (24):
- Use the following user’s credentials: where you will need to enter the User Name in the format “Domain\User”. This is the option we have used for this tutorial.
- Use alternate credentials: where you will have to give a User Name.
- Skip AD authorization.
Once you have made your choice and entered any necessary details, click on “Confirm” (25).
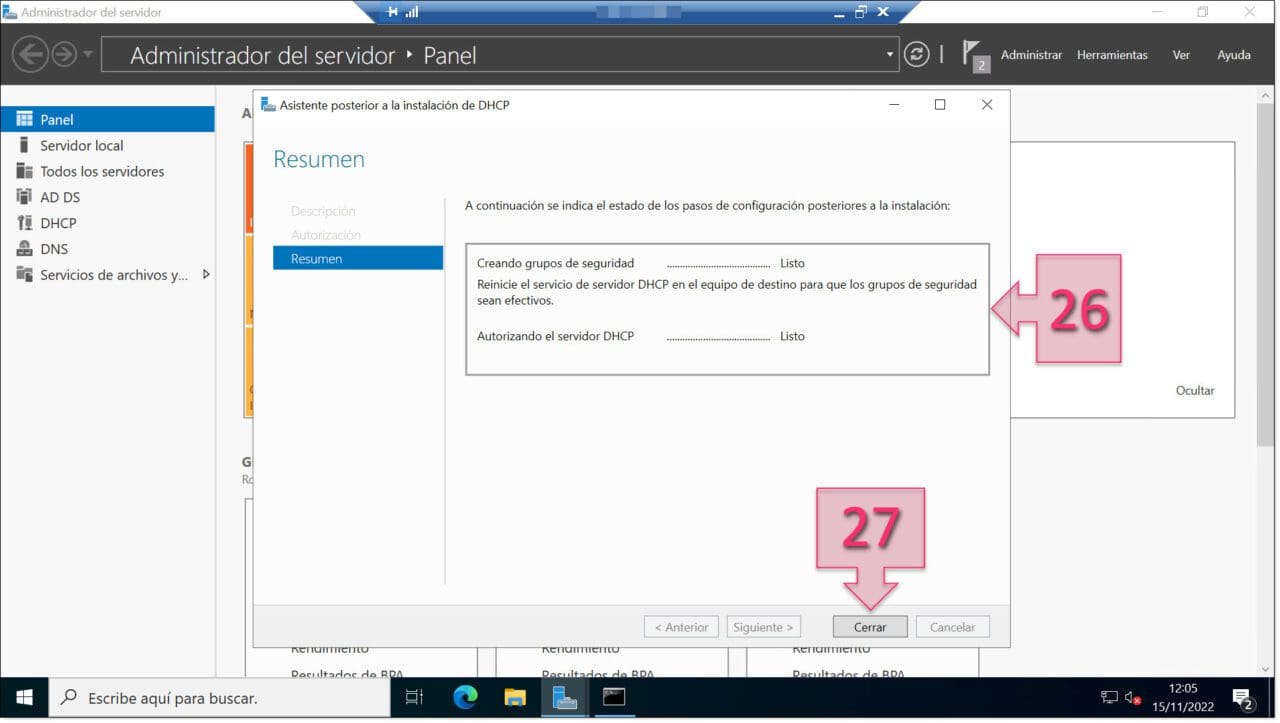
Next, you will see a summary page of your configuration steps:
- Creating security groups.
- Authorizing DHCP server.
If everything has worked correctly, you should see “Done” (26) next to each point.
Once this is complete, click on “Close” (27).
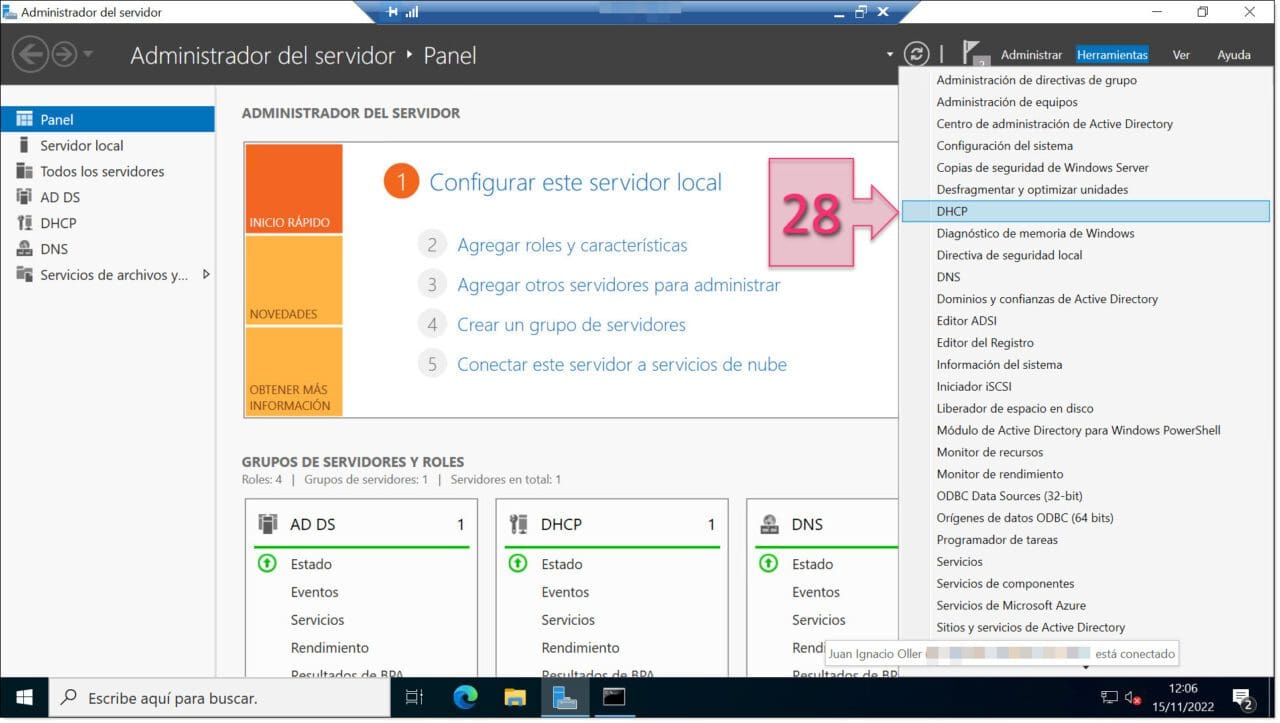
The DHCP tool (28) will now be available in Server Manager. Click on the Tools menu and then click on DHCP to manage the new service.
Lastly, you will see the DHCP management console, where you can perform all DHCP-related tasks, such as creating scopes, assigning leases, creating ranges, configuring parameters that are provided to clients, etc.
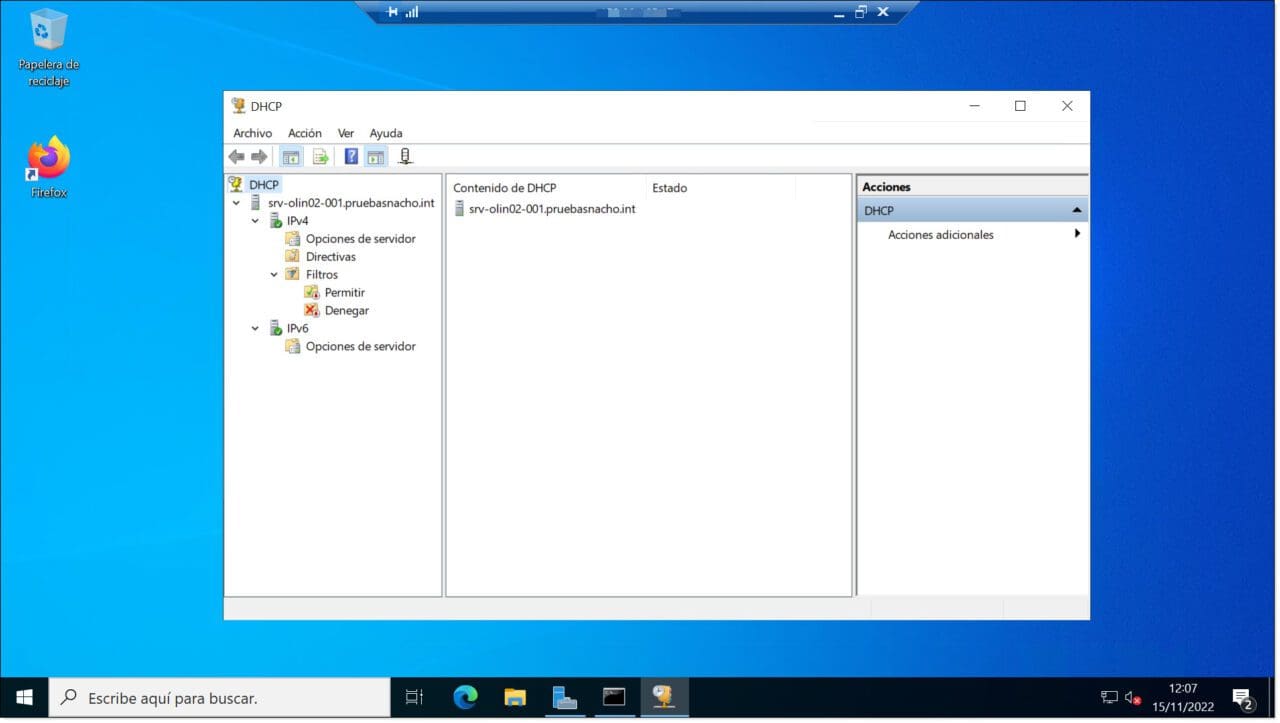
You have now successfully installed and configured your DHCP server. There still remain tasks like configuring scopes and basic settings, but we will leave this for a future tutorial.
Conclusion
As you can see, installing a DHCP server is very simple, whether you are installing the server role on Windows Server 2022, 2019 or 2016.
We hope that you will be able to follow this guide without any issues, but if you do encounter any problems, don’t hesitate to contact us so we can help you.
Thanks for choosing Jotelulu!


