In this tutorial, you will learn how to configure AD DS on Windows Server to provide domain services to your infrastructure.
The Directory Service is, without a doubt, part of the backbone of any IT infrastructure. The Directory Service provides centralised services to coordinate all your different servers and services.
The Directory Service is responsible for, among other things, providing a single, centralised point to store object data for your company’s infrastructure so that it can be used by users and services for enquiries, validation and routing.
On Microsoft systems, the Directory Services is called the Active Directory.
Among other things, the Active Directory performs the following functions:
- It provides a standard, centralised model that helps various services perform validations and function correctly
- It provides a comprehensive, centralised security model for the entire organisation.
- It provides a global directory with secure, resilient storage to ensure business continuity, although this also depends on its configuration by the systems administrator.
- It publishes the necessary services for the business to function correctly, supporting services like Teams, Exchange, etc.
We are not going to delve into any more detail about the Active Directory because it is beyond the scope of this tutorial. But you can find out more information about this service on our blog.
How to configure AD DS on a Windows server
Before you get started
To successfully complete this tutorial and configure AD DS, all you will need is an operational Windows server.
Preparing your destination server
Before installing AD DS on your server, you will need to complete the following tasks:
- Update your server, particularly any security updates.
- Allocate a fixed IP address: For obvious reasons, no server should ever be assigned a dynamic IP address, so this should be done first.
- Allocate a server name: During the installation, a random name will be generated. You should change this to one that complies with your company’s naming policy.
- Create an additional local administrator account that can be used in case an incident occurs. It should only be used for this purpose.
Part 1 – Installing the AD DS server role
NOTE: For the purposes of this tutorial, as explained above, we assume that you have an operational Windows Server. The screenshots have been taken from Windows Server 2022 Standard, and the tutorial should be valid for all other versions available on the platform (Windows Server 2016, Windows Server 2019 and Windows Server 2022).
To begin this task, you will need to open the Server Manager, which, on Windows Server 2016 to 2022, should load automatically after logging in. If this does not happen, simply type “Server Manager” into the search bar and launch it manually.
In Server Manager, click on “Manage” in the top-right corner and select “Add Roles and Features” (1). This will load the Add Roles and Features Wizard.
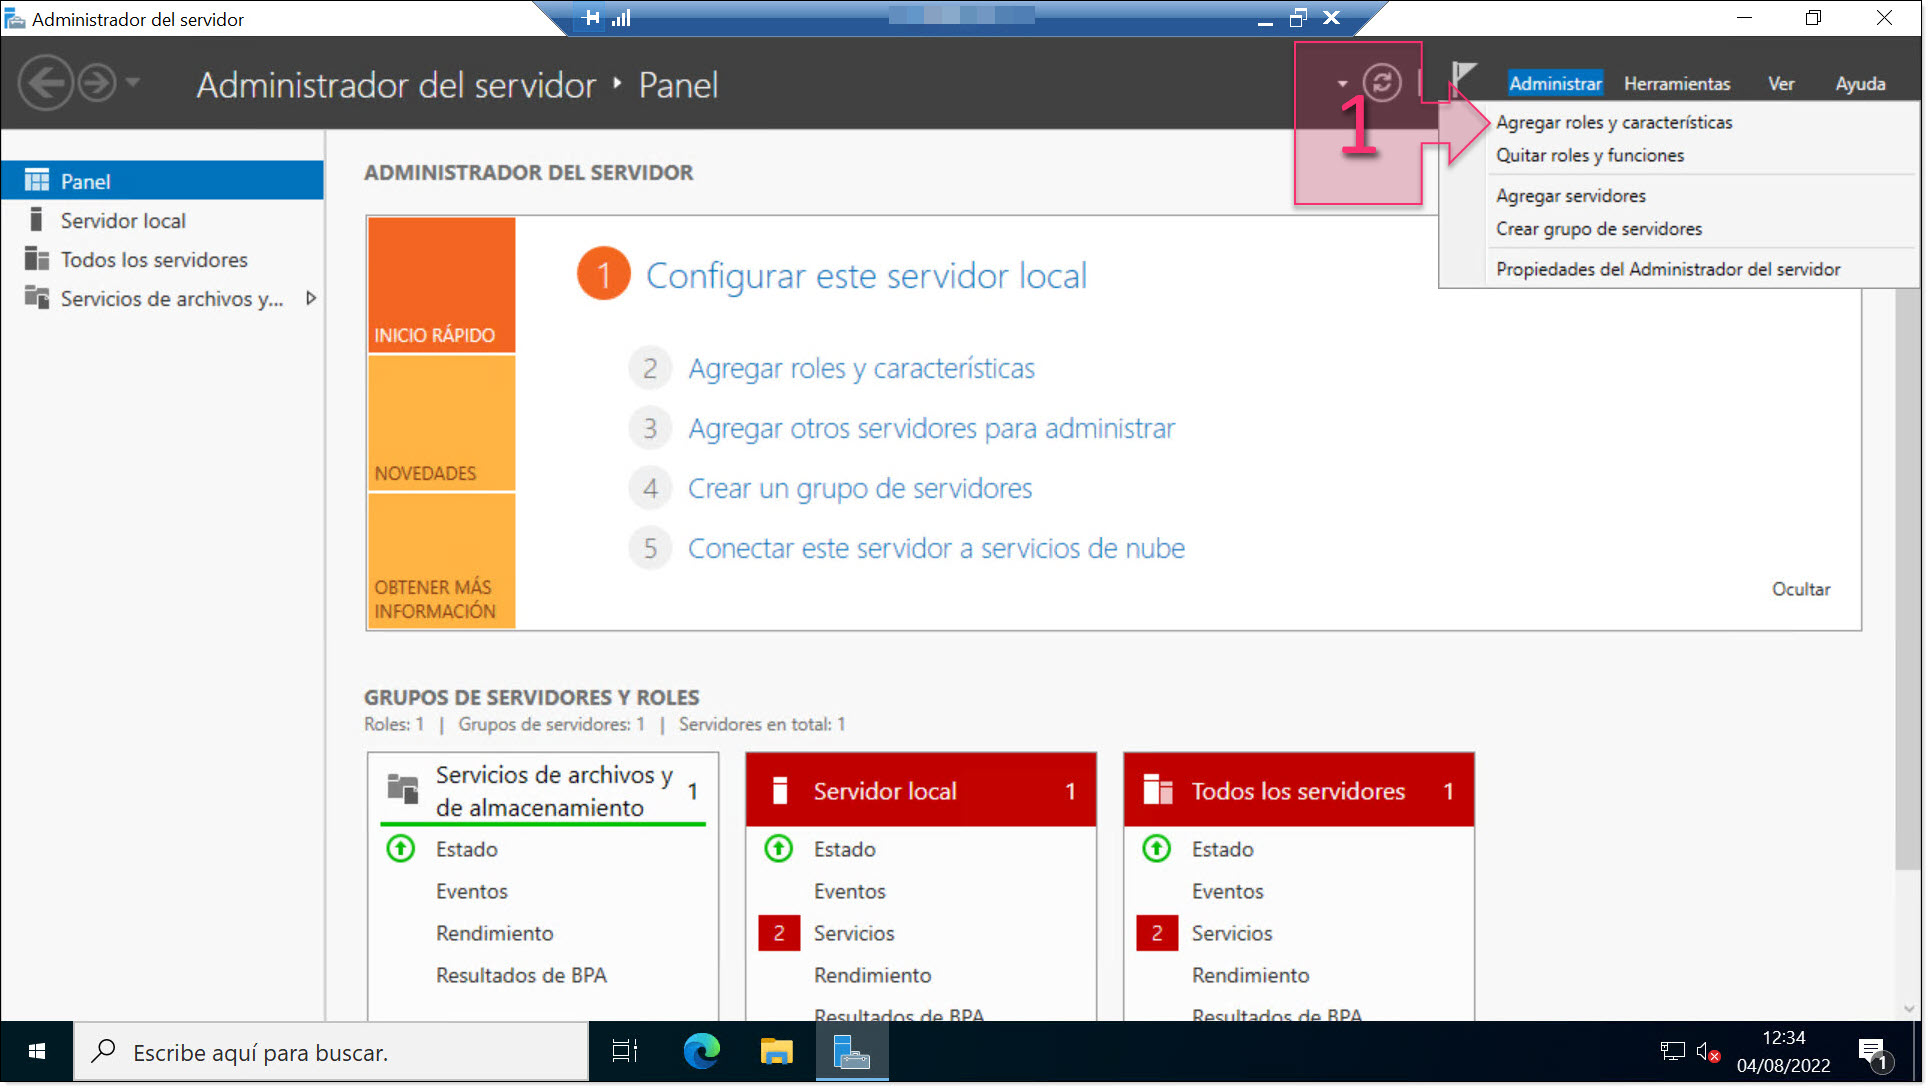
Part 1 – Click on Add Roles and Features in Server Manager
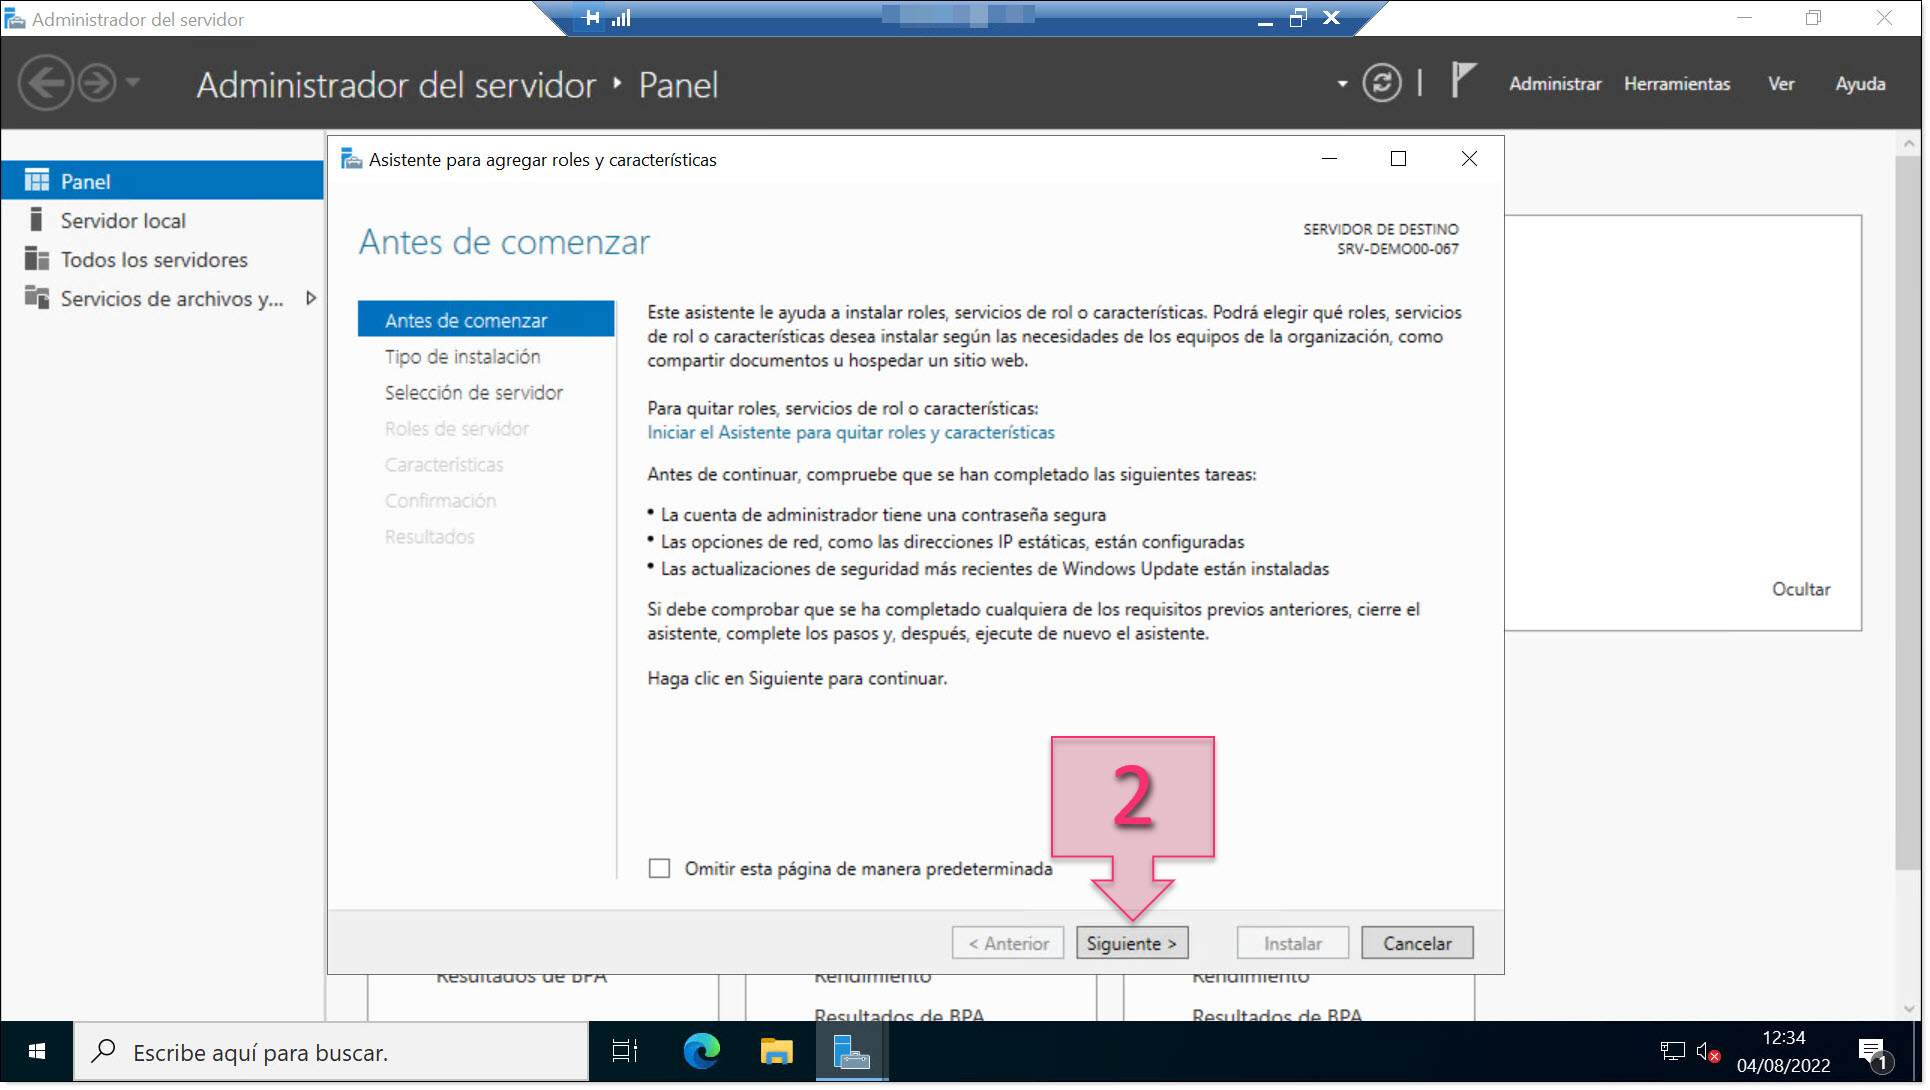
Read the “Before you begin” page
The next screen is titled “Select installation type” and there are two options:
- Role-based or feature-based installation: This allows you to configure roles, role services and features on a single server. This is the option that we will choose for this tutorial.
- Remote Desktop Services installation: This allows you to install required role services for Virtual Desktop Infrastructure (VDI).
For this tutorial, select “Role-based or feature-based installation” (3) and click on “Next” (4).
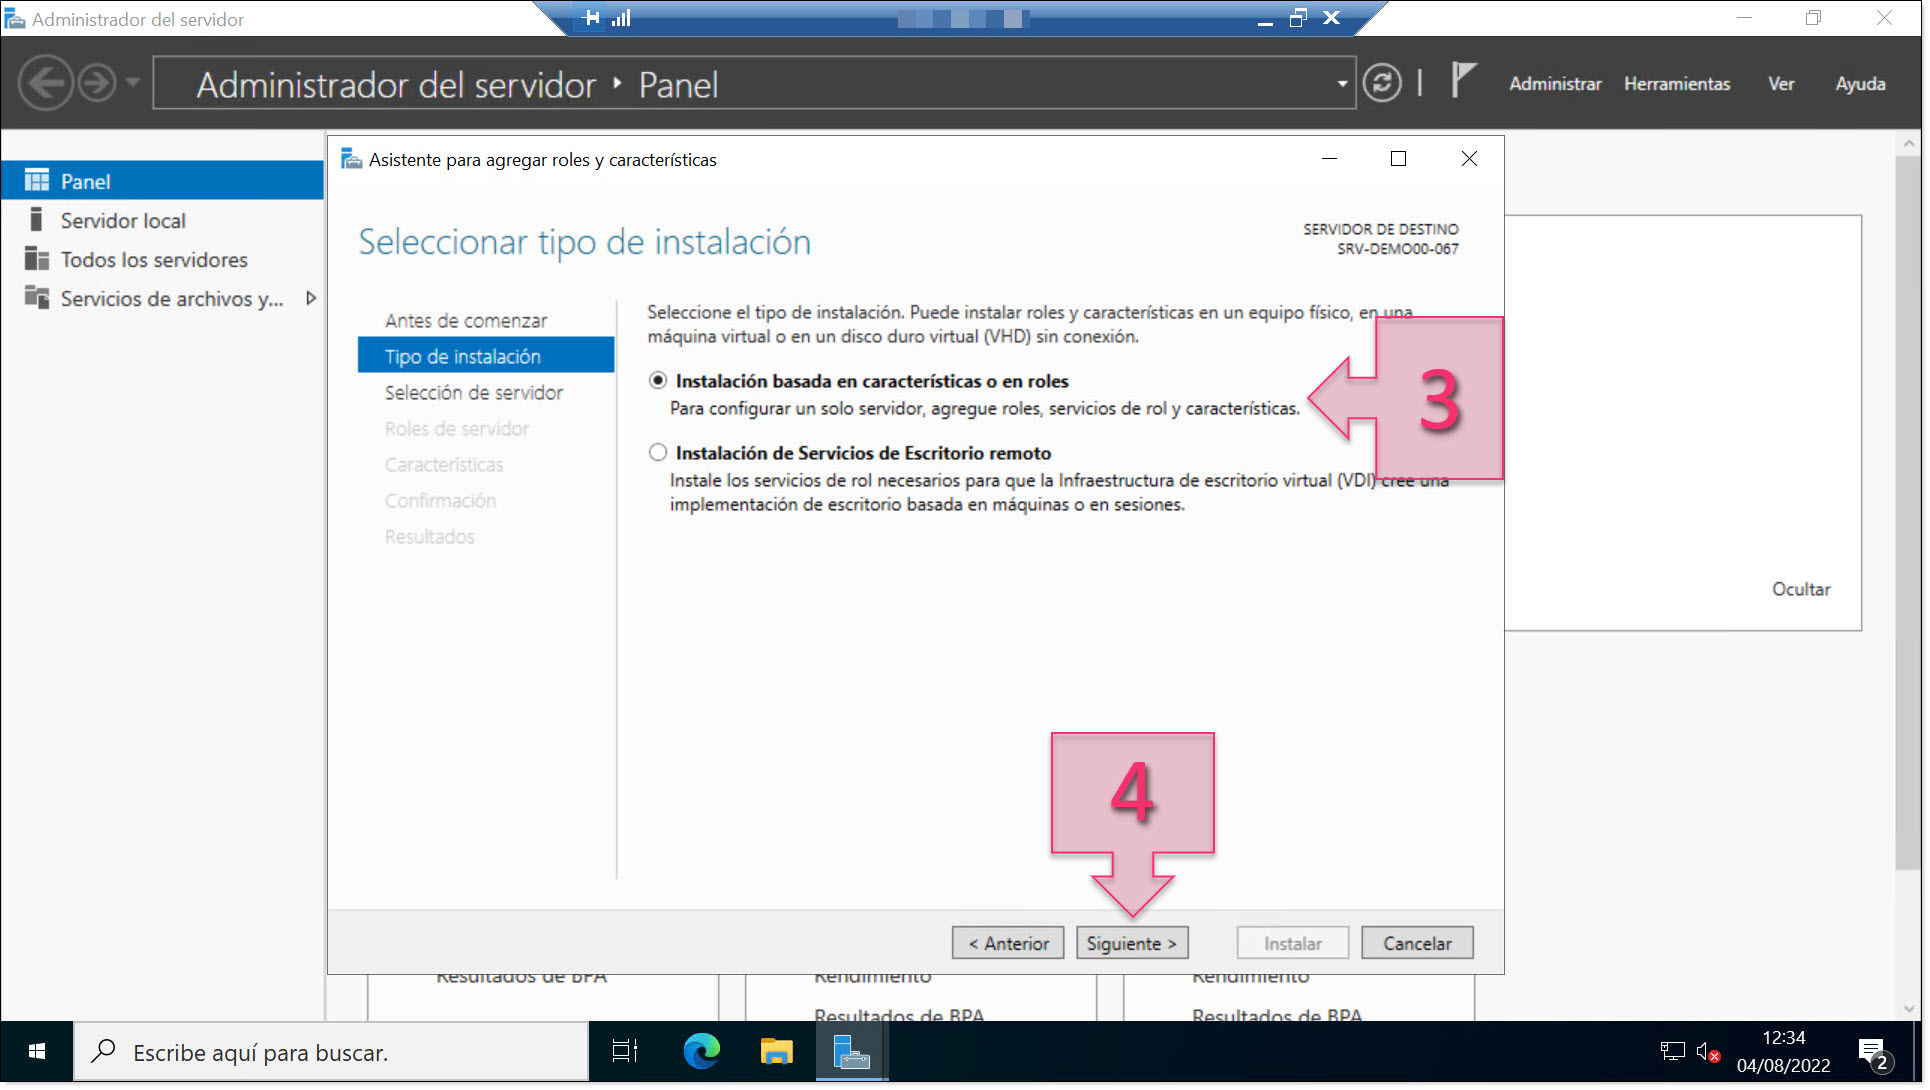
Part 1 – Select Role-based or feature-based installation
Next, you will need to select the destination server (5).
First, you are asked whether you wish to install on a server or on a virtual hard disk. Select “Select a server from the server pool” (5).
You will then see a list of all the available servers. If this is your first server, you will see only one on this list. If you have many servers, you can use the filter to search by server name.
Once you have found the server you wish to use, click on it in the list (6) and click on “Next” (7).
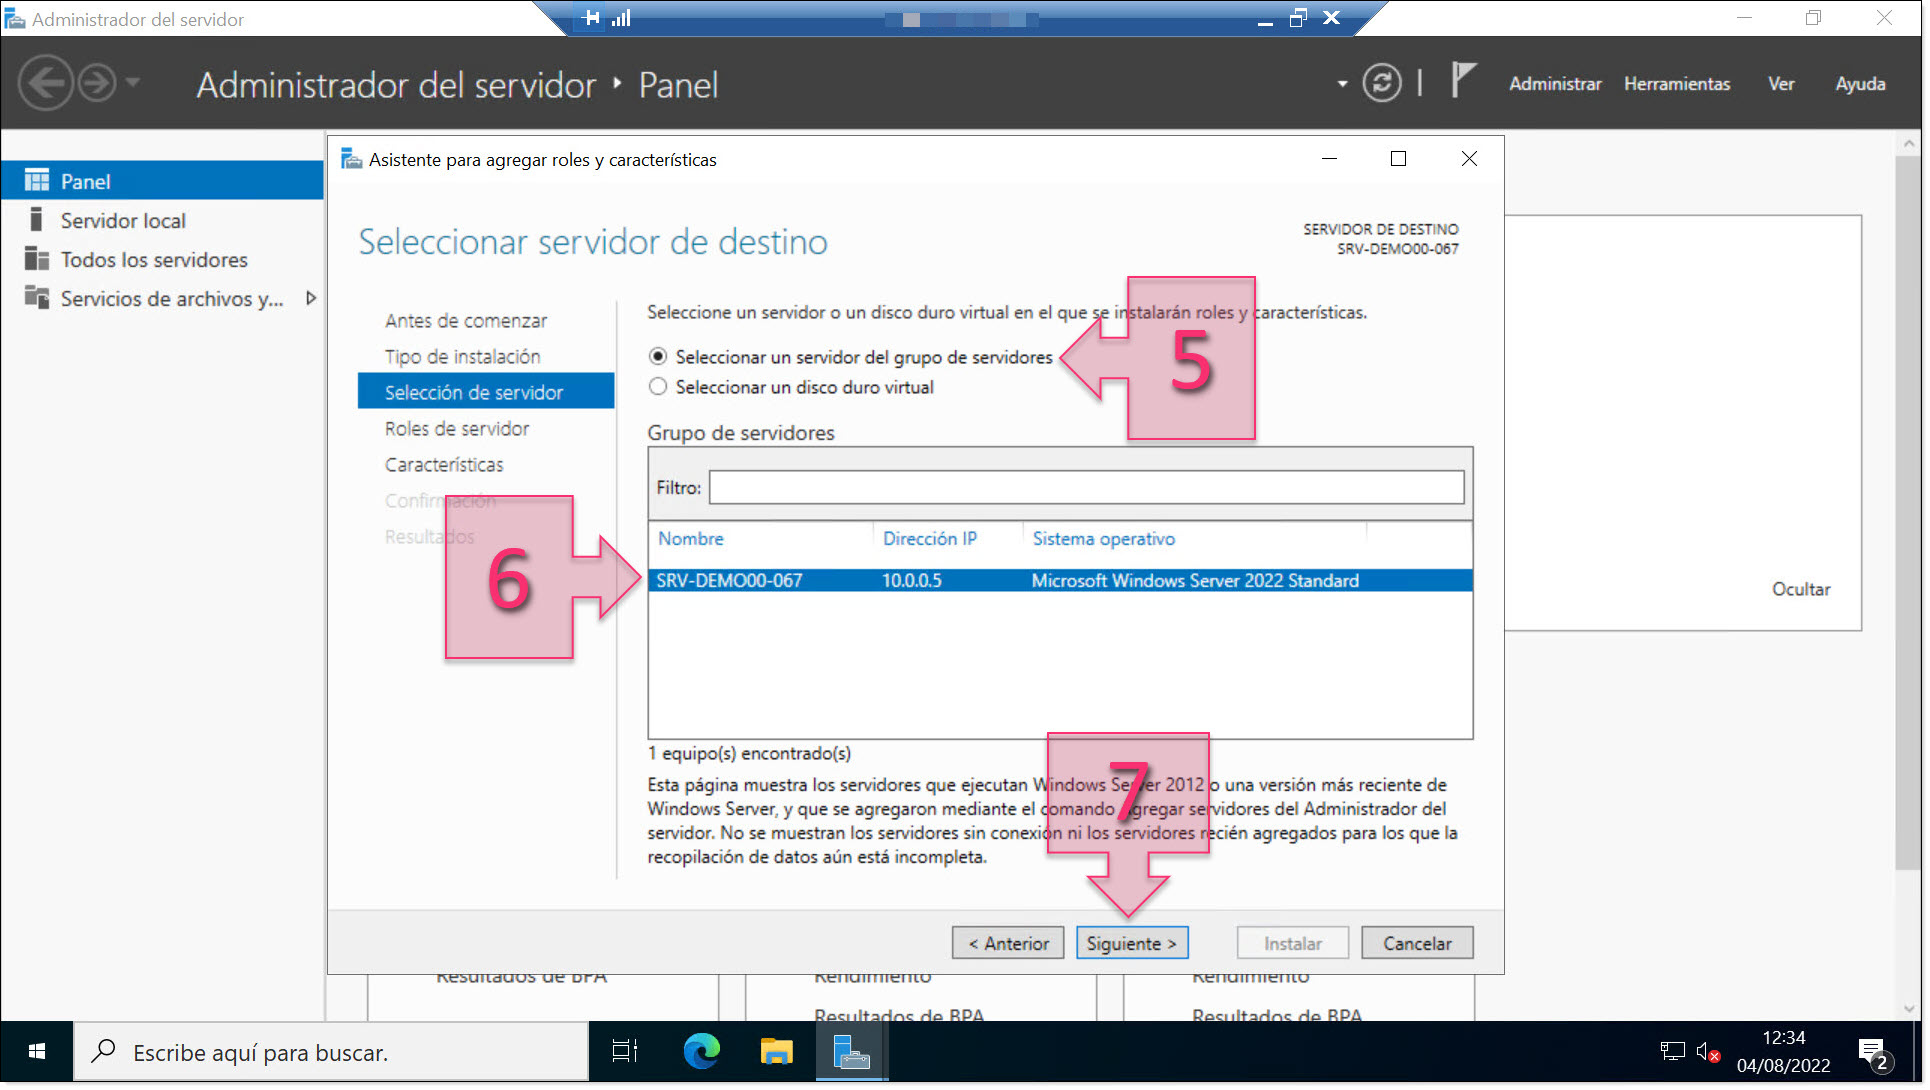
Part 1 – Select the destination server
NOTE: If you wish to install other roles or features, it is possible to do it all at the same time. However, we do not recommend this for the following reasons:
- Installing roles or features one by one will allow you to keep a clear record of what has been installed correctly or what problems have occurred. By performing each installation separately, it will be easier to identify any errors.
- It is recommended that some roles are installed on dedicated devices for security and performance reasons. AD DS is one such role.
Next, you will need to select the server roles that you wish to install. Here, you should tick the checkbox next to “Active Directory Domain Services” (8).
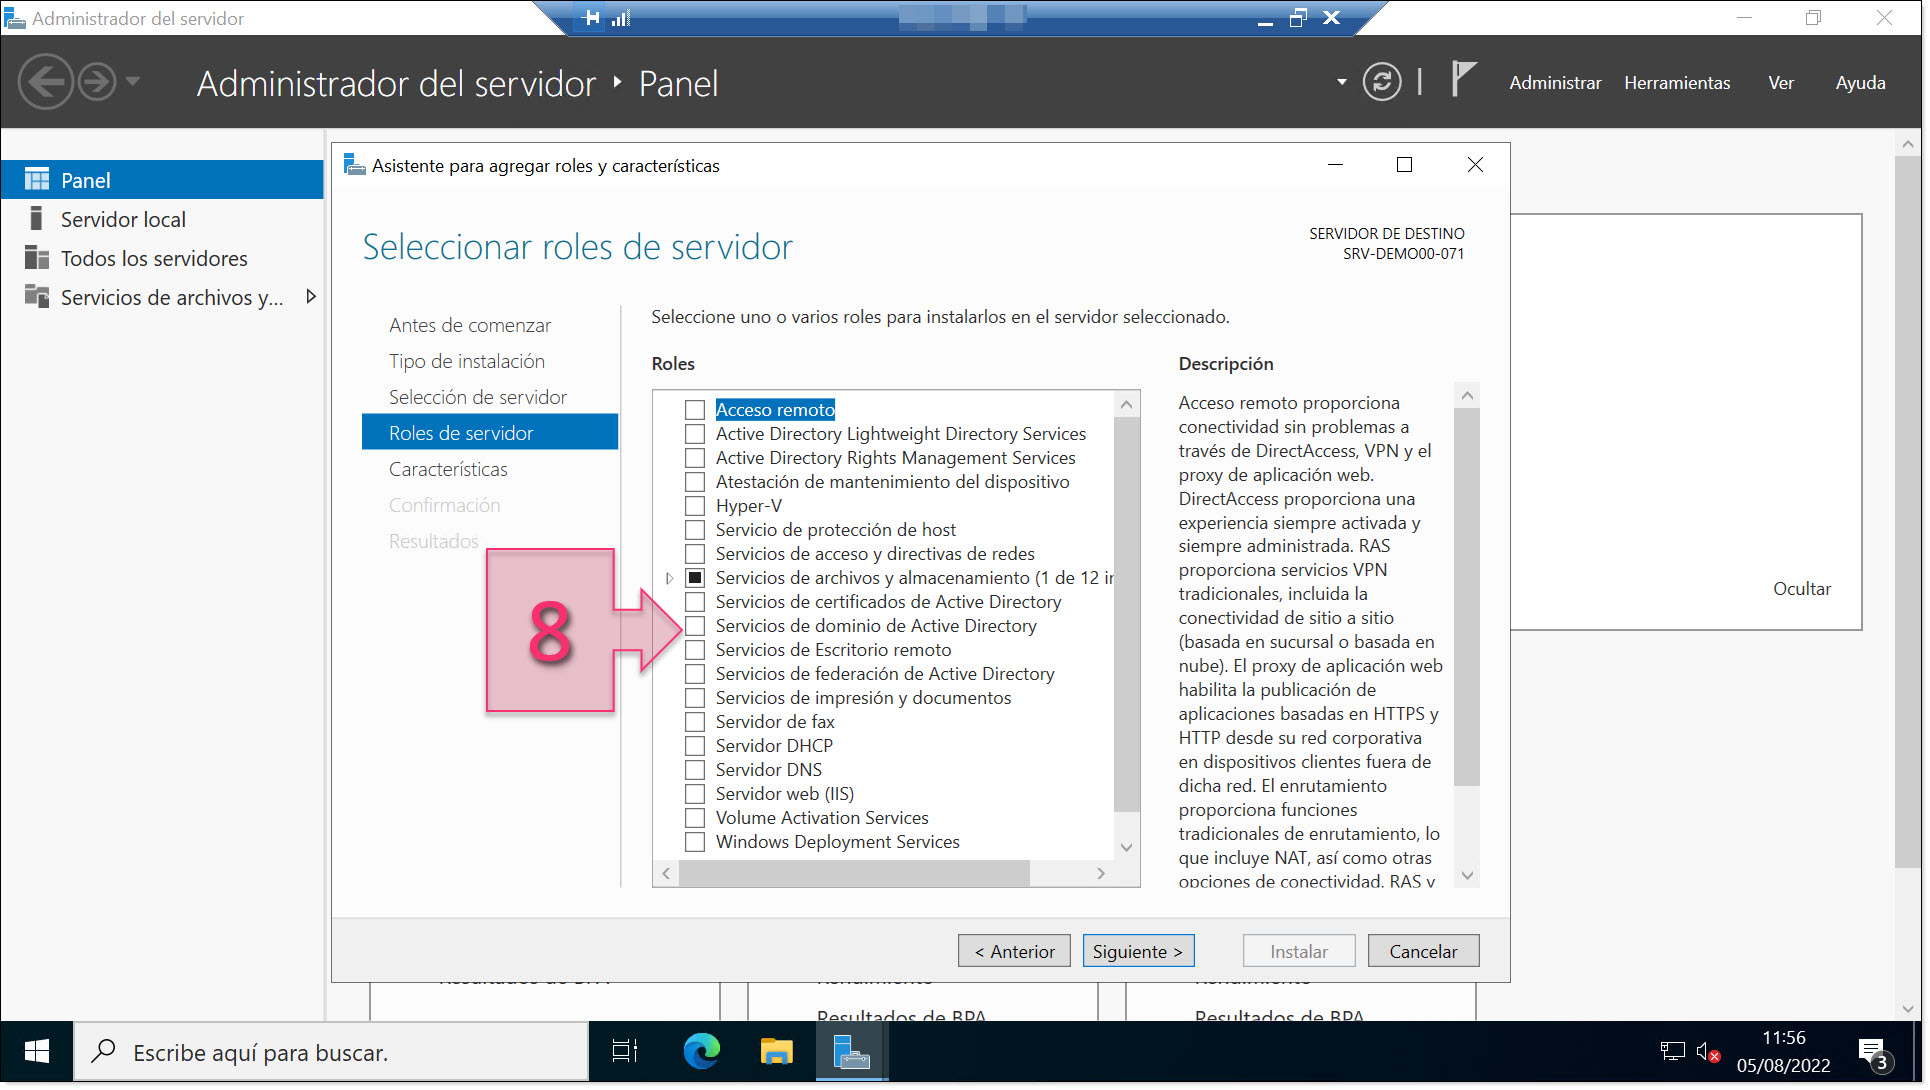
Part 1 – Select Active Directory Domain Services
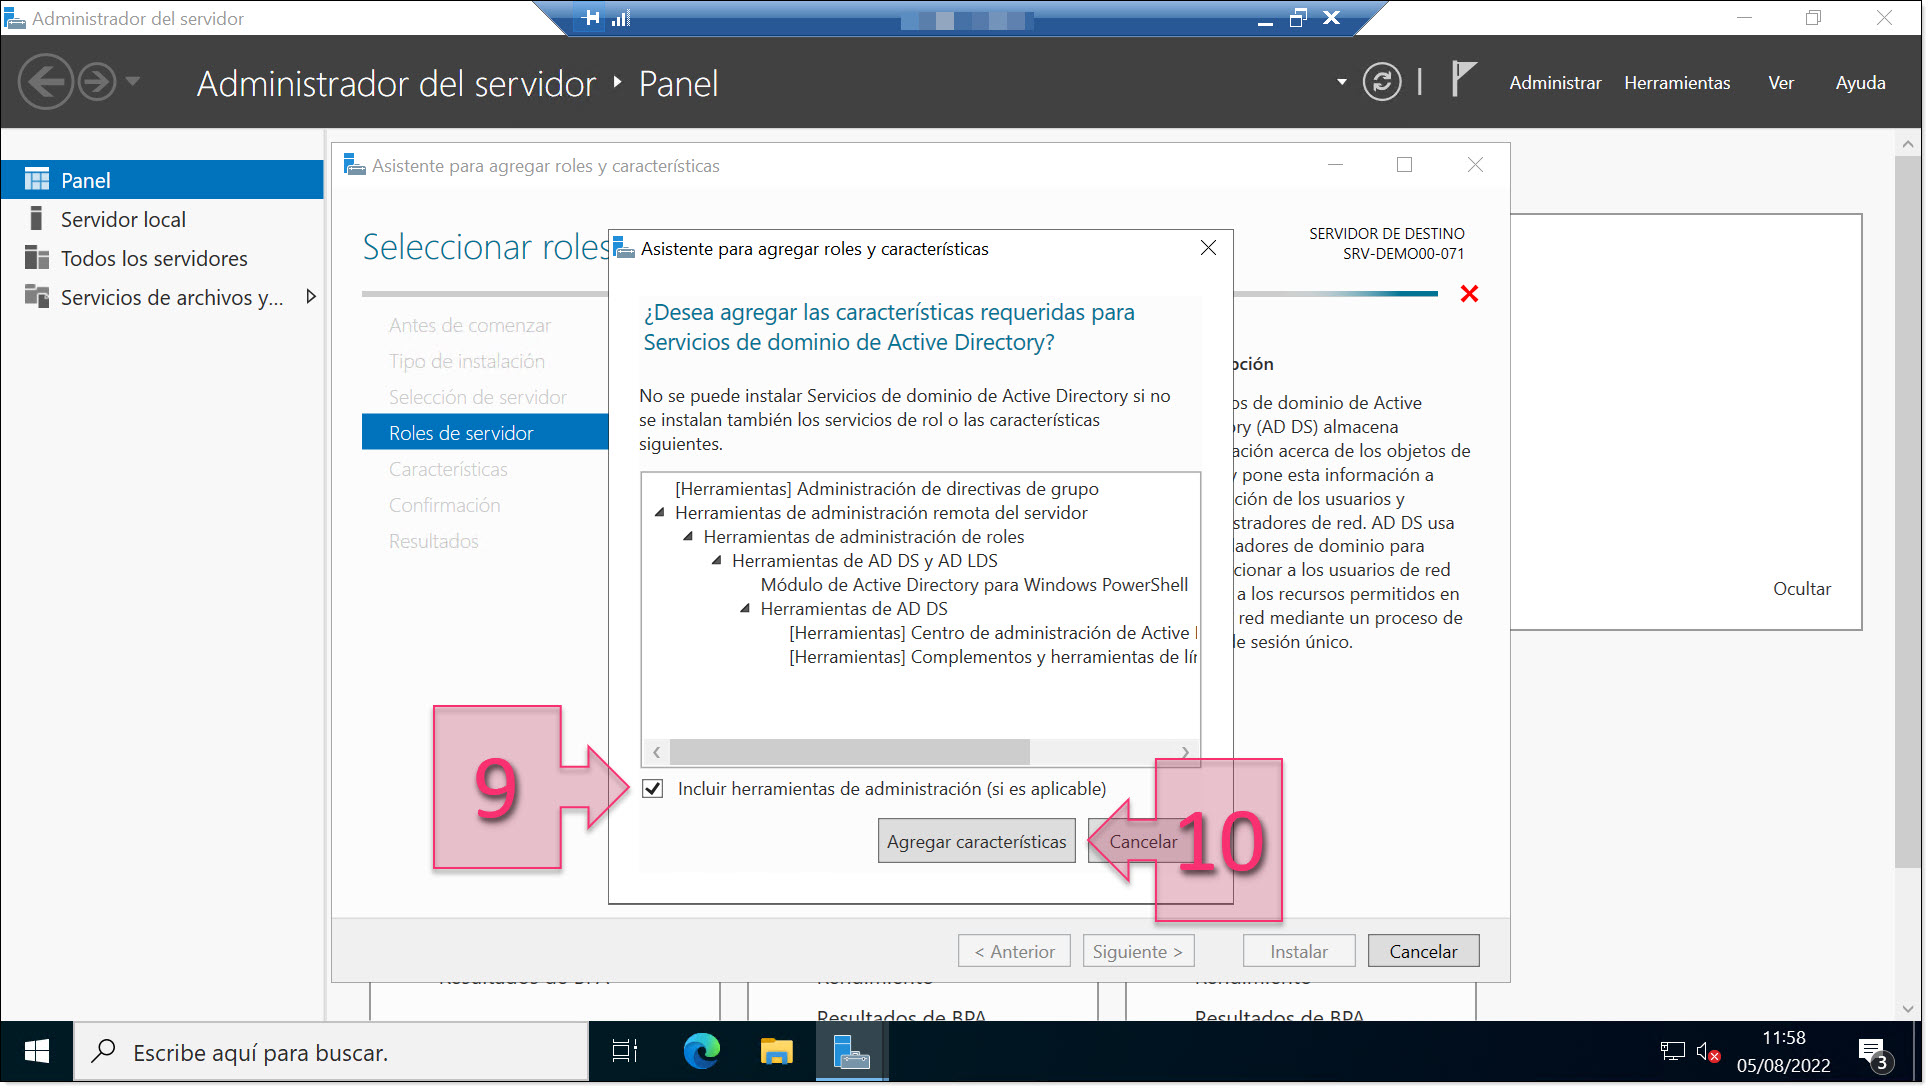
Part 1 – Add the required features for domain services
In the “Select server roles” window, click on “Next” (11).
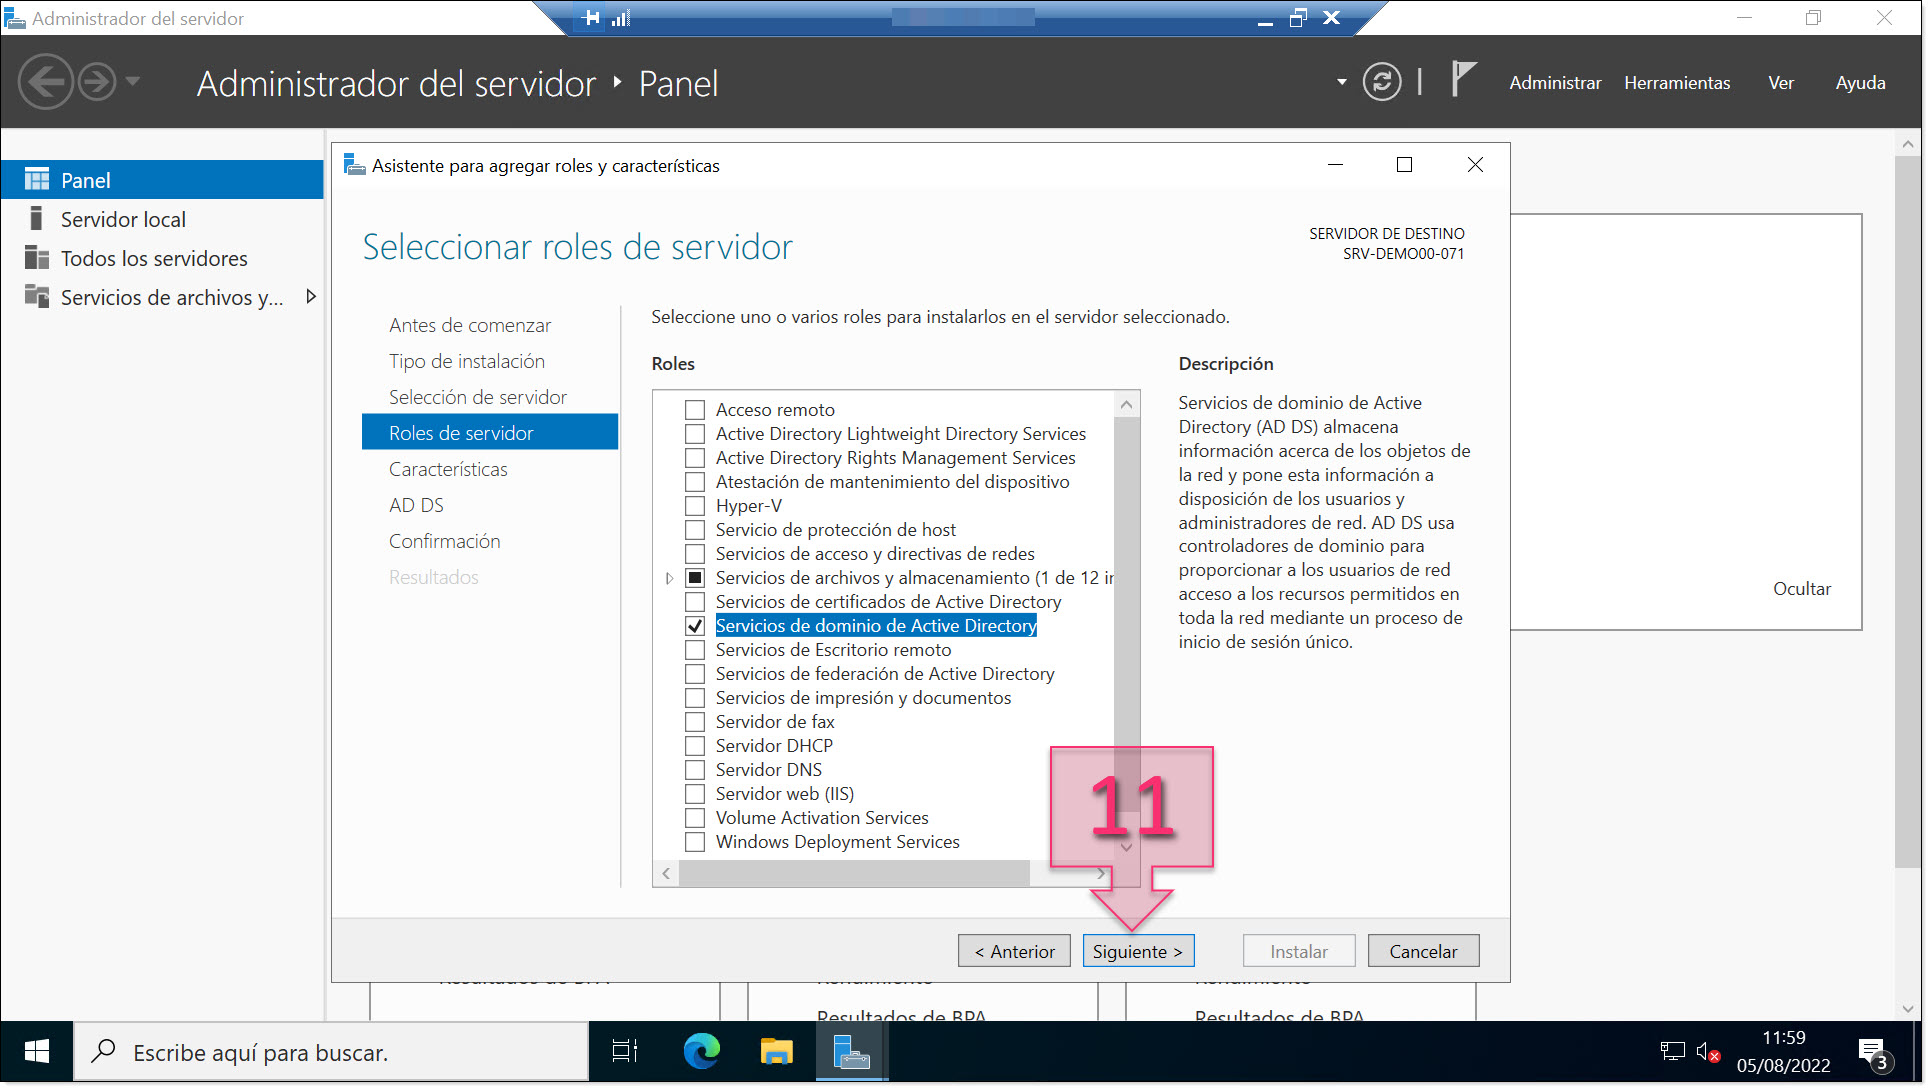
Part 1 – Click on “Next”
You will now see the “Select features” page. Even though a number of features will already be ticked by default, we will still review them to check that all the necessary tools are ticked.
Under “Features”, click on “Remote Server Administration Tools > Role Administration Tools > AD DS Tools”. There, you should check that “Active Directory Administrative Center” and “AD DS Snap-ins and Command-line Tools” are both selected. Similarly, we particularly recommend selecting “Active Directory Module for Windows PowerShell“ (12).
Once you have done this, click on “Next” (13).
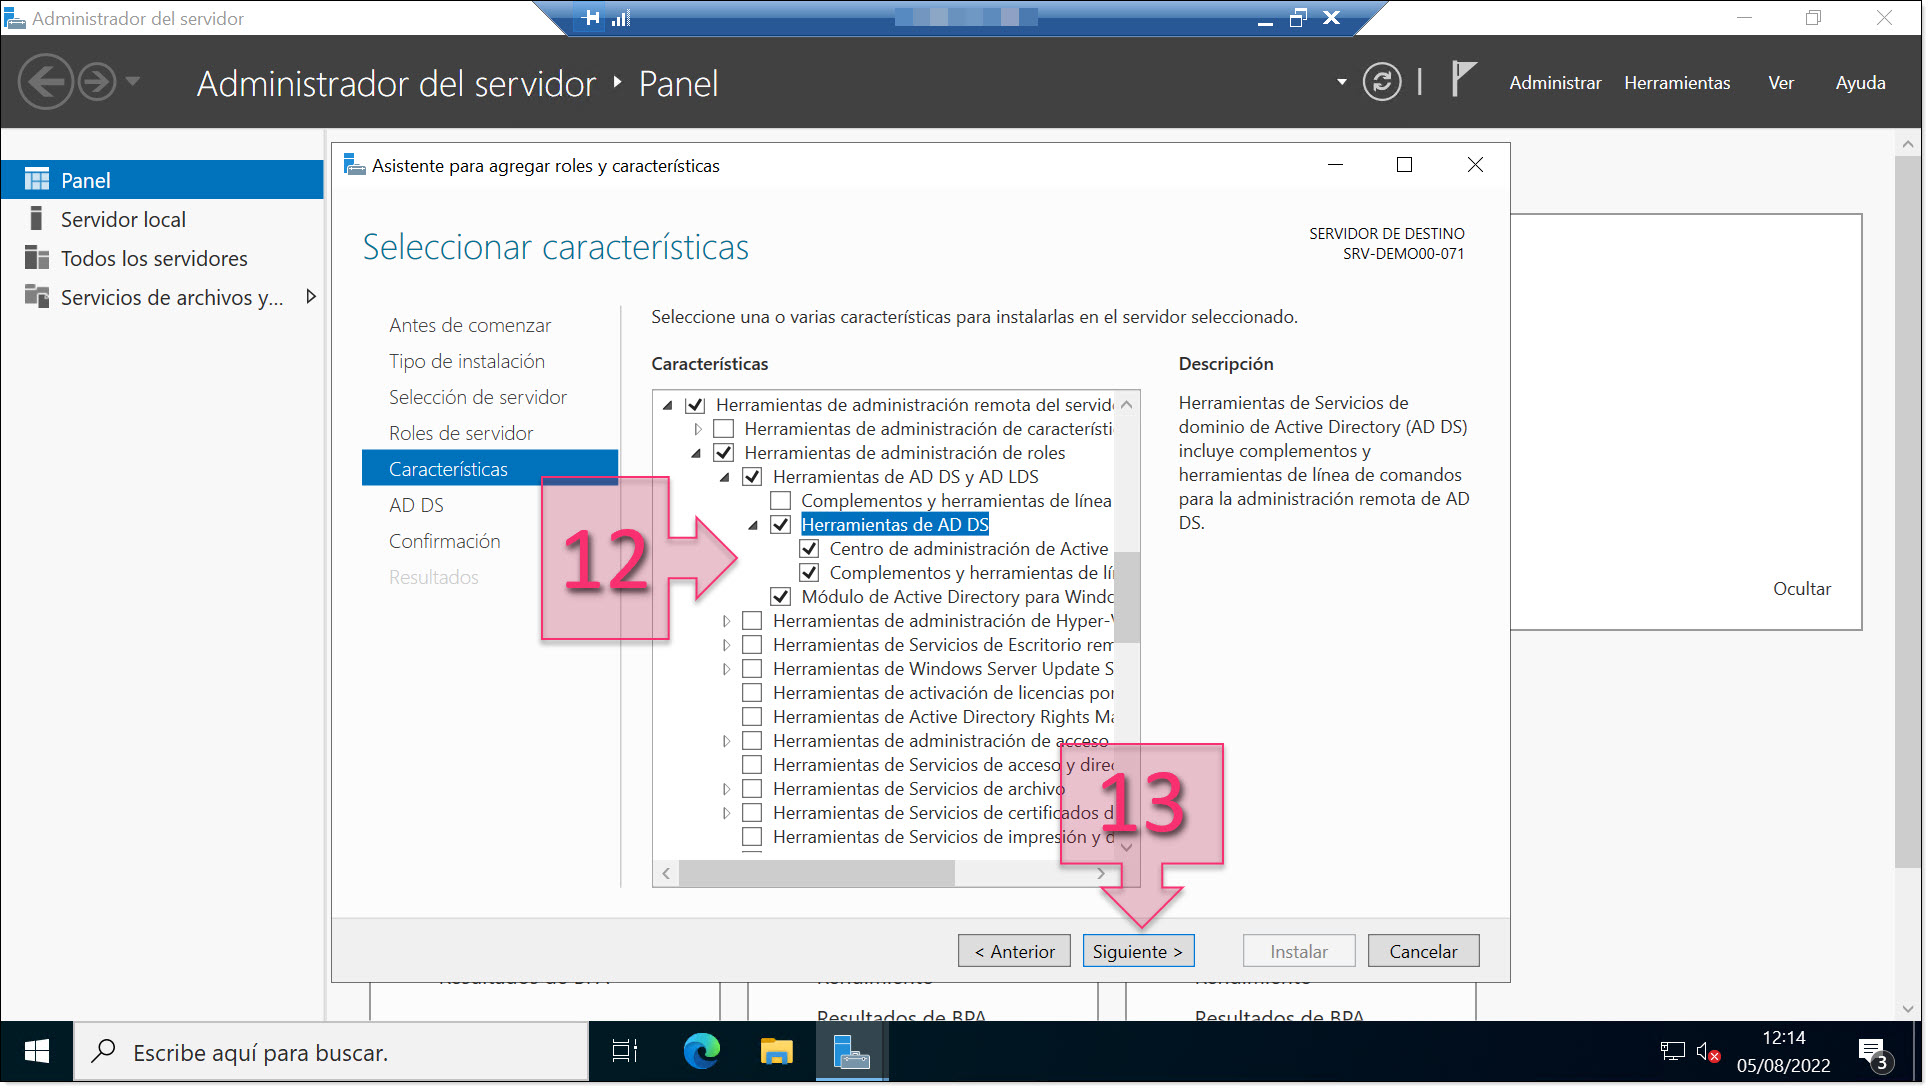
Part 1 – Select the necessary AD DS tools
The next page is “Active Directory Domain Services”, which displays information about Azure Active Directory and how to configure Office 365 with Azure Active Directory Connect. Since this information is not relevant to this tutorial, simply click on “Next” (14).
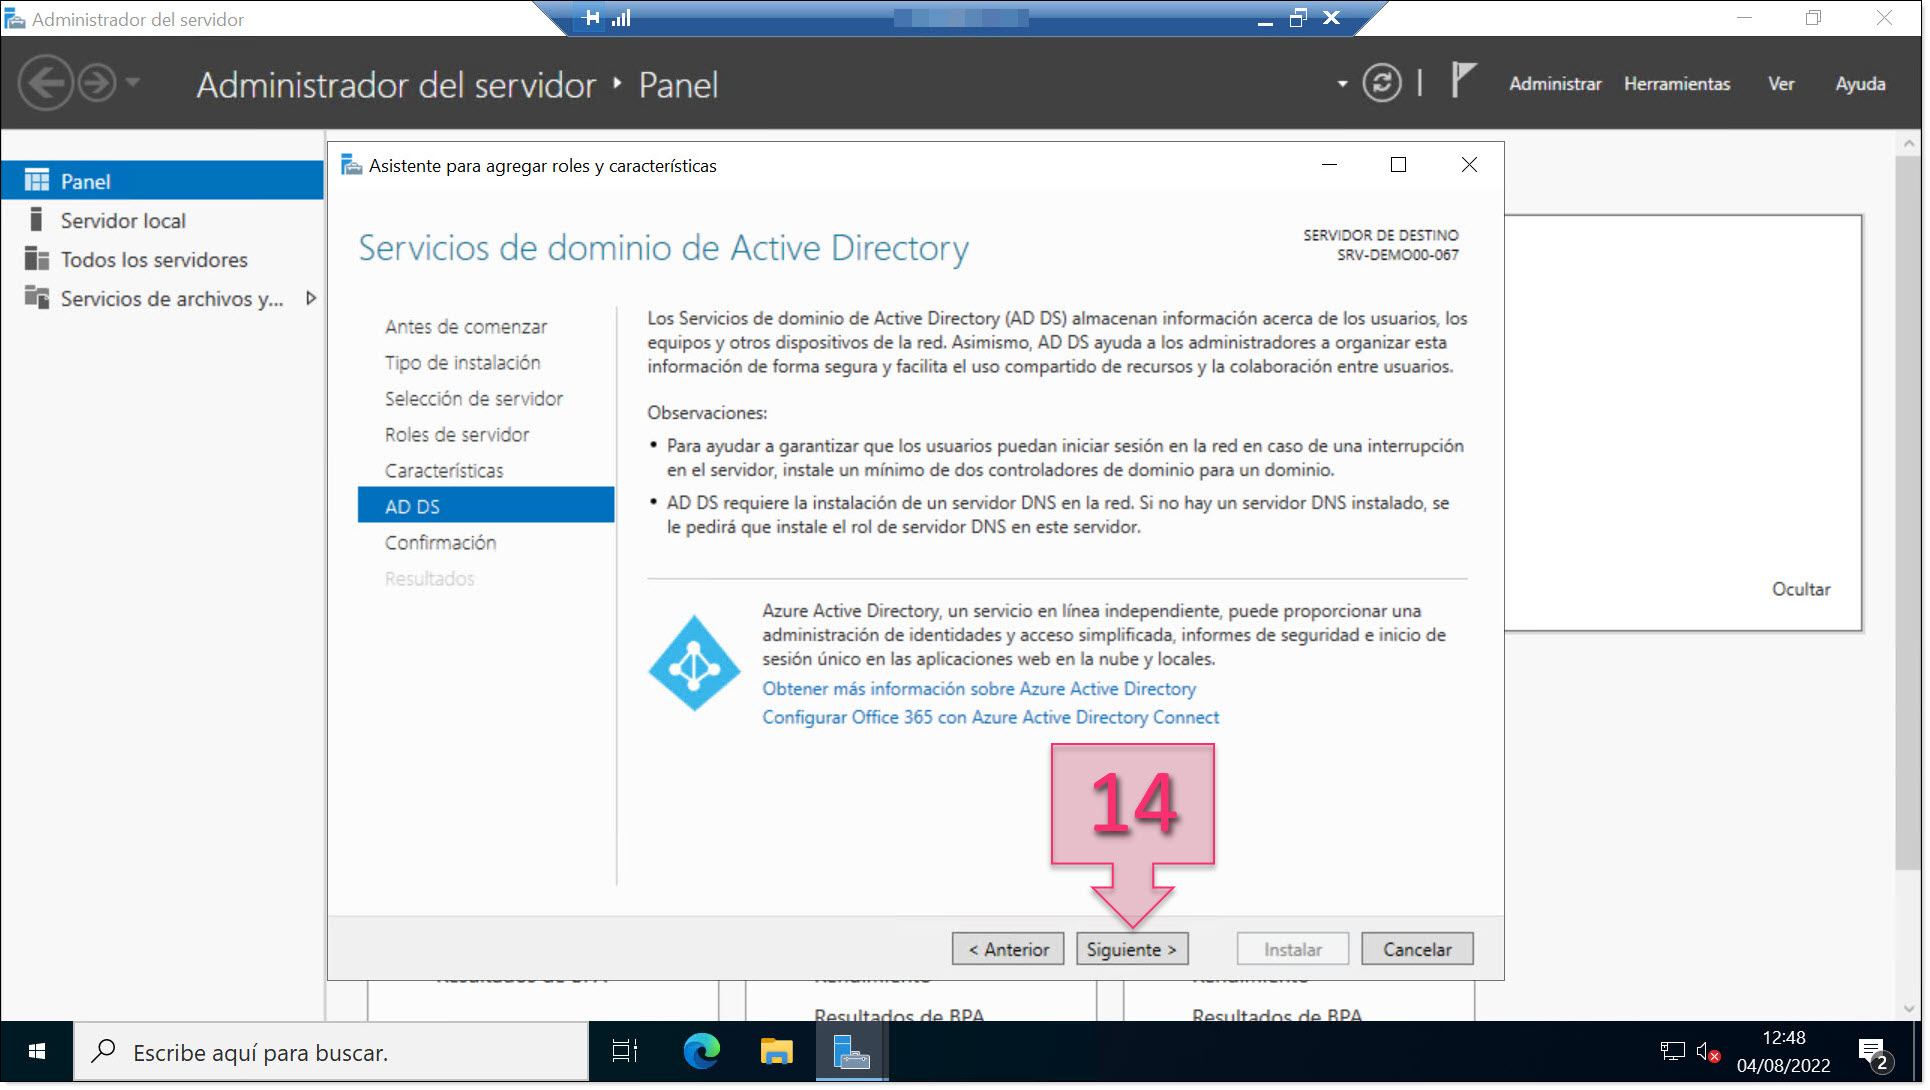
Part 1 – Read the information about AD DS and Azure AD DS and click on Next
You are now nearly at the end of this part of the tutorial. In the next part, we will configure the Domain Controller (DC).
In the “Confirm installation selections” window, tick the box marked “Restart the destination server automatically if required” (15). This is an option available when installing any role on Microsoft Windows Server. Technically, this should not be important as it is not necessary to restart the system during the installation phase. However, you will have to do so during the configuration phase.
The most important point here is to review the selections shown (16).
Once you are satisfied that everything is correct, click on “Install” (17).
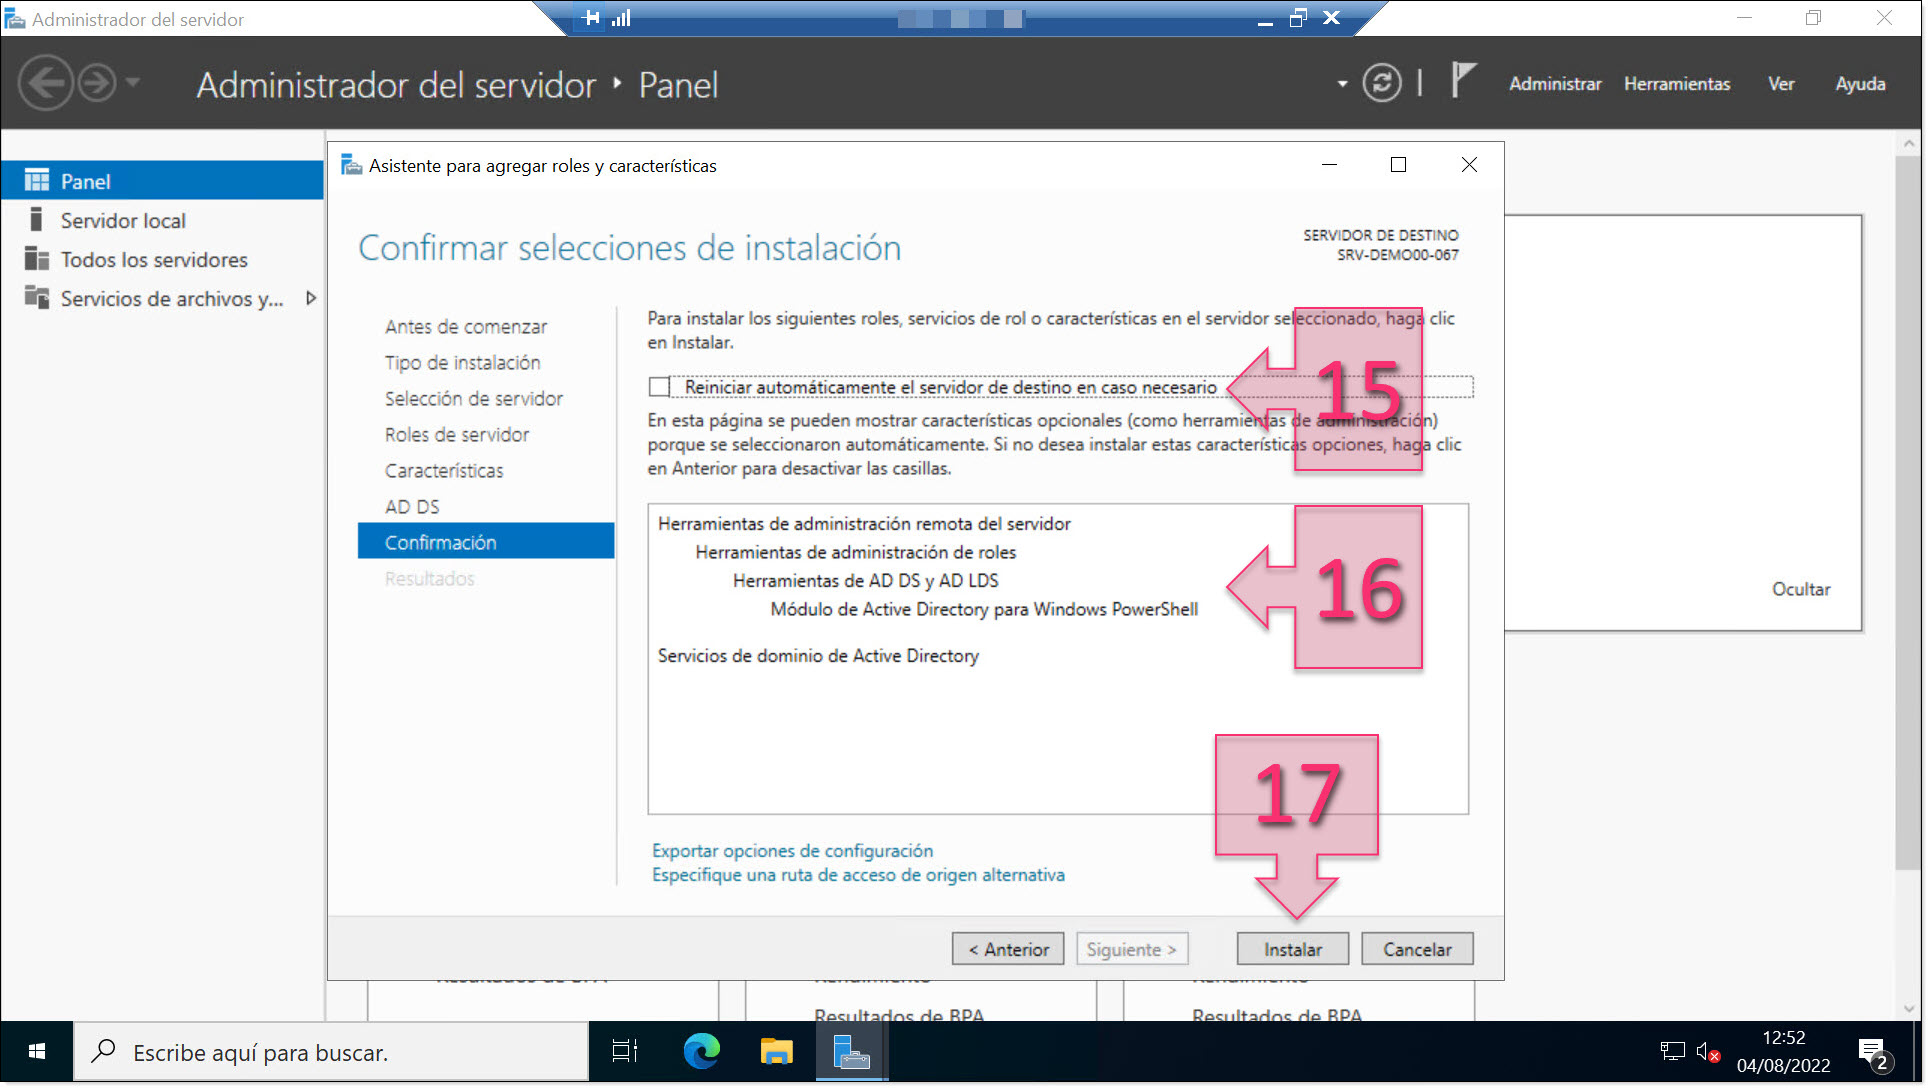
Part 1 – Review your installation selections and click on Install
At this point, as with almost all Microsoft installations, you will see a progress bar to monitor the installation process, although it isn’t always particularly reliable.
If you wish, you can click on “Close” (18) and the installation will continue in the background.
If you close the installation window, you will still be able to see information about its progress, whether it has finished, whether it has been successful or encountered errors, or whether there are any actions required by clicking the flag (19) at the top of the Server Manager window.
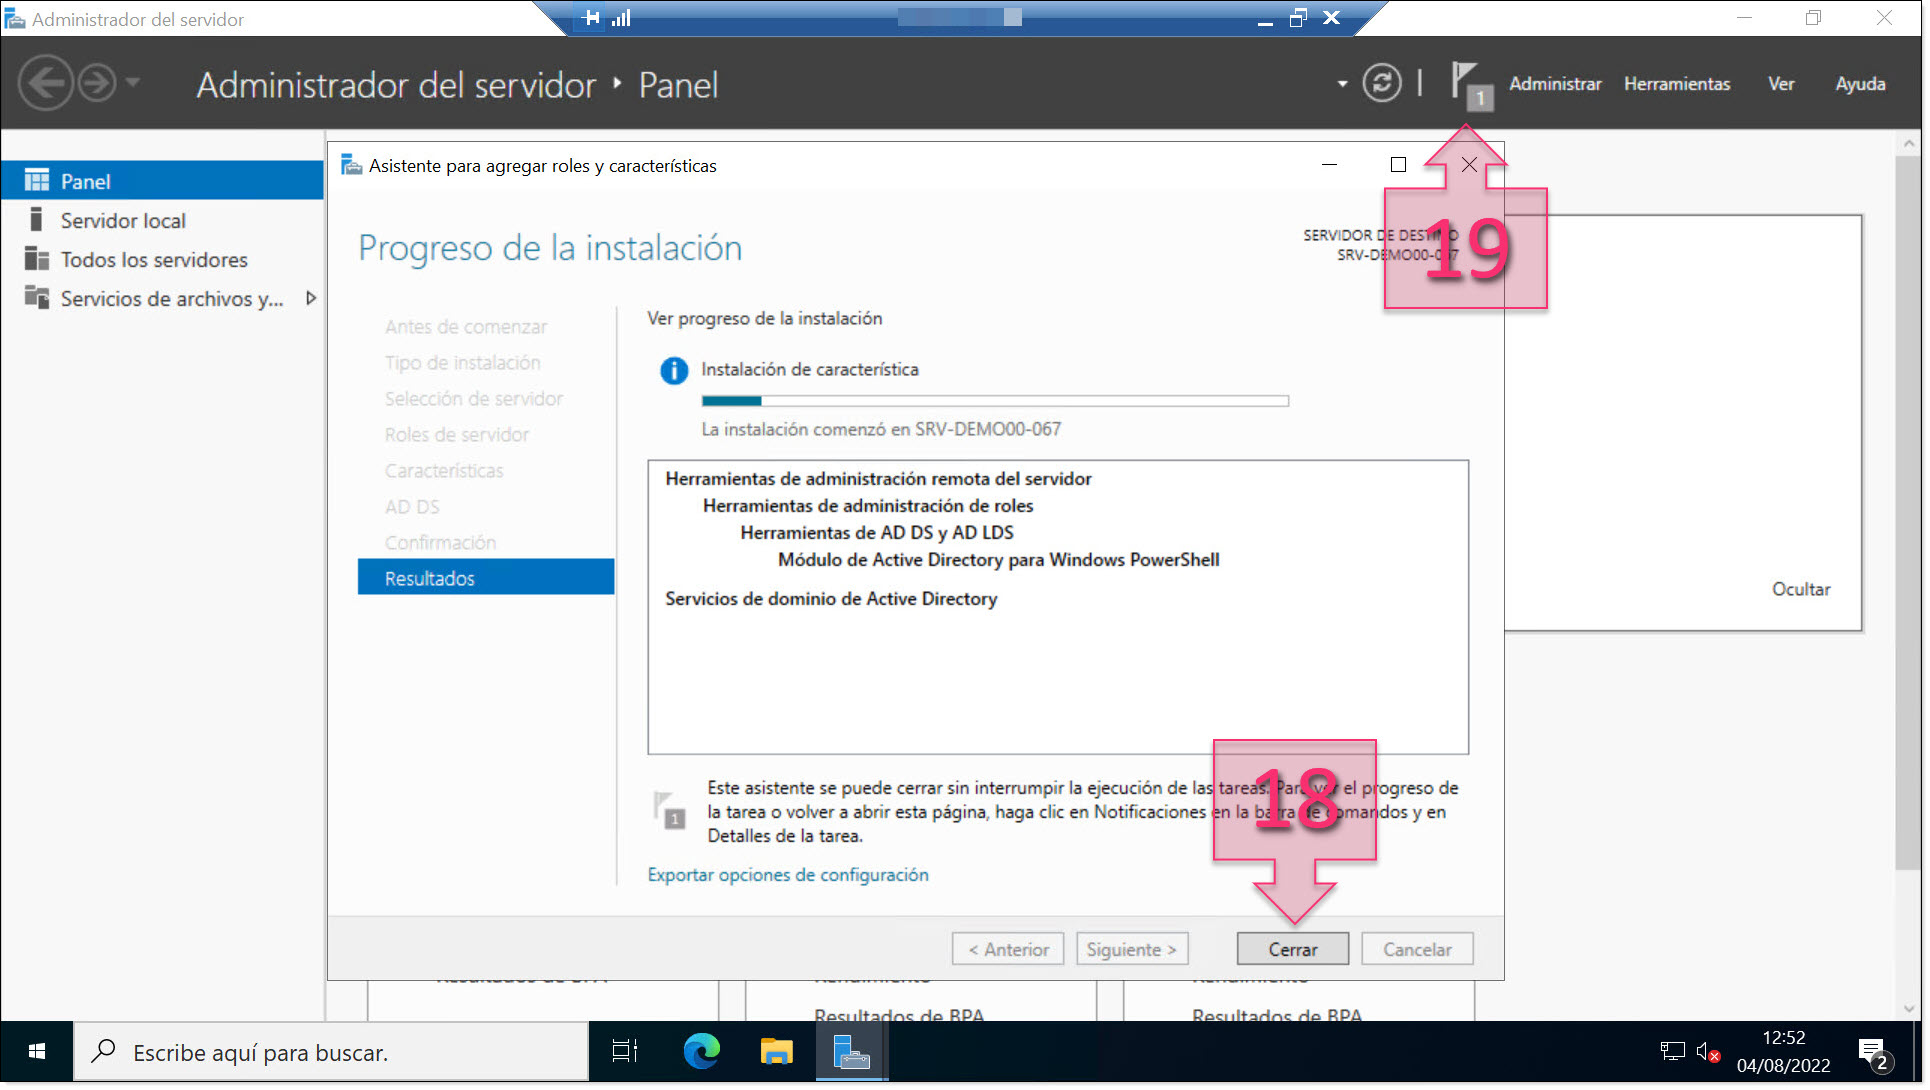
Part 1 – Check the installation progress
You have now successfully installed AD DS on the server. The next step is to promote the server to a Domain Controller.
Part 2 – Promoting the server to a domain controller
To promote the server to a domain controller, click on the flag at the top of the screen (19). If everything has run correctly, you will see the following message:
“Post-deployment Configuration: Configuration Required for Active Directory Domain Services on <SERVER_NAME>”
Click on the link beneath that reads “Promote this server to a domain controller” (20).
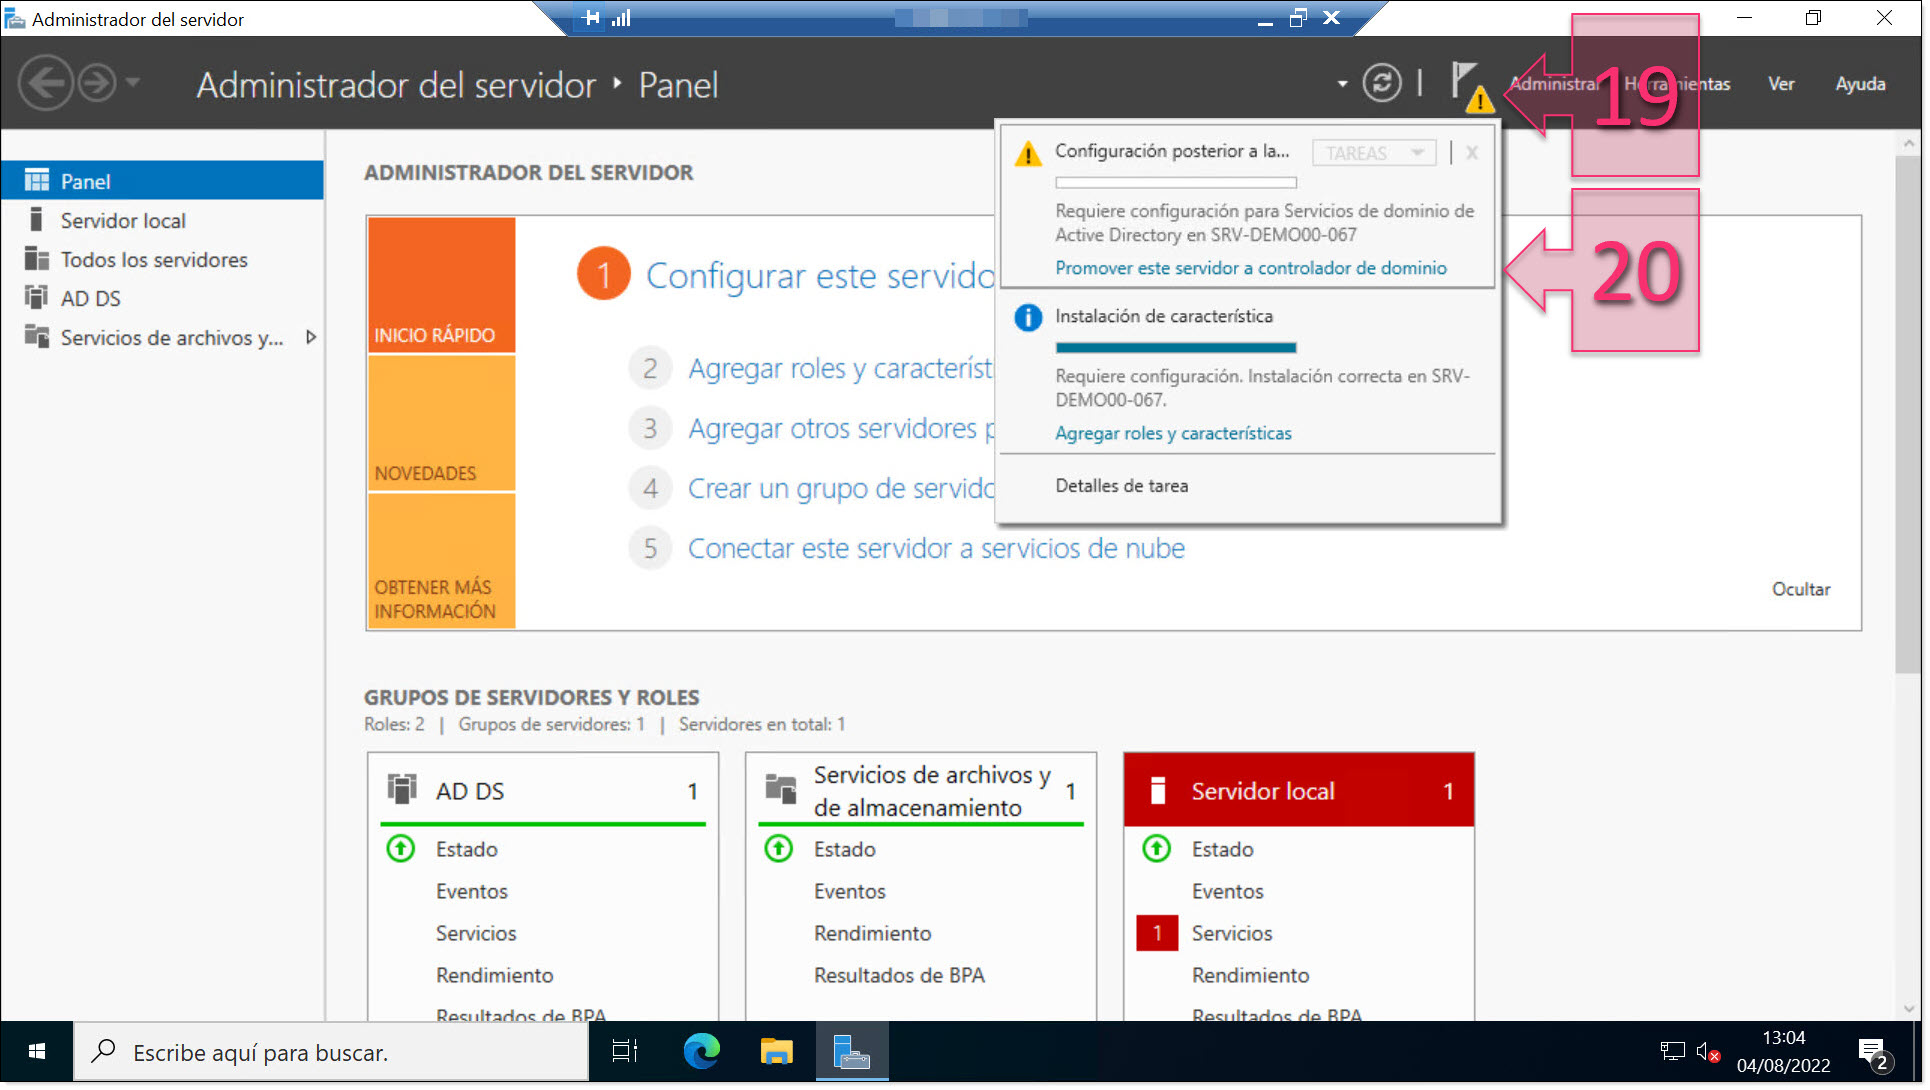
Part 2 – Promote the server to a domain controller
This will launch the Active Directory Domain Services Configuration Wizard.
On the “Deployment Configuration” page, you are required to select the deployment operation that you wish to perform. Here, you have three options depending on whether you have already deployed domain infrastructure or whether you wish to start from scratch:
- Add a domain controller to an existing domain.
- Add a new domain to an existing forest.
- Add a new forest (this is the one we will use since we have not previously deployed a domain structure).
Select “Add a new forest” (21).
Below, you will then be required to enter a “Root domain name” (22), which will be the FQDN (Fully Qualified Domain Name) in the case of a unique domain name with an extension. For example, this could be:
- PruebaNacho.com
- PruebaNacho.es
- PruebaNacho.int (“int” indicates that this is an internal domain).
If you enter a name without an extension, an error will occur, just like if you were adding a new domain to an existing tree and the domain you were trying to add already existed.
Once you have entered the root domain name, click on “Next” (23)
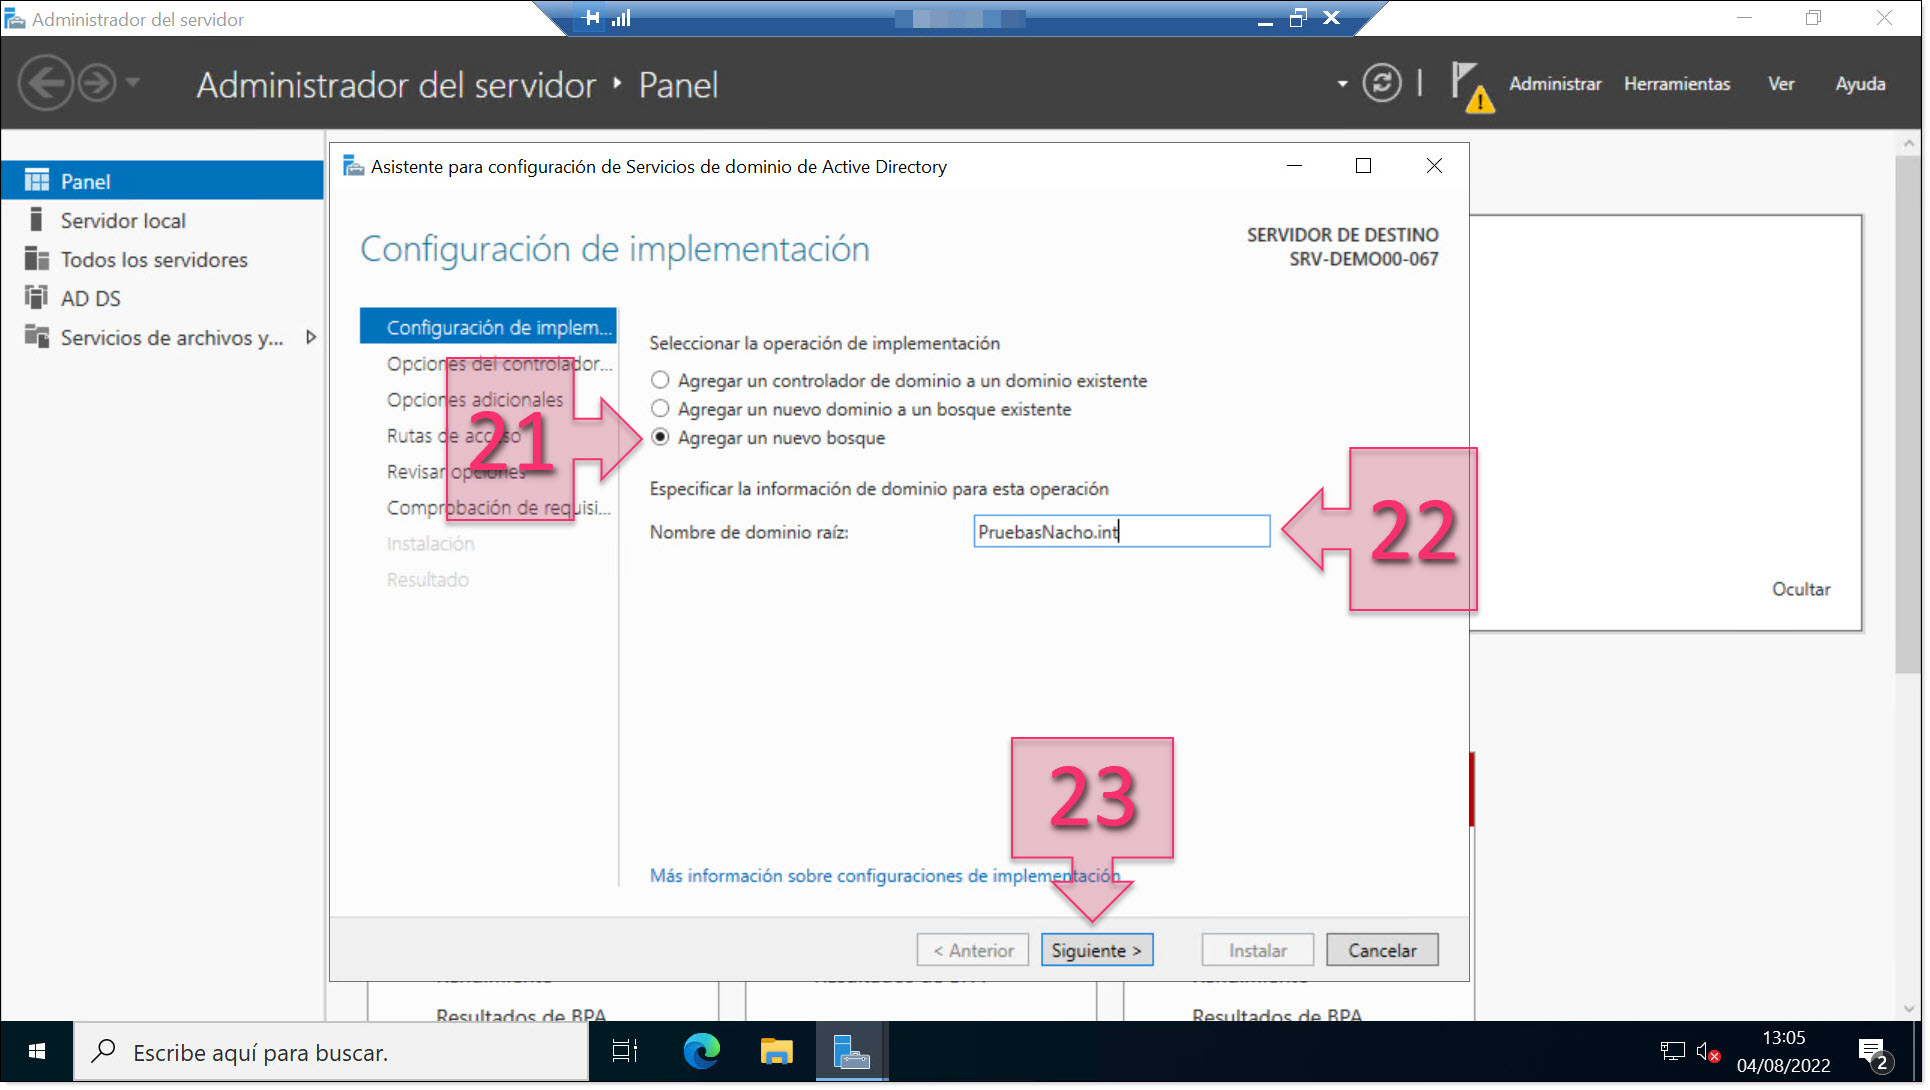
Part 3 – Deploy a new forest and enter a root domain name
Next, you will need to set the domain controller options. There are two sections:
- Select the functional level of the new forest and root domain.
- Specify domain controller capabilities.
Under “Select the functional level of the new forest and root domain” (24), you will see separate drop-down menus for the forest and the domain. There is no reason that these need to be different, but there is also no reason that they need to be the same, and you can simply choose the lowest version of domain controller allowed in each case.
However, this is a choice that should not be taken lightly as this will affect the functionalities available for the domain. We recommend that you select the same level as your existing domain controllers without giving compatibility to previous levels. That way, for example, if you are going to deploy all Windows Server 2022 domain controllers, they will be configured with the same maximum level.
Under “Specify domain controller capabilities” (25), you should select Global Catalogue (GC) and Domain Name System (DNS) Server as we are setting up the infrastructure from scratch and we do not have other servers. Furthermore, both options are obligatory for setting up the infrastructure.
Below, you will be asked for the Domain Services Restore Mode (DSRM) password (26). This is often a separate password that is saved in the password manager in case something happens to the domain. However, many systems administrators use their administrator password for convenience.
Once everything is configured, click on “Next” (27).
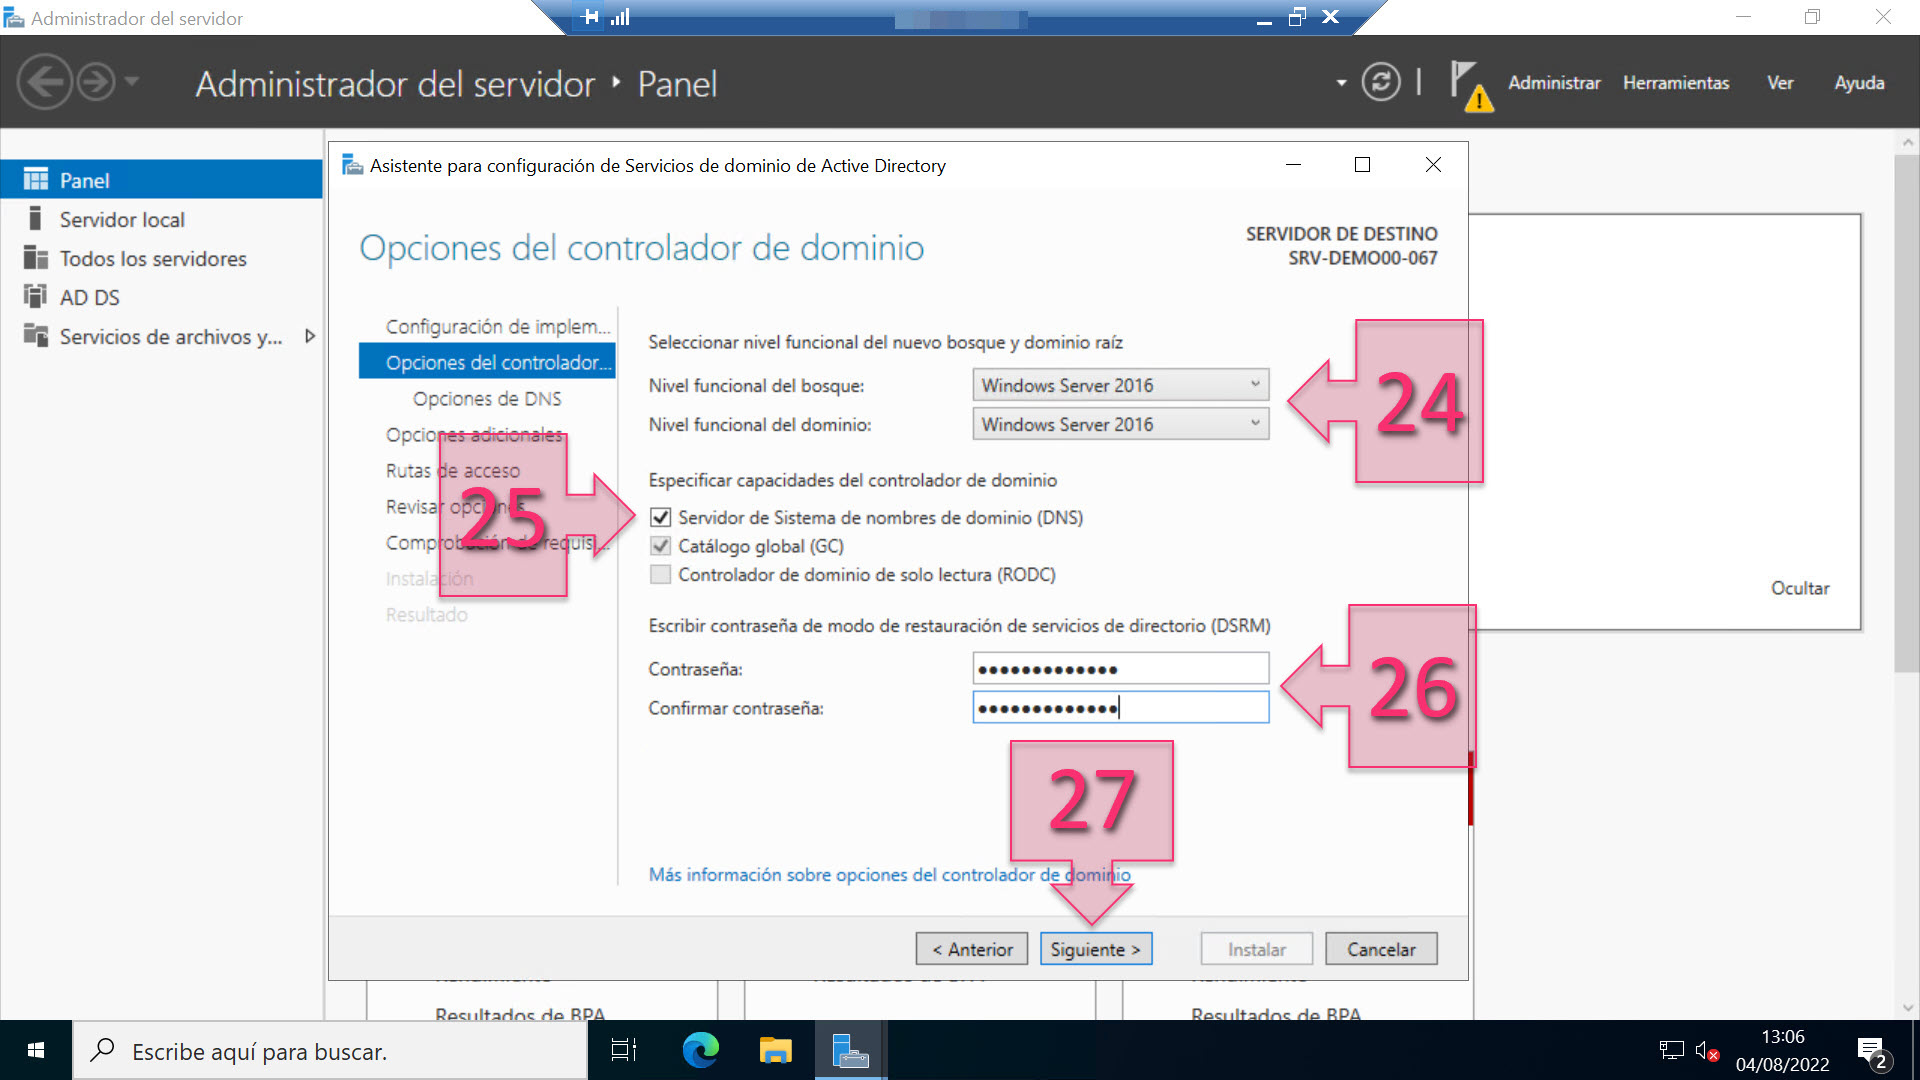
Part 2 – Select domain controller options
Next, you will see the “DNS options” page, where you will see the following message: A delegation for this DNS server could not be created because the authoritative parent zone cannot be found…”.
This is due to the fact that we are not using a DNS server but it will be deployed along with the AD DS Server. As a result, there is no need to change any settings. In fact, if you look below the message, you will see that it is not possible to mark the option “Create DNS delegation” (28) because it is greyed out.
Click on “Next” (29).
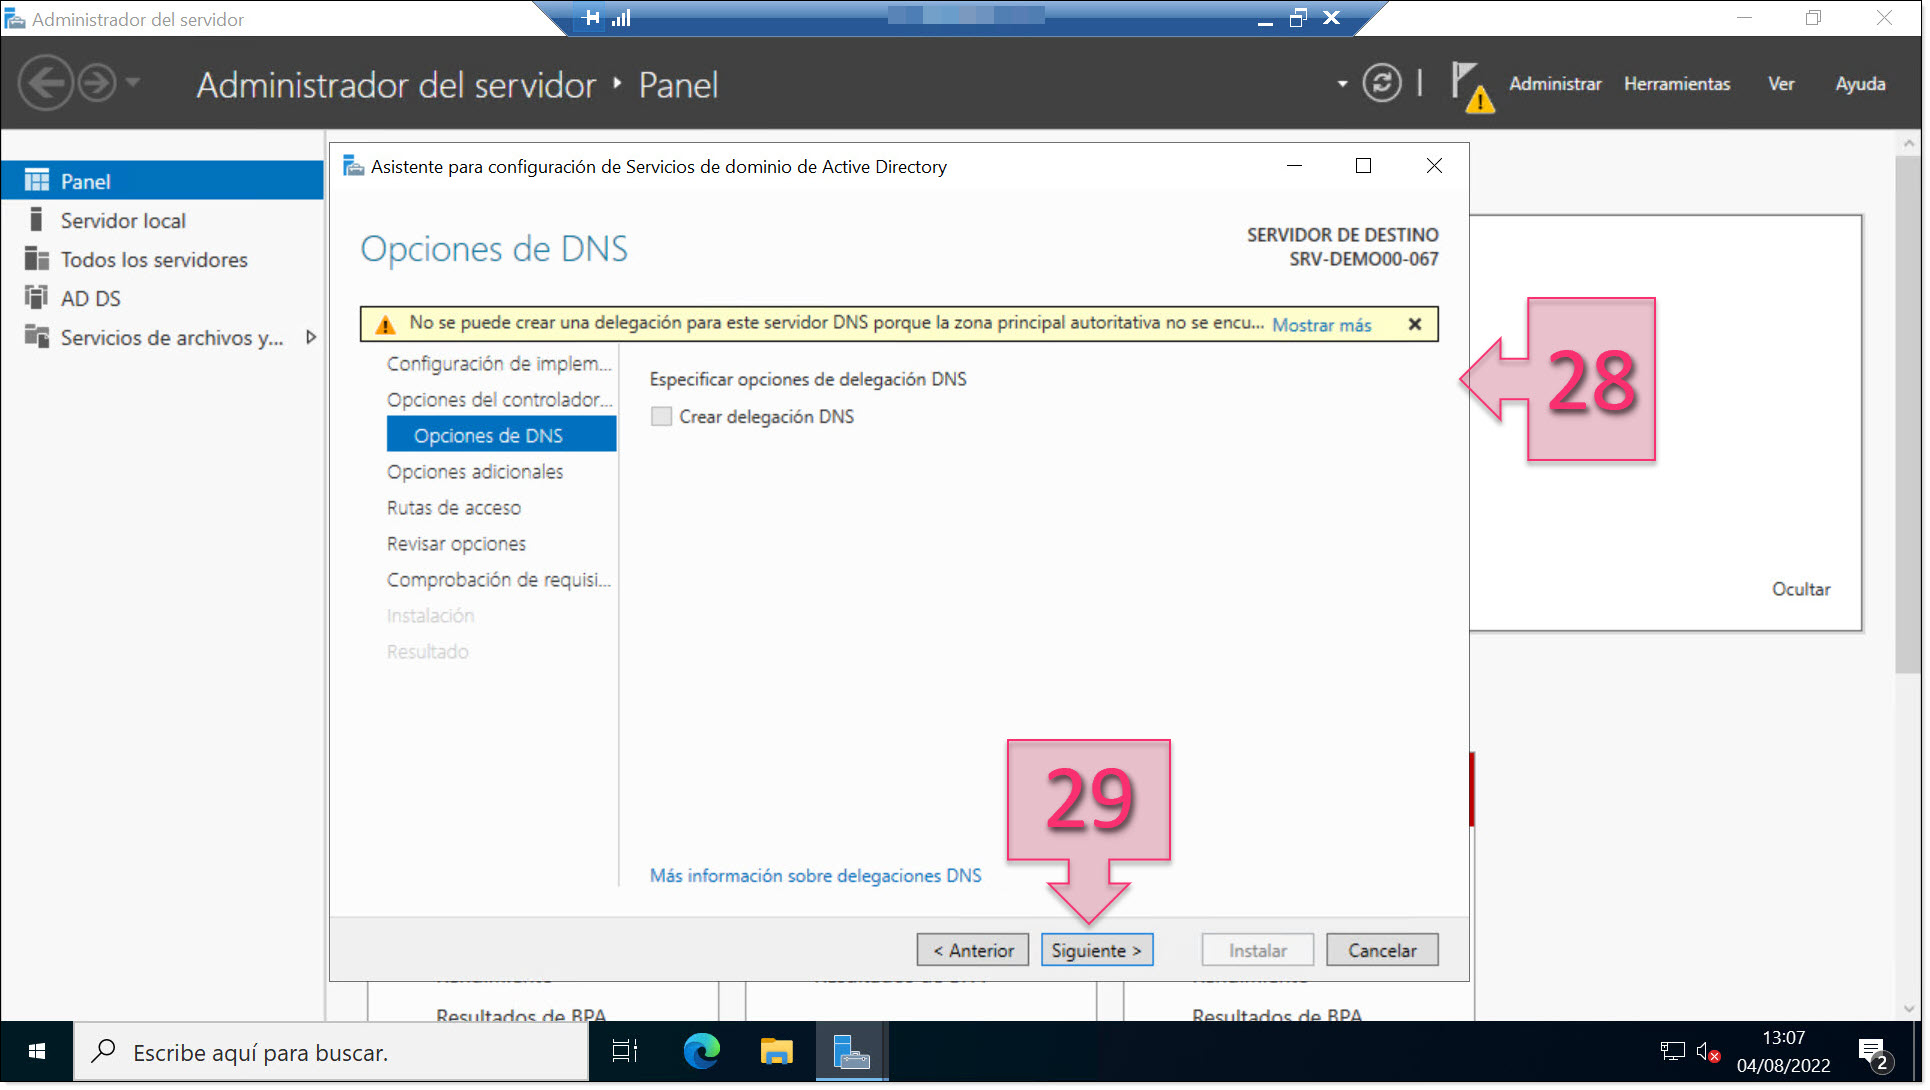
Part 2 – Click on “Next”
On the “Additional Options” page, you should check the NetBIOS domain name assigned and change it if necessary. The system will take the domain name provided at the beginning of the process and will remove the extension. If everything is OK, simply click on “Next” (31).
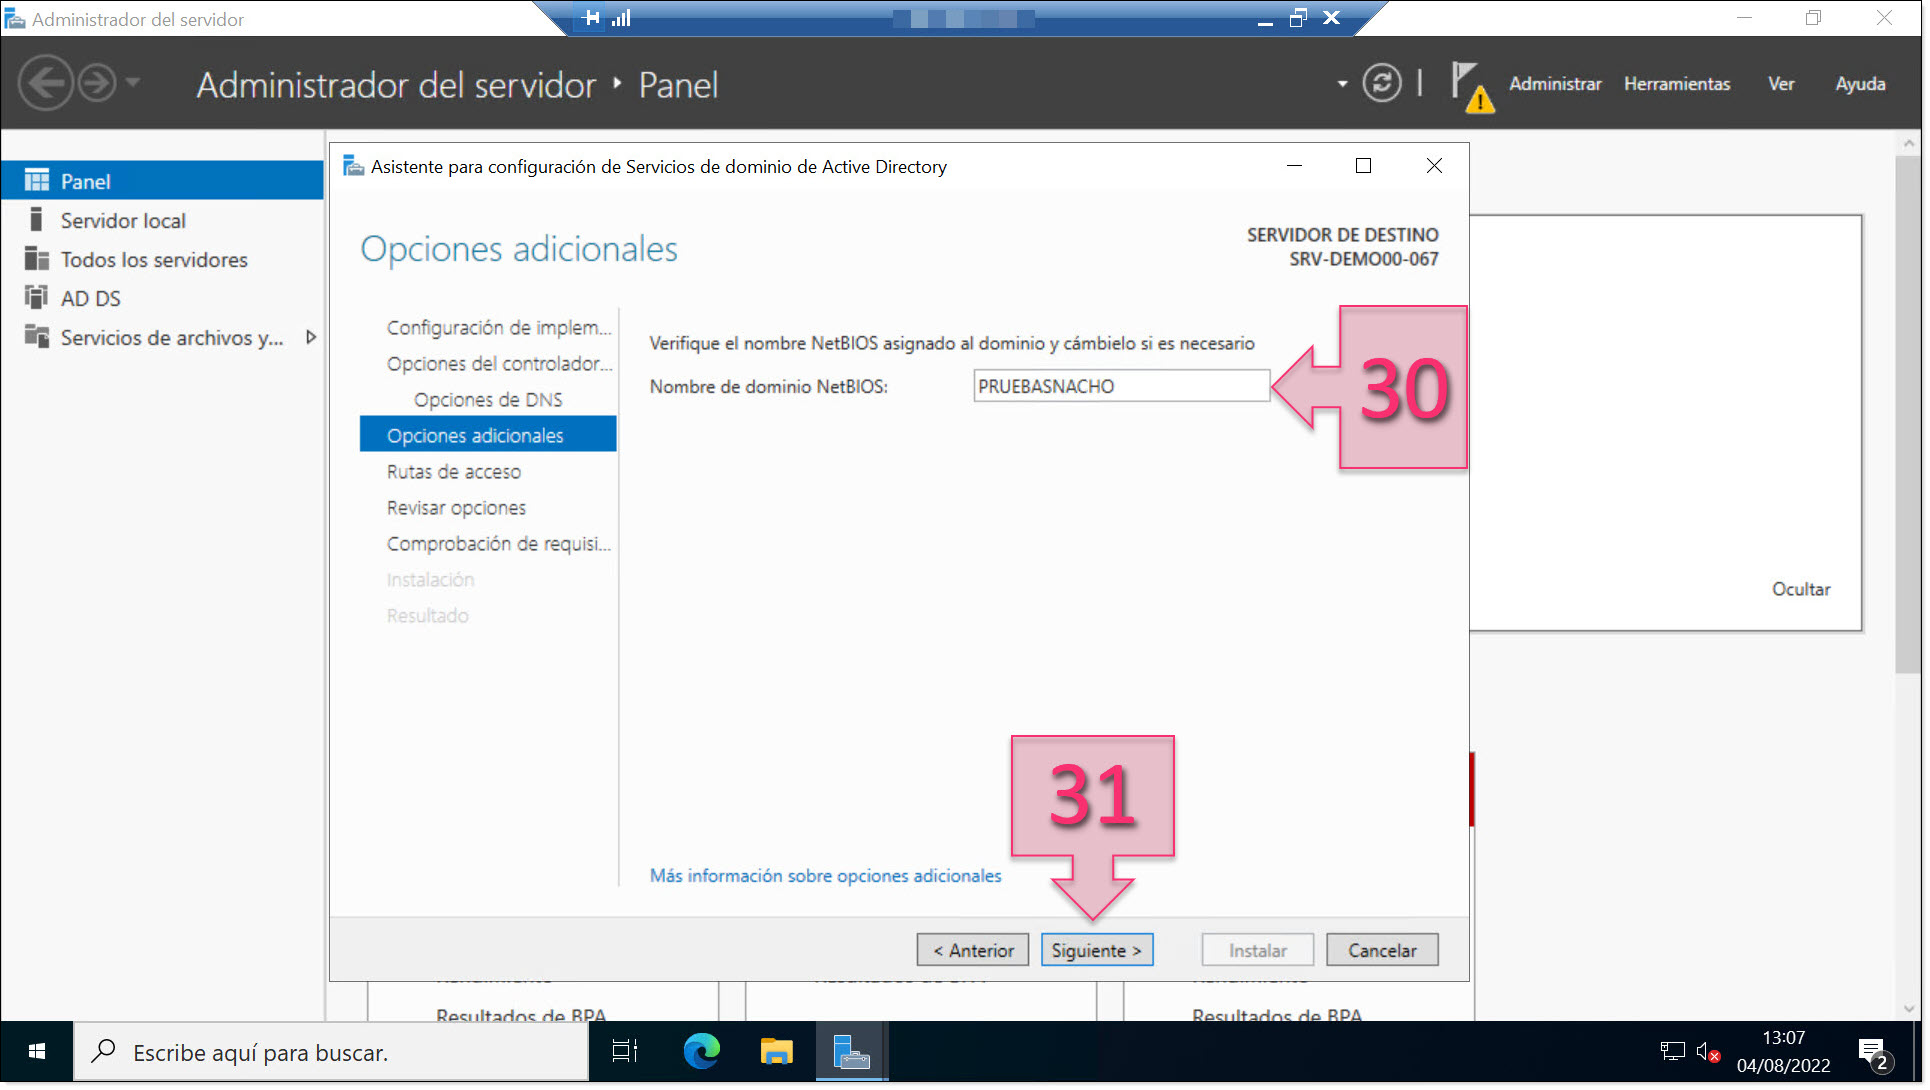
Part 2 – Review the NetBIOS domain name
At this point, we are almost at the end of the entire process. All you need to do now is configure the paths for the Database folder, the Log files folder and the SYSVOL folder (32).
Luckily, these folders have standard paths, so you shouldn’t need to change them unless your company’s naming policy requires it. The default paths are as follows:
- Database folder: C:\Windows\NTDS
- Log files folder: C:\Windows\NTDS
- SYSVOL folder: C:\Windows\SYSVOL
Once you have checked these and changed them, if necessary, click on “Next” (33).
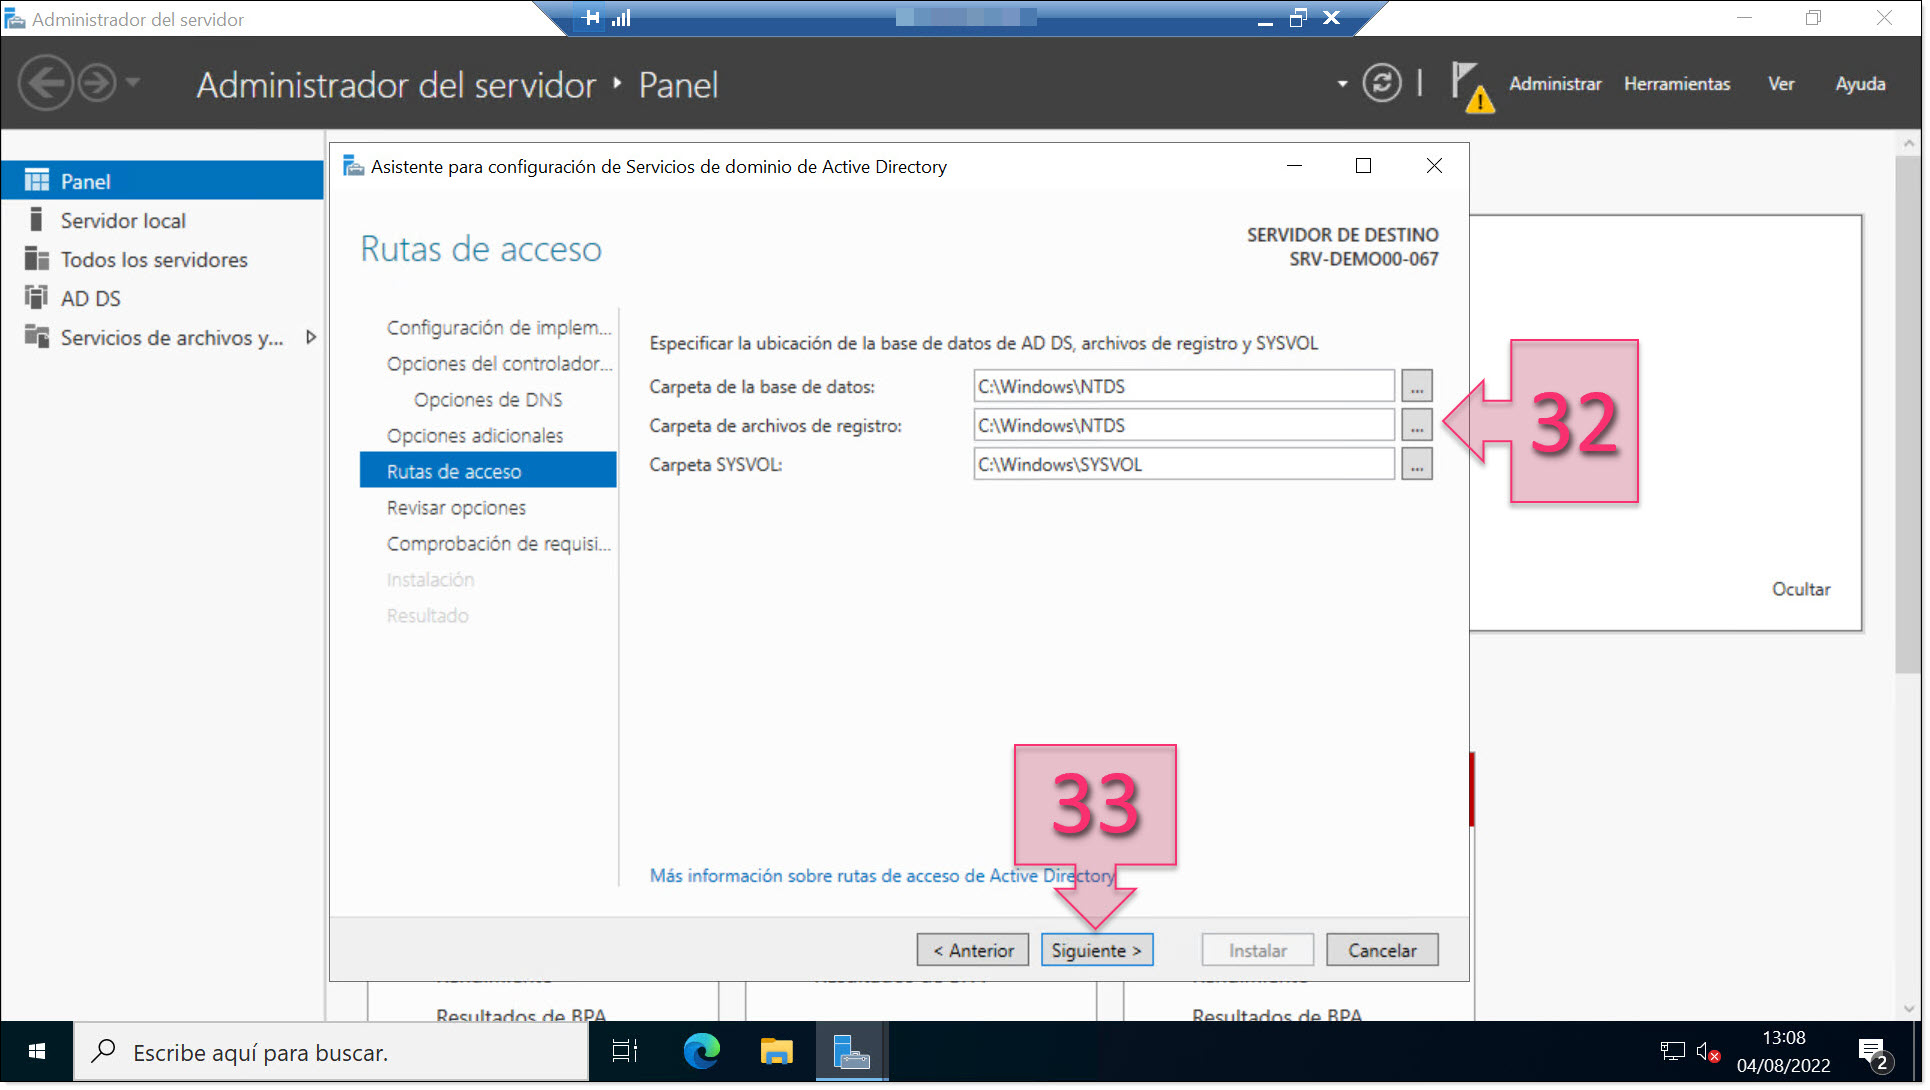
Part 2 – Review the paths for the database, log files and SYSVOL folders
The next page is the “Review options” page, where you will need to review your selections (34).
At the bottom, there is a “View script” (35) button. This will show the PowerShell script which will allow you to perform the same configuration using Microsoft PowerShell. Below, you will see the script for this tutorial:
#
# Windows PowerShell script for AD DS implementation
#
Import-Module ADDSDeployment
Install-ADDSForest `
-CreateDnsDelegation:$false `
-DatabasePath “C:\Windows\NTDS” `
-DomainMode “WinThreshold” `
-DomainName “PruebasNacho.int” `
-DomainNetbiosName “PRUEBASNACHO” `
-ForestMode “WinThreshold” `
-InstallDns:$true `
-LogPath “C:\Windows\NTDS” `
-NoRebootOnCompletion:$false `
-SysvolPath “C:\Windows\SYSVOL” `
-Force:$true
Once you are sure that all the settings are correct, click on “Next” (36)
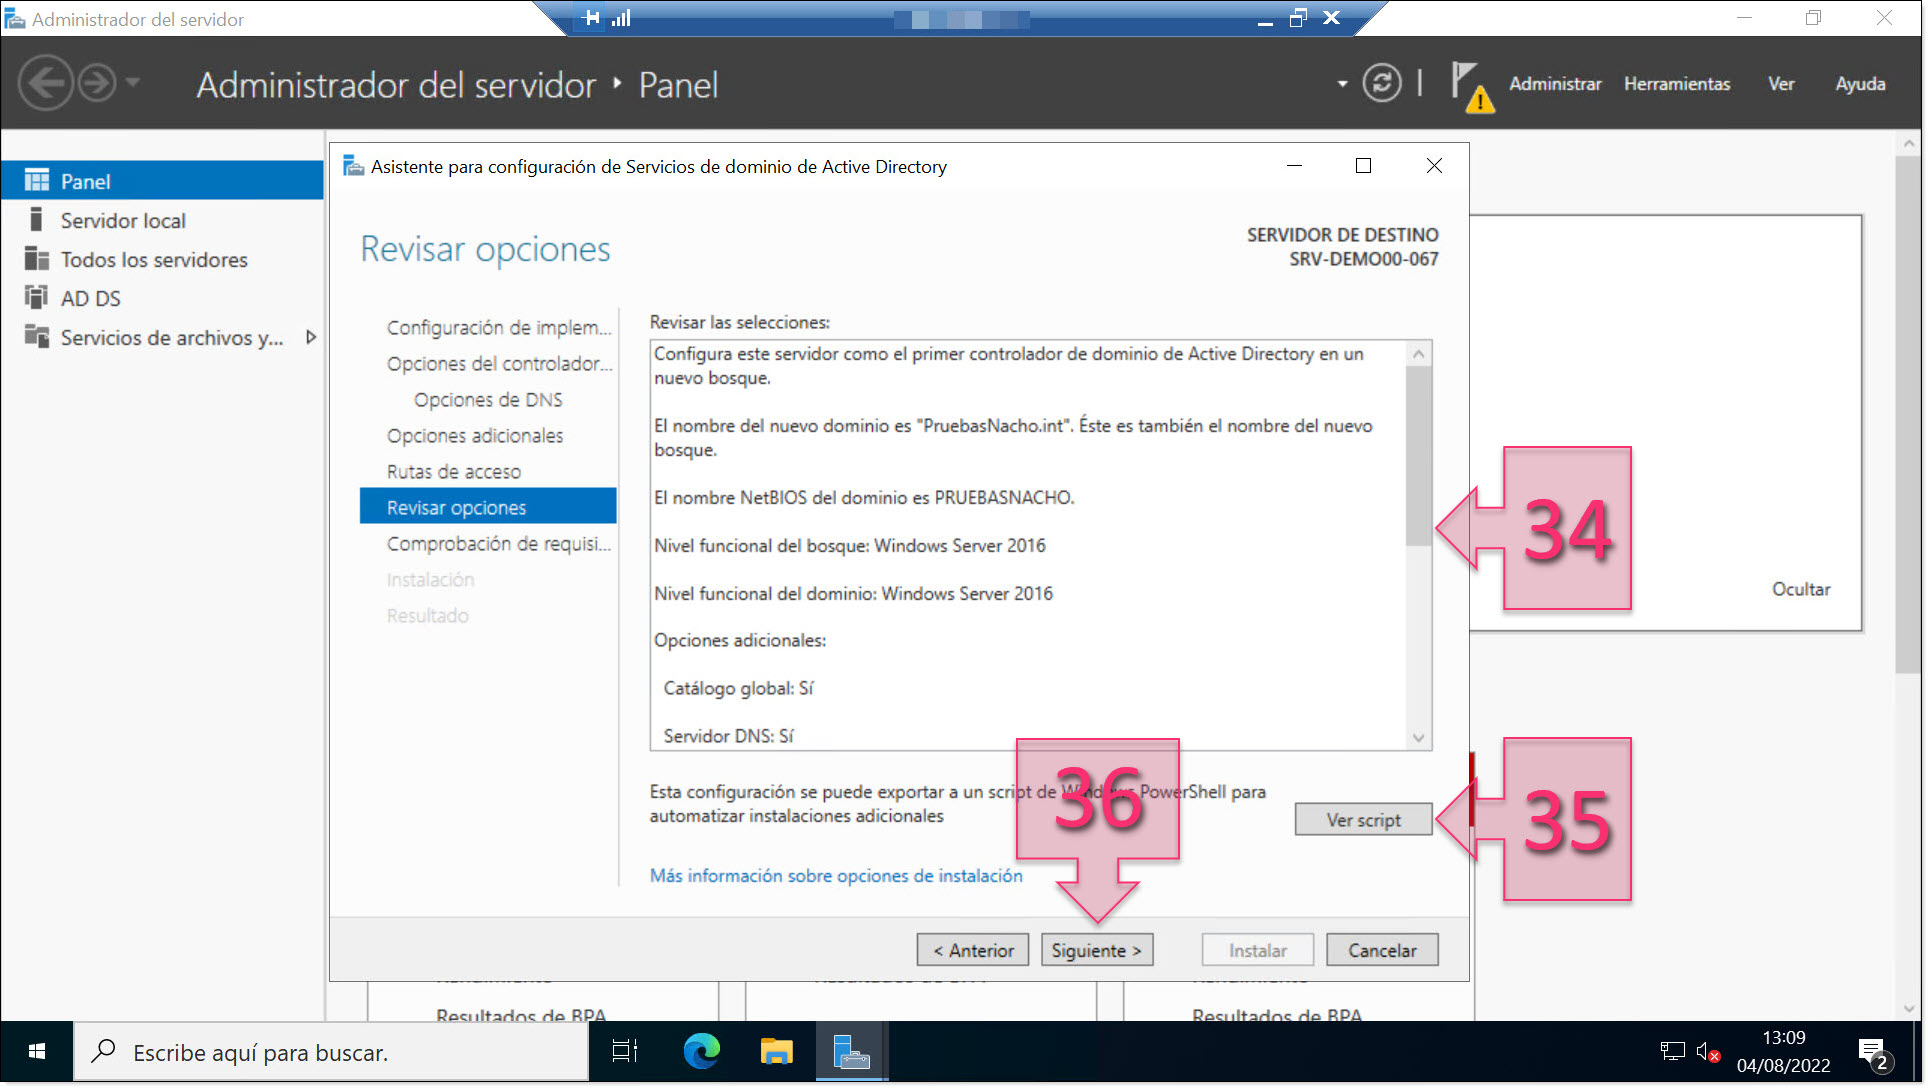
Part 2 – Review the selections for the domain controller
At this point, you will see the “Prerequisites Check” page where the system will check that all the necessary requirements have been met to proceed with the installation.
If everything is OK, you will see the message “All prerequisite checks passed successfully…” (38) and a hyperlink directing you to further information. This information may also list those prerequisites that passed but can be improved or those prerequisites that have not passed but will not affect performance.
You will also see the results of the test in the main window (39). Green ticks denote tests that have passed. Yellow warning signs denote errors that will not affect performance. And red warnings denote errors that need to be addressed before you can run the installation. For example, not having a fixed IP address will be flagged with a yellow warning.
Once you have checked all this information, click on “Install” (40).
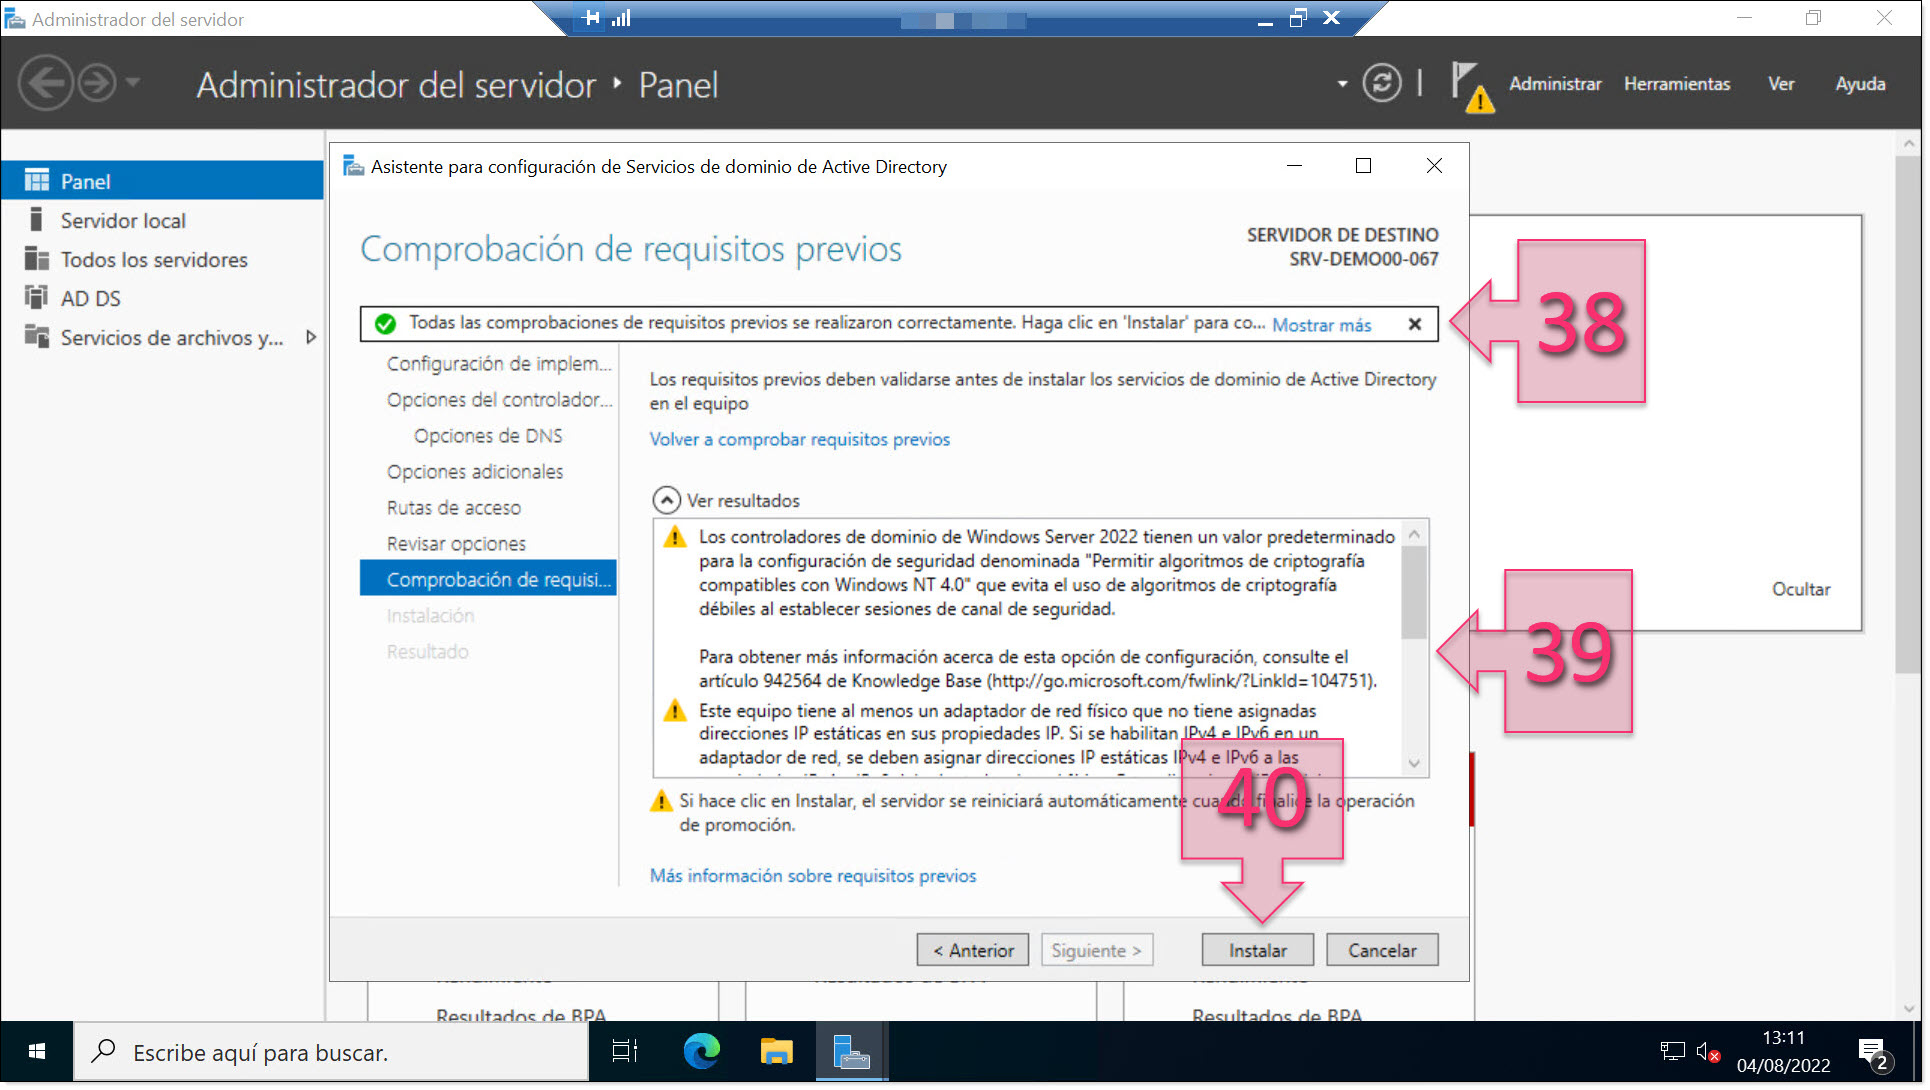
Part 2 – Check that all prerequisite tests have passed and launch the installation
At this point, you will see a progress line at the top of the window showing the progress of the installation.
Below, you will see detailed information about the installation (41) in real time. These messages can be copied, which can be very useful if you want to want to find out more information by following the links provided.
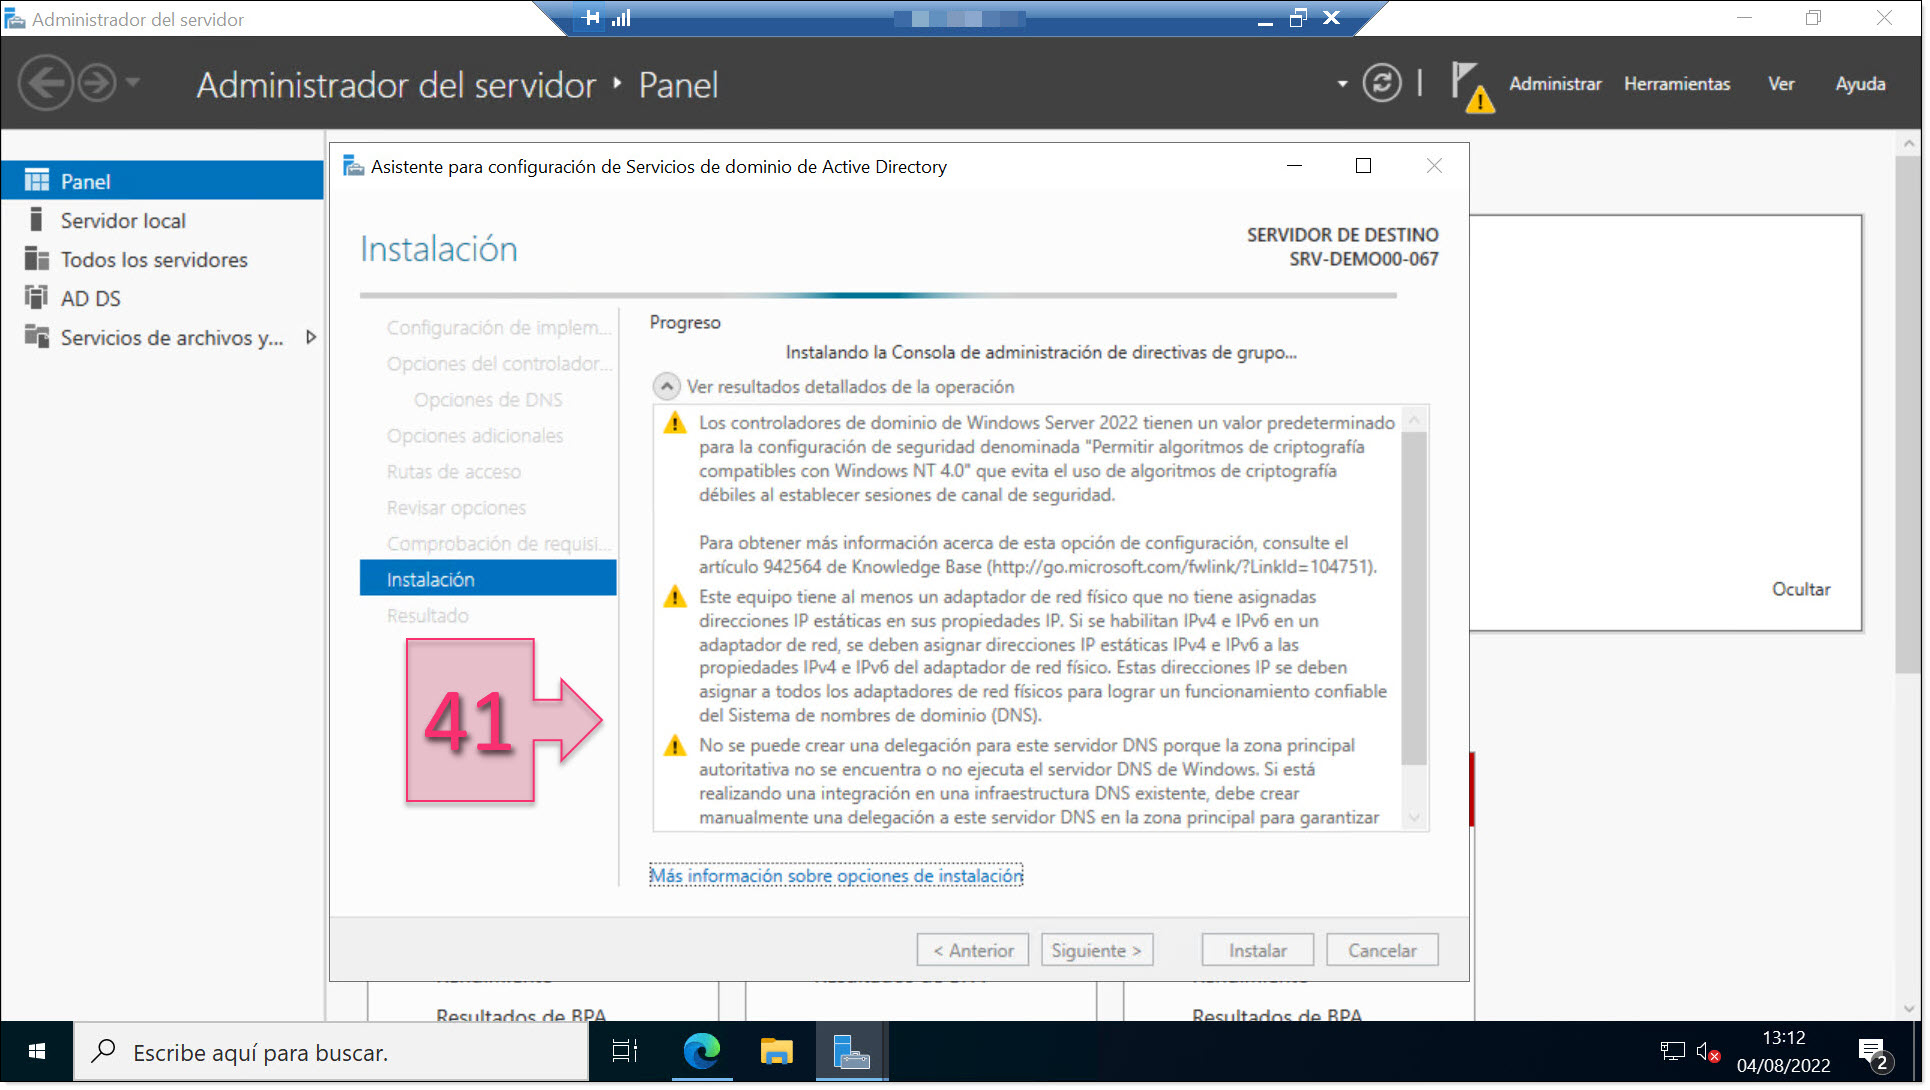
Part 2 – Wait for the installation to complete and review any messages that appear
Once the installation has finished, you will see a message informing you that you will be logged out (42) to restart the system. Click on “Close”.
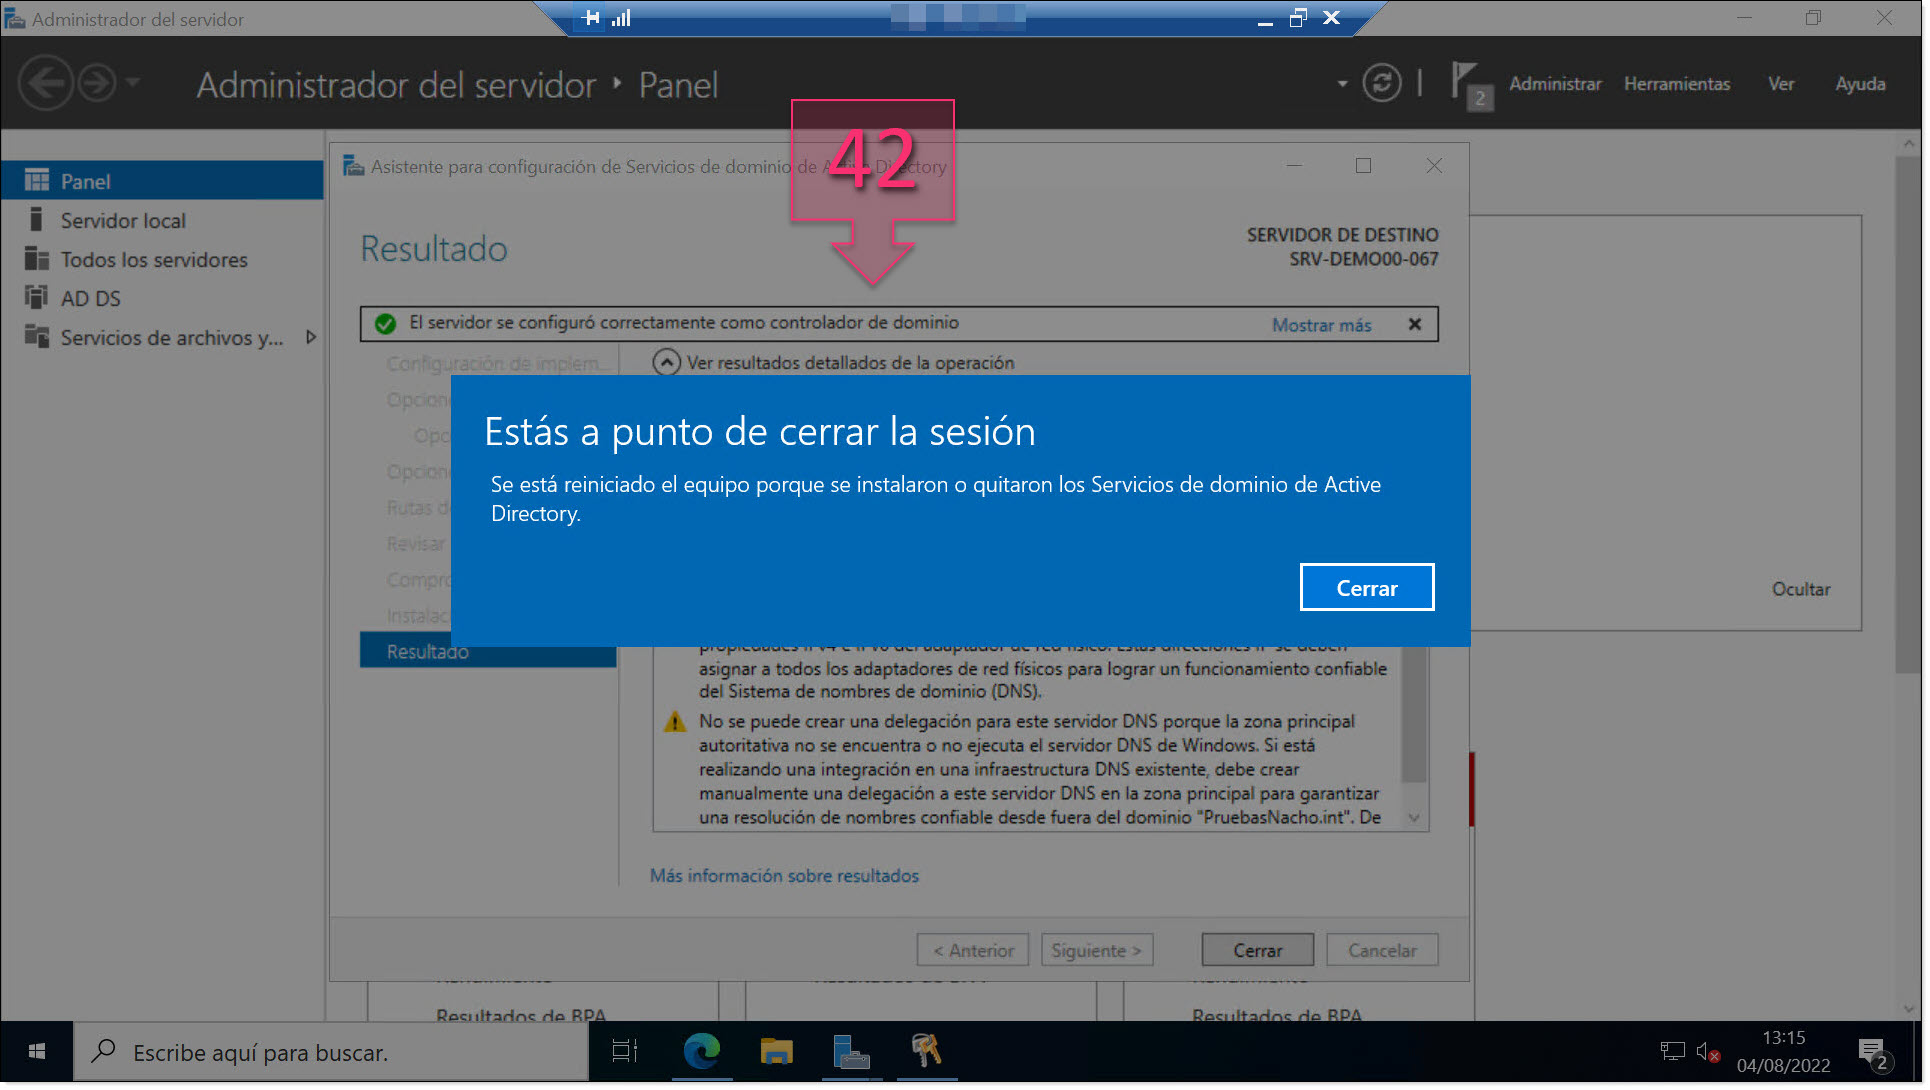
Part 2 – Click on “Close” to restart your system
Once the system restarts, you may have to wait just a few minutes. One thing about Microsoft, which can be good or bad depending on how nervous you are, is that access and control are loaded on Windows Servers before all other services. This means that, sometimes, the server will start and all of your services or installations might not yet be loaded.
After waiting a few minutes, you should be able to see “AS DS” and “DNS” under “Roles and Server Groups” (43), confirming that the installation was successful.
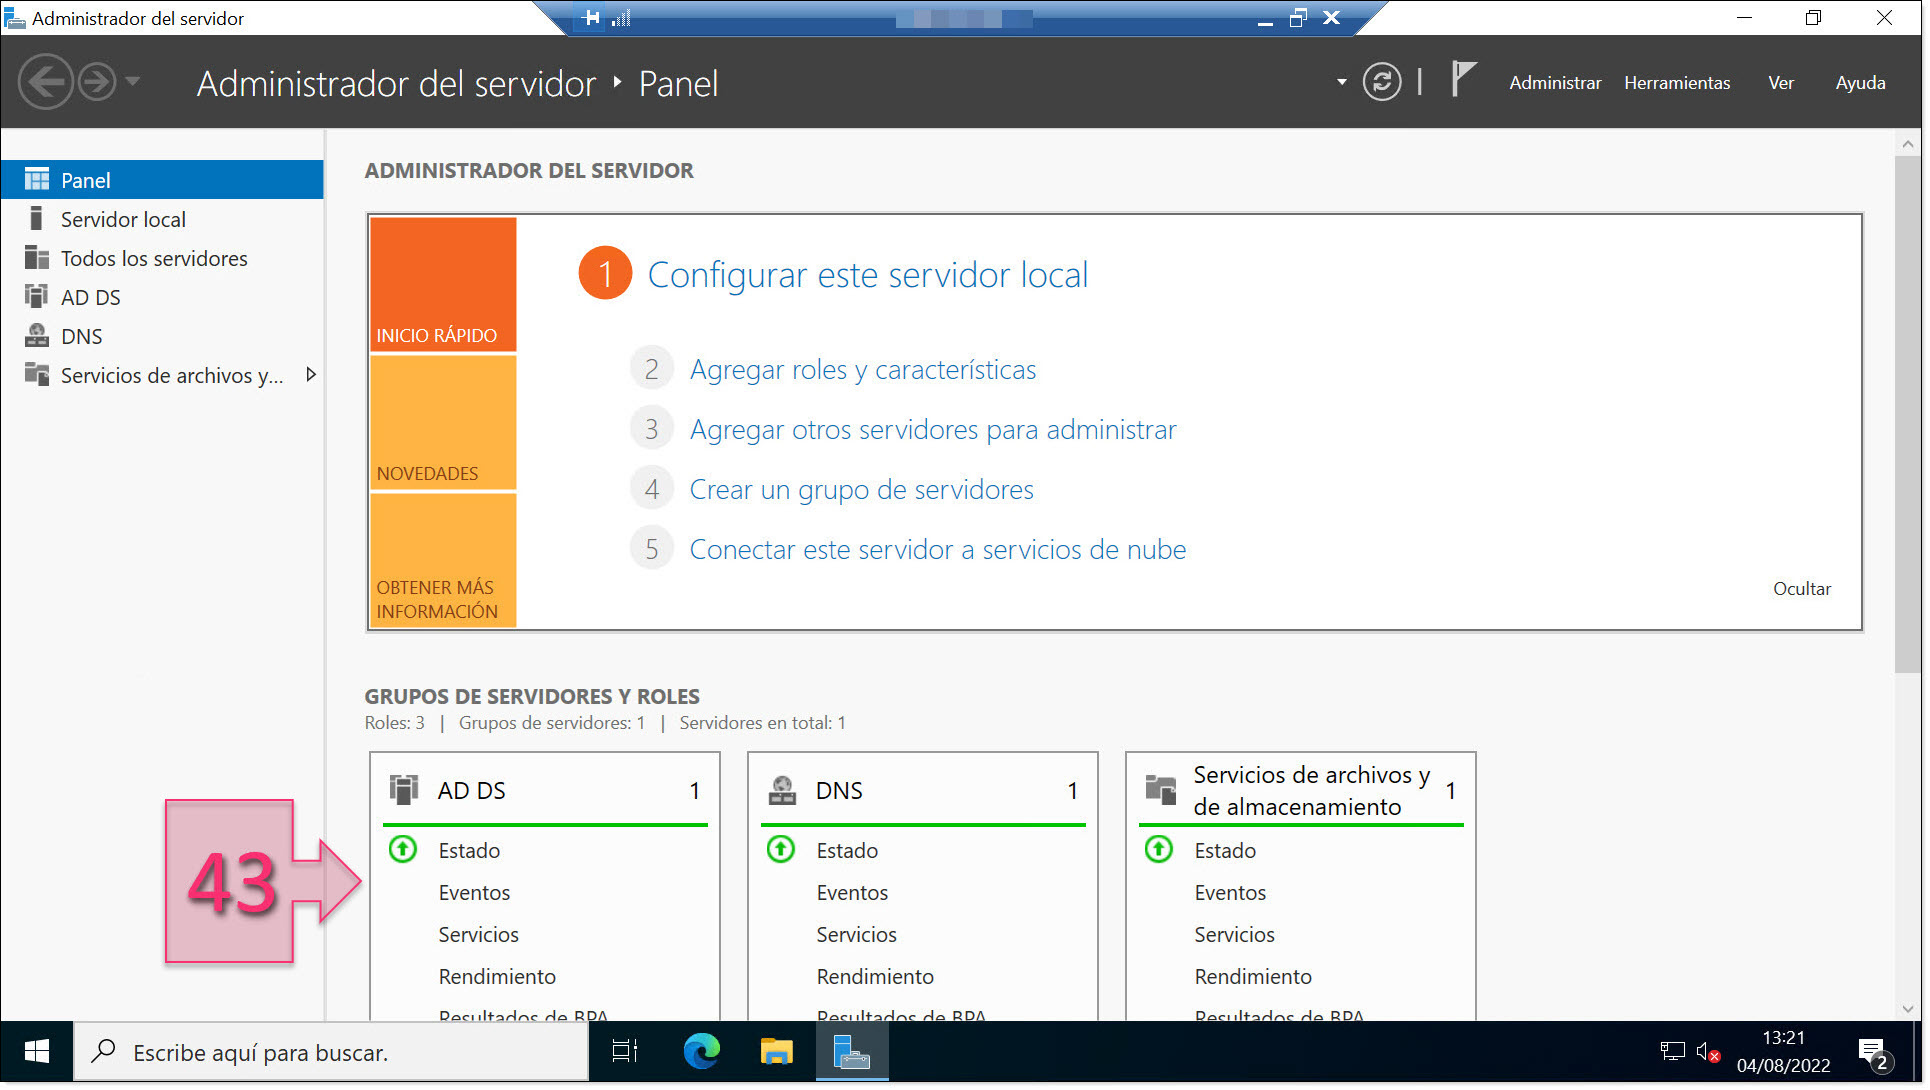
Part 2 – Check that the roles have been successfully installed
After you have done all this, there will be other tasks to perform, such as schema configuration, organising drives, registering devices, etc. But we will save this for a separate article.
Conclusions and next steps:
In this tutorial, you have learnt how to configure Active Directory Domain Services on Windows Server 2022 or any other version on your cloud infrastructure. This provides your infrastructure with a simple, secure, centralised management system.
We hope that you have found this tutorial useful. However, if you have any problems, please don’t hesitate to contact us so that we can help you out.
Thank you for choosing Jotelulu!


