In this tutorial, you will learn how to configure a remote access VPN connection. All you need to do is enable the VPN on the network, register users and then configure the connection on each user device.
For almost every company, security is a top priority, particularly when it comes to protecting data. A VPN (Virtual Private Network) establishes a kind of encryption tunnel across the internet, so that users can securely access services and documents from any remote location. This tutorial will explain how to securely connect a user device to a server via a VPN.
How to configure a remote access VPN connection?
Before you begin
To successfully complete this tutorial, you will need:
- To be registered with an organisation on the Jotelulu platform and have signed in using your username and password.
- To have subscribed to a Server or Remote Desktop service in order to enable a VPN on your network.
NOTE: It is important to remember that if you use NAT, you will only be able to use an L2TP connection because the connection will block the port. Any other user that wants to use this port will be denied.
Step 1. Enable the VPN on the server network.
On the main dashboard, click on the top of the Servers card (1).

Step 1. Open the Servers subscription page.
On the Servers subscription page, click on the VPN section (2) in the left-hand menu.

Step 1. Open the VPN section from the left-hand menu of the Servers subscription page.
On the VPN page, click on the Remote Access tab (3).

Step 1. Open the Remote Access tab on the VPN page.
At this point, you will see a list of available networks. Choose a network (there will generally be one) and change its status from OFF to ON (4).

Step 1. Choose a network and enable it as a Remote Access VPN.
Once you have enabled the network, a Pre-shared Key (5) will be created. Click on the eye symbol to see the key and take note of it for use later on. Similarly, you should take note of thepublic IP address (6) which you will need to make the connection.

Step 1. Take note of the Pre-shared Key and the public IP address.
Step 2. Register users
Now that you have enabled the network and taken note of the necessary details, you will need to register each user who will use the remote access VPN. To start doing this, click on the New User button (7).

Step 2. Click on the New User button to begin registering users
To register a new user, you will need to enter their name and password (with a confirmation (8)) and click on OK (9).

Step 2. Enter the new user’s name and password.
Your new user will now be registered for the L2TP over IPsec VPN.

Step 2. Check that your new remote access user has been created successfully
Step 3. Configure the remote access VPN on the user device
Once the server has been configured on the Jotelulu platform, you will now need to configure the remote access VPN on the user device. To do this, go to Settings (10) on the device in question.

Step 3. Open Settings on the user device
In Settings, select Network and Internet (11).

Step 3. Go to Settings > Network and Internet on the user device.
In Network and Internet, click on VPN in the left-hand menu (12).

Step 3. Go to Settings > Network and Internet > VPN on the user device.
Proceed to add a VPN connection (13).

Step 3. Go to Settings > Network and Internet > VPN > Add a VPN connection
At this point, a window will appear asking for the following details:
- VPN Provider: choose “Windows (built-in)” from the drop-down list.
- Connection name: Enter a name.
- Server name or address: Enter the public IP address that you wrote down earlier.
- VPN type: Choose “L2TP/IPsec with pre-shared key”.
- Pre-shared Key: enter the pre-shared key that you wrote down earlier.
- Username: Enter the user’s username.
- Password: Enter the user’s password.
Once all the details have been entered, click onSave (14).

Step 3. Enter and save all the information to configure the remote access VPN on the user device.
Once you have saved the VPN configuration, there is one more step before connecting the user device to the VPN. When establishing an L2TP connection, Windows sends all traffic through the VPN by default, so there will be no internet access. To make sure that only VPN traffic is routed through the VPN connection, you will need to make the following changes to the network settings. First, go to Control Panel > Network and Internet > Network and Sharing Centre (15) and click on “Change adapter settings” in the left-hand menu (16).

Step 3. Go to Control Panel > Network Centre > Change Adaptor Configuration
Next, right-click on the VPN you just created (17) and select Properties (18).

Step 3. Open VPN connection properties
NOTE: At this point, you need to decide whether to use IPv4 or IPv6. Go to the Networking tab (19) to choose one or the other. The rest of the steps in the process will remain the same, regardless of which you use.
In the Properties window, click on the Networking tab (19) and click on the Properties button (20). Then, click on Advanced (21) and lastly, disable the checkbox “Use the default gateway on remote network” (22). Click on OK (23).
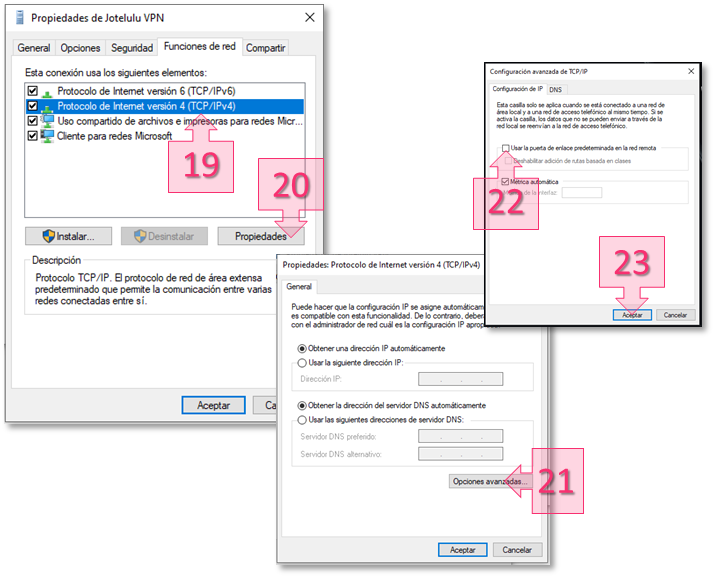
Step 3. Disable the default gateway on the remote network
Next, go to the Security tab (24) on the Properties window and change the Data encryption setting (25) to “Require encryption (disconnect if server declines)”. Keep the checkbox “Microsoft CHAP Version 2” ticked (26) and clickon OK (27).

Step 3. Configuring the VPN security settings.
Once this has all been completed, the only thing that remains to be done is to connect to the remote access VPN (28).

Step 3. Connection to the VPN from the user device.
All done! You have now configured your remote access VPN. Simply repeat the process for each other user who requires access.
Summary:
Many organisations need to protect their data and network connections, and using a VPN is a good way of doing this for remote users. In this tutorial, you have learnt how to create a remote access VPN and securely access services from any remote location.
We hope that this tutorial has been useful for you. If you still have some questions or would like to talk to us about any technical matters, you can write to us at platform@jotelulu.com or call us at +351 211 24 62 60 and we will be happy to help.