Cloud and Systems
Discover how to create a SQL Server table using a script so you don’t have to do it through the graphical interface of SQL Server Management Studio.
Sometimes we may need to deploy databases or deploy new tables in our SQL Server Database Management System, and doing it manually through the graphical interface can be a real headache. For this reason, we will see how to perform this task in a much more logical and comfortable way, by entering Transact-SQL commands.
This tutorial does not aim to be a complete guide to Transact-SQL or ANSI SQL, so we will not go into great detail about syntax or the hundreds of options available when creating tables or any SQL elements. Therefore, at the end of the tutorial, we will provide a couple of links that complement the information presented here.
How to create a SQL Server table using a script?
Prerequisites or pre-configuration
To successfully complete this tutorial and create a table using a script on our Jotelulu SQL Server, you will need:
- First, to be registered on the Jotelulu Platform with an organization and logged in via Log-in.
- Second, have an active Server subscription.
- Have a working Windows server within the subscription with SQL Server installed.
Step 1. Creating the code to execute
The first thing we need to do is understand a bit about how to connect, manipulate data, etc., within SQL Server, but as mentioned before, without going into too much detail.
To connect to the database, use the “USE <DATABASE_NAME>” command, where <DATABASE_NAME> is the name of the database you want to connect to, and where the table we are going to create will be added.
Next, enter the commands to create the table, which has a fairly simple syntax:
CREATE TABLE <TABLE_NAME> ( )
Where <TABLE_NAME> refers to the name we will give the table during creation, which will later be used to reference it.
Inside the table, we will have rows and columns. The columns will represent the fields of the table, while the rows will represent the different entries of items in the table.
When defining fields (columns), we should consider at least two elements: the field name and the data type being stored.
Regarding the name, not much else needs to be added, except that it should be as descriptive as possible to avoid confusion when filling the table. When discussing data types, we can go a bit further and say that the following types exist (ordered by type and alphabetically within each type):
Exact numeric types:
- bigint
- bit
- decimal
- int
- money
- numeric
- smallint
- smallmoney
- tinyint
Approximate numeric types:
- float
- real
Date and time types:
- date
- datetime
- datetime2
- datetimeoffset
- smalldatetime
- time
Character strings:
- char
- text
- varchar
Unicode character strings:
- nchar
- ntext
- nvarchar
Binary strings:
- binary
- image
- varbinary
In practice, we usually work with a limited number of types, for example: decimal, int, float, real, date, char, varchar, binary.
Other points to consider include whether we allow fields to remain empty or whether all fields must be filled. To enforce a field to be filled, add “NOT NULL” after the type.
You can also declare if a column is a primary key (PRIMARY KEY), if it must have a unique value (UNIQUE), etc. For now, we will work with the basics: declaring the type and whether null values are allowed.
The example we will create is a User table with the following fields:
- DNI: an integer (int) that cannot be left empty (NOT NULL).
- First Name: a character string up to 128 characters (varchar(128)) that cannot be left empty (NOT NULL).
- Last Name: a character string up to 128 characters (varchar(128)) that cannot be left empty (NOT NULL).
- Gender: a character string up to 20 characters (varchar(20)) that cannot be left empty (NOT NULL).
- Age: a number (smallint) and can be left empty.
- Birth Date: a date (datetime) and can be left empty.
- Phone: an integer (int) that can be left empty (NULL).
- Email: a character string up to 128 characters (varchar(128)) that can be left empty (NULL).
The SQL declaration would be as follows:
CREATE TABLE dbo.User ( DNI int NOT NULL ,FirstName varchar(128) NOT NULL ,LastName varchar(128) NOT NULL ,Gender varchar(20) ,Age smallint ,BirthDate datetime ,Phone int ,Email varchar(128) );
Additionally, we can specify the database where the table should be created. If necessary, we can create the database using the “CREATE DATABASE” command. Also, include the “GO” statement after each command to execute them individually; otherwise, the table might not exist when attempting to use it, causing an error.
Thus, we could run the following sequence:
CREATE DATABASE Clients;
GO
USE Clients; GO
CREATE TABLE dbo.User ( DNI int NOT NULL ,FirstName varchar(128) NOT NULL ,LastName varchar(128) NOT NULL ,Gender varchar(20) ,Age smallint ,BirthDate datetime ,Phone int ,Email varchar(128) );
And with this, the definition is complete.
Step 2. Execute our code on the database
Now that we know what will be executed, we will perform the process to run it from SSMS (SQL Server Management Studio). This allows us to deploy the new table (and database if needed).
First, access the SSMS console and authenticate against the instance where you will work, usually the default instance unless changed.
Once inside SSMS, click “New Query” (1).
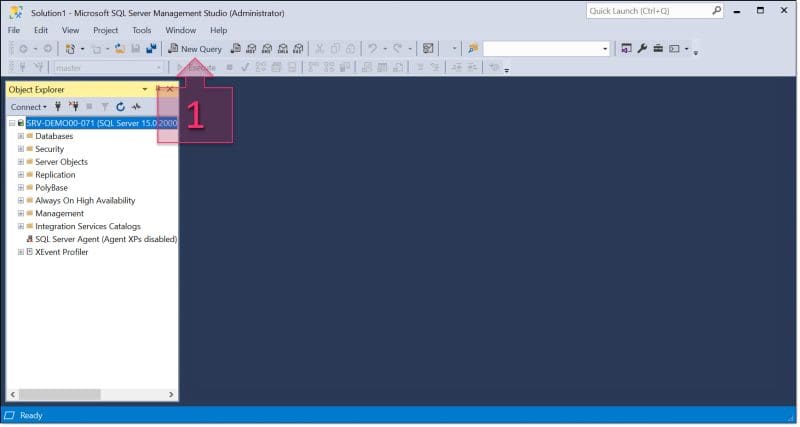
Step 1. Open a new query to copy our SQL table creation code
Paste the previously created code (2), making sure no strange characters or extra spaces were introduced, which can happen when pasting from some editors.
Click “Execute” (3) to run the commands. You will see messages (4) updating as the execution progresses, usually very quickly. If successful, a “Query executed successfully” message will appear (5). If there are errors, they will appear in the message window (4) and (5).
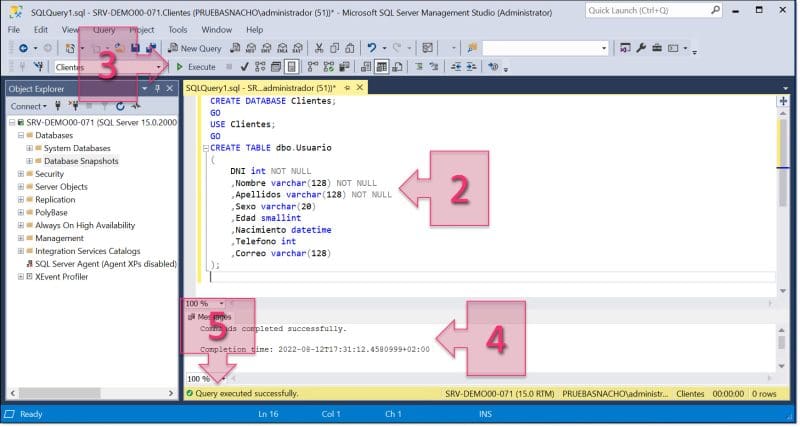
Enter the table creation code, execute, and check if everything went well
After running the commands, go to “Object Explorer” (6) to check if the elements created by your code exist. You may need to expand “Databases” to find the database created (“Clients”), then expand “Tables” to see the created tables.
If you cannot see the created elements, click “Refresh” (7). If the view still does not update, close and reopen SSMS. As many know, graphical consoles in Microsoft often require manual refresh.
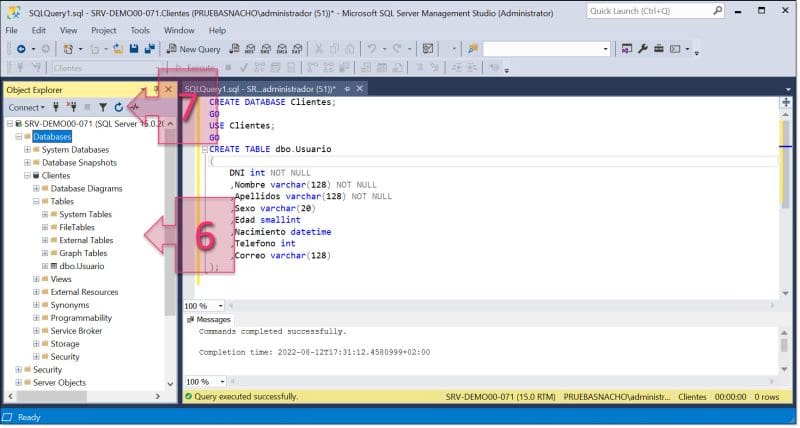
Check Object Explorer to verify table creation
NOTE: When executing commands, it may report success but not immediately display changes. Usually, clicking “Refresh” will reveal changes, but if not, exiting and re-entering SSMS should solve the problem.
To learn more, see examples of creating tables using CREATE TABLE in the Microsoft documentation: CREATE TABLE (Transact-SQL) – SQL Server
For further reading on Transact-SQL, see the Microsoft documentation: Transact-SQL Reference (Database Engine).
Conclusions and next steps:
The process described in this tutorial allows you to quickly create tables and even databases using code on your SQL Server instances in Jotelulu.
We hope this small guide helps you deploy tables in SQL Server. If you encounter any issues, don’t hesitate to contact us for assistance.
Thank you for your trust!
August 5, 2022