Cloud and Systems
Discover the basic PowerShell commands for managing users on your AD DS Server to speed up and save time in infrastructure management.
As we explained in the article 10 PowerShell Commands to Control AD DS Server Objects, “setting up and managing an IT infrastructure is a demanding task requiring the technical team to invest a great effort, with hundreds of hours dedicated to proper planning and configuration, plus hundreds or even thousands of hours of maintenance, including tasks of various kinds.”
In that article, we already outlined some commands to help audit the objects in our AD DS Server, specifically user and computer audits, but clearly, that does not cover all tasks. That’s why we decided to write this article, where we will discuss how to create users and groups and perform basic management tasks with them.
Of course, we recommend initially testing on a separate server, commonly called a “sandbox” or “pilot,” rather than a production server. This provides greater freedom and avoids mishaps. If you don’t have an AD DS Server infrastructure to test, you can follow this tutorial explaining How to Set Up Your AD DS Server in Jotelulu.
How to Manage AD DS Server Users Using PowerShell?
Without further ado, let’s start testing and discuss everything we will need, including the different commands and modifiers we can use.
Preparing PowerShell Operations with AD DS Server:
Before working with PowerShell against Active Directory (AD), we need to check the version of PowerShell available on the server and import the AD DS administration module.
To check the PowerShell version, we can use the following commands:
Get-Host
$PSVersionTable
$PSVersionTable.PSVersion
We can use the “Get-Host” command without parameters, which returns several console details, including the “Version” parameter indicating the PowerShell version.
Alternatively, we can query the version directly using the “$PSVersionTable” command, which provides extensive information. To show only the PowerShell version, use $PSVersionTable.PSVersion.
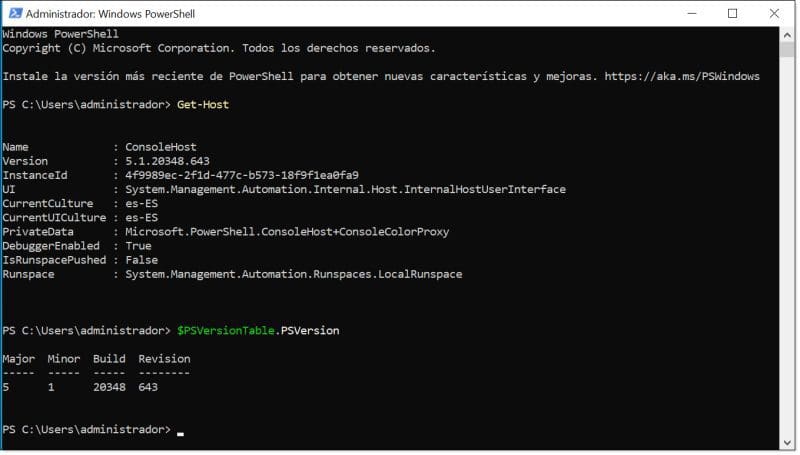
Check the installed PowerShell version on the system
Once confirmed that PowerShell is available, we need to import the module to work with Active Directory.
The module for managing AD DS via PowerShell is “ActiveDirectory”, a straightforward name by Microsoft that simplifies searching.
To import the module, open a PowerShell console with Administrator privileges and run:
Import-Module ActiveDirectory
The installation is quick, sometimes only showing a brief flash, and it works correctly if no error messages appear.

Import Active Directory administration module in PowerShell
Request Domain Information:
With the ability to connect to the domain and run commands, we can start by retrieving information about the forest, domain, and domain controllers.
To get AD DS forest information, run:
Get-ADForest
This provides information on:
- Forest name
- Domains
- Sites
- Domain root
- Partitions
- Domain naming master
- Forest functional level
You can filter for specific details, like the Domain Naming Master or Forest Functional Level, using a “|” (pipe) to redirect output and “Select” to choose specific fields.
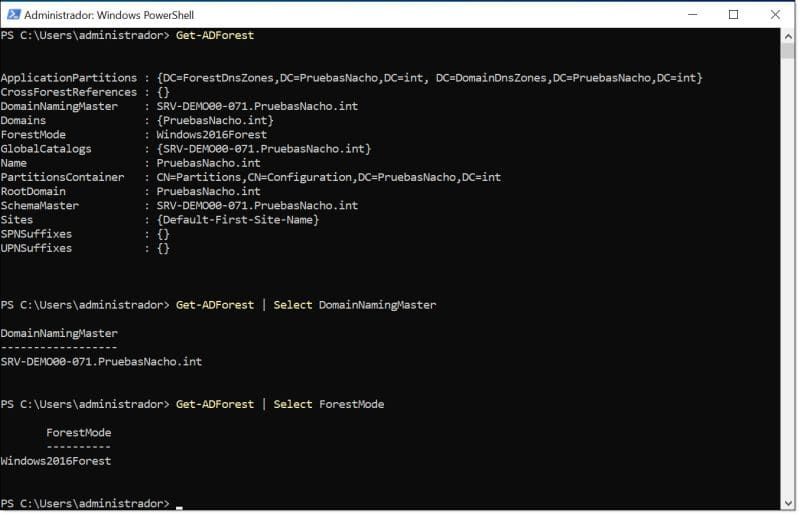
Retrieve information about AD DS forest
To get AD DS domain information, use a similar command to “Get-ADForest”: the “Get-ADDomain” command, replacing “Forest” with “Domain”.
“Get-ADDomain” provides:
- Domain name
- Child domains
- Parent domain
- DNS root
- Domain functional level
- Forest membership
- NetBIOS name
- PDC emulator
- RID master
- Infrastructure master
You can filter as before to query, for example, Domain Level, Domain Name, etc.
Examples:
- Get-ADDomain | Select Name
- Get-ADDomain | Select DomainMode
- Get-ADDomain | Select Name, DomainMode
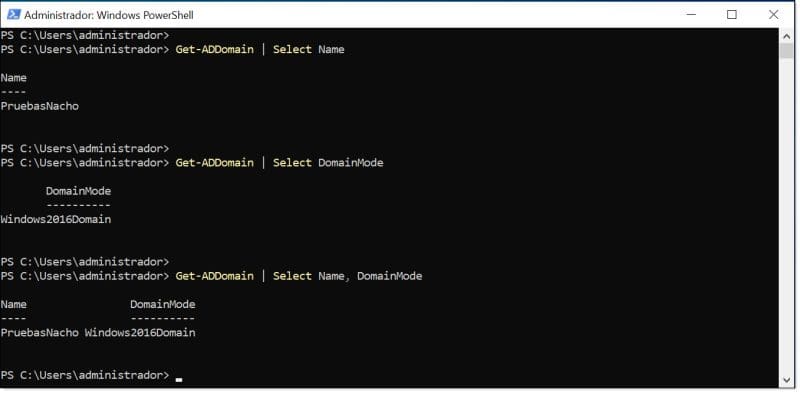
Retrieve information about AD DS domain
At this point, we also introduce how to modify output formatting to suit our needs. To adjust the output, we use the “|” (pipe) to redirect the output into the desired format. These modifications can be applied whenever we want to improve the presentation of retrieved data.
Three of the most commonly used formats are:
- FT: Table (Format Table)
- FL: List (Format List)
- Out-GridView: List (External window format)
They are used as follows:
- Get-ADDomain | Select Name, DomainMode | FT
- Get-ADDomain | Select Name, DomainMode | FL
- Get-ADDomain | Select Name, DomainMode | Out-GridView
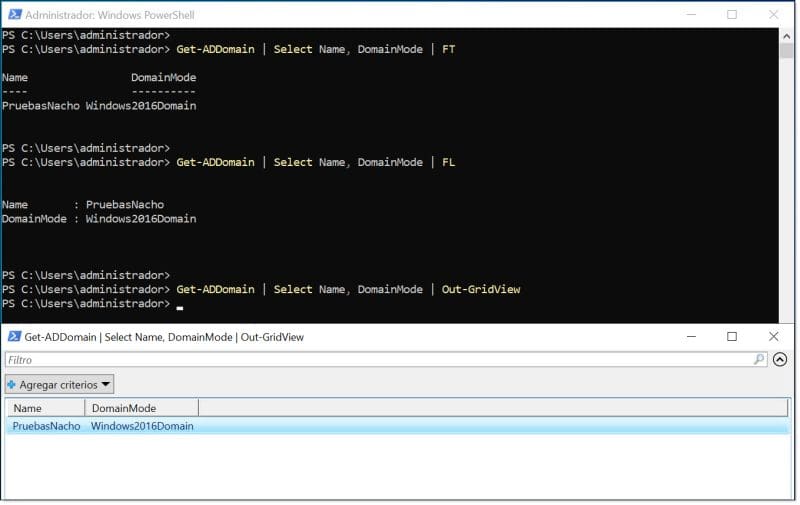
Examples of PowerShell query output formatting
It may also be useful to query information about Domain Controllers (DC) in our AD DS Server infrastructure.
To obtain this information, use the “Get-ADDomainController” command. You can use the “-Filter” modifier to select specific information or continue using “| Select” as before.
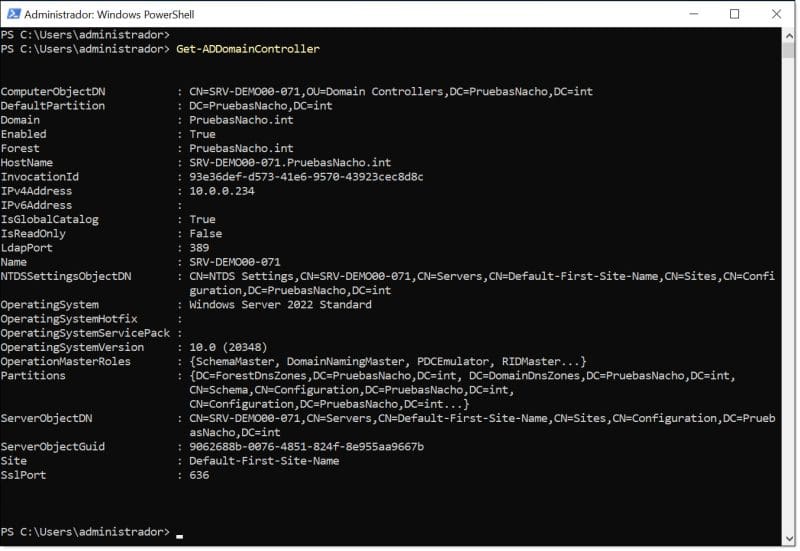
Retrieve information about Domain Controllers in our AD DS
Retrieve User Information:
The next step is to retrieve user information, for example, checking all information and configuration for a specific user.
There are several ways to do this. The first is running the “Get-ADUser” command with only the username parameter:
Get-ADUser jioller
We can also specify which information to retrieve using the “-Properties” modifier, followed by “*” for all properties or by listing specific fields.
Get-ADUser jioller -Properties *
Get-ADUser jioller -Properties CN, UserPrincipalName, whenCreated, whenChanged
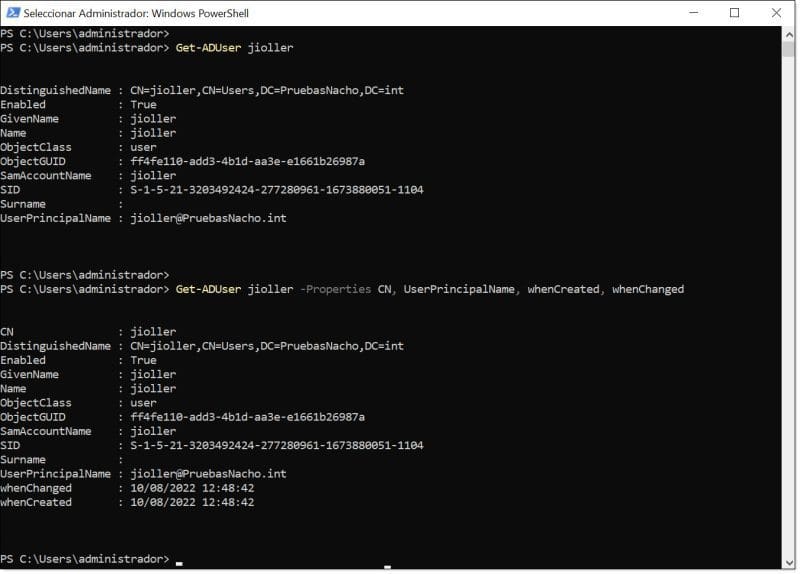
Retrieve information about users registered in our AD DS
Another useful query is retrieving the total number of users in the domain, which can help quickly audit new accounts. The command is simple: query domain users with “Get-ADUser -Filter *” and count the results with “().count”.
(Get-ADUser -Filter *).count
NOTE: Always remember that PowerShell is much more than a conventional command line. It works with objects, so options are nearly limitless.

Check the number of users in the domain
Create and Delete Users:
Creating and deleting domain users is common and should be managed efficiently to save time.
Although bulk imports are common in PowerShell, we’ll first see how to create a user manually, then later automate bulk creation.
To create a user, set the password first since it cannot be entered directly in the command. Replace <PASSWORD> with your chosen password:
$userpassword=ConvertTo-SecureString -AsPlainText -Force -String <PASSWORD>
Then run “New-ADUser”:
New-ADUser -Name jioller2 -AccountPassword $userpassword
Optionally, you can add parameters like description or enable the account immediately:
New-ADUser -Name jioller2 -Description “Second Account of Nacho” -Enabled $true -AccountPassword $userpassword
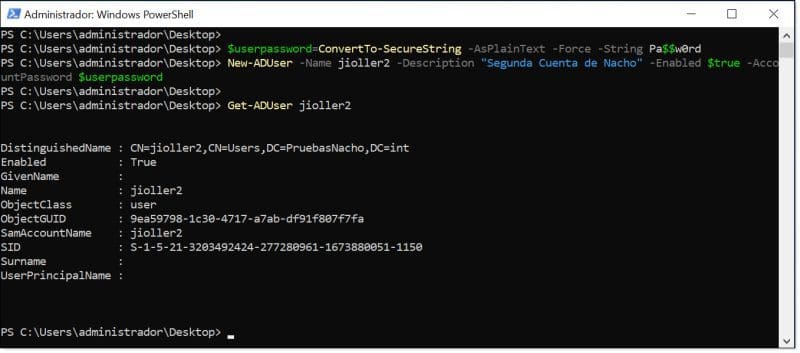
Add a new user manually and check creation
To delete users manually, use the “Remove-LocalUser” command followed by the account name:
Remove-LocalUser jioller2
We can also filter results, e.g., show users whose names start with “jio”:
Get-ADUser -Filter ‘Name -like “jio*”‘ | Select Name
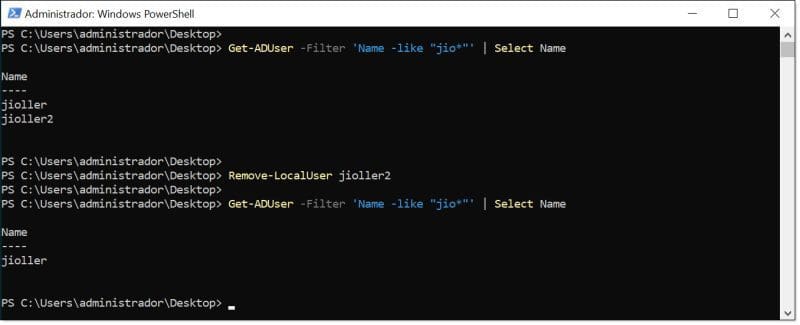
Delete a user from AD DS with PowerShell and verify success
Bulk User Creation and Deletion:
Now let’s see how to automate user creation using a “.csv” file and a small script that reads the file line by line, creating users one by one based on each line’s information.
First, create a user and password file with a simple structure where each line represents a user, with fields separated by commas.
The structure might look like this, with the first line containing the field names and each subsequent line representing a user:
user,password
user01,password01
user02,password02
…
Next, import the file into PowerShell so the script can read it:
$userlist=Import-Csv -Path users.csv
This command loads the file using Import-Csv from the specified -Path. Make sure the file is in the current directory or provide the full path:
-Path C:\Users\administrator\Desktop\users.csv
Then, execute the script to create users:
foreach ($i in $userlist)
{
$userpassword=ConvertTo-SecureString $i.password -AsPlainText -Force
New-LocalUser $i.user -Password $userpassword
}
This script loops through each line and creates a user with New-LocalUser. The line $userpassword=ConvertTo-SecureString $i.password -AsPlainText -Force ensures passwords are correctly assigned.
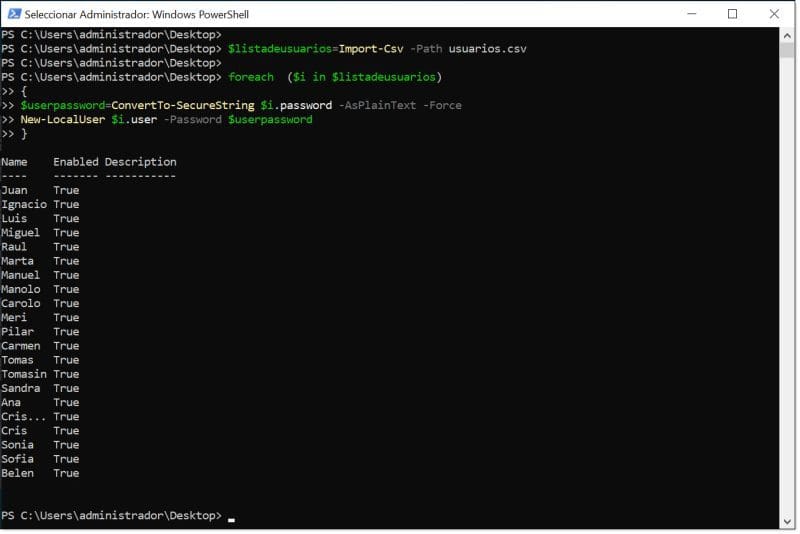
Bulk user import into our AD DS
The script runs in “verbose” mode, showing execution information for each user added. A “True” result indicates success.
To delete users in bulk, prepare a CSV file containing only the usernames:
user
user01
user02
…
Import the file into PowerShell:
$userlist=Import-Csv -Path deleteusers.csv
Execute the deletion script:
foreach ($i in $userlist)
{
Remove-LocalUser $i.user
}
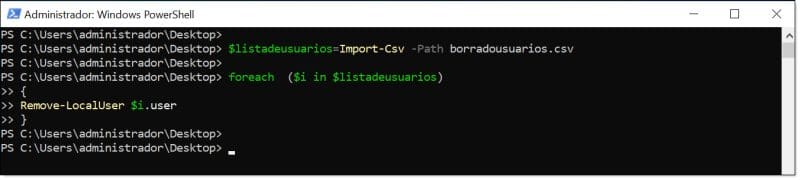
Bulk user deletion script execution
Password Changes:
An important daily task is changing or resetting user passwords, especially in organizations with many non-advanced or temporary users.
There are two main approaches, depending on whether you know the current password.
If you know the current password, run the command and enter the current password when prompted:
Set-ADAccountPassword jioller
If the current password is unknown, use the -Reset modifier:
Set-ADAccountPassword jioller -Reset
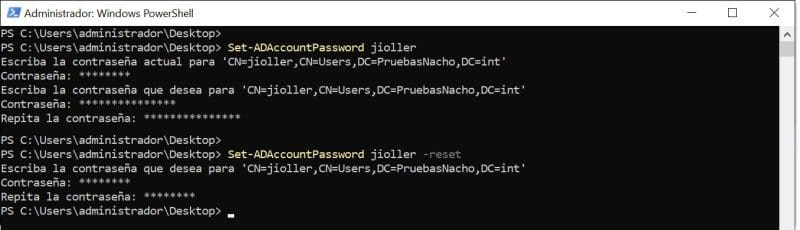
Testing two ways to change a password
Unlock Accounts:
If a user account is locked, you can unlock it using the “unlock-ADAccount” command followed by the username. Add -Verbose for task details:
unlock-ADAccount jioller -Verbose
You can also simulate the command using -WhatIf:
unlock-ADAccount jioller -WhatIf

Unlocking a user and simulating account unlock
Other User Operations:
Sometimes you may need to modify user information, such as adding a description, department, or city. Use “Set-ADUser” with the username and parameter:
Example: add a description to user “jioller”:
Set-ADUser jioller -Description “Nacho’s User”
NOTE: Descriptions should be enclosed in quotes, especially if they contain spaces.
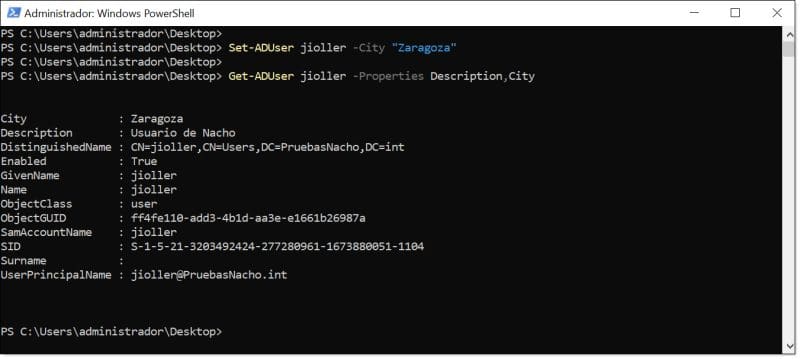
Modify and verify user description and city
Group Management:
We also review some basic operations with AD DS groups. First, retrieve information about a specific group using “Get-ADGroup”:
Get-ADGroup “TestGroup”
No quotes are needed around the group name as shown.
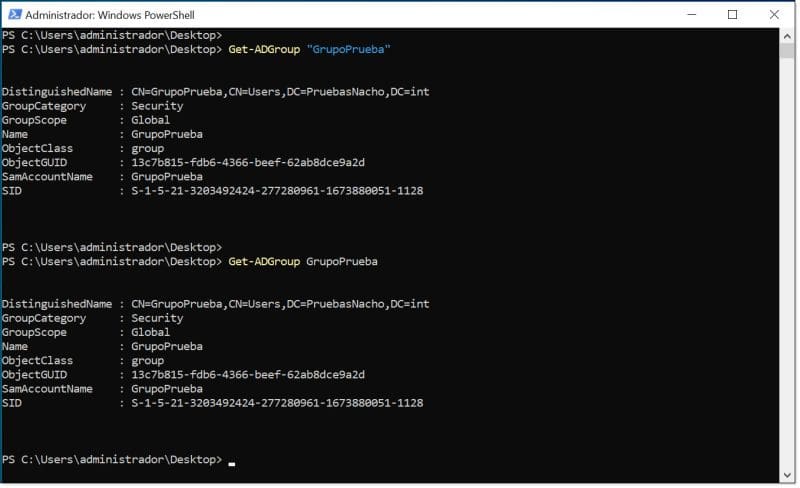
Retrieve information about an AD DS group
Check group members using “Get-ADGroupMember”:
Get-ADGroupMember “TestGroup”
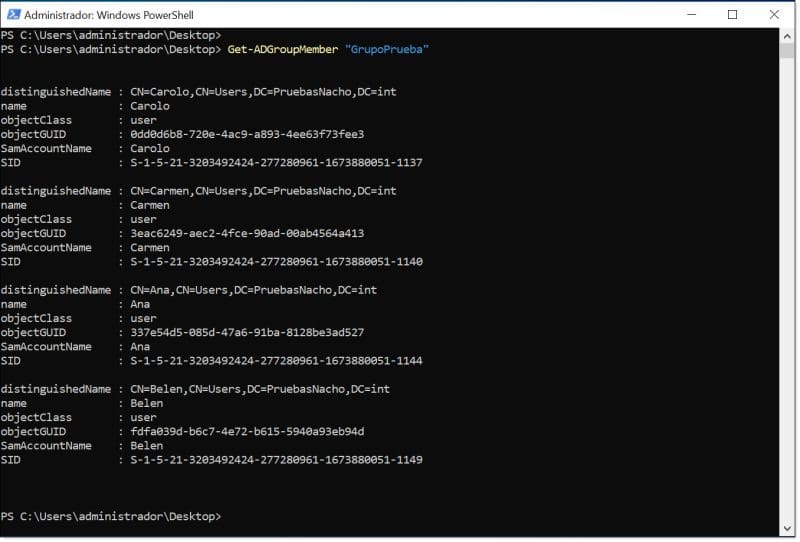
List group members
Add a user to an existing group using “Add-ADGroupMember”:
Add-ADGroupMember “TestGroup” jioller
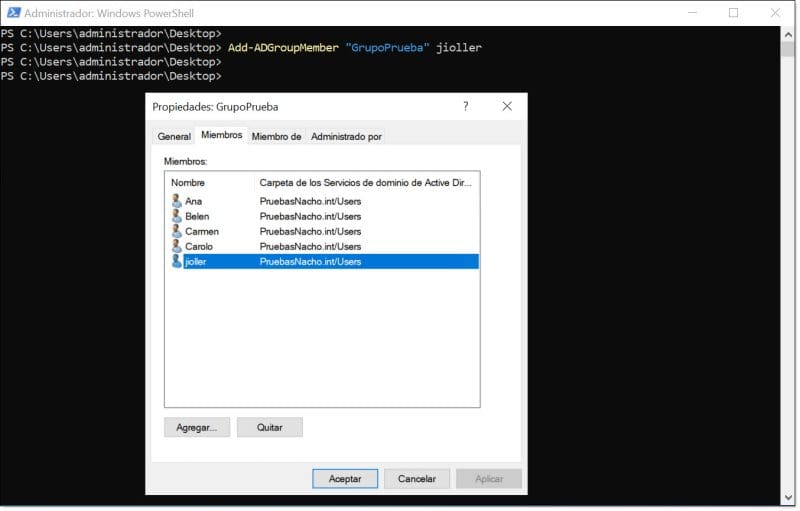
Add a user to an existing group with PowerShell
We’ll stop here and expand in future articles with more tricks, other object management, GPO management, and Granular Password Policies (PSO).
Conclusions and Analysis of AD DS Server
This is not the ultimate AD DS user management tutorial with PowerShell, but it provides useful commands for basic administration.
With this, we can start administering AD DS, focusing on objects (users and groups), including user creation, deletion, and basic management.
We recommend exploring PowerShell further, as it has unlimited potential for efficiently managing Microsoft infrastructure, including clients, servers, services, and some GNU/Linux components.
August 10, 2022