In this tutorial, you will learn how to manually back up your QNAP data to a Jotelulu S3 bucket in order to maintain a security copy of your company’s data on the public cloud and ensure business continuity when faced with disruptions.
Sometimes, keeping a backup on a separate cabinet might not be enough, especially if that cabinet is located in the same place as all your servers. What would happen if there was a fire? Should you have a Plan B?
In a word, yes. When it comes to business continuity management, it is vital to have a Plan B. However, many contingency plans are expensive, and this can put off many businesses from taking these kinds of measures.
That is why, here at Jotelulu, we offer the possibility of using our S3 Buckets service as an affordable yet reliable way to store backup copies of your QNAP cabinet.
How to back up your QNAP cabinet to a Jotelulu S3 bucket
NOTE: This tutorial has been written for a QNAP TS-x73A. If you are using a different model, you may find that there are small differences in the steps that you need to follow.
Before you get started
To successfully complete this tutorial and backup your QNAP NAS to an S3 Bucket, you will need:
- To be registered on the Jotelulu platform and have logged in.
- To have already subscribed to the Jotelulu S3 Buckets service.
- To have an operational QNAP cabinet connected to the internet and have administrator access.
NOTE: This tutorial will include instructions on how to map an S3 bucket to QNAP. You may wish to do this separately for use in other tasks, in which case, you can always consult this tutorial: How to Map a Jotelulu S3 Bucket to QNAP.
Creating a QNAP backup on an S3 bucket
For this tutorial, you will need to run HBS 3 Hybrid Backup Sync (1), which is the backup program that is included with QNAP. This way, you won’t need to install any additional software that could affect your cabinet’s performance.
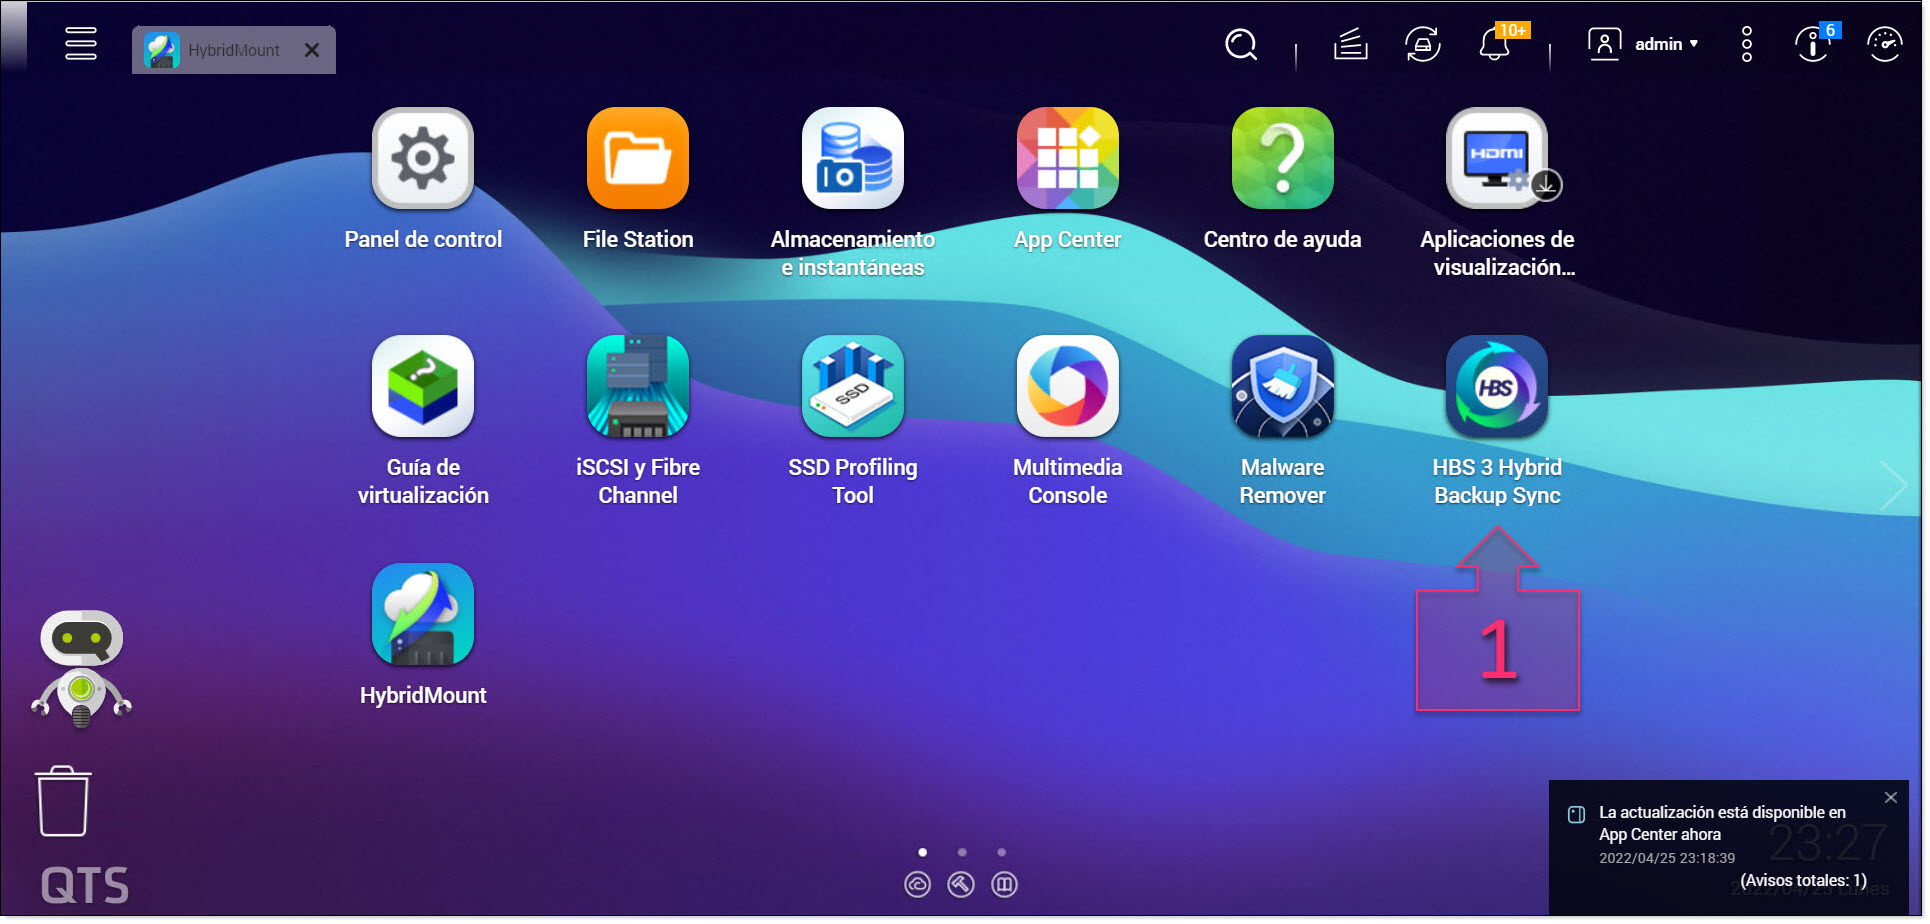
Run HBS3 Hybrid Backup Sync
This will load a wizard that will guide you through the backup process.
First, click on “Back Up Now” and select “New backup job” from the drop-down menu (2).
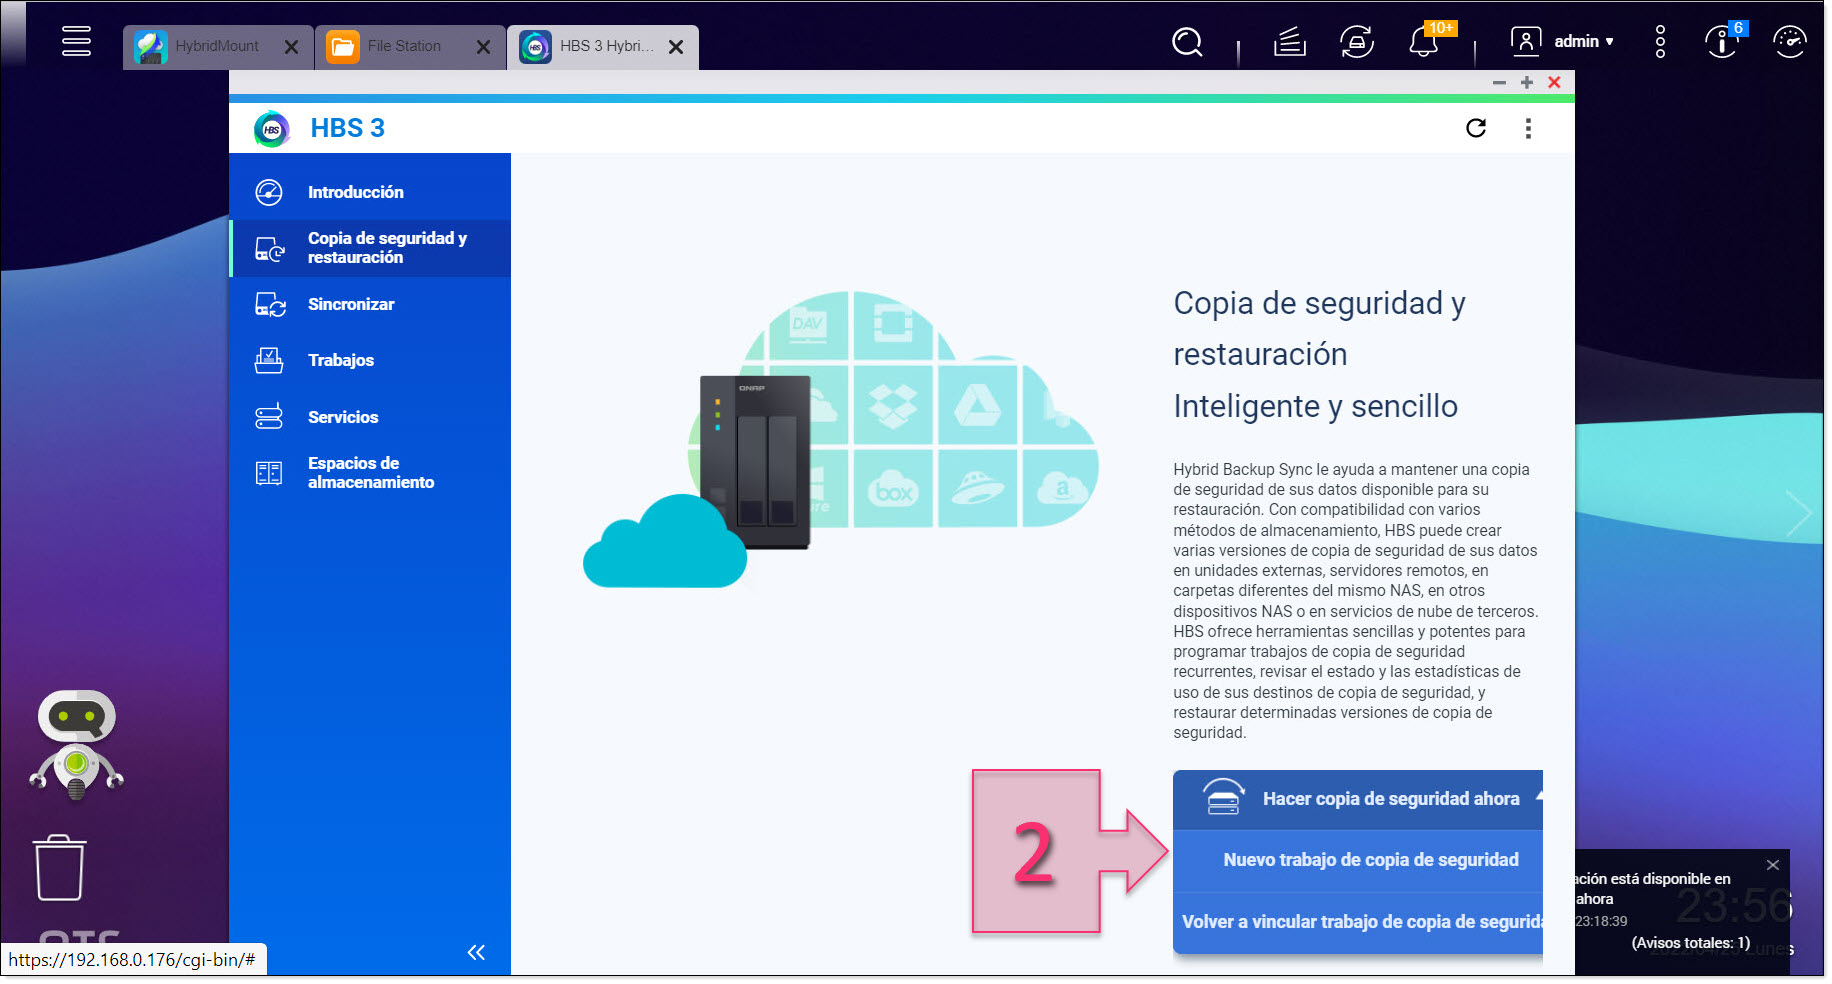
Select “New backup job”
Next, you will need to select the source folder (3), in order words, the files that you wish to back up. Just highlighting the folder is not enough. You need to make sure that the checkbox is ticked, otherwise, you will not be able to proceed.
Once you have ticked the checkbox for the folder that you wish to back up, click on “Next”.
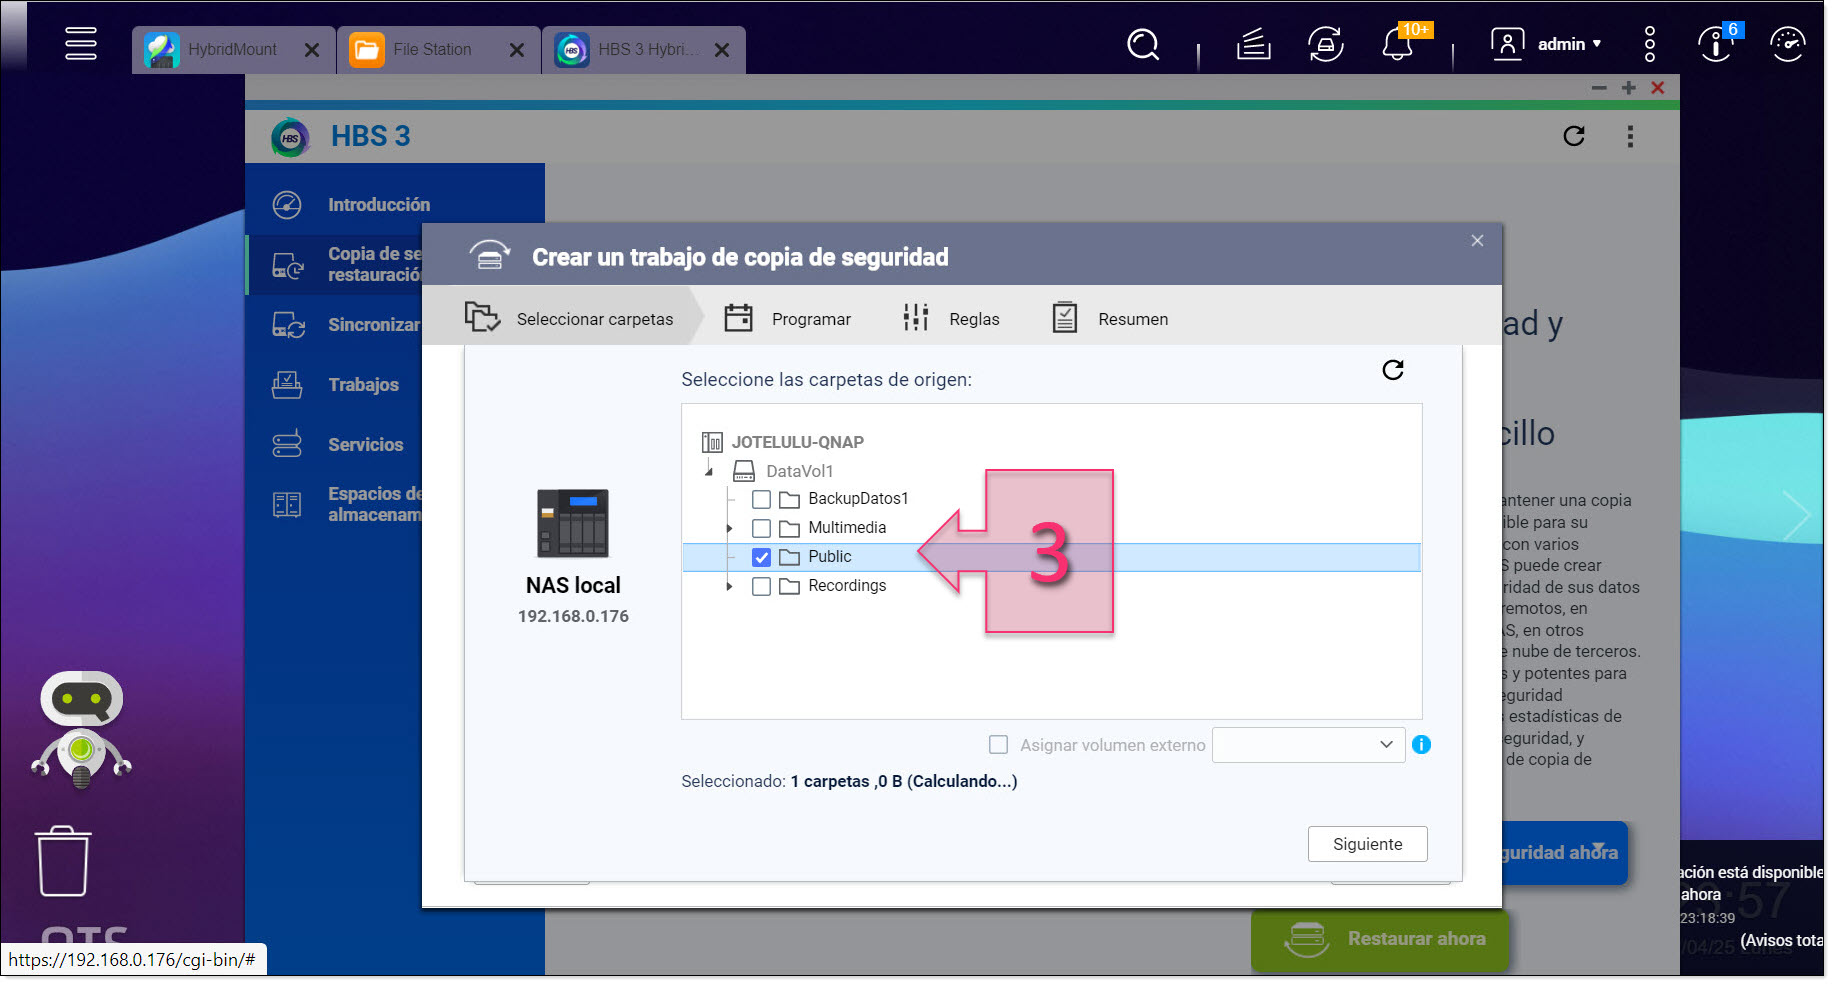
Select the folder that you wish to back up
Next, you will need to select the destination storage space. Here, you should select “Amazon S3 & S3 Compatible” (4).
NOTE: There are plans to add a Jotelulu S3 application to the QNAP Marketplace, but until then, we will use the S3 Compatible option.
Then, click on “Add new account” (5).
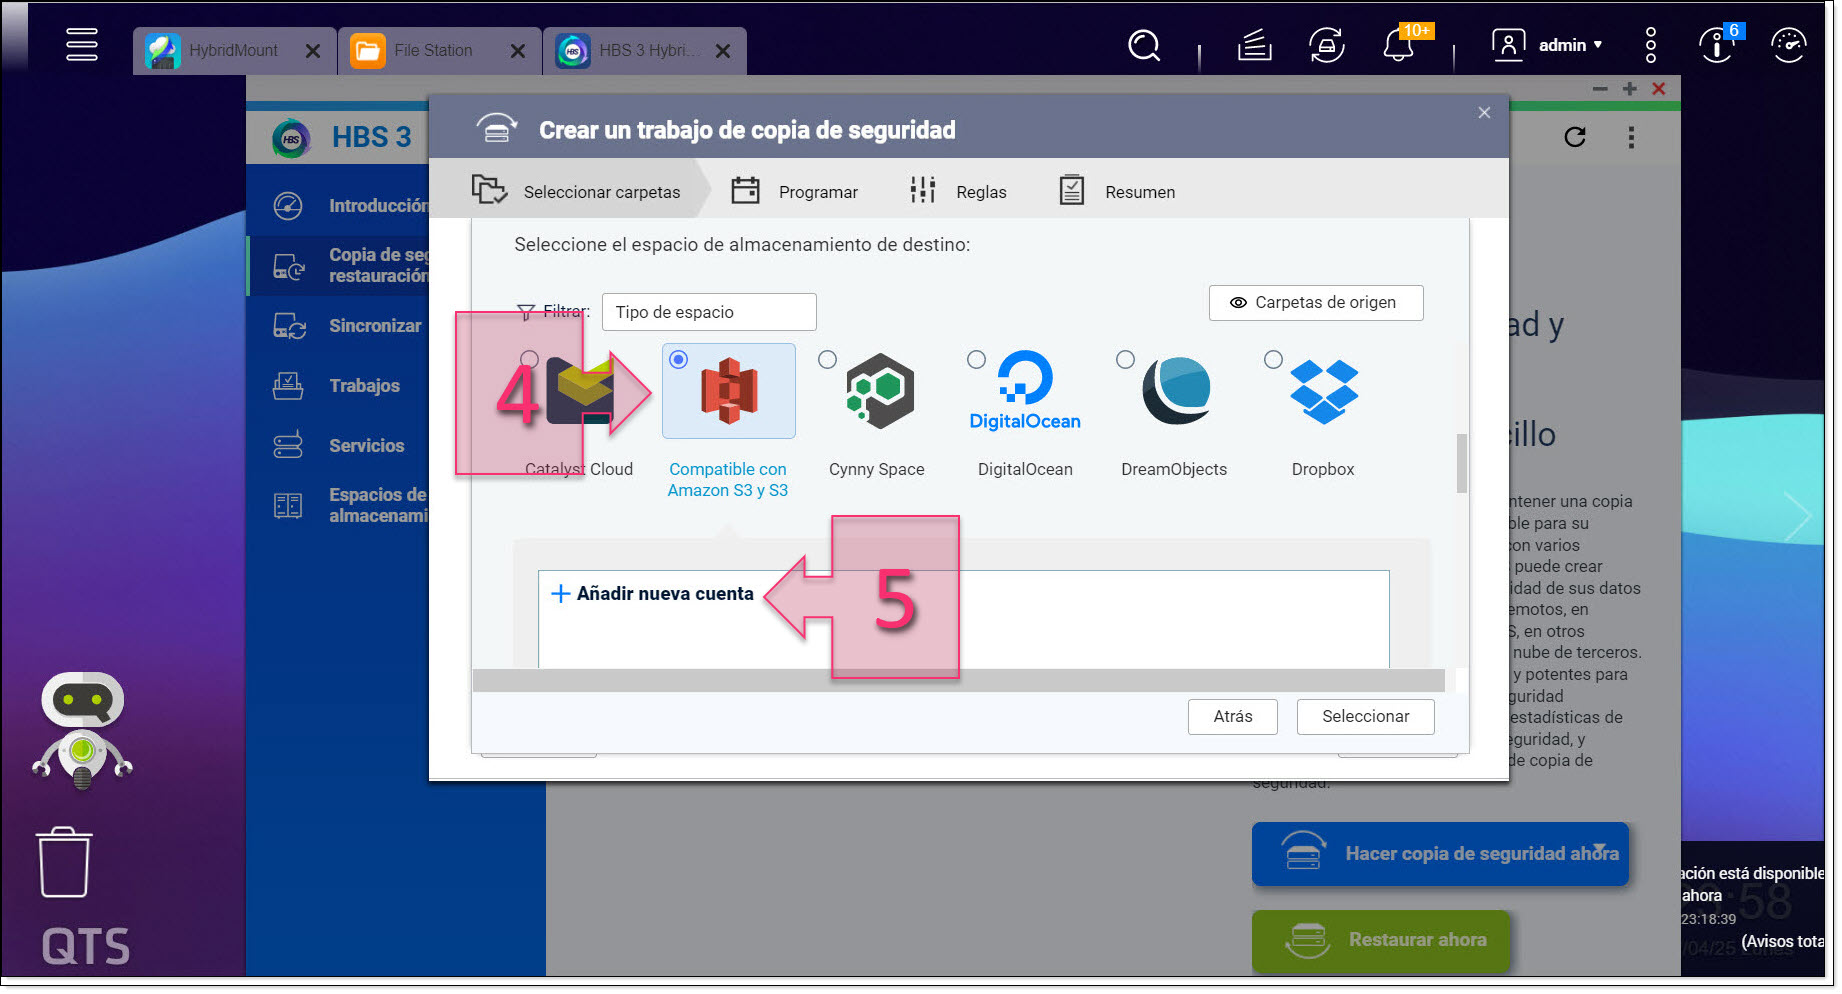
Select “Amazon S3 & S3 Compatible” as the destination storage space
To create a new storage space, you will now need to fill in some details that you will need to note down from the S3 Buckets section on the Jotelulu platform.
You will need to fill in the following details (6):
- Name: Name given to the connection. This should already be filled in by default.
- Service provider: This will be S3 Compatible.
- Server address: Enter “s3.jotelulu.com”, which is basically what the S3 service shows but without the “https://” at the beginning.
- Access key: Enter the key for the S3 bucket that you wish to connect to.
- Secret key: Enter the key for the S3 bucket that you wish to connect to.
- Signature version: Select “V2”, which should be already selected by default.
- Use SSL connection: Tick the checkbox.
- Validate SSL certificate: Tick the checkbox.
Click on “Create” (7).
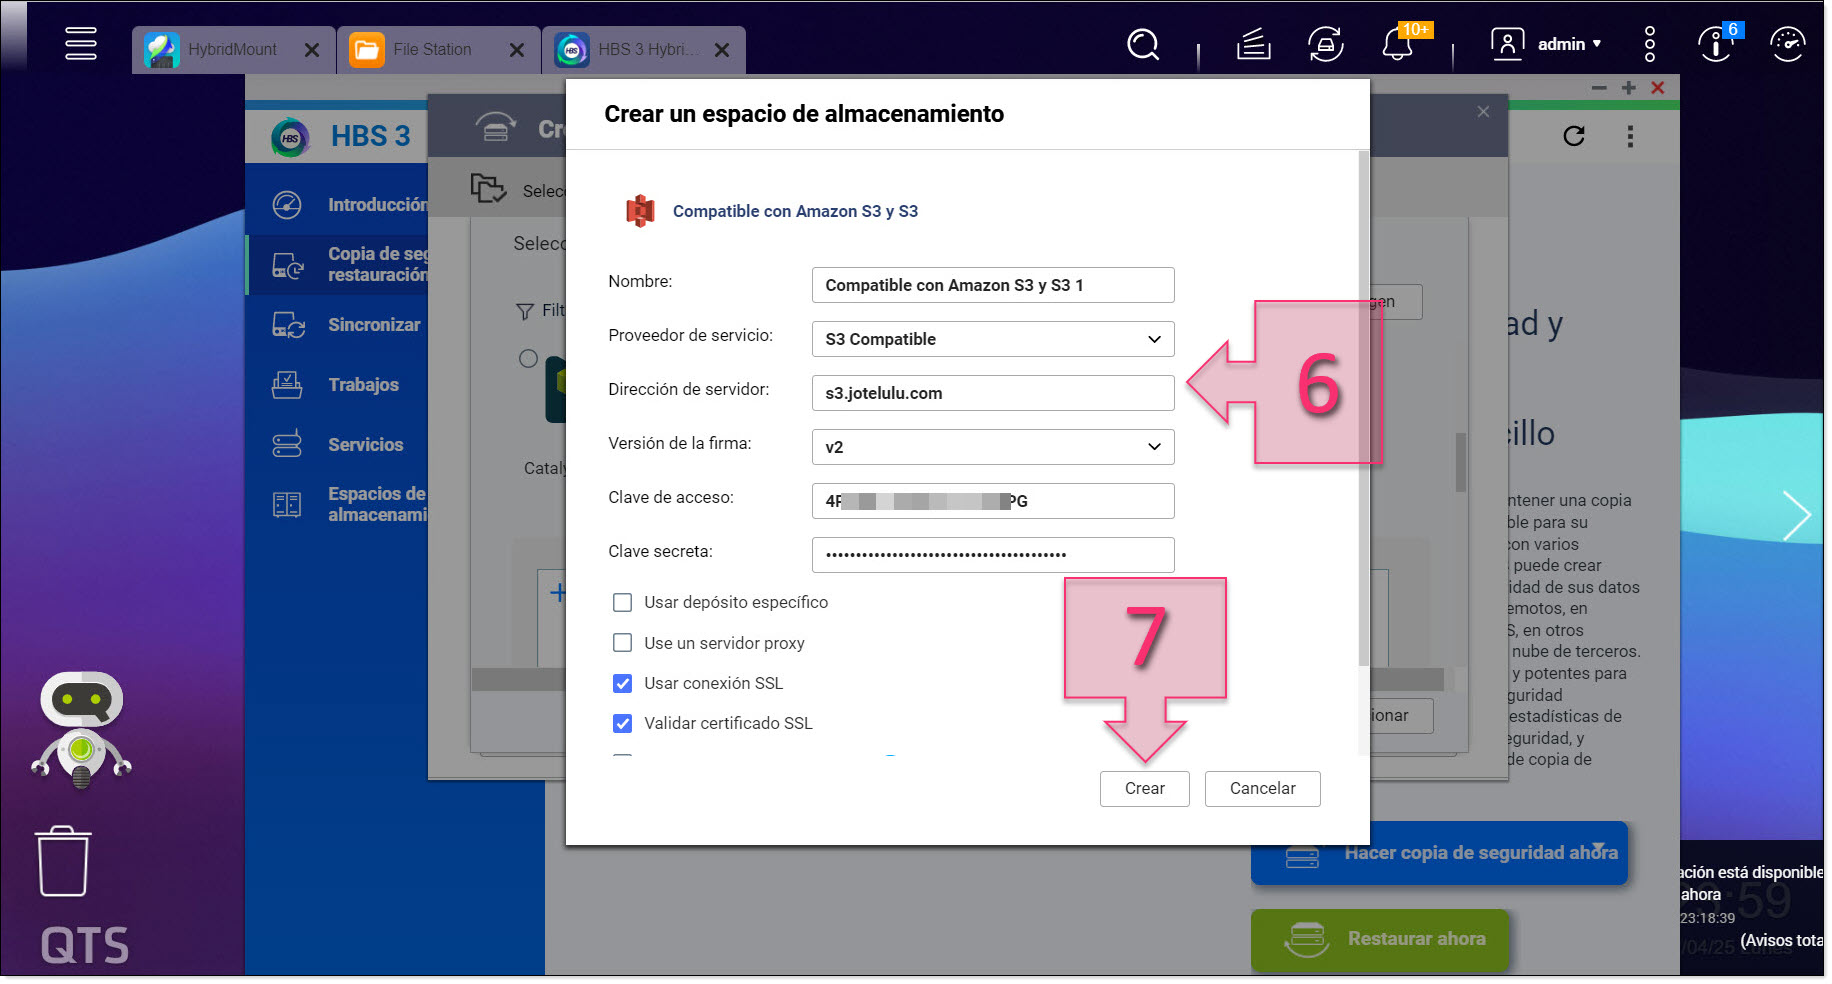
Fill in the details to configure the S3 compatible storage space
For this next step, it is very important to ensure that you have selected the correct storage space (8). The one selected should already be the one that you have just created, but it is important to check first.
Next to “Bucket name” you should see the name of the bucket (9). If you do not see the right name, click on the drop-down menu and select the right option.
“Multipart Size” (10) can be left as the default value of 128 MB.
Then, click on “Select” (11).
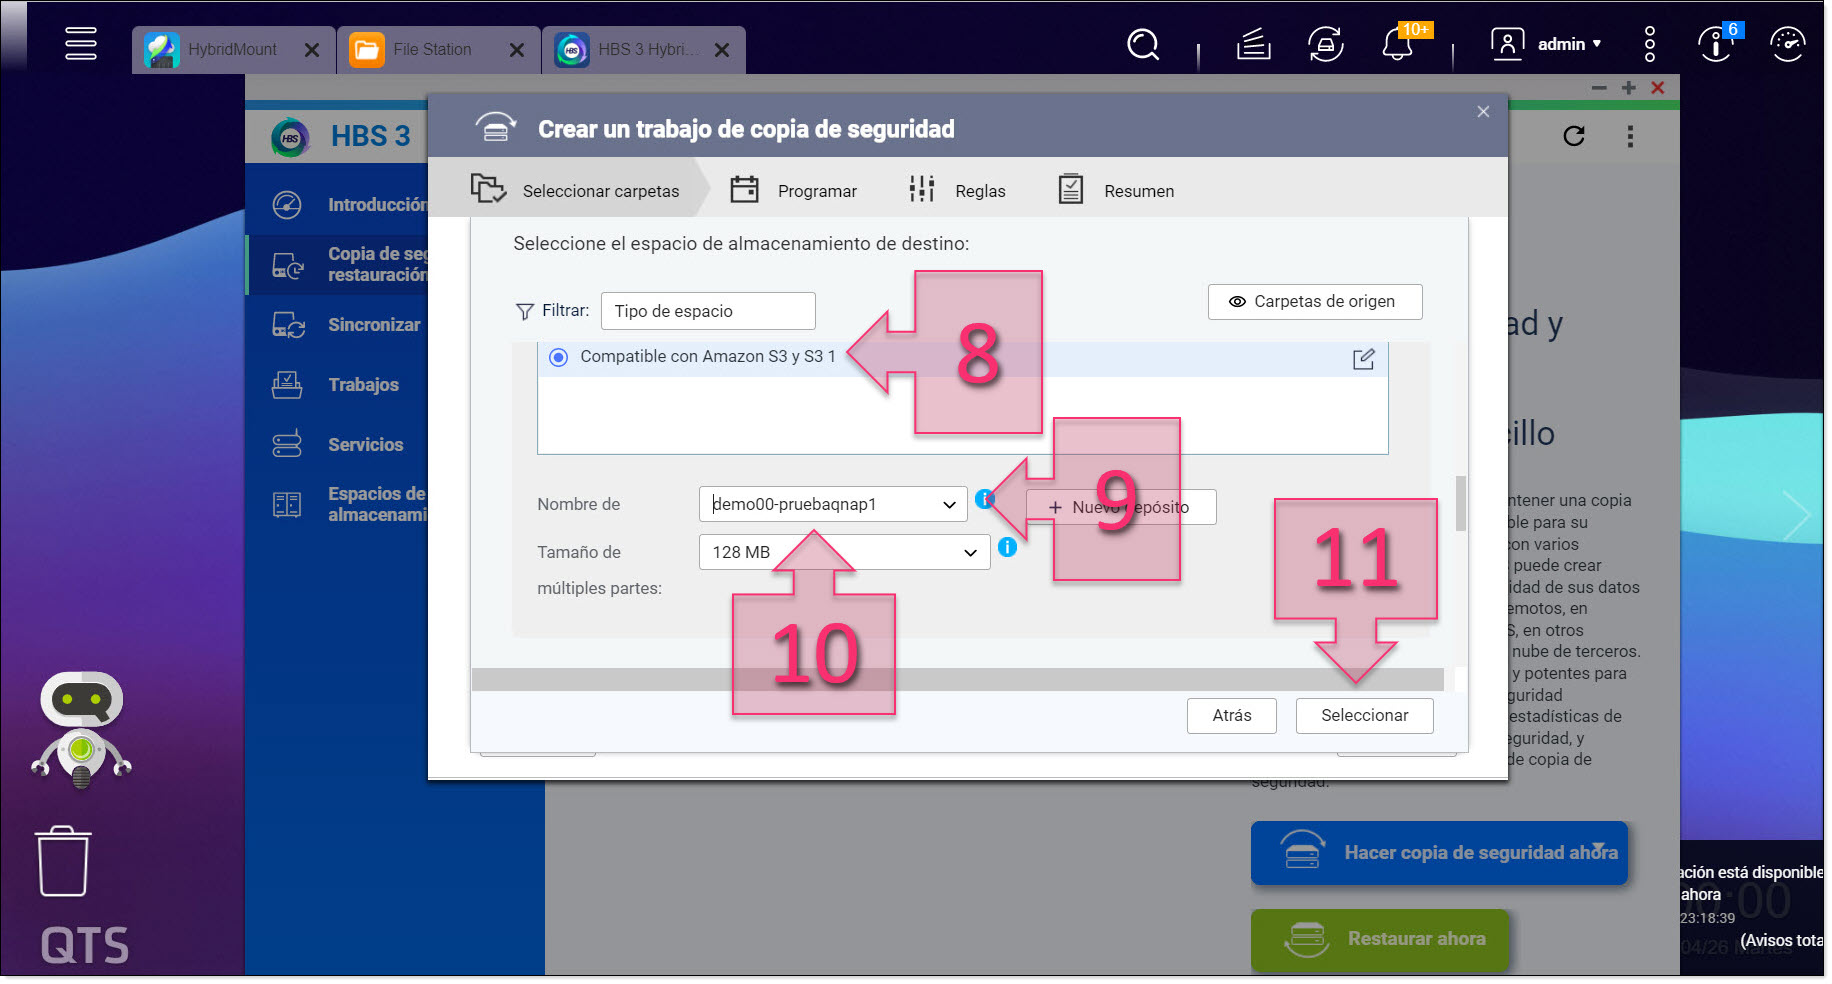
Choose the correct bucket name
On the next page, you need to select the destination folder. Choose the path that you wish to use (12) according to the way your organisation manages its data.
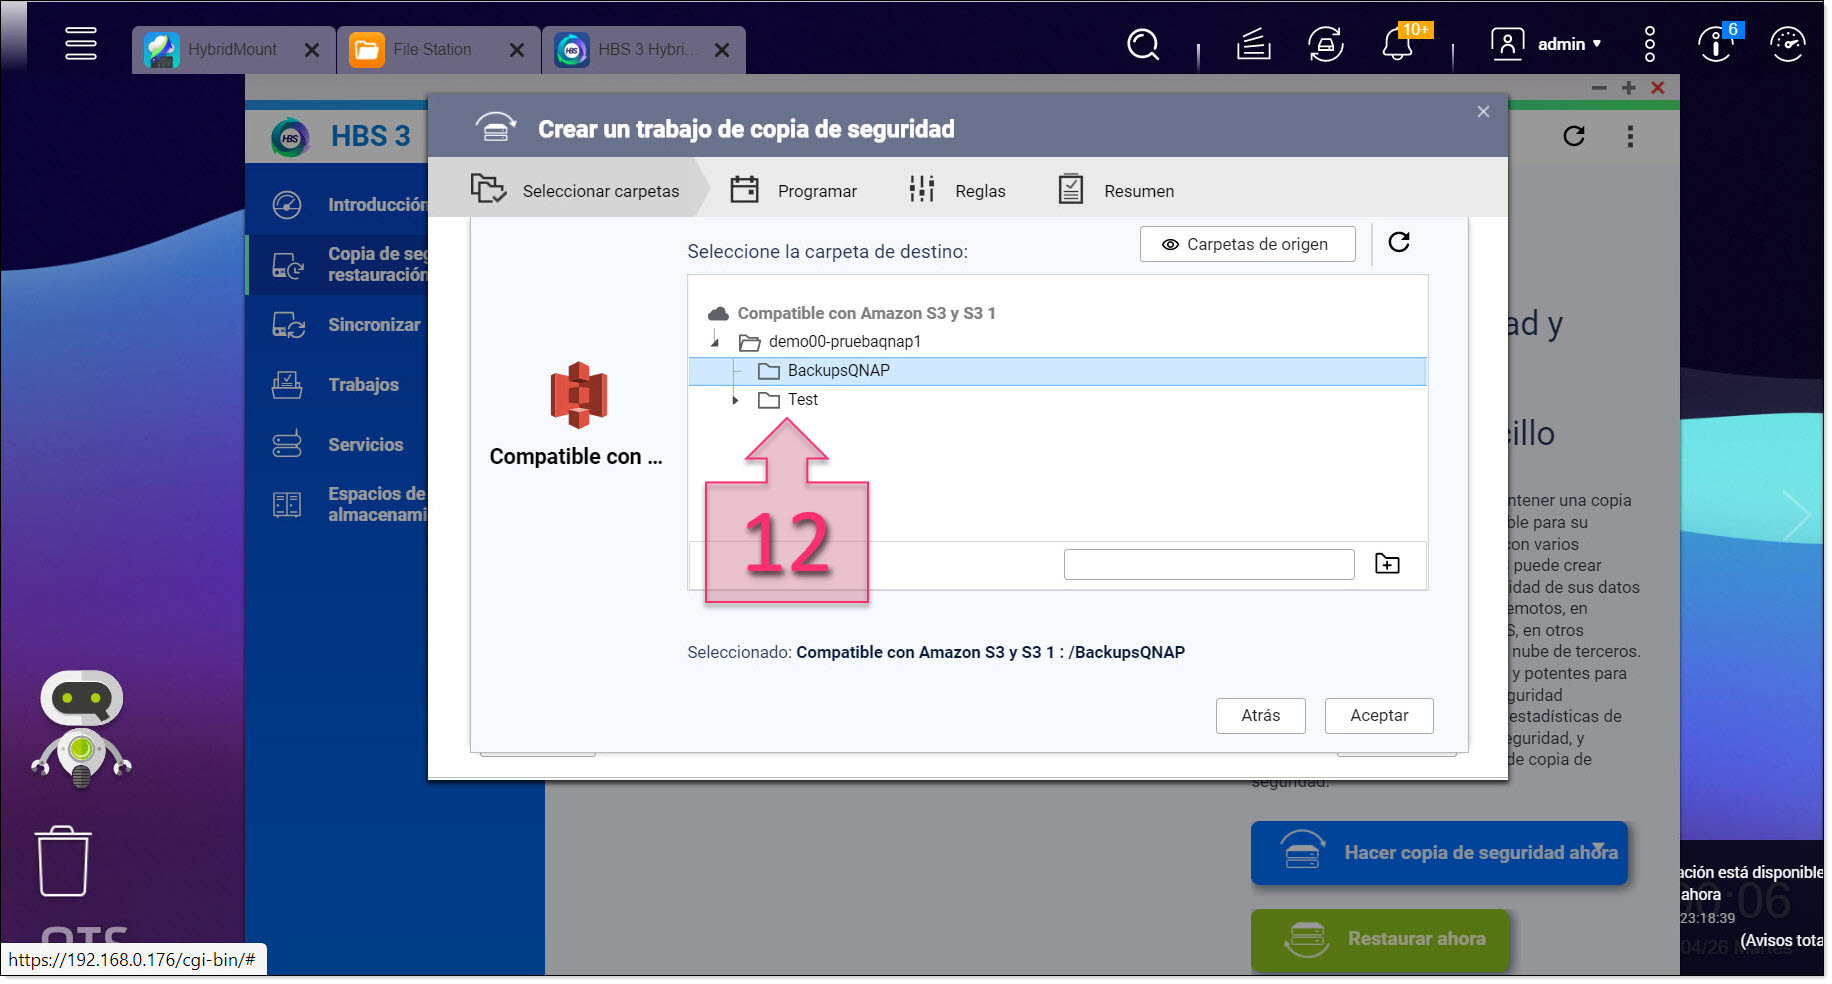
Select the path where the backup will be stored
Next, you need to give the job a name (13). This can be whatever you wish, but we recommend entering a descriptive name to more easily identify the backup later. This may seem a trivial matter, but many months after creating the backup, or if you have a particularly large IT infrastructure, you may find it difficult to remember which backup is which.
Another field that you can use to identify the backup is the “Description” field (14), where you can write in more detail to remind you exactly when the backup was made and why.
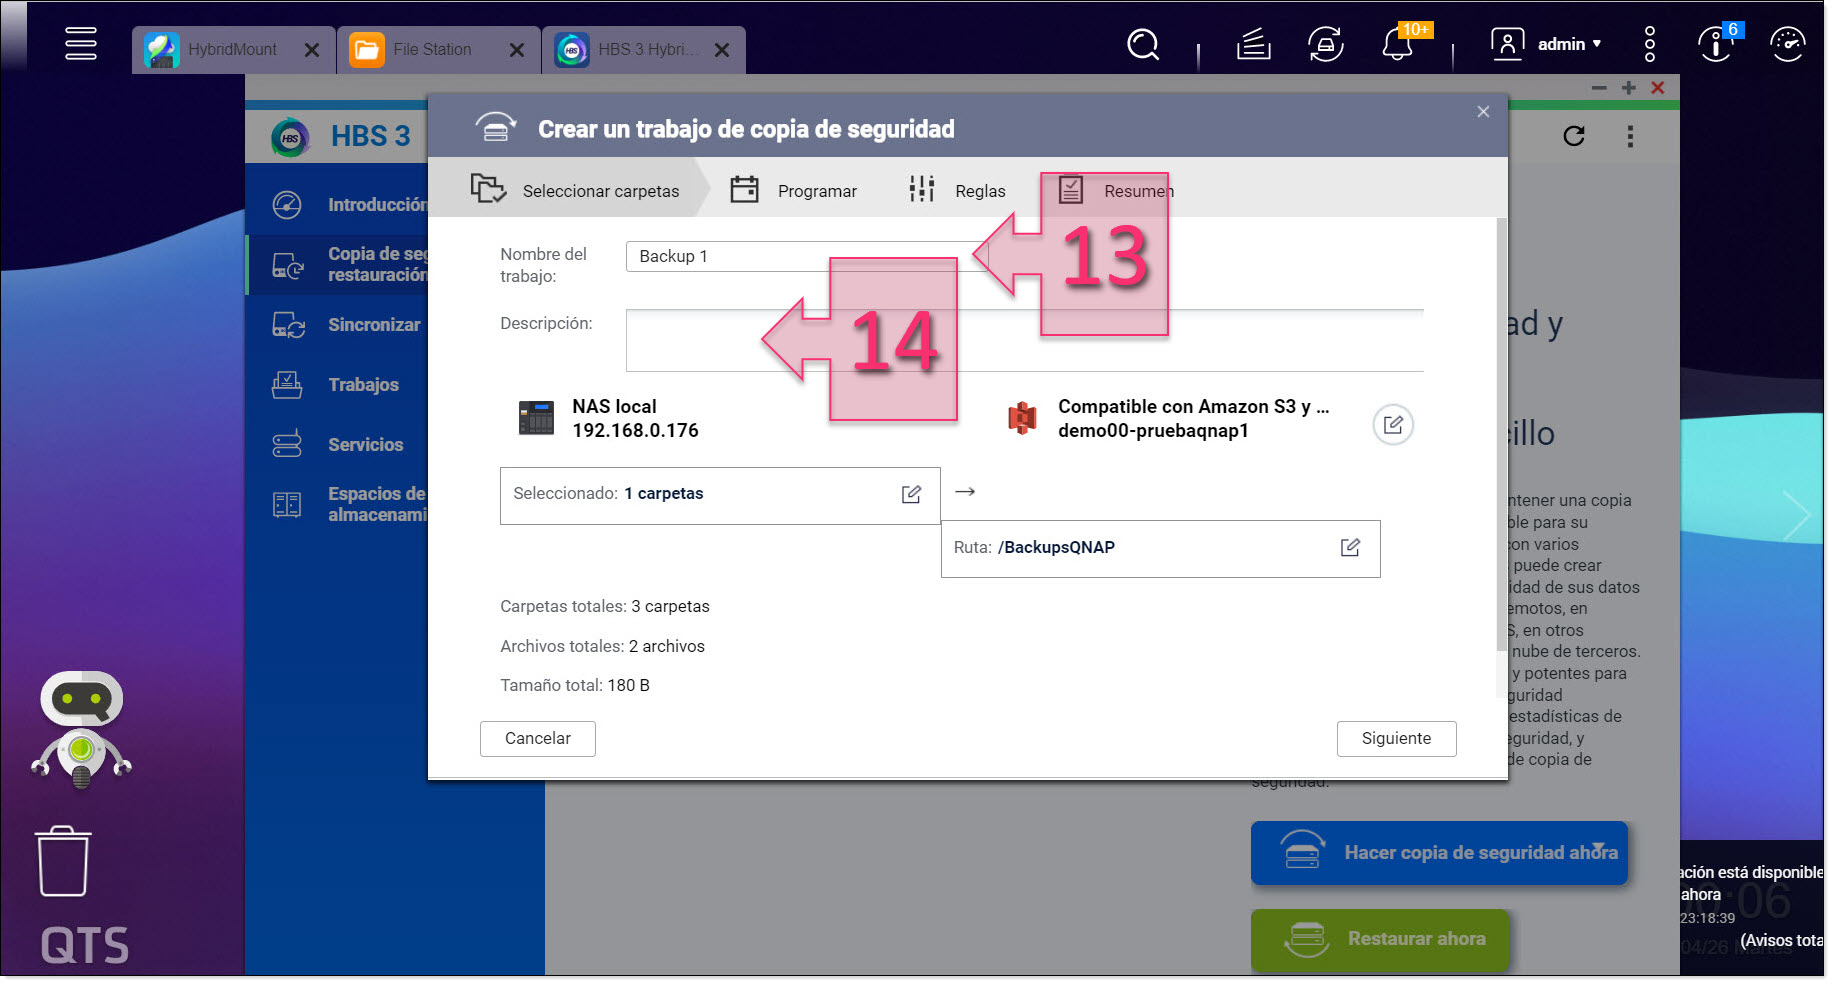
Give the backup job a name
Lastly, we come to the job schedule. You can use these settings to make regular backups or make backups after specific actions. For this tutorial, we are not going to create a schedule. Click on “No schedule” (15), select “Back Up Now” (16) and click on “Next”.
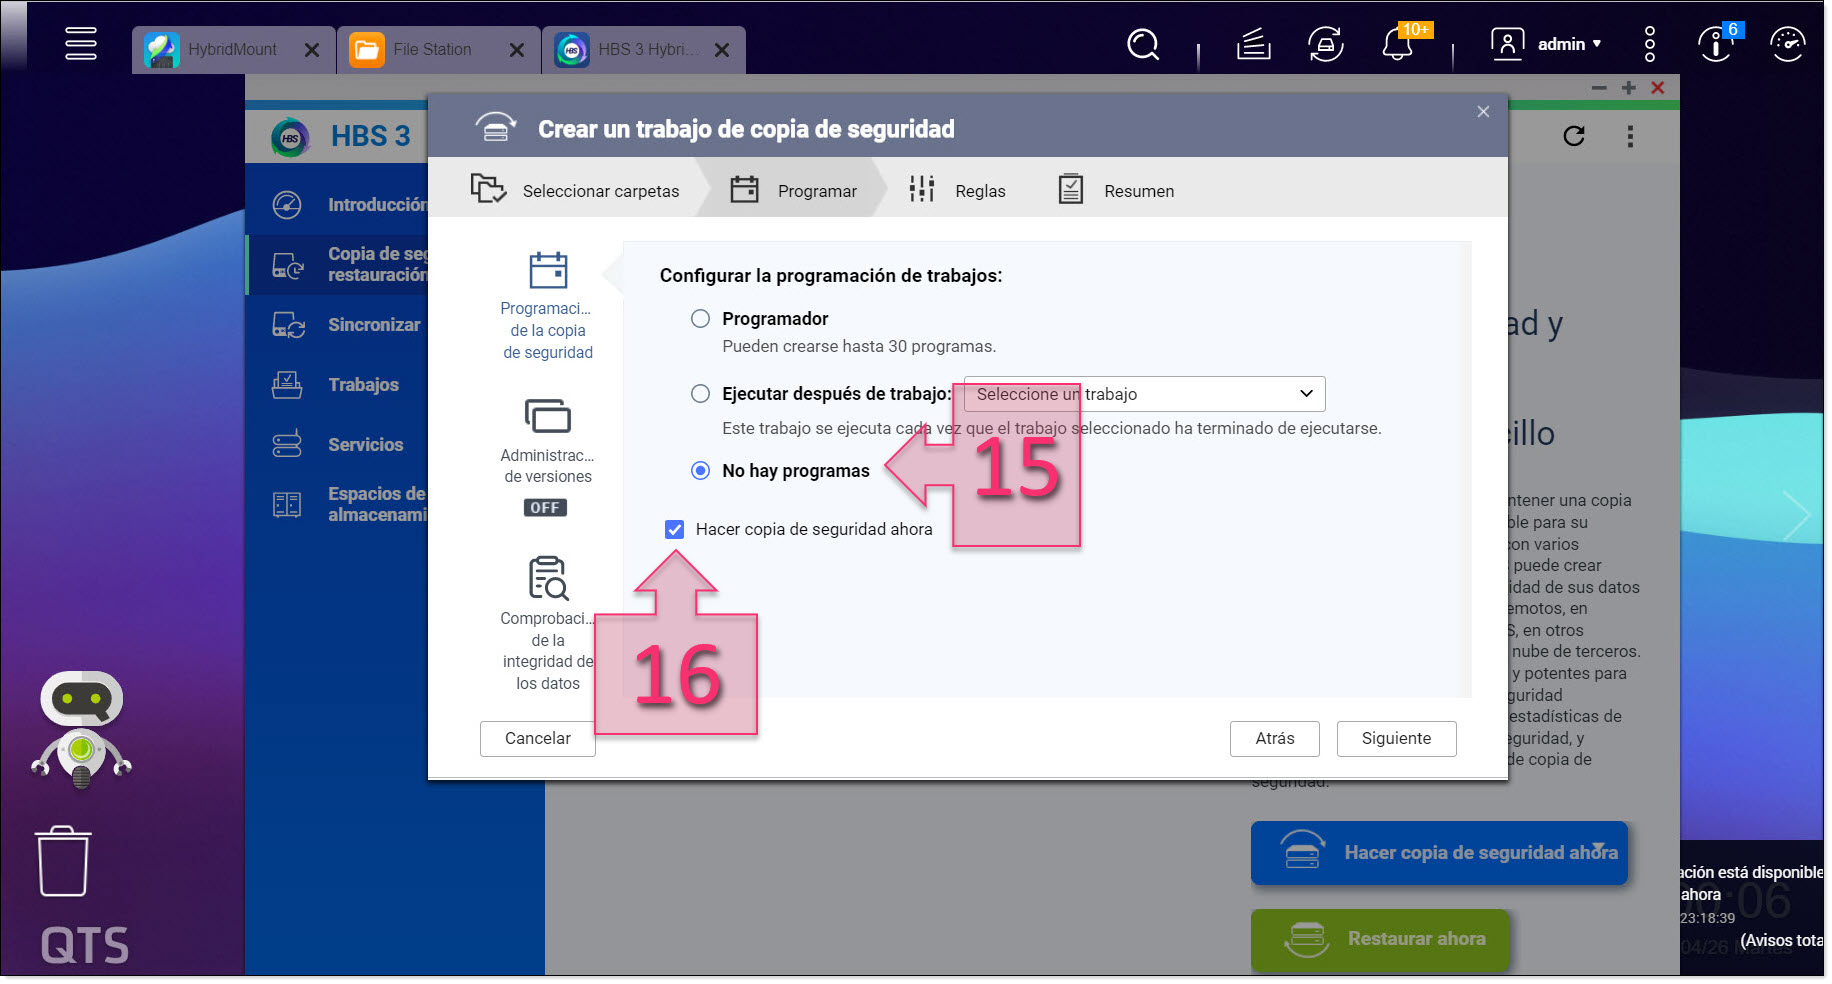
Select “Back Up Now”
In the Rule section, untick all the default options (17) and click on “Next”.
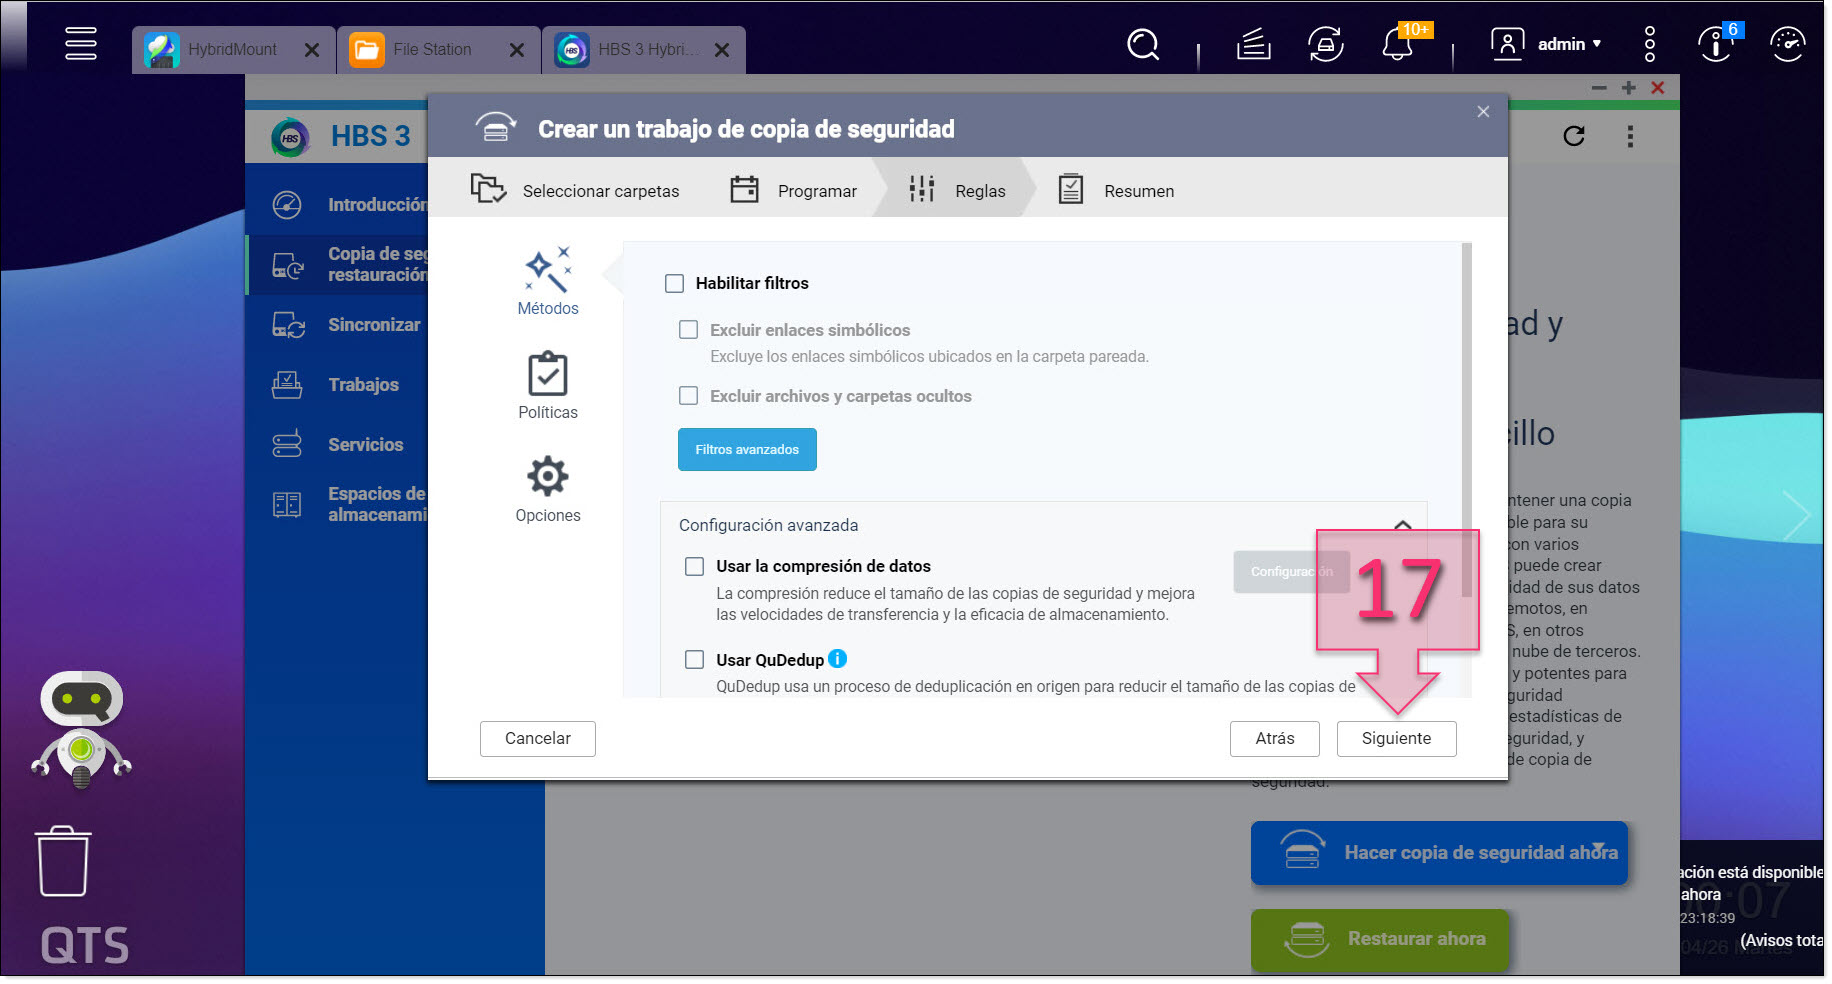
Disable the default options in the Rules Section
At this point, as is customary, you will see a summary of your choices. Check your job settings carefully and, if everything is correct, click on “Create” (18).
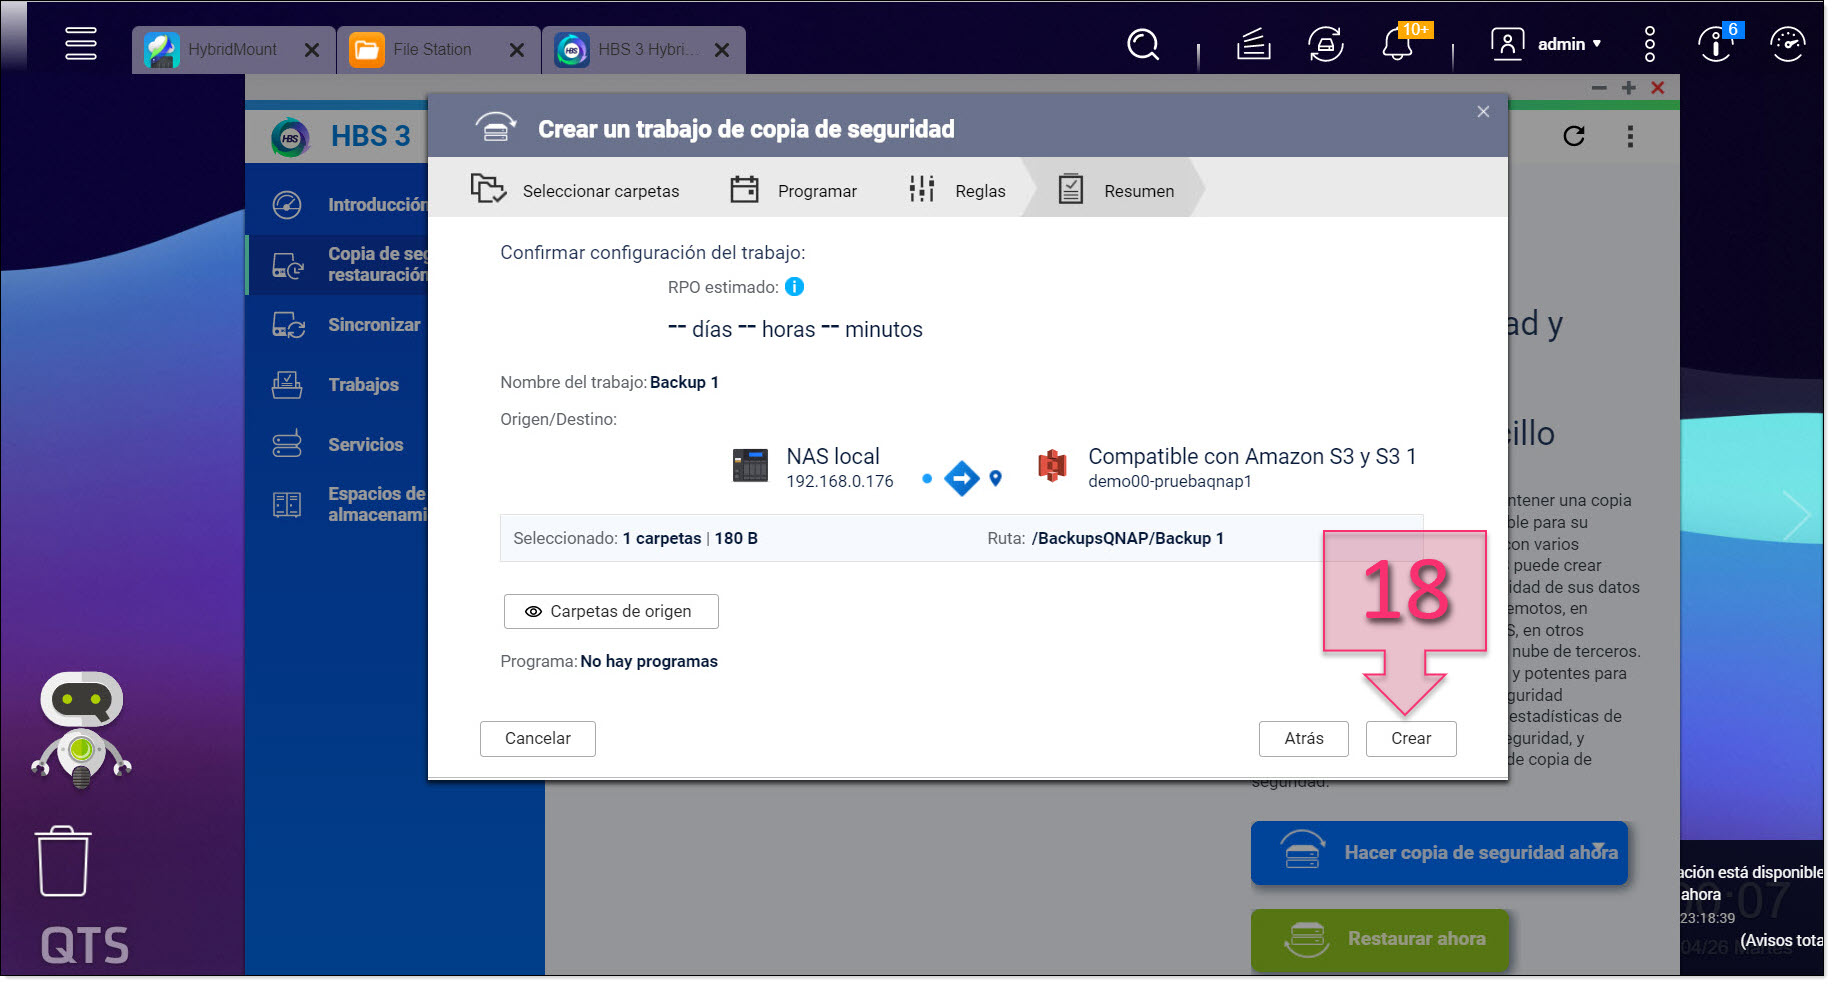
Check your job settings and click on “Create”
You will now be shown the backup progress. How long this takes will vary depending on the size of the backup and the speed of your internet connection.
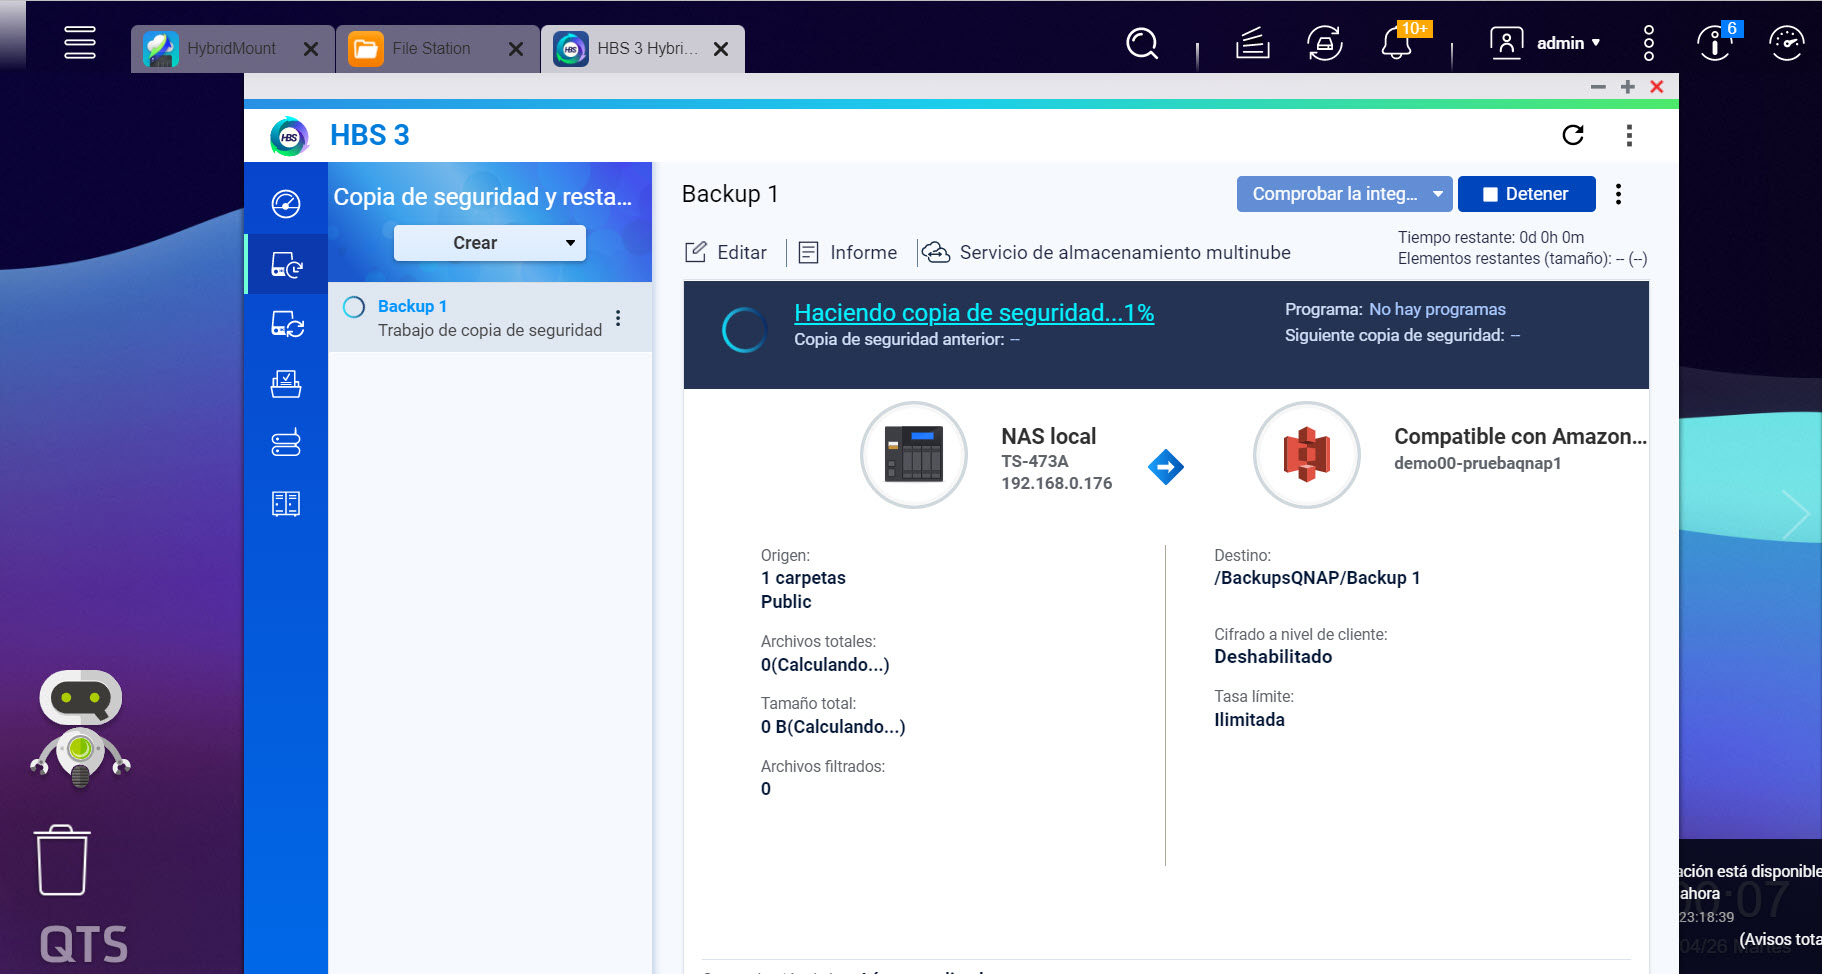
Wait while your backup is created
If everything has gone smoothly, you will eventually see a message confirming that your backup has been successfully created. It will also inform you about the time the job was finished and other details related to your backup schedule.
Once the backup has been created, click on “Close”.
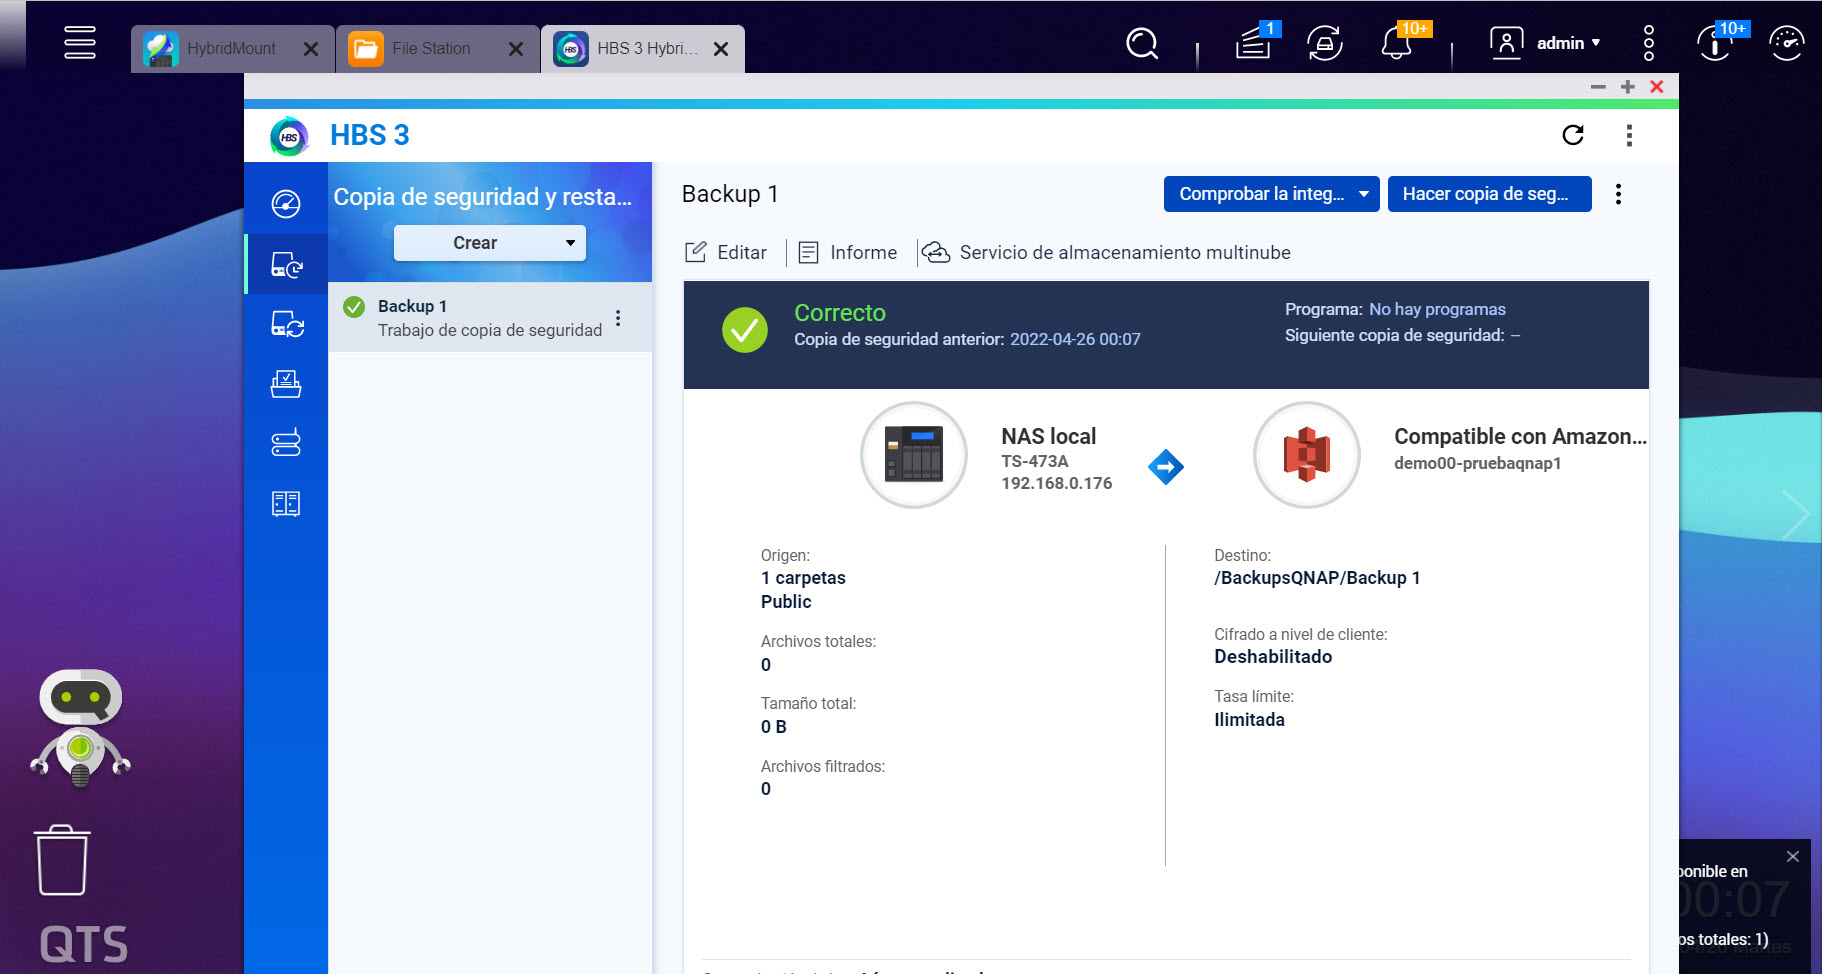
Check that your backup has been created successfully
To check that your backup has been created successfully, check that it is visible on the S3 bucket section of the Jotelulu platform.
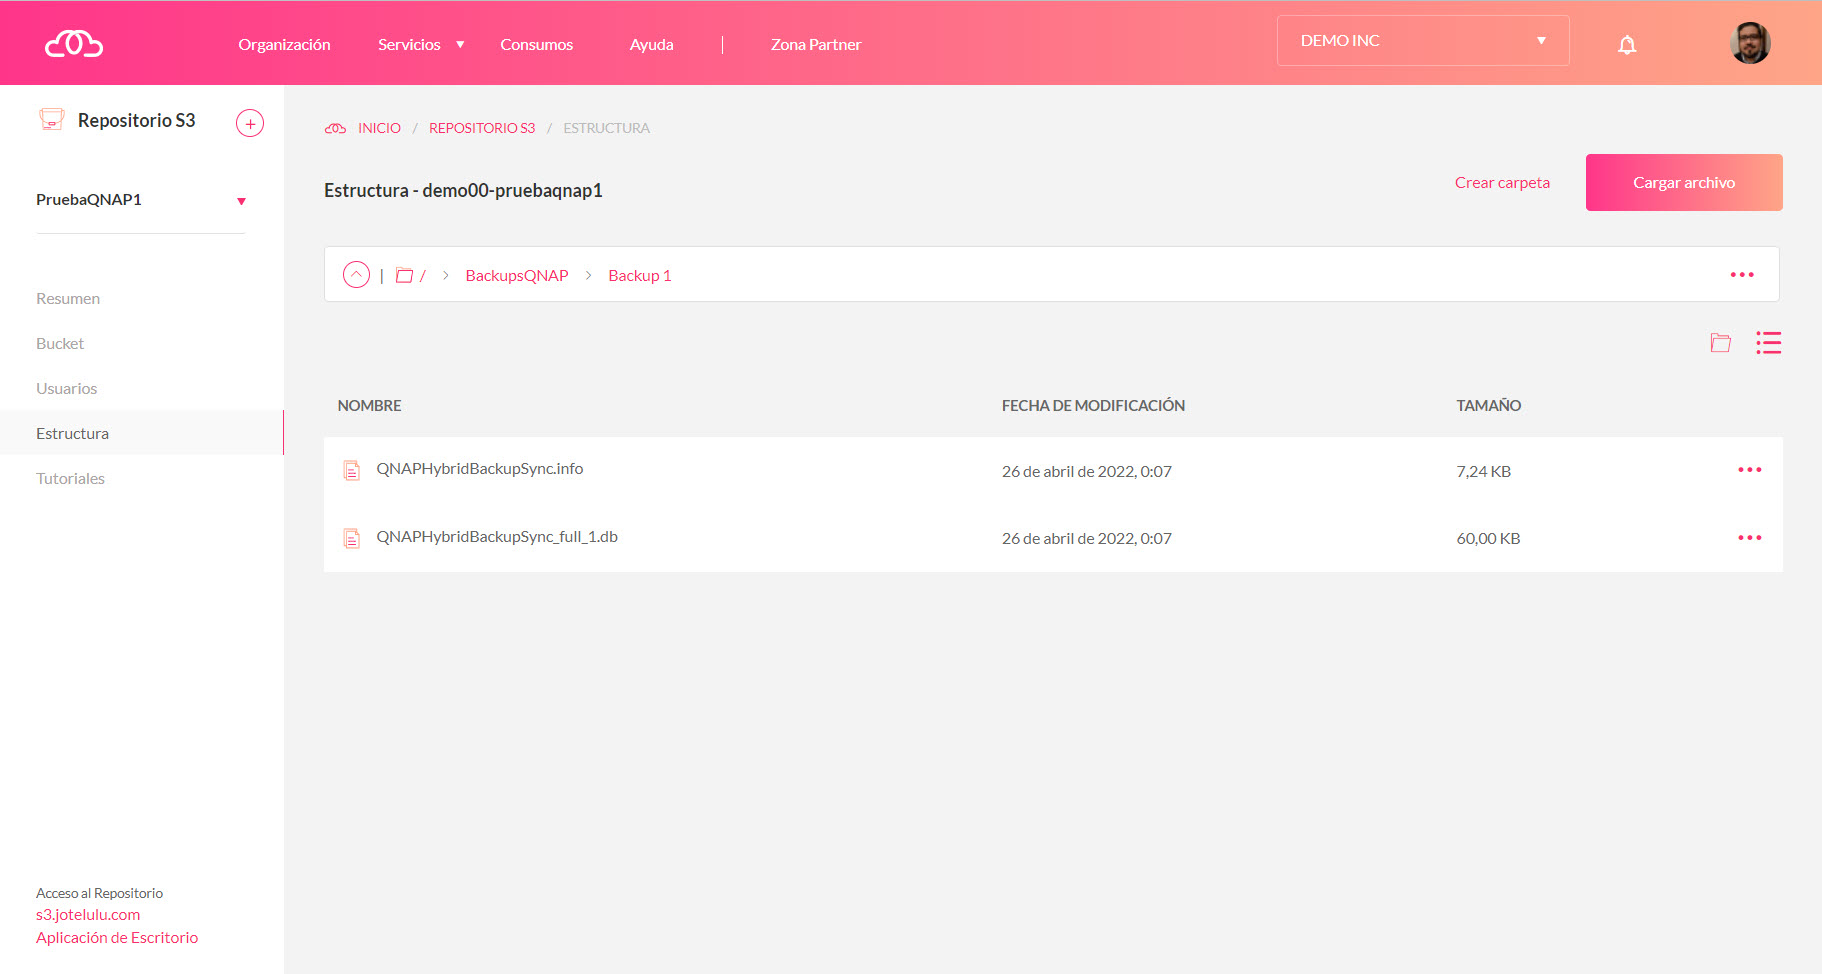
Check your S3 bucket on the Jotelulu platform to confirm that your QNAP data has been backed up correctly
Congratulations! You have successfully backed up your QNAP data to your S3 bucket.
Conclusions and next steps:
Backing up your QNAP cabinet to a Jotelulu S3 bucket might seem a little laborious at first because you have to create a space on your S3 bucket, configure the backup, etc. But once you have done it the first time, it will be simply to create additional backups in the future.
We hope that you have found this tutorial useful. If you still have any questions or need more technical information, don’t hesitate to contact us by writing to plataforma@jotelulu.com or calling +34 911 333 710.
Many thanks for choosing Jotelulu!


